Showing posts with label 3D. Show all posts

Wednesday, November 30, 2022

Just a Little Reminder that You are Loved

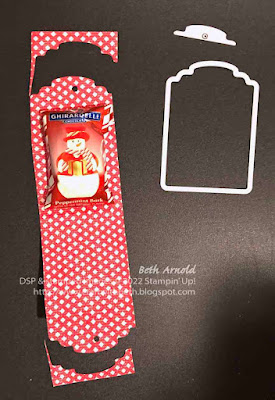
I was looking at the peppermint snowman treat holder I made on Monday. Since the peppermint snowman chocolate candy is only available during the winter months of the year, I thought what other treats would fit in this treat holder size. A 2" Ghirardelli chocolate square fits perfectly in this treat holder size too!

This treat holder is a terrific way to add a little sweetness to a loved one's day and to show them that you are thinking of and love them!

Ghirardelli chocolate square treat holder wrapper made with the Designer Tags. The greeting says just a little reminder that you are loved. treat holder, 3D, gift packaging, Stylish Shapes Dies, Framed Florets Dies, Designer Tags Dies, flowers, floral, friendship, thinking of you


I layered the small and large flowers from the Fitting Florets stamp set with the leaf dies from the Framed Florets Dies to create a little embellishment behind the greeting banner.

Ghirardelli chocolate square treat holder wrapper made with the Designer Tags. how to add the flowers underneath of the greeting banner. treat holder, 3D, gift packaging, Stylish Shapes Dies, Framed Florets Dies, Designer Tags Dies, flowers, floral, friendship, thinking of you

To make the greeting banner, first stamp and die cut the banner from a piece of Basic White cardstock and the stitched banner die. Then adhere the banner die cut to a scrap of Daffodil Delight that is a little larger than the banner. Use paper snips to cut a banner shape from the Daffodil Delight cardstock slightly bigger than the Basic White banner die cut. You now have a Basic White cardstock banner outlined in Daffodil Delight cardstock.

Below are the measurements and the supply list for my Fitting Florets chocolate square treat holder. If you need supplies to recreate this treat holder, please, shop my online store HERE.


Measurements

  • Treat Holder Base: 1-3/4" x 6"; scored at 3" (Fitting Florets Designer Series Paper (DSP))
  • Greeting: 3-1/2" x 1" (Basic White Cardstock)
  • Greeting Mat 4" x 1-1/2" (Daffodil Delight Cardstock)
  • Ribbon: 10" long (Evening Evergreen 3/8" Open Weave Ribbon)


Supplies

Stamps
#161815 Fitting Florets Stamp Set
#162407 Fitting Florets Bundle (includes #161815 Fitting Florets Stamp Set & #160623 Framed Florets Dies at a 10% savings)

Paper
#119683 Daffodil Delight Cardstock
#155574 Evening Evergreen Cardstock
#159276 Basic White Cardstock
#161814 Fitting Florets Designer Series Paper (DSP)

Ink
#155576 Evening Evergreen Ink Pad
#132708 Memento Tuxedo Black Ink Pad
#155520 Polished Pink Stampin' Blends Combo Pack (both)
#155517 Evening Evergreen Stampin' Blends Combo Pack (dark)

Embellishments
#155573 Evening Evergreen 3/8" Open Weave Ribbon
#104430 Dimensionals

Tools
#160623 Framed Florets Dies
#159165 Designer Tags Dies
#159183 Stylish Shapes Dies
#110755 Multipurpose Liquid Glue
#102300 Bone Folder
#103579 Paper Snips
#130148 Grid Paper
#152392 Paper Trimmer
#149653 Stampin' Cut & Emboss Machine
#126200 Stampin' Scrub
#153648 Stampin' Mist Cleaner
#118490 Clear Block H

I hope you enjoyed today's Designer Tags Dies treat holder and give it a try. Post your treat holder project photo on social media and be sure to tag me with #craftwithbeth. I can't wait to see what you create!

If you need supplies to make this project, please, shop my online store HERE.

If you have any questions about today's project, please, don't hesitate to ask me.

Thanks for stopping by!
Beth

Monday, November 28, 2022

Turn a Tag into a Treat Holder with Partial Die Cutting

Today's Ghirardelli peppermint snowman treat holder was an experiment. Could I use something from the 2022-2023 Annual Catalog to replicate one of my favorite quick and easy treat holders?

peppermint snowman chocolate candy Ghirardelli wrapped in a sleeve of red and white striped patterned paper. the greeting on the front says noel and is in the shape of a light blue circle with stitching around the inside circumference of the circle. Framed and Festive, treat holder, 3D, Christmas, snowman, winter, gift packaging

I was sad to see the Scalloped Tag Topper Punch retired. I have made countless different treat holders and boxes with the decorative punch over the years.

The Scalloped Tag Topper Punch was one of my go to stamping tools! When the 2022-2023 Annual Catalog debuted, I noticed a possible replacement - #159165 Designer Tags Dies on page 170.

#159165 Designer Tags Dies graphic

This die set comes with 4 different tag dies, 1 decorative tag background die, 3 dies to cut shapes - a rose, a butterfly, and a floral sprig - and a tiny circle die.

I am excited about all of the tag shapes and decorative additions. However, the tiny circle die is what really surprised me. I thought, you know, it looks like a circle hole punch shape. That's helpful, I guess. I could just use a handheld circle punch though. 


#159165 Designer Tags Dies graphic metal dies

What's the big deal? The tiny little dot in the above graphics is not just a tiny circle die. It is a circle die that cuts the hole at the top of the tag, yes, but the actual die is in the shape of the top of the tag with the circle in the middle! Great, right!? The die's shape can be butted up to the top of the tag die for precise alignment!

No more guessing where the center of the tag is. The die lines up for you. That is why that tiny little circle in the above graphic is so great. So clever! Spread the word!

Ok. So, how did I turn a tag into a treat holder? The secret is to partially die cut only the ends of the designer series paper and not the bottom. To do this, cut the designer series paper slightly narrower than the width of the die. Fold the designer series paper in half.

Framed and Festive, treat holder, 3D, Christmas, snowman, winter, gift packaging


Slide the open end of the designer series paper from the back of the die to the front. Keep the folded end on top of the die, so the fold won't get cut. If the side view of the treat holder, I didn't crease the fold line, so you could see where the fold area goes more easily.

Line up the open end of the designer series paper with the top of the tag die. Place the circle die on top of the designer series paper at the top of the tag. Place a piece of low tact tape on the dies and run it through the Stampin' Cut and Emboss Machine.

Framed and Festive, treat holder, 3D, Christmas, snowman, winter, gift packaging


Tada! Your "tag" is now twice as long as the die and ready to add your treats to.

Framed and Festive, treat holder, 3D, Christmas, snowman, winter, gift packaging


Add the chocolate snowman with a bit of Stampin' Seal or a glue dot to the inside of the treat holder. Add the stamped and die cut stitched circle on dimensionals with some pearl basic jewels. Close up the treat holder and thread the ribbon half way through the top holes. Then tie the ribbon into a bow.

Once you make one treat holder. You will be making multiples in minutes!

Framed and Festive, treat holder, 3D, Christmas, snowman, winter, gift packaging

Below are the measurements and the supply list for my Ghirardelli peppermint snowman treat holder. If you need supplies to recreate this treat holder, please, shop my online store HERE.

Measurements

  • Treat Holder Base: 1-3/4" x 6"; scored at 3" (Sweetest Christmas Designer Series Paper (DSP))
  • Greeting: 2" x 2" (Pool Party Cardstock) - use the 3rd smallest stitched circle die
  • Ribbon: 8" long (Real Red and Garden Green 3/8" Ribbon Combo Pack)


Supplies

Stamps
#160888 Framed and Festive Stamp Set

Paper
#122924 Pool Party Cardstock
#159559 Sweetest Christmas Designer Series Paper (DSP)

Ink
#147114 Early Espresso Ink Pad

Embellishments
#159577 Real Red and Garden Green 3/8" Ribbon Combo Pack
#144219 Pearl Basic Jewels
#104430 Dimensionals

Tools
#159165 Designer Tags Dies
#159183 Stylish Shapes Dies
#110755 Multipurpose Liquid Glue
#102300 Bone Folder
#103579 Paper Snips
#130148 Grid Paper
#152392 Paper Trimmer
#149653 Stampin' Cut & Emboss Machine
#126200 Stampin' Scrub
#153648 Stampin' Mist Cleaner
#118486 Clear Block C


I made 12 treat holders with 1 sheet of 12" x 12" designer series paper and 1 piece of 8-1/2" x 11" cardstock. If you cut your 8-1/2" x 11" piece of cardstock into 2" x 11" strips, you can die cut 20 circles from one sheet of 8-1/2" x 11" cardstock, making this treat holder design very economical and a great way to use up designer series paper.

peppermint snowman chocolate candy Ghirardelli wrapped in a sleeve of red and white striped patterned paper. the greeting on the front says noel and is in the shape of a light blue circle with stitching around the inside circumference of the circle. Framed and Festive, treat holder, 3D, Christmas, snowman, winter, gift packaging

I hope you enjoyed today's snowman treat holder featuring the Designer Tags Dies and give it a try. How will you decorate your Designer Tags treat holder? Post your treat holder project photo and be sure to tag me with #craftwithbeth. I can't wait to see what treat holders you create using the Designer Tags Dies!

If you need supplies to make this project, please, shop my online store HERE.

If you have any questions about today's project, please, don't hesitate to ask me. I am happy to help you with you stamping questions!

Thanks for stopping by!
Beth

Friday, November 18, 2022

2-in-1 Thanksgiving Pumpkin Treat Holder and Placecard

Is it a treat holder or a place card? Why not be both!? Delight your Thanksgiving guests with this a pumpkin chocolate kiss triangle treat holder!

Hello Harvest, Rustic Pumpkin Dies, Thanksgiving place card chocolate kiss treat holder, table setting, 3D, home decor

This style of treat holder is so easy, quick to make, and can be customizable to the materials that you have on hand.

The base is a piece of cardstock bent into the shape of a triangle. Then a die cut or punched shape is adhered to 2 sides of the triangle and then adhered together. Lastly, a chocolate kiss is placed in the center of the triangle.

Hello Harvest, Rustic Pumpkin Dies, Thanksgiving place card chocolate kiss treat holder, table setting, 3D, home decor


You may be familiar with this treat holder style with my plethora of cat punch treat holders for Valentine's Day and Halloween. Now that the cat punch is retired, I had to brainstorm other punches and dies that I could make the triangle treat holder with.

Don't worry. I didn't sell my cat punch after it retired. The cat punch is one punch that I plan on keeping for a long time regardless of its current or retired status. So, you may see some projects in the future with the cat punch.

With Thanksgiving coming soon, the pumpkin stamp and die from the #159634 Hello Harvest stamp set and the #159643 Rustic Pumpkin Dies was a great place to start!

Hello Harvest, Rustic Pumpkin Dies, Thanksgiving place card chocolate kiss treat holder, table setting, 3D, home decor


Once I made the treat holders, I added a name tag across the front of the pumpkin to add the name of a guest. I wrote the names for these samples with my computer. However, I recommend a Basic Black Stampin' Write Marker or a Basic Black Stampin' Blend to write the name of your guest before you attach the name tag to the pumpkin.

Hello Harvest, Rustic Pumpkin Dies, Thanksgiving place card chocolate kiss treat holder, table setting, 3D, home decor

These treat holder place cards are versatile. Use them during the dinner or after. The place cards can be put at each guest's place setting or on a side table for guests to pick up when they arrive or for when they leave.


Below are the measurements and the supply list for my pumpkin place card and treat holder. If you need supplies to recreate this project, please, shop my online store HERE.

Measurements

  • Triangle Base: 1" x 2-1/2"; scored at 3/4" and 1-3/4" (Pumpkin Pie Cardstock)
  • Pumpkins (cut 1 of each color of cardstock): 2-1/2" x 2-1/2" (Pumpkin Pie Cardstock and Basic White Cardstock)
  • Name Tag: 1/2" x 2" (Basic White Cardstock)


Supplies

Stamps
#159634 Hello Harvest
#159644 Hello Harvest Bundle

Ink
#147114 Early Espresso Ink Pad
#154897 Pumpkin Pie Stampin' Blends Combo Pack (both)
# Soft Suede Stampin' Blends Combo Pack (both)

Paper
#105117 Pumpkin Pie Cardstock
#159276 Basic White Cardstock

Embellishments
#104199 Linen Thread

Tools
#159643 Rustic Pumpkin Dies
#103683 Mini Glue Dots
#110755 Multipurpose Liquid Glue
#102300 Bone Folder
#103579 Paper Snips
#130148 Grid Paper
#152392 Paper Trimmer
#149653 Stampin' Cut & Emboss Machine
#126200 Stampin' Scrub
#153648 Stampin' Mist Cleaner
#118485 Clear Block D
Chocolate Kisses

I hope you enjoyed today's pumpkin place card and treat holder. I know your Thanksgiving guest are going to love receiving this sweet treat holder at your Thanksgiving dinner!

Hello Harvest, Rustic Pumpkin Dies, Thanksgiving place card chocolate kiss treat holder, table setting, 3D, home decor

Have you tried this triangle style treat holder? What stamps, punches, and dies did you use? Post a photo on social media and tag me with the hashtag #craftwithbeth, so I can find your projects. I would love to see what you create!

If you need supplies to make this project, please, shop my online store HERE.

If you have any questions about today's project, please, don't hesitate to ask me.

Thanks for stopping by!
Beth

Wednesday, November 9, 2022

Make a Sweet Gift with this Turkey Punch Art Treat Holder

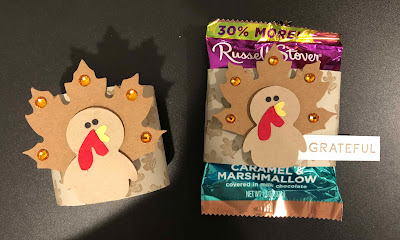
I am back with a second way to use Libby Fen's amazing turkey punch art! Today's project is a sweet chocolate marshmallow punch candy treat wrapper featuring Libby's turkey punch art.

turkey punch art candy wrapper. cardstock candy wrapper is wrapped around a chocolate marshmallow pumpkin candy. Thanksgiving, punch art, penguin builder punch, Painted Pheasant, 3D, treat holder


The candy wrapper starts off the same way the turkey punch art napkin ring on Monday did. Stamp the leaves image with Crumb Cake ink all over the Sahara Sand wrapper base.

stamp the leaves on the candy wrapper base. Thanksgiving, punch art, penguin builder punch, Painted Pheasant, 3D, treat holder

Curl the wrapper base with a bone folder to help wrap it around the candy. Wrap the wrapper base around the candy starting in the center of the front. Wrap the cardstock around the candy, so that the ends meet in the center of the front of the candy. Adhere the ends together with liquid glue or tear and Tape Adhesive.


adhere the turkey punch art candy wrapper ends together. cardstock candy wrapper is wrapped around a chocolate marshmallow pumpkin candy. Thanksgiving, punch art, penguin builder punch, Painted Pheasant, 3D, treat holder

Stamp the grateful greeting with Crumb Cake ink onto a Basic White cardstock rectangle. Stamp the greeting toward the right side, so that you can tuck the left side of the greeting underneath of the turkey punch art.

Adhere the greeting to candy wrapper on the right side and slightly to the right of the center.


turkey punch art candy wrapper. cardstock candy wrapper is wrapped around a chocolate marshmallow pumpkin candy. Thanksgiving, punch art, penguin builder punch, Painted Pheasant, 3D, treat holder

Build the turkey punch art. Punch the body of the turkey using the Penguin Builder Punch and Crumb Cake cardstock. Punch the eyes from the Whale Builder Punch and Basic Black cardstock. Punch the wattle from the Whale Builder Punch spout and Real Red cardstock. Punch the beak from the Song Bird Punch and Daffodil Delight cardstock. Adhere the eyes, wattle, and beak to the turkey's body.


add dimensionals to the punch art. Thanksgiving, punch art, penguin builder punch, Painted Pheasant, 3D, treat holder

Add three dimensionals vertically down the center of the back of the turkey's body. Attach a maple leaf die cut from the Leaf Label and Amber Gems Combo Pack to the back of the turkey's body. Add amber gems to each of the ends of the feathers.

Then add 4 dimensionals vertically down the center of the back of the maple leaf. In the photo above, you will see 3 dimensionals on the leaf. Add 1 more dimensional right on top of the dimensional at the bottom of the turkey body. This will form a double layer of dimensionals to evenly support and level the punch art on the candy wrapper.


side view of add dimensionals to the punch art. Thanksgiving, punch art, penguin builder punch, Painted Pheasant, 3D, treat holder

Below are the measurements and the supply list for my Thanksgiving turkey candy wrapper. If you need supplies to recreate this project, please, shop my online store HERE.

Measurements

  • Candy Wrapper: 2" x 7-1/2" (Sahara Sand Cardstock)
  • Greeting: 1/2" x 2-1/4" (Basic White Cardstock)
  • Turkey: 2" x 2-1/4" (Crumb Cake Cardstock)
  • Turkey Beak: 1" x 2" (Daffodil Delight Cardstock)
  • Turkey Wattle: 1" x 2" (Real Red Cardstock)
  • Turkey Eyes: 1" x 2" (Basic Black Cardstock)
  • Feathers: use a leaf from the Leaf Label and Amber Gems Combo Pack


Supplies

Stamps
#159846 Painted Pheasant

Ink
#147116 Crumb Cake Ink Pad

Paper
#121043 Sahara Sand Cardstock
#120953 Crumb Cake Cardstock
#119683 Daffodil Delight Cardstock
#102482 Real Red Cardstock
#121045 Basic Black Cardstock

Embellishments
#159969 Leaf Label and Amber Gems Combo Pack
#104430 Dimensionals

Tools
#152699 Whale Builder Punch
#158726 Song Bird Punch
#156452 Penguin Builder Punch
#154031 Tear and Tape Adhesive
#117147 Clear Block B
#118489 Clear Block G
#110755 Multipurpose Liquid Glue
#102300 Bone Folder
#103579 Paper Snips
#130148 Grid Paper
#152392 Paper Trimmer
#126200 Stampin' Scrub
#153648 Stampin' Mist Cleaner


turkey punch art candy wrapper and turkey punch art napkin ring. cardstock candy wrapper is wrapped around a chocolate marshmallow pumpkin candy. Thanksgiving, punch art, penguin builder punch, Painted Pheasant, 3D, treat holder
 
There are so many more ways to decorate for Thanksgiving with this delightful turkey punch art! I would love to see how you use this turkey punch art for your Thanksgiving celebration! Post a photo of your turkey punch art project and tag me on social media with #craftwithbeth. I can't wait to see what you create!

I hope you enjoyed today's turkey punch art candy wrapper. If you need supplies to make this project, please, shop my online store HERE.

Thanks for stopping by!
Beth

Monday, November 7, 2022

Set Your Thanksgiving Table with Turkey Punch Art Decor!

When I saw Libby Fen's punch art turkey card using the Penguin Builder Punch, I just had to create a project using her punch art design! Libby's turkey punch art is so perfect, festive, and adorable! It is great for your Thanksgiving guests of all ages! Today's project is a custom napkin ring for your Thanksgiving table.

Thanksgiving napkin ring with a punch art turkey on the front. A maple leaf die cut is used for the turkey's feathers. Thanksgiving, punch art, penguin builder punch, Painted Pheasant, 3D, table setting, home decor


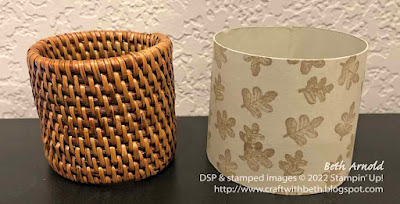
I made a napkin ring for the Thanksgiving table featuring Libby's punch art turkey. The napkin ring base is Sahara Sanda cardstock stamped with the leaves from Painted Pheasant. Attached to the front is the turkey punch art. I love the addition of the amber gems to the ends of the turkey's "feathers"! How clever and beautiful!

Thanksgiving napkin ring with a punch art turkey on the front. A maple leaf die cut is used for the turkey's feathers. Thanksgiving, punch art, penguin builder punch, Painted Pheasant, 3D, table setting, home decor
 

First, I stamped the leaves image with Crumb Cake ink on a 2" x 7-3/4" piece of Sahara Sand cardstock. Then I added a piece of Tear and Tape Adhesive vertically to the left edge of the cardstock.

Stamp the leaves on the napkin ring base, add adhesive, and curl. Thanksgiving, punch art, penguin builder punch, Painted Pheasant, 3D, table setting, home decor


Next I curled the cardstock with a bone folder to  help the cardstock become a cylinder shape.

Form the napkin ring shape around a store bought napkin ring. Thanksgiving, punch art, penguin builder punch, Painted Pheasant, 3D, table setting, home decor

I used a napkin ring that I had to help shape the cardstock napkin ring. This is not necessary, but it was helpful for me to form the napkin ring cyclinder shape. Remove the Tear and Tape Adhesive and adhere the cardstock ends together to complete the napkin ring base.

cardstock napkin ring wrapped around the store bought napkin ring to help make the cylindrical shape. Thanksgiving, punch art, penguin builder punch, Painted Pheasant, 3D, table setting, home decor


If you are using a store bought napkin ring as a form, you can now remove it from the cardstock napkin ring base.

cardstock napkin ring wrapped around the store bought napkin ring to help make the cylindrical shape. Thanksgiving, punch art, penguin builder punch, Painted Pheasant, 3D, table setting, home decor

Build the turkey punch art. Punch the body of the turkey using the Penguin Builder Punch and Crumb Cake cardstock. Punch the eyes from the Whale Builder Punch and Basic Black cardstock. Punch the wattle from the Whale Builder Punch spout and Real Red cardstock. Punch the beak from the Song Bird Punch and Daffodil Delight cardstock. Adhere the eyes, wattle, and beak to the turkey's body.
 

Thanksgiving, punch art, penguin builder punch, Painted Pheasant, 3D, table setting, home decor

Add 3 dimensionals vertically down the center of the back of the turkey's body. Attach a maple leaf die cut from the Leaf Label and Amber Gems Combo Pack to the back of the turkey's body. Add amber gems to each of the ends of the feathers.

Then add 4 dimensionals vertically down the center of the back of the maple leaf. In the photo below, you will see 3 dimensionals on the leaf. Add 1 more dimensional right on top of the dimensional at the bottom of the turkey body. This will form a double layer of dimensionals to evenly support and level the punch art on the napkin ring.

add dimensionals to the back of the punch art and the leaf to attach it to the napkin ring base. Thanksgiving, punch art, penguin builder punch, Painted Pheasant, 3D, table setting, home decor

Adding dimensionals down the center of the punch art enables the cardstock to move and bend when being used without tearing or being too fragile.

Below are the measurements and the supply list for my Thanksgiving napkin ring. If you need supplies to recreate this project, please, shop my online store HERE.

Measurements

  • Napkin Ring Base: 2" x 7-3/4" (Sahara Sand Cardstock)
  • Turkey: 2" x 2-1/4" (Crumb Cake Cardstock)
  • Turkey Beak: 1" x 2" (Daffodil Delight Cardstock)
  • Turkey Wattle: 1" x 2" (Real Red Cardstock)
  • Turkey Eyes: 1" x 2" (Basic Black Cardstock)
  • Feathers: use a leaf from the Leaf Label and Amber Gems Combo Pack


Supplies

Stamps
#159846 Painted Pheasant

Ink
#147116 Crumb Cake Ink Pad

Paper
#121043 Sahara Sand Cardstock
#120953 Crumb Cake Cardstock
#119683 Daffodil Delight Cardstock
#102482 Real Red Cardstock
#121045 Basic Black Cardstock

Embellishments
#159969 Leaf Label and Amber Gems Combo Pack
#104430 Dimensionals

Tools
#152699 Whale Builder Punch
#158726 Song Bird Punch
#156452 Penguin Builder Punch
#154031 Tear and Tape Adhesive
#117147 Clear Block B
#110755 Multipurpose Liquid Glue
#102300 Bone Folder
#103579 Paper Snips
#130148 Grid Paper
#152392 Paper Trimmer
#126200 Stampin' Scrub
#153648 Stampin' Mist Cleaner
Napin Ring (optional)


For today's project I used a cloth napkin. However, A paper napkin would be just as festive too! There are so many beautiful, seasonal paper napkins available too.

Not a fan of napkin rings? Check back here on my blog on Wednesday, I will show you how to turn this turkey punch art into something sweet!

I hope you enjoyed today's fun Penguin Builder Punch Thanksgiving napkin ring. If you need supplies to make this project, please, shop my online store HERE.

If you have any questions about today's project, please, don't hesitate to ask me.

Thanks for stopping by!
Beth

Friday, November 4, 2022

Make your Thanksgiving Extra Special with these Festive Treat Boxes

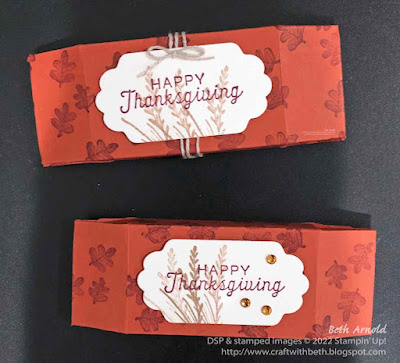
Today's Thanksgiving treat boxes were inspired by a project shared by fellow demonstrator Julie DeMatteo. Julie shared a treat box that she modified from fellow demonstrator Katja Hamann. Julie resized Katja's original box to fit a Reese's peanut butter egg. I am using Julie's resized box measurements for my Thanksgiving treat box.

Thanksgiving rectangular treat boxes. the ends of the boxes are bent at slight angles to give a cinched appearance. Thanksgiving, treat holder, box, gift packaging, Painted Pheasant, 3D


I enjoy creating and making different shaped treat holders. When I saw both Julie's and Katja's boxes, I thought that the shape and construction was very intriguing. I had to try it!

I made two treat boxes right away! I decorated both treat boxes with the leaves stamp from the Painted Pheasant stamp set and Rich Razzleberry ink.

I die cut the small label from the Seasonal Dies and a piece of Very Vanilla cardstock. The Happy Thanksgiving greeting is stamped in the center with Rich Razzleberry ink. The grassy reeds are stamped with Crumb Cake ink with full strength ink and stamped off strength ink.

On one of the boxes I wrapped linen thread and added a box to the top of the greeting. On the other box I added 3 amber gems to the right of the greeting and the grassy reeds.


Thanksgiving rectangular treat boxes. the ends of the boxes are bent at slight angles to give a cinched appearance. Thanksgiving, treat holder, box, gift packaging, Painted Pheasant, 3D


Below are the measurements and the supply list for my Thankgiving treat boxes. If you need supplies to recreate these treat boxes, please, shop my online store HERE.


Measurements

  • Treat Holder Base: 6-1/4" x 5-3/8"; scored on the 6-1/4" side at 5/8", 1-5/8", 4-5/8"; scored on the 5-3/8" side at 3/4", 2-1/2", 3-1/4", and 5"; scored on the 5-3/8" side only down to the 1st horizontal score line at 3/8" and 2-7/8" (flip the cardstock to score on the opposite side)
  • Greeting Label: 2" x 3" (Very Vanilla Cardstock)


Supplies

Stamps
#159846 Painted Pheasant Stamp Set

Paper
#119684 Cajun Craze Cardstock
#101650 Very Vanilla Cardstock

Ink
#147091 Rich Razzleberry Ink Pad
#147116 Crumb Cake Ink Pad

Embellishments
#159969 Leaf Label and Amber Gems Combo Pack
#104199 Linen Thread
#104430 Dimensionals

Tools
#156299 Seasonal Label Dies
#122334 Simply Scored Scoring Tool
#110755 Multipurpose Liquid Glue
#102300 Bone Folder
#103579 Paper Snips
#130148 Grid Paper
#152392 Paper Trimmer
#149653 Stampin' Cut & Emboss Machine
#126200 Stampin' Scrub
#153648 Stampin' Mist Cleaner
#117147 Clear Block B
#118490 Clear Block H
1/2" Circle Punch
Corner Rounder Punch


I hope you enjoyed today's Thanksgiving treat boxes and give them a try! You can also put other treats in this box, including other types of chocolate or candy, small gifts, puzzle pieces, and more! What will you put in your treat boxes?

I would love to see what treat boxes you make! Post your treat box photos on social media and be sure to tag me with #craftwithbeth. I can't wait to see what you create!

If you need supplies to make these boxes, please, shop my online store HERE.

If you have any questions about today's project, please, don't hesitate to ask me.

Thanks for stopping by!
Beth

Friday, October 28, 2022

Christmas Wreath Pocket Gift Card Holder

Being a demonstrator, to me, means being part of an incredible stamping community. Part of my stamping community is my demonstrator team. They are an amazing group of ladies that I am so happy to be a part of! We talk throughout the week with each other, craft together, have in-person & online get togethers, go shopping together, have luncheons, play games, have bingo nights, and more.

We also have team meetings once a month on Zoom where we share projects and do challenges. Not all of my team members are local, and we all have different work hours, so it make sense to have our regular team meetings online.

pocket gift card holder with a wreath die cut in the center and the words Merry Christmas in the center of the wreath, Cottage Wreath, Christmas, Gift Card Holder, Pocket Card, 3D, Boughs of Holly DSP


During our October team meeting I shared a pocket gift card holder. The shape of this holder may be familiar, and I have made this style of pocket card before. However, the measurements for this gift card holder are my own.

pocket gift card holder with a wreath die cut in the center and the words Merry Christmas in the center of the wreath and the insert to the right with a gift card attached, Cottage Wreath, Christmas, Gift Card Holder, Pocket Card, 3D, Boughs of Holly DSP


I demonstrated how to make the pocket and how to make the insert. On the back of the insert is a piece of Basic White cardstock stamped with leaves, leaving plenty of room to write a special Christmas message.

pocket gift card holder with a wreath die cut in the center and the words Merry Christmas in the center of the wreath and the insert to the right, Cottage Wreath, Christmas, Gift Card Holder, Pocket Card, 3D, Boughs of Holly DSP


I named our team Purrfect Stampers because my husband and I have two adorable, amazing cats. We love and spoil our cats with toys, treats, blankets, and more! They are very loved! The name comes from a play on the words purr like the sound a cat makes and perfect. It is not a claim just a play on words. All of my team members also love animals.

Starter Kit Plus demonstrator joining special square graphic


Have you ever thought of becoming a Stampin' Up! demonstrator? There are still a few more days to take advantage of Stampin' Up!'s joining special - Starter Kit Plus!

New team members will get even MORE FREE products in their customizable Starter Kit. Between October 4th-31st, 2022, those who sign up can get $155 USD worth of eligible products for only $99 USD (plus local tax) + free business supplies + free shipping + all the fun being a part of Stampin’ Up! 

Sign up HERE or contact me today for more information. 

For more promotion details, please, see my blog post HERE or Stampin' Up! HERE.

I would love to welcome you to the Purrfect Stampers Team!

Please, note that these are just some of the things that my demonstrator team does. It is not necessarily indicative of any other or all demonstrator teams. This post doesn't make any claims and is anecdotal only to share what the Purrfect Stampers Team does.

Thanks for stopping by!
Beth

Wednesday, October 26, 2022

Quick and Easy Rustic Harvest Aromatherapy Air Freshener

During one of my demonstrator team get togethers we made different spa and home decor recipes, including a body butter, an oatmeal and chamomile facial, and this autumnal scented air freshener.

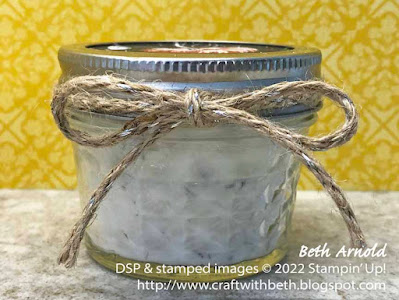
aromatherapy air freshener in a glass pint canning jar decorated with fall patterned paper, Rustic Harvest DSP, home decor, aromatherapy, air freshener
 

It was a big hit! First we traced the outside of the bottom of the jar ring (the part with the threads) with a pencil onto a piece of Rustic Harvest Designer Series Paper. We cut out the circle with paper snips and inserted the circle into the jar ring.

Then we filled the glass canning pint jars half full with Epsom salts and dried lavender flowers. We added the essential oils and stirred it well to combine. The essential oils are optional. The lavender flowers smell amazing on their own too. Gently crush them in your hands before adding them to the Epsom salts.

side view of the aromatherapy air freshener in a glass pint canning jar decorated with fall patterned paper showing the lavender flowers and epsom salts, Rustic Harvest DSP, home decor, aromatherapy, air fresheners


Next we added Epsom salts and lavender flower buds to fill the rest of the jar, added a few more drops of essential oil, and stirred well to combine. Adding the Epsom salts and lavender in two parts makes it a lot less messy. The first time I made these air fresheners I made a mess with the Epsom salts all over my kitchen island.

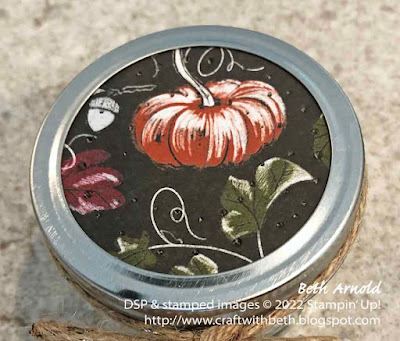
Finally, we put the lid on and added some holes to the designer series paper with the Take Your Pick Tool to allow the scent to fill the room.

top of an aromatherapy air freshener in a glass pint canning jar decorated with fall patterned paper, Rustic Harvest DSP, home decor, aromatherapy, air freshener
 

Please, note that this air freshener is intended to be placed in an area away from children and pets. This blog post is not intended to treat or diagnose anything, and is not advice of any kind. This blog post is anecdotal only of the steps we took to make this air freshener.

I put this air freshener in the powder bathroom in my house. The door stays closed almost all of the time, so the cats don't have access to it unsupervised.

Below are the measurements and supply list to recreate this fall scented air freshener. If you need supplies to recreate this home decor project, please, shop my online store HERE.


Measurements

  • Designer Series Paper Lid: 3-3/4" x 3-3/4" (Rustic Harvest Designer Series Paper (DSP))


Supply List

Paper
#159633 Rustic Harvest Designer Series Paper (DSP)


Embellishments
#159662 Silver-Threaded Twine


Tools
#103579 Paper Snips
#130148 Grid Paper
#152392 Paper Trimmer
#144107 Take Your Pick Tool
Glass Canning Jar with Lid Ring
Epsom Salts
Essential Oils (optional)
Dried Lavender Flowers
Fork


I could have added more decoration, but I didn't want the decorations to get wet or get soap on them. If this air freshener were for another room, I would definitely add more decorations like the banner stamp and die from the Hello Harvest Bundle. 

How would you decorate your air freshener? Leave me a comment below telling me what embellishments you would add.

I hope you enjoyed today's Rustic Harvest aromatherapy air freshener. If you need supplies to make this autumnal air freshener, please, shop my online store HERE.

If you have any questions about today's project, please, don't hesitate to ask me.

Thanks for stopping by!
Beth

Friday, October 21, 2022

Trio of Witch Hats Pumpkin Candy Wrapper

Today's project is a chocolate treat wrapper decorated with a trio of witch hats from the Bewitching stamp set and the Witch Hat Builder Punch. I make a lot of boxes and bags for treats that I thought a wrapper would be a fun way to package a treat!

chocolate pumpkin candy wrapped with a horizonal band of paper decorated with three witches hats in the center; halloween, treat holder, Bewitching, Best Witches, 3D, witch hat builder punch


Halloween is one of my favorite holidays. Halloween also has the best candy! I cannot go to the grocery store during the fall or any month with a holiday in it and not buy seasonal candy. In the grocery store that I most often go to the candy is in the center of the store, and you cannot go to the cash registers without passing buy it. So, of course, I have to look for the new candy!

This particular chocolate pumpkin candy is available during other times of the year, especially at Easter. I love the strawberry cream eggs that this brand makes! I was pleasantly surprised to see this chocolate pumpkin filled with caramel and marshmallow in the grocery store.

Below are the measurements and supply list to recreate this frightfully delicious candy wrapper. If you need supplies to recreate this project, please, shop my online store HERE.


Measurements

  • Belly Band: 2" x 8-1/2" (Parakeet Party Cardstock); trim excess cardstock as needed
  • Witch Hats (stamp all 3): 2-1/2" x 8-1/2" (Basic White Cardstock)
  • Greeting: 1" x 2" (Basic White Cardstock)


Supply List

Stamps
#159855 Bewitching Stamp Set (also available with the Witch Hat Builder Punch as a bundle with item #159857 Bewitching Bundle)
#159860 Best Witches Stamp Set

Paper
#159259 Parakeet Party Cardstock
#159276 Basic White Cardstock

Ink
#47099 Gorgeous Grape Ink Pad
#159208 Parakeet Party Ink Pad
#132708 Memento Tuxedo Black Ink Pad

Embellishments
#104430 Dimensionals

Tools
#159856 Witch Hat Builder Punch
#110755 Multipurpose Liquid Glue
#102300 Bone Folder
#103579 Paper Snips
#130148 Grid Paper
#152392 Paper Trimmer
#126200 Stampin' Scrub
#153648 Stampin' Mist Cleaner
#118485 Clear Block D
#118489 Clear Block G


close up of a chocolate pumpkin candy wrapped with a horizonal band of bright green paper decorated with three witches hats in the center; halloween, treat holder, Bewitching, Best Witches, 3D, witch hat builder punch


This candy wrapper comes together relatively quickly with little paper. You can cut 5 belly bands from one piece of 8-1/2" x 11" cardstock and 4 greeting strips from the inch left at the bottom, which makes it perfect for making multiples of for a party, a get together, coworkers, neighbors, community members, and more!

You can also customize the basic shape of this candy wrapper to fit any holiday or occasion. I can imagine making more of these for Thanksgiving to put one at each person's place setting! How would you customize this candy wrapper? Tell me in the comments below!

I hope you enjoyed today's Bewitching treat wrapper. If you need supplies to make this sweet treat wrapper, please, shop my online store HERE.

If you have any questions about today's project, please, don't hesitate to ask me.

Thanks for stopping by!
Beth

Wednesday, October 19, 2022

Love at First Bite Halloween Treat Holder

Today's Halloween treat box features a peanut butter cup so big that even Count Dracula might not be able to bite through it!

orange box decorated with black and gray striped paper around the side and an image of costomed trick-or-treaters underneath the moon and some bats; halloween, treat holder, Scary Cut, 3D, box


I found this enormous peanut butter cup at my favorite local sandwich shop - the one with the yellow and white striped bags. This sandwich shop sources a lot of locally made and small business food products. This peanut butter cup comes from a company in Nashville, TN. They always have something new and interesting to try!

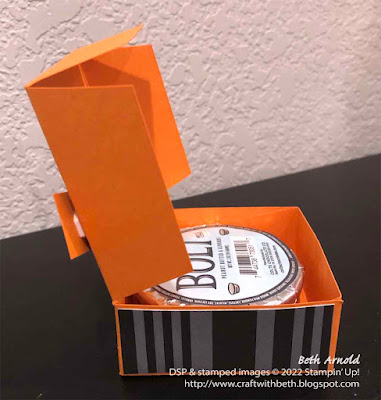
opened view of the orange box decorated with black and gray striped paper around the side and an image of costomed trick-or-treaters underneath the moon and some bats showing a large peanut butter cup inside of the box; halloween, treat holder, Scary Cut, 3D, box


I created this box to hold the peanut butter cup as a Halloween treat for my husband. Peanut butter cups are one of his top favorite types of candy. You could also put other types of treats or small gifts in this box.

The style of this box is similar to a pizza-style box. The peanut butter cup sits inside of the bottom part and the back of the box has a hinged lid. I measured the diameter and the height of the peanut butter cup to determine the dimensions of the box. Then I added a little more to accommodate the fold lines.

side view of the opened orange box decorated with black and gray striped paper around the side and an image of costumed trick-or-treaters underneath the moon and some bats; Halloween, treat holder, Scary Cut, 3D, box


Below are the measurements and supply list to recreate this fa-boo-lous Halloween treat box. If you need supplies to recreate this treat box, please, shop my online store HERE.

Measurements

  • Box Base: 8-7/8" x 5"; scored on the short side at 1-1/8" & 3-7/8" and scored on the long side at 1-1/8", 3-7/8", 5", & 7-3/4" (see template below for cutting and scoring guide) (Pumpkin Pie Cardstock)
  • Side Panels (cut 4): 1" x 2-5/8" (Black and White Designs Designer Series Paper)
  • Top Panel #1: 2-1/2" x 2-1/2" (Black and White Designs Designer Series Paper)
  • Top Panel #2: 2-1/4" x 2-1/4" (Basic White Cardstock)
  • Greeting: 1-3/4" x 2" (Pumpkin Pie Cardstock) - then trim with paper snips to fit the greeting


Supply List

Stamps
#159850 Scary Cute Stamp Set

Paper
#105117 Pumpkin Pie Cardstock
#159276 Basic White Cardstock
#159861 Black and White Designs Designer Series Paper

Ink
#132708 Memento Tuxedo Black Ink Pad

Embellishments
#104430 Dimensionals
#141897 Clear Wink of Stella

Tools
#122334 Simply Scoring Scoring Tool
#110755 Multipurpose Liquid Glue
#102300 Bone Folder
#103579 Paper Snips
#130148 Grid Paper
#152392 Paper Trimmer
#126200 Stampin' Scrub
#153648 Stampin' Mist Cleaner
#118487 Clear Block A
#118490 Clear Block H


I created a template showing the cutting and scoring lines for this Halloween treat box. The red lines indicate the cut lines. The blue dashed lines indicate the scoring lines. Be sure to angle cut or notch the side tabs as indicated, so that the box closes smoothly and neatly.

Halloween treat holder box template graphic; halloween, treat holder, Scary Cut, 3D, box

I hope you enjoyed today's Scary Cute peanut butter cup treat holder box. If you need supplies to make this Halloween treat box, please, shop my online store HERE.


If you have any questions about today's project, please, don't hesitate to ask me.

Thanks for stopping by!
Beth
Tuesday, September 6, 2022

September's Newsletter is now available!

Happy September! I just sent my September newsletter to my email list. This month I share how to use the Baby Wipe Technique for fall and beyond cards and projects.


Hello Harvest Pleasant Pheasant Treat Cup 3D box Thanksgiving Baby Wipe Technique


Christmas Lights Baby Wipe Technique Card Snowflakes Lights Aglow Product Suite

Christmas Lights Baby Wipe Technique Card Christmas Tree Lights Aglow Product Suite Peace

I also share tips to care for your Simply Shammy and resize a die to fit your project. These are projects and tips that I only share with my email list. So, you have to be an email list subscriber to receive these project instructions and tips.


sign up for my email list here graphic


September's newsletter is available all September long when you sign up for my email list. If you are not an email list subscriber, you can subscribe today and receive September's newsletter.

I would love to welcome you to my email list! Sign up for my email list by entering your name and email in the sign up form at the top right corner of my blog.


Craft with Beth Card Tracker Chart Graphic
 

And, when you sign up for my email list I will also send you a card tracking chart (as a PDF) to help you keep track of which cards you send to whom. Track cards that you send for birthdays, Christmas, Valentine's Day, Thanksgiving, and more, so you never send the same card twice to the same person. 

I can't wait to see you on my email list! Sign up today in the upper right corner of my blog.

Thanks for stopping by!

Beth

Wednesday, July 13, 2022

Whale Done Fish Cracker Snack Tag

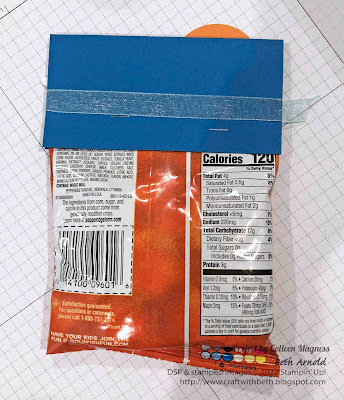
My demonstrator team leader Colleen Magness made this cute Whale Done fish cracker snack bag topper for one of our Better Your Best Demonstrator Team events quite awhile ago. She made everyone little goodie bags with some projects to make, a stamp set, some embellishments, and some snacks to enjoy during our event. The decoration of the snack bag was such a thoughtful touch! I felt so special!
Whale Done Stamp Set Whale Builder Punch Fish Cracker Snack Bag Tag Topper


I had taken pictures of her fish cracker snack decoration and completely forgot to share what an adorable addition this was to our event goodie bags. I was flipping through the photos on my phone and found them. After I shared my s'mores bag topper project on June 13th, I knew Colleen's bag topper would provide you with even more inspiration on how to dress up a snack bag!

I loved how Colleen created an underwater scene with the Whale Done stamp set and how kind it was for her to make our team event that much more special! Plus, the construction of the tag is genius!

Whale Done Stamp Set Whale Builder Punch Fish Cracker Snack Bag Tag Topper


The Pretty Peacock cardstock was folded in half and stapled to the top of the fish cracker bag with the staple prongs showing in the front and the smooth side of the staple showing on the back. Then she stamped and adhered the under the sea scene to the Pretty Peacock cardstock, covering the staple prongs. The ribbon was tied onto the tag next followed by the whale cut out and the layered circles.

Talk about a clever way to hide the sharper edges of the staple!

To make the underwater scene, Colleen stamped a piece of Basic White cardstock with the seaweed and coral stamps along the bottom and stamped the school of fish across the top. She then sponged around the outer edges of the Basic White cardstock to create an underwater look to the tag.

Below are the measurements and supplies to make Colleen's fish cracker snack bag topper. Colleen's bag topper used Pretty Peacock cardstock and ink. However, Pretty Peacock is a retired In Color. You could substitute Pacific Point or your favorite blue or blue green cardstock and ink pad. I have substituted Pacific Point in the measurements and the supply list below.

Measurements

  • Tag Topper Base: 4-1/2" x 4-1/2"; scored at 2-1/4" (Pacific Point Cardstock)
  • 1st Mat: 4-1/2" x 2" (Basic White Cardstock)
  • Circle 1: 2" x 2" (Basic White Cardstock) - use the 1-9/16" diameter circle die
  • Circle 2: 2" x 2" (Pumpkin Pie Cardstock) - use the 1-3/4" diameter circle die
  • Whale: 2-1/2" x 2" (Basic White Cardstock)


Supplies

#158315 Whale Done Stamp Set
#159276 Basic White Cardstock
#11350 Pacific Point Cardstock
#105117 Pumpkin Pie Cardstock
#147098 Pacific Point Ink Pad
#147086 Pumpkin Pie Ink Pad
#102300 Bone Folder
#103579 Paper Snips
#130148 Grid Paper
#152392 Paper Trimmer
#149653 Stampin' Cut & Emboss Machine
#118486 Clear Block C
#118485 Clear Block D
#118490 Clear Block H
#152699 Whale Punch
#151770 Layering Circle Dies
#152462 Pool Party 3/8" Ribbon
Fish Cracker Snack-sized Bags
Stapler
Staples


It is fun to incorporate stamping into everyday items and events! This snack bag topper is such a cute and delightful way to deliver snacks for an event like a birthday party, an aquarium trip, a road trip, a movie night, tailgating, and more!

I hope you try decorating snack bags! If you need supplies to make this Whale Done snack bag topper, please, shop my online store HERE. I can't wait to see how you decorate your snack bag!

If you have any questions about today's project, please, don't hesitate to ask me. I am happy to help you with your stamping questions!

Thanks for stopping by! Have a great day!
Beth