World Kindness was started in 1998 by the World Kindness Movement to recognize good deeds in the community, foster kindness, and emphasize that kindness unites us because it bridges division. It transcends boundaries.
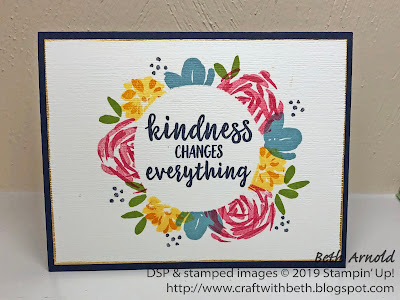
To create this "wreath" of flowers, I used the reserve masking technique. The reverse masking technique blocks off an area that you don't want to be stamp. For today's project, I want to stamp flowers around the greeting stamp, but I don't want to cover the greeting. So, I need to block or mask the greeting stamp. I chose a circle for the shape of my mask, but you can choose any shape.
First, I stamped the greeting "Kindness changes everything" with Night of Navy ink in the center of a 4" by 5-1/4" piece of Whisper White cardstock.
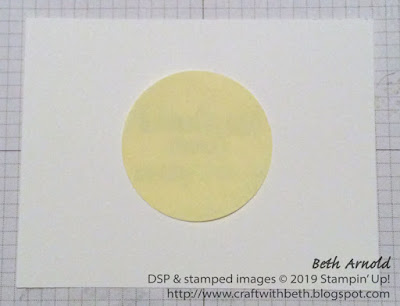
Then I made the reserve mask from a sticky note. I punched out a 2-1/4" circle from a sticky note.
I placed the 2-1/4" sticky note circle over top of the "Kindness changes everything" greeting and pressed it firmly in place.
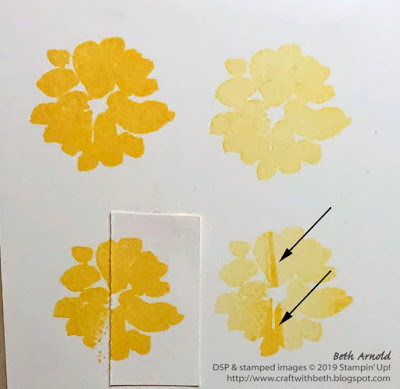
Next I began stamping the flower around the edge of the sticky note circle. I stamped the most detailed rose image with Melon Mambo ink and then layered the medium detailed rose image with Melon Mambo ink stamped off over top of the first rose image (i.e. ink the stamp with Melon Mambo ink, stamp it onto grid paper, and then stamp it over top of the first rose image without reinking the stamp).
Each time I stamped over the edge of the cardstock and the sticky note circle, I stamped the image onto my grid paper to remove the excess ink. There is a tiny height different between the cardstock and the sticky note, so the ink doesn't transfer to your paper. It stays on the stamp. If you don't stamp off the excess ink between stampings, there will be a line of extra ink that will distort your stamped image. It will not be a crisp, clean image.
I continued stamping the flowers around the sticky note circle until it was full of flowers and leaves.
Next, I peeled off the sticky note circle. I ran the Whisper White cardstock through my die cutting machine with the Subtle Embossing Folder to add texture. Then I ran the edges of the Whisper White cardstock through the Delicata Golden Glitz ink pad to give the edges a little more definition and sparkle.
For the inside, I added a row of flowers along the bottom and the "If flowers were hugs, I'd send you a thousand" greeting. But, you could also leave the greeting off.
It is easy to get so busy that kindness may be forgotten from time to time. A simple hello or thank you when greeting passers by at the post office, the dentist, or the office can make the world of difference in others' days. I hope you make today about kindness! How do you show kindness?
You can find the measurements and a supply list for this project at
the end of the post. I hope you enjoyed this project! Please leave a
comment below (click on the pencil icon)! I would love to hear from you!
Thanks for stopping by!
Beth
++++++++++++++++++
Shop Online 24/7 in my
Online Store
Check out the
Clearance Rack
Sign Up for
Classes, Events, and Retreat Days
Sign up for
my newsletter and mailing list or request a catalog
Sign Up for
Paper Pumpkin
Join my
Stampin' Team - the Purrfect Stampers!
Host Codes & Current Promotions:
November Host Code - XQANHP6H
When placing an order, please use host code
XQANHP6H for orders under $150 USD. Please don't use the host code if your order is more than $150. Use Host Code
XQANHP6H if you are attending the Stamp of the Month Class long distance to have your Stamp of the Month Bundle mailed directly to you.
The
Christmastime is Here Product Suite is coming November 1st and is
available while supplies last. You can purchase the entire product suite
or pick and choose your favorite products!
Shop my online store today for all of the Christmastime is Here products while supplies last!
The NEW Paper Trimmer is debuting November 1st, 2019! Woohoo! Check out my detailed review
here! Order the NEW Paper Trimmer in my online store
here!
From
September 4th, 2019 through January 2nd, 2020 shop the 2019 Holiday
Catalog! The 2019 Holiday Catalog is filled with Autumn, Halloween,
Thanksgiving, Christmas, News Years, and a sprinkling of Valentine's Day
stamps, Designer Series Paper, embellishments, and more to spark your
creativity!
Check out all of the new products today!
Stampin' Up! is launching a NEW line of storage solutions called
Storage by Stampin' Up!
for ink pads, Stampin' Write Markers, Stampin' Blends, and accessories!
Each of the modular cubes, trays, and bins are stackable and can be
configured in hundreds of ways! Check out the new storage solution on
my online store. Check out the product flyer
here and the configuration idea flyer
here.
Get
a sneak peek of December's Paper Pumpkin Kit! December's kit theme is
something for everything. It will make 12 full-sized cards (4 each of 3
designs) and will include a super versatile stamp set with 13 sentiment
stamps! Wow! December's kit will make it easy to send a card to a loved
one no matter the occasion! The coordinating colors are Crushed Curry,
Grapefruit Grove, Old Olive, Shaded Spruce, & Terracotta Tile.
Sign up for Paper Pumpkin by December 10th to receive December's Kit! Click
here for more information about December's Paper Pumpkin kit!
June 4th, 2019 - June 2nd, 2020 -
Shop from the 2019-2020 Annual Catalog
for all of your stamping needs! This catalog is bursting with must have
stamp sets, dies, embossing folders, ribbons, rhinestones, and more! I
love the entire catalog! I think you will too!
Check out all of the new products today!
Are you new to stamping? The
Beginner Brochure
may be the right place to start! The Beginner Brochure features a
collection of stamp sets, kits, and bundles that are specifically
designed to help you build your stamping skills! Check out our Beginner
Brochure today!
View the Beginner Brochure products in my online store. Download the Beginner Brochure
here.
P.S. If you are a Magnolia Lane Product Suite Fan, there is a companion stamp set Magnolia Blooms (
Item #152729) in the
Beginner Brochure!
Do you love Stampin' Up! products? Do you love sharing the joy of stamping with others? Have you considered
joining Stampin' Up! as
a demonstrator even for the discount? I would love to have you be a
part of my Purrfect Stampers Demonstrator Team! You can build your own
Starter Kit (valued at $125 USD) for $99 +tax!
Join Stampin' Up! and build your own Starter Kit today!
World Kindness Day Card Supply
List
|
Stamps
|
#147513 Abstract Impressions
(Photopolymer)
#144783 Painted Harvest
(Photopolymer)
|
Paper
|
|
Ink
|
#147086 Pumpkin Pie Ink
Pad
#150711 Delicata Golden Glitz Ink Pad
|
Embellishments
|
|
Tools
|
Die Cutting
Machine
|
World Kindness Day Card Measurements
|
|
Paper
|
Dimensions
|
Card Base
|
Night of Navy Cardstock
|
8-1/2” x 5-1/2”;
scored at 4-1/4”
|
1st Mat
|
Whisper White
Cardstock
|
4” x 5-1/4”
|
Inside Mat
|
Whisper White
Cardstock
|
4” x 5-1/4”
|


