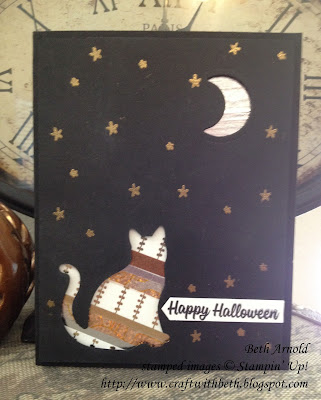
The create the inlay shape you can use punches or framelits/thinlits/dies. The inlaid technique is amazing for using up scraps, especially those one has trouble parting with. I know I do.
For this Halloween card, I used the Year of Cheer Washi Tape. First, I punched a cat from a 4" x 5-1/4" piece of Basic Black cardstock in the lower left corner. Then I die cut the moon using the Wood Crate Framelits in the upper right corner.
Then I stamp the smaller and the larger star images from Hearts Come Home stamp set using Versamark ink. I covered the stars with gold embossing powder before heat embossing with the Heat Tool.
Next I stamped the Happy Halloween greeting from Spooky Cat stamp set and punched it out with the Classic Label punch. After, I adhered the greeting to the right of the cat and trimmed the excess.
I turned the Basic Black cardstock over and added dimensionals. The entire cardstock piece needs to be supported, especially around the cut outs and the edges. I added dimensionals to the edges as well as around the cat and in the center. It may be too many dimensionals, but if I am mailing my card, I want to make sure they arrive in one piece and not torn from lack of support.
Sometimes it can be tricky to see if you have removed all of the dimensional backings. I recommend starting in one spot and moving in one direction. For example, I started in the upper left corner and worked my way to the upper right corner. Then I moved downward and began again from the left side, moving toward the right side.
To double check that you have removed all of the dimensional backings, tilt your card. If you see a matte finish on top of the dimensional, the backing is still on. If you see a shiny finish, the backing has been removed.
Once the inlay shapes are cut out, I can add the washi tape behind. On a piece of Whisper White cardstock, I put down strips of washi tape randomly across the areas where the cat and the moon cut outs would show. I made sure to add a bit extra on all sides, so no edges will show.
Smooth the washi tape with a bone folder.
Then I adhered the Whisper White cardstock to the front of the card base (5-1/2" x 8-1/2"; scored at 4-1/4"). I adhered the Basic Black cardstock with the cat and moon cut out on top of the washi tape and the card base front.
The inside features rows of Year of Cheer Washi Tape on a 4" x 5-1/4" piece of Whisper White cardstock. The vine tape is at the bottom with a strip of copper tape on the top. Lastly, there is the gold tape in the center of the copper tape.
I made two additional color scheme variations in Pumpkin Pie and in Perfect Plum using Halloween Night Washi Tape and Pick a Pattern Washi Tape, respectively.
This washi tape is from the 2016 Holiday catalog. However, you can substitute any washi tape of your choosing for this technique. Instead of cutting out the moon and embossing the stars, I simply stamped them with Versamark and let it dry to create a subtle texture. I used a Basic Black Marker to make faux stitch lines around the cat and the 1st matte.
You can see that the inlaid technique is truly wonderful for using up little bits and scraps.
The faux stitching lines are only around the cat on this Perfect Plum variation.
The black and white dot washi tape is very wide, so I only used half of the width for the card front and inside.
How would you use the inlay technique? What types of shapes would you choose? I would love to see what you create.
Thanks for stopping by!
Beth
Inlaid Washi Tape
Halloween Card Project Supply List
|
|
Stamps
|
#146014 Spooky Cat
Bundle
|
Paper
|
#121045 Basic
Black
#100730
Whisper White
|
Ink
|
#102283 Versamark
#140931 Basic Black
Archival
|
Embellishments
|
#109129 Gold Embossing
Powder
#104430 Dimensionals
#144644 Year of Cheer Washi
Tape
|
Tools
|
#103083 Embossing Buddy
#143730 Wood Crate
Framelits
#129053 Heat Tool
#143263 Big Shot Machine
#141491 Classic Label
Punch
|
Pumpkin Pie Variation Inlaid
Washi Tape Halloween Card Project Supply List
|
|
Stamps
|
#146014 Spooky Cat
Bundle
|
Paper
|
#105117
Pumpkin Pie
#100730
Whisper White
|
Ink
|
#102283 Versamark
#140931 Basic Black
Archival
#100082 Basic Black
Stampin’ Write Marker
|
Embellishments
|
#104430 Dimensionals
#142026 Halloween Night Washi Tape
(retired)
|
Tools
|
#141491 Classic Label
Punch
|
Perfect Plum Variation Inlaid
Washi Tape Halloween Card Project Supply List
|
|
Stamps
|
#146014 Spooky Cat
Bundle
|
Paper
|
#101889
Perfect Plum
#100730
Whisper White
|
Ink
|
#102283 Versamark
#140931 Basic Black
Archival
#100082 Basic Black
STampin’ Write Marker
|
Embellishments
|
#104430 Dimensionals
#144166 Pick A Pattern Washi
Tape
|
Tools
|
#141491 Classic Label
Punch
|


