Showing posts with label sponging. Show all posts

Friday, June 24, 2022

Sneak Peek: Scary Cute Sponged & Embossed Halloween Card

Are you ready for another sneak peek from the 2022 July-December Mini Catalog? Today's card features the Scary Cute Stamp Set and Scary Silhouette Dies as well as sponging with the blending brushes and embossing with the Simply Scored Scoring Tool.

Scary Cute Scary Silhouette Dies Halloween Card Sponging Blending Brushes Embossing


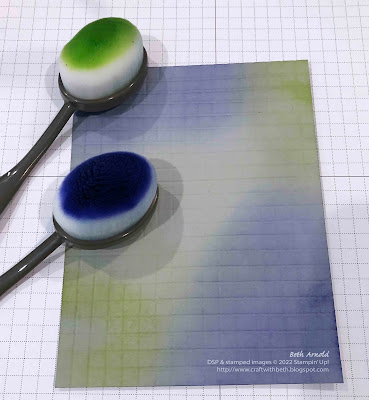
Did you know that you can create embossed patterns with the Simply Scored Scoring Tool? That's right! You can! I used the Simply Scored Scoring Tool to create an embossed grid on a piece of Smoky Slate cardstock. I placed the Smoky Slate cardstock in the upper left corner of the Simply Scored and scored every 1/4" across the cardstock. Then I rotated the cardstock 90 degrees and scored every 1/4" across the cardstock. This created an embossed grid pattern.

Scary Cute Scary Silhouette Dies Halloween Card Sponging Blending Brushes Embossing


Next I sponged Starry Sky and Parakeet Party around the edges of the Smoky Slate cardstock to highlight the embossed grid pattern.

I also sponged the Parakeet Party ink all over the Basic White cardstock mat with the stamped Frankenstein's monsters cardstock mat and Orchid Oasis ink around the edges to give it a creepy Halloween glow to the center.

On the inside of the Card Base I stamped the moon image in the upper right corner and the group of trick-or-treaters in the lower left corner with Momento Tuxedo Black in. It looks like the moon was not stamped correctly, however, this is the texture of the stamp. I also got a "seagull" or an extra line of ink around the right side of the trick-or-treaters.

Scary Cute Scary Silhouette Dies Halloween Card Sponging Blending Brushes Embossing


This extra line of ink is from pressing the stamp into the ink pad too hard and from rocking the stamp's edges into the stamp pad. My best friend's mom calls these extra lines of ink "seagulls".

Instead of editing the photo to remove the "seagull," I am leaving it in for two reasons.

  • One reason is that even demonstrators and stampers that have been stamping for a long time make stamping mistakes.
  • The second reason is that the "seagull" acts as a motion or action line, giving the impression that the trick-or-treaters are running to get more candy. It is a great way to make a stamping mistake into a design element. That is the story, and I am sticking with! Lol!


Below are the measurements and supplies to recreate this sponged and emboss Scary Cute Halloween card.

Measurements

  • Card Base: 4-1/4" x 11"; scored at 5-1/2" (Thick Basic White Cardstock)
  • 1st Mat: 4-1/4" x 5-1/2" (Smoky Slate Cardstock)
  • 2nd Mat: 3-3/4" x 5" (Orchid Oasis Cardstock)
  • 3rd Mat: 3-5/8" x 4-7/8" (Basic White Cardstock)
  • Greeting: 2-1/4" x 1-1/4" (Orchid Oasis Cardstock)
  • Greeting Banner: 1/4" x 2-1/2" (Basic White Cardstock)


Supplies

#159850 Scary Cute Stamp Set (also available as a bundle - #159852 Scary Cute Bundle)
#159276 Basic White Cardstock
#159229 Thick Basic White Cardstock
#159267 Orchid Oasis Cardstock
#131202 Smoky Slate Cardstock
#132708 Memento Tuxedo Black Ink Pad
#159214 Orchid Oasis Ink Pad
#159208 Parakeet Party Ink Pad
#104430 Dimensionals
#110755 Multipurpose Liquid Glue
#102300 Bone Folder
#103579 Paper Snips
#130148 Grid Paper
#152392 Paper Trimmer
#149653 Stampin' Cut & Emboss Machine
#118487 Clear Block A
#117147 Clear Block B
#118486 Clear Block C
#153611 Blending Brushes
#159851 Scary Silhouette Dies


I know I will be making more of these cards for my favorite tricker-or-treaters! The Scary Cute stamp set will be in the July-December Mini Catalog which is debuting on July 1st - only a week away. I hope you enjoyed today's Scary Cute Halloween card and add the Scary Cute Bundle to your wish list!  Then shop my online store HERE starting July 1st.

If you have any questions about today's project, please, don't hesitate to ask me. I am happy to help you with your stamping questions!

Thanks for stopping by! Have a great day!
Beth

Friday, June 17, 2022

Stamped and Sponged Beauty of Friendship Card

There are some times when we need encouragement or support in trying or difficult times. I created this card as a thinking of you and support card for those times. I was inspired by the beautiful trees and the bright sunny days that we have been having lately and how much joy a warm sunny day brings me. 


Beauty of Friendship Encouragement Thinking of You Support Card Sponging Blending Brushes Masking Reverse Masking

Looking up at the sky, seeing the trees circled around me and the sun above seemed like kind friends. The inside of the card is stamped with a tree in the lower left corner, leaving room for a comforting message.


Beauty of Friendship Encouragement Thinking of You Support Card Sponging Blending Brushes Masking Reverse Masking

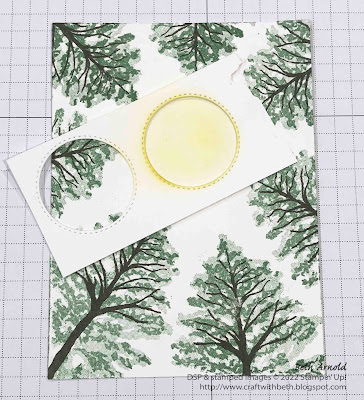
The looking up at the tree and sun scene is created by first stamping the tree leaves and tree trunk images around the edges of the 2nd Mat. I knew where I wanted to place the sun, so I was careful to leave plenty of room for the sun.

Next I created a mask and a reverse mask for the sun. I used a piece of Basic White cardstock and die cut the 2nd smallest stitched circle from it. I kept both the circle die cut and the piece of cardstock. The piece of cardstock with the circle cut out of it will become the mask. I used a blending brush to sponge So Saffron ink through the mask to make a sun shape.


Beauty of Friendship Encouragement Thinking of You Support Card Sponging Blending Brushes Masking Reverse Masking


Then I removed the mask and replaced it with the reverse mask - the circle die cut. I added the tiniest bit of Stampin' Seal adhesive to the back of the circle die cut to temporarily attach the circle die cut to the 2nd Mat. The circle die cut will keep the ink from covering the sun area while I sponged the sky.

I lightly added Tahitian Tide ink to a blending brush and applied it to the 2nd Mat in a swirling motion. I left some areas with patches of the white cardstock showing through to give the idea of sunlight shining through a whisper of clouds.


Beauty of Friendship Encouragement Thinking of You Support Card Sponging Blending Brushes Masking Reverse Masking


The greeting with stamped on a piece of Basic White cardstock and added to the lower right corner of the 2nd Mat. The 2nd Mat was adhered to the center of the 1st Mat and then to the card front.

You can use sticky note paper or computer paper in place of the Basic White cardstock for the mask and reverse mask. I had cut an extra circle for another project that I ended up not using, so it was right next to me on my desk.

Below are the measurements and supply list for this stamped and sponged Beauty of Friendship card.


Measurements

  • Card Base: 4-1/4" x 11"; scored at 5-1/2" (Thick Basic White Cardstock)
  • 1st Mat: 4" x 5-1/4" (Early Espresso Cardstock)
  • 2nd Mat: 3-5/8" x 4-7/8" (Basic White Cardstock)
  • Greeting: 1/2" x 1-3/4" (Basic White Cardstock)
  • Circle Mask/Reverse Mask: 2" x 3" (Basic White Cardstock, sticky note paper, or computer paper) - use the 2nd smallest stitched circle die


Supplies

  • #154983 Beauty of Friendship Stamp Set
  • #159229 Thick Basic White Cardstock
  • #119686 Early Espresso Cardstock
  • #159276 Basic White Cardstock
  • #147089 Garden Green Ink Pad
  • #159210 Tahitian Tide Ink Pad
  • #147109 So Saffron Ink Pad
  • #147114 Early Espresso Ink Pad
  • #110755 Multipurpose Liquid Glue
  • #152813 Stampin' Seal Adhesive
  • #118485 Clear Block D
  • #118490 Clear Block H
  • #118489 Clear Block G
  • #102300 Bone Folder
  • #103579 Paper Snips
  • #130148 Grid Paper
  • #152392 Paper Trimmer
  • #149653 Stampin' Cut & Emboss Machine
  • #159183 Stylish Shapes Dies
  • #153611 Blending Brushes 
  • Optional: sticky note paper or computer paper


I hope you enjoyed today's card! I hope you give this stamped and sponged Beauty of Friendship card a try! If you need supplies to make this card, please shop my online store HERE

Thanks for stopping by!

Beth


Wednesday, July 3, 2019

Paper Pumpkin June 2019 A Little Smile Alternative Projects #1 Bridge Fold Beach Card

The mini cards in June's Paper Pumpkin Kit are gorgeous on their own! I absolutely love the idea of acknowledging kindness in our every day lives. However, when I opened the kit contents all I could think of was my trip to the Caribbean earlier this year and the great beach views!

Craft with Beth: Stampin' Up! Paper Pumpkin Project Kit June 2019 A Little Kindness Alternative Project Bridge Fun Fold Card Beach Sponging Embossing Folder Seashells Coral Vellum Stenciling

I immediately thought of creating a bridge fun fold card of how the beach, the palm trees, and the ocean view from my room's balcony.

I used the Pinewood Planks 3D Embossing Folder to recreate the wooden docks dotted along the islands. I first embossed Whisper White cardstock with the Pinewood Planks 3D Embossing Folder with my die-cutting machine. Then I randomly and lightly sponged Crumb Cake ink over the debossed side to create a worn look.

Craft with Beth: Stampin' Up! Paper Pumpkin Project Kit June 2019 A Little Kindness Alternative Project Bridge Fun Fold Card Beach Sponging Embossing Folder Seashells Coral Vellum Stenciling

The bridge piece looked a little plain. So, I used the round vellum coral die cut piece as a stencil to sponge Versamark ink onto the bridge piece.

I also sponged the coral die cuts with Calyspo Coral ink to add a burst of color against the blues, tans, and white.

Craft with Beth: Stampin' Up! Paper Pumpkin Project Kit June 2019 A Little Kindness Alternative Project Bridge Fun Fold Card Beach Sponging Embossing Folder Seashells Coral Vellum Stenciling

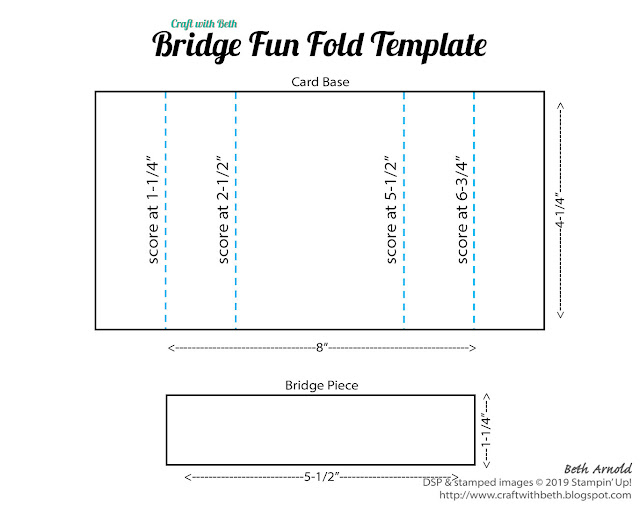
Here you can see how the Bridge Fold card is scored into 5 sections and then folded to make a u-shaped card base that stands up on its own but magically folds flat to be placed into an envelope. The Bridge Fun Fold gets it name from the bracing or bridging cardstock piece in the front of the card. This fun fold is sometimes called a U-Shaped Fun Fold.

Craft with Beth: Stampin' Up! Paper Pumpkin Project Kit June 2019 A Little Kindness Alternative Project Bridge Fun Fold Card Beach Sponging Embossing Folder Seashells Coral Vellum Stenciling Template Graphic

What additional or alternative project have you created using your June's Paper Pumpkin Kit, A Little Smile? Post a photo of your project in the comments below (click on the pencil icon)! I would love to hear from you!

You can find the measurements and a supply list for this project at the end of the post. I hope you enjoyed this project!

Thanks for stopping by!
Beth

++++++++++++++++++
Shop Online 24/7 in my Online Store
Check out the Clearance Rack
Sign Up for Classes, Events, and Retreat Days
Sign up for my newsletter and mailing list or request a catalog
Sign Up for Paper Pumpkin
Join my Stampin' Team - the Purrfect Stampers!

Host Codes & Current Promotions:
June Host Code - WMKPWCCH
When placing an order, please use host code WMKPWCCH for orders under $150 USD. Please don't use the host code if your order is more than $150. Use Host Code WMKPWCCH if you are attending the Stamp of the Month Class long distance to have your Stamp of the Month Bundle mailed directly to you.

Craft with Beth: Stampin' Up! Bonus Days 2019 Graphic Banner

Bonus Days are here! From July 1st through July 31st, 2019, you can earn Bonus Days Coupon Codes with each qualifying order! For every $50 USD you order, you earn a $5 Coupon Code to redeem from August 1st - August 31st, 2019! Check out the promotion flyer here and more details here.

Craft with Beth: Stampin' Up! Extra! Extra! New Demonstrator Promotion July and August 2019 Graphic Banner

Extra! Extra! There is a new promotion for demonstrators who join Stampin' Up! from July 1st through August 31st, 2019! New demonstrators receive $30 additional USD in their Starter Kit and then another $10 USD Coupon Code the following month to redeem on their first order! That means, for $99 USD plus tax, demonstrators who join during this promotion receive $155 USD in product towards their Starter Kit, a FREE Paper Pumpkin Kit, FREE business supplies, FREE shipping, and a $10 USD Coupon Code (the following month)! WOW! That's an incredible way to start your Stampin' Up! demonstratorship! I would love to have you join my demonstrator team Purrfect Stampers! Check out the promotion flyer here and more details and exclusions here.

Craft with Beth: Stampin' Up! Storage by Stampin' Up! organization stamp craft room Banner Graphic

Stampin' Up! is launching a NEW line of storage solutions called Storage by Stampin' Up! for ink pads, Stampin' Write Markers, Stampin' Blends, and accessories! Each of the modular cubes, trays, and bins are stackable and can be configured in hundreds of ways! Check out the new storage solution on my online store. Check out the product flyer here and the configuration idea flyer here.

Craft with Beth: Stampin' Up! Paper Pumpkin Graphic Banner Jul 2019 Summertime Fun

Paper Pumpkin is giving us a sneak peek into July's Project Kit! Summer is the perfect time to kick back, relax, and enjoy yourself. You may even be planning some time for creativity. Paper Pumpkin's got you covered. Our July kit gives you everything you need for summertime paper crafting bliss. Each kit comes with 9 cards in 3 designs. Plus, it coordinates with 3 Product Suites in the new 2019-2020 Annual Catalog. Mix and match with Come Sail Away, Garden Lane, and Woven Threads Product Suites, and you will have projects for days! Long summer days, that is! July's project kit's coordinating colors are gold, kraft, Mossy Meadow, Old Olive, Pear Pizzazz, Pretty Peacock, Sahara Sand, Seaside Spray, Terracotta Tile, and Whisper White. I can't wait to see what is in store for July's kit! Sign up for Paper Pumpkin by July 10th to receive July's Kit!

Craft with Beth: Stampin' Up! 2019-2020 Annual Catalog Graphic Banner

June 4th, 2019 - June 2nd, 2020 - Shop from the 2019-2020 Annual Catalog for all of your stamping needs! This catalog is bursting with must have stamp sets, dies, embossing folders, ribbons, rhinestones, and more! I love the entire catalog! I think you will too! Check out all of the new products today!

http://www.stampinup.com/ecweb/category/110090/experience-creativity-projects?dbwsdemoid=2123316

Are you new to stamping? The Beginner Brochure may be the right place to start! The Beginner Brochure features a collection of stamp sets, kits, and bundles that are specifically designed to help you build your stamping skills! Check out our Beginner Brochure today! View the Beginner Brochure products in my online store. Download the Beginner Brochure here.

P.S. If you are a Magnolia Lane Product Suite Fan, there is a companion stamp set Magnolia Blooms (Item #152729) in the Beginner Brochure!


A Little Kindness Bridge Fun Fold Card Supply List
Stamps
#152105 A Little Smile Paper Pumpkin Project Kit (Photopolymer)
Paper
#100730 Whisper White Cardstock
#131297 Coastal Cabana Cardstock
#120953 Crumb Cake Cardstock
Ink
#147116 Crumb Cake Ink Pad
#147101 Calypso Coral Ink Pad
#102283 Versamark Watermark Ink Pad
Embellishments
#104430 Dimensionals
Tools
#126889 Stampin’ Trimmer
#143263 Big Shot Machine
#102300 Bone Folder
#138995 Tear & Tape Adhesive or liquid glue
#152320 Pinewood Planks 3D Embossing Folder
#149658 3D Embossing Folder Plate
#101310 Sponges


A Little Kindness Bridge Fun Fold Card Measurements

Paper
Dimensions
Card Base
Coastal Cabana Cardstock
4-1/4” x 8”; scored on the long side at 1-1/4”, 2-1/2”, 5-1/2”, & 6-3/4”
Bridge Piece
Coastal Cabana Cardstock
5-1/2” x 1-1/4”
Side Mats (cut 4)
Crumb Cake Cardstock
4” x 1”
Wood Pieces (cut 4)
Whisper White Cardstock
4” x 7/8”
Rear Mat
Crumb Cake Cardstock
4” x 2-3/4”
Beach Scene Piece
Front of the Ocean and Sky Mini Card
Cut the mini card in half along the score line; use the card front for the beach scene & save the back for another project
Palm Trees
Palm Trees Die Cut from the Project Kit
Use as is from the Project Kit
Banner
Wood Banner Die Cut from the Project Kit
Use as is from the Project Kit
Sand Dollars (2)
Sand Dollar Die Cuts from the Project Kit
Use as is from the Project Kit
Coral (2)
Vellum Coral Die Cuts from the Project Kit
Sponge with Calypso Coral ink