Showing posts with label thinking of you. Show all posts

Thursday, January 26, 2023

Love you a bunch heirloom carrot card

Each Tuesday I send out my stamping newsletter to my email list. On January 31st, I will be sharing this sweet card featuring the Thanks a Bunch stamp set from the 2023 Sale-A-Brations Catalog. It can be used as an alternative to the traditional hearts Valentine's Day card or a card anytime of the year to say I love you.

weekly newsletter sneak peek, Thanks a bunch stamp set, love you a bunch, card, thinking of you, bunch of carrots


This Valentine's Day card is only available to my email list subscribers. If you are already on my email list, you will automatically receive the project supply list, measurements, and instructions for this card.

If you are not on my email list and would like to receive the project supply list, measurements, and instructions for this Christmas card, please, sign up for my email list by January 30th, 2023.

Sign up for my mailing list today HERE or in the bright blue sign up box in the right sidebar of my blog. I can't wait to welcome you as a subscriber!

Beth


Wednesday, November 30, 2022

Just a Little Reminder that You are Loved

I was looking at the peppermint snowman treat holder I made on Monday. Since the peppermint snowman chocolate candy is only available during the winter months of the year, I thought what other treats would fit in this treat holder size. A 2" Ghirardelli chocolate square fits perfectly in this treat holder size too!

This treat holder is a terrific way to add a little sweetness to a loved one's day and to show them that you are thinking of and love them!

Ghirardelli chocolate square treat holder wrapper made with the Designer Tags. The greeting says just a little reminder that you are loved. treat holder, 3D, gift packaging, Stylish Shapes Dies, Framed Florets Dies, Designer Tags Dies, flowers, floral, friendship, thinking of you


I layered the small and large flowers from the Fitting Florets stamp set with the leaf dies from the Framed Florets Dies to create a little embellishment behind the greeting banner.

Ghirardelli chocolate square treat holder wrapper made with the Designer Tags. how to add the flowers underneath of the greeting banner. treat holder, 3D, gift packaging, Stylish Shapes Dies, Framed Florets Dies, Designer Tags Dies, flowers, floral, friendship, thinking of you

To make the greeting banner, first stamp and die cut the banner from a piece of Basic White cardstock and the stitched banner die. Then adhere the banner die cut to a scrap of Daffodil Delight that is a little larger than the banner. Use paper snips to cut a banner shape from the Daffodil Delight cardstock slightly bigger than the Basic White banner die cut. You now have a Basic White cardstock banner outlined in Daffodil Delight cardstock.

Below are the measurements and the supply list for my Fitting Florets chocolate square treat holder. If you need supplies to recreate this treat holder, please, shop my online store HERE.


Measurements

  • Treat Holder Base: 1-3/4" x 6"; scored at 3" (Fitting Florets Designer Series Paper (DSP))
  • Greeting: 3-1/2" x 1" (Basic White Cardstock)
  • Greeting Mat 4" x 1-1/2" (Daffodil Delight Cardstock)
  • Ribbon: 10" long (Evening Evergreen 3/8" Open Weave Ribbon)


Supplies

Stamps
#161815 Fitting Florets Stamp Set
#162407 Fitting Florets Bundle (includes #161815 Fitting Florets Stamp Set & #160623 Framed Florets Dies at a 10% savings)

Paper
#119683 Daffodil Delight Cardstock
#155574 Evening Evergreen Cardstock
#159276 Basic White Cardstock
#161814 Fitting Florets Designer Series Paper (DSP)

Ink
#155576 Evening Evergreen Ink Pad
#132708 Memento Tuxedo Black Ink Pad
#155520 Polished Pink Stampin' Blends Combo Pack (both)
#155517 Evening Evergreen Stampin' Blends Combo Pack (dark)

Embellishments
#155573 Evening Evergreen 3/8" Open Weave Ribbon
#104430 Dimensionals

Tools
#160623 Framed Florets Dies
#159165 Designer Tags Dies
#159183 Stylish Shapes Dies
#110755 Multipurpose Liquid Glue
#102300 Bone Folder
#103579 Paper Snips
#130148 Grid Paper
#152392 Paper Trimmer
#149653 Stampin' Cut & Emboss Machine
#126200 Stampin' Scrub
#153648 Stampin' Mist Cleaner
#118490 Clear Block H

I hope you enjoyed today's Designer Tags Dies treat holder and give it a try. Post your treat holder project photo on social media and be sure to tag me with #craftwithbeth. I can't wait to see what you create!

If you need supplies to make this project, please, shop my online store HERE.

If you have any questions about today's project, please, don't hesitate to ask me.

Thanks for stopping by!
Beth

Thursday, November 10, 2022

Practice your Stampin' Blends skills with these friendship cards

Each Tuesday I send out my stamping newsletter to my email list. On November 15th, I will be sharing two autumnal friendship cards featuring the Hello Harvest Stamp Set and Die Bundle.


Hello Harvest autumnal floral friendship thinking of you card


These floral friendship cards is only available to my email list subscribers. If you are already on my email list, you will automatically receive the project supply list, measurements, and instructions for this card.

If you are not on my email list and would like to receive the project supply list, measurements, and instructions for this Christmas card, please, sign up for my email list by Monday, November 14th, 2022.

Sign up for my mailing list today HERE or in the bright blue sign up box in the upper right corner of my blog. I can't wait to welcome you as a subscriber!

Beth

Wednesday, September 28, 2022

Go to Greeting Birthday Banner Card

I had my eye of the #158763 Go to Greetings stamp set since the 2022-2023 Annual Catalog debuted. I ordered it during the 24-hour stamp sale, and it arrived quicker than I thought it would! I was so excited to get it in the mail that I sat down to create cards right away. Today's birthday card is one of the ideas I knew I wanted to make first!


birthday card with horizontal band of pink paper with white embossed words saying happy birthday and banners of floral patterned paper below and perpendicular to the horizontal pink paper band. Go to Greetings stamp set birthday card, Awash in Beauty Designer Series Paper, DSP, birthday card, heat embossing

The largest greeting stamp size makes a bold, slightly more formal look for this birthday card. The font style is thick enough to make a clear impression when heat embossed. I also used the embossing buddy to double ensure that no stray embossing powder heat set on the Polished Pink cardstock just in case. The lettering embossed neatly and each of the letters are crisp and legible.

step-by-step photo of the banner placement on the card front. Go to Greetings stamp set birthday card, Awash in Beauty Designer Series Paper, DSP, birthday card, heat embossing


I first arranged the banners along the bottom half of the card front. Once I was happy with the placement, I added Stampin' Seal to the bottom half of the back of the Polished Pink greeting piece. I carefully placed the Polished Pink greeting piece on top of the banners to adhere them in place all at the same time. I totally held my breath during that step! Lol! Next I added liquid glue to the back and adhered it to the card front.

inside of birthday card has a horizontal band of pink paper on top of a horizontal band of pale pink plaid patterned paper along the bottom edge of the card inside. Go to Greetings stamp set birthday card, Awash in Beauty Designer Series Paper, DSP, birthday card, heat embossing


Inside the card I added a piece of pink plaid paper from the Awash in Beauty Designer Series Paper (DSP) pack and a narrow piece of Polished Pink cardstock to cover the DSP seam and for an extra pop of pink.

You can also see in the photo above that only the tops of the banners are adhered to the card front. This adds a bit of whimsy and movement to the card.


pick up all of the banners at once with the pink cardstock. Go to Greetings stamp set birthday card, Awash in Beauty Designer Series Paper, DSP, birthday card, heat embossing


Below are the measurements and supply list to recreate this Go to Greetings banner birthday card. If you need supplies to recreate this card, please, shop my online store HERE.


Measurements

  • Card Base: 8-1/2" x 5-1/2" (Thick Basic White Cardstock)
  • Greeting: 1-3/8" x 5-1/2" (Polished Pink Cardstock)
  • Banners (cut 9): 1/2" x 3" (Awash in Beauty Designer Series Paper (DSP))
  • Inside DSP Strip: 1/2" x 5-1/2" (Awash in Beauty Designer Series Paper (DSP))
  • Inside Cardstock Strip: 1/4" x 5-1/2" (Polished Pink Cardstock)


Supply List

Stamps
#158763 Go to Greetings Stamp Set

Paper
#159229 Thick Basic White Cardstock
#155710 Polished Pink Cardstock
#158973 Awash in Beauty Designer Series Paper (DSP)

Ink
#102283 Versamark Clear Watermark Ink Pad

Embellishments
#158136 Brushed Brass Butterflies
#155554 Basics Stampin' Emboss Powder (white)

Tools
#153608 Banners Pick a Punch
#129053 Heat Tool
#118490 Clear Block H
#110755 Multipurpose Liquid Glue
#152813 Stampin' Seal Adhesive
#102300 Bone Folder
#103579 Paper Snips
#130148 Grid Paper
#152392 Paper Trimmer
#126200 Stampin' Scrub
#153648 Stampin' Mist Cleaner


thinking of you card with horizontal band of pink paper with white embossed words saying thinking of you and banners of floral patterned paper below and perpendicular to the horizontal pink paper band. Go to Greetings stamp set thinking of you, Awash in Beauty Designer Series Paper, DSP, birthday card, heat embossing
 

The second card that I made using the thinking of you greeting turned out nicely even though this was not the greeting I intended to stamp! Whoops! Even still, what a cheerful way to let a loved one know you are thinking about them!

What other greetings would you use on this banner card? Let me know in the comments below!

I hope you enjoyed today's Go to Greetings birthday banner card. If you need supplies to make this sweet card, please, shop my online store HERE.

If you have any questions about today's project, please, don't hesitate to ask me.

Thanks for stopping by!
Beth

Wednesday, July 6, 2022

You are Missed Rustic Harvest Designer Series Paper

The 2022 July-December Mini Catalog debuted a few days ago. I just had to share this "gourd-eous" thinking of you card from page 50 of the July-December Mini Catalog! This card sample show cases how to use the Rustic Harvest paper as a background and as a grouping of gourds around the pumpkin die cut.


Hello Harvest Stamp Set Rustic Harvest DSP Thinking of You Miss You card 2022 July-December Mini Catalog Page 50 card sample


Not only can you use the Rustic Harvest Designer Series Paper for larger areas of your card projects, but you can also use them in smaller ways by fussy cutting the different pumpkins, gourds, and leaves.

I also like how Stampin' Up! paired the Hello Harvest Product Suite with the #159163 Fabulous Frames Dies on page 171 of the 2022-2023 Annual Catalog. The frame die cut provides a beautiful gold foil backdrop to anchor the gourd arrangement!

What a perfect card to let a loved one know that you are thinking of them!

Check out the 2022 July-December Mini Catalog for even more "gourd-eous" card and project samples! Shop the 2022 July-December Mini Catalog in my online store HERE.


Thanks for stopping by!

Beth

Wednesday, June 22, 2022

You are Simply Fabulous Circle Easel Card

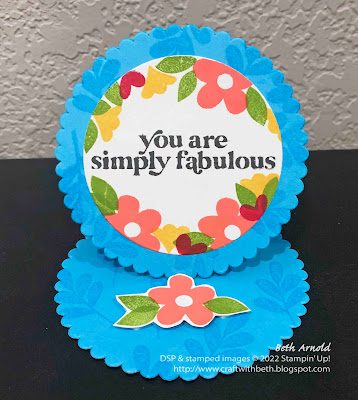
Today's project is a circle easel card featuring the Simply Fabulous stamp set. The Simply Fabulous stamp set is one of my top must-have stamp sets from the 2022-2023 Annual Catalog. It has cute little flowers and leaves stamps along with greetings perfect for friendship, encouragement, and celebration.

Simply Fabulous Circle Easel Card


The varied scale of the flowers and leaves stamps ranges from small to large and makes this a fantastic set for building bouquets, wreaths, clusters, and more! Use the larger flowers and leaves for focal images. Sprinkle in the smaller flowers and leaves to fill in the spaces between to create a cohesive bouquet or wreath!

Simply Fabulous Circle Easel Card


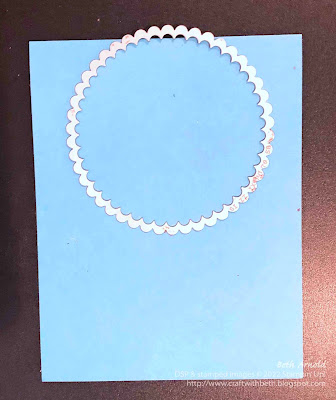
The base for the circle easel card is made of two connected scalloped circles. To connect the scalloped circles, I cut a piece of Tahitian Tide cardstock and folded it in half, then I placed the largest Layering Circle die on the Tahitian Tide cardstock with about 1/8" of the die above the fold, and ran it through the Stampin' Cut & Emboss Machine.

Simply Fabulous Circle Easel Card


Moving the topmost edge of the scalloped circle die above the fold line means that the area that the die is not touching the cardstock will not be cut.

Simply Fabulous Circle Easel Card


A second scalloped circle is die cut and adhered to one of the card base scallop circles to make the easel stand up.

 
Below are the measurements and supplies to recreate this Simply Fabulous Circle Easel Card.

Measurements

  • Card Base: 4-1/4" x 8"; scored at 4" (Tahitian Tide Cardstock)
  • Scalloped Circle: 3-1/2" x 3-1/2" (Tahitian Tide Cardstock)
  • Circles: 5" x 2-3/4" (Basic White Cardstock) - cut 2 of the 2-3/8" circles from this piece of cardstock and cut 1 of them in half
  • Stopper: 2" x 3"


Supplies

#159133 Simply Fabuous Stamp Set
#159261 Tahitian Tide Cardstock
#102283 Versamark Watermark Ink Pad
#147052 Flirty Flamingo Ink Pad
#147094 Daffodil Delight Ink Pad
#147095 Granny Apple Green Ink Pad
#147051 Melon Mambo Ink Pad
#132708 Momento Tuxedo Black Ink Pad
#104430 Dimensionals
#110755 Multipurpose Liquid Glue
#102300 Bone Folder
#103579 Paper Snips
#130148 Grid Paper
#152392 Paper Trimmer
#149653 Stampin' Cut & Emboss Machine
#118487 Clear Block A
#117147 Clear Block B
#118490 Clear Block H
#151770 Layering Circle Dies


A circle easel card makes a great display card. I chose "You are simply fabulous" for the greeting on this circle easel card. It is a kind reminder that we are fabulous too! It can be easy to focus more on the care of others and forget to care for and appreciate yourself too. This card could be a visual reminder that you are simply fabulous too!

I hope you give this circle easel a card and make one for each of your best friends! I think you will really enjoy stamping with the Simply Fabulous stamp set! If you need supplies to make this card, please, shop my online store HERE.

If you have any questions about today's project, please, don't hesitate to ask me. I am happy to help you with your stamping questions!

Thanks for stopping by! Have a great day!
Beth

Friday, June 17, 2022

Stamped and Sponged Beauty of Friendship Card

There are some times when we need encouragement or support in trying or difficult times. I created this card as a thinking of you and support card for those times. I was inspired by the beautiful trees and the bright sunny days that we have been having lately and how much joy a warm sunny day brings me. 


Beauty of Friendship Encouragement Thinking of You Support Card Sponging Blending Brushes Masking Reverse Masking

Looking up at the sky, seeing the trees circled around me and the sun above seemed like kind friends. The inside of the card is stamped with a tree in the lower left corner, leaving room for a comforting message.


Beauty of Friendship Encouragement Thinking of You Support Card Sponging Blending Brushes Masking Reverse Masking

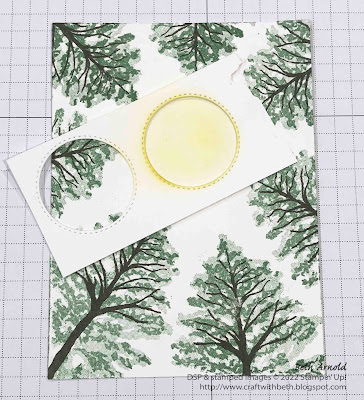
The looking up at the tree and sun scene is created by first stamping the tree leaves and tree trunk images around the edges of the 2nd Mat. I knew where I wanted to place the sun, so I was careful to leave plenty of room for the sun.

Next I created a mask and a reverse mask for the sun. I used a piece of Basic White cardstock and die cut the 2nd smallest stitched circle from it. I kept both the circle die cut and the piece of cardstock. The piece of cardstock with the circle cut out of it will become the mask. I used a blending brush to sponge So Saffron ink through the mask to make a sun shape.


Beauty of Friendship Encouragement Thinking of You Support Card Sponging Blending Brushes Masking Reverse Masking


Then I removed the mask and replaced it with the reverse mask - the circle die cut. I added the tiniest bit of Stampin' Seal adhesive to the back of the circle die cut to temporarily attach the circle die cut to the 2nd Mat. The circle die cut will keep the ink from covering the sun area while I sponged the sky.

I lightly added Tahitian Tide ink to a blending brush and applied it to the 2nd Mat in a swirling motion. I left some areas with patches of the white cardstock showing through to give the idea of sunlight shining through a whisper of clouds.


Beauty of Friendship Encouragement Thinking of You Support Card Sponging Blending Brushes Masking Reverse Masking


The greeting with stamped on a piece of Basic White cardstock and added to the lower right corner of the 2nd Mat. The 2nd Mat was adhered to the center of the 1st Mat and then to the card front.

You can use sticky note paper or computer paper in place of the Basic White cardstock for the mask and reverse mask. I had cut an extra circle for another project that I ended up not using, so it was right next to me on my desk.

Below are the measurements and supply list for this stamped and sponged Beauty of Friendship card.


Measurements

  • Card Base: 4-1/4" x 11"; scored at 5-1/2" (Thick Basic White Cardstock)
  • 1st Mat: 4" x 5-1/4" (Early Espresso Cardstock)
  • 2nd Mat: 3-5/8" x 4-7/8" (Basic White Cardstock)
  • Greeting: 1/2" x 1-3/4" (Basic White Cardstock)
  • Circle Mask/Reverse Mask: 2" x 3" (Basic White Cardstock, sticky note paper, or computer paper) - use the 2nd smallest stitched circle die


Supplies

  • #154983 Beauty of Friendship Stamp Set
  • #159229 Thick Basic White Cardstock
  • #119686 Early Espresso Cardstock
  • #159276 Basic White Cardstock
  • #147089 Garden Green Ink Pad
  • #159210 Tahitian Tide Ink Pad
  • #147109 So Saffron Ink Pad
  • #147114 Early Espresso Ink Pad
  • #110755 Multipurpose Liquid Glue
  • #152813 Stampin' Seal Adhesive
  • #118485 Clear Block D
  • #118490 Clear Block H
  • #118489 Clear Block G
  • #102300 Bone Folder
  • #103579 Paper Snips
  • #130148 Grid Paper
  • #152392 Paper Trimmer
  • #149653 Stampin' Cut & Emboss Machine
  • #159183 Stylish Shapes Dies
  • #153611 Blending Brushes 
  • Optional: sticky note paper or computer paper


I hope you enjoyed today's card! I hope you give this stamped and sponged Beauty of Friendship card a try! If you need supplies to make this card, please shop my online store HERE

Thanks for stopping by!

Beth
 

Wednesday, May 25, 2022

A Little Hello from Me to You

Today's thinking of you card features the leaves image from the Uniquely Artistic stamp set (#158935) in the 2022-2023 Annual Catalog. I created vertical columns of the leaves in four shades of green - Garden Green, Shaded Spruce, Old Olive, and Pear Pizzazz and added a greeting from the Pansy Patch stamp set (#154999). I randomly picked a spot on the cardstock, stamped a leaf image in Old Olive ink, and added another old olive leaves images above and below the first image. Then I filled in the rest of the Basic White cardstock with the other colors of green ink, rotating the stamp as needed to form the vertical columns.

Uniquely Artistic stamp set hello thinking of you card


I received the Uniquely Artistic stamp set as a prize for attending OnTour in April. OnTour is a Stampin' Up! demonstrators' event where demonstrators get to preview the catalog before it goes live to customers. It is usually held around April and previews the next Annual Catalog. 

This year OnTour was held virtually on Zoom. Stampin' Up! Staff members and demonstrators shared different cards and projects showcasing the new stamps, papers, and embellishments from the annual catalog. We were also able to meet new demonstrators during our break out networking sessions. It was so much fun to see new stamping products and meet new friends! OnTour is one of our yearly events that I look forward to as a demonstrator!

Below are the measurements and supply list for today's Uniquely Artistic card.

Measurements

Card Base: 8-1/2" x 5-1/2"; scored at 4-1/4" (Garden Green Cardstock)
1st Mat: 4" x 5-1/4" (Basic White Cardstock)
Greeting: (Basic White Cardstock)
Greeting Mat: (Old Olive Cardstock)
Inside Mat: 4" x 5-1/4" (Basic White

Supplies

#158935 Uniquely Artistic Stamp Set
#154999 Pansy Patch Stamp Set
#159276 Basic White Cardstock
#102584 Garden Green Cardstock
#100702 Old Olive Cardstock
#147089 Garden Green Ink Pad
#147090 Old Olive Ink Pad
#147104 Pear Pizzazz Ink Pad
#147089 Shaded Spruce Ink Pad
#104430 Dimensionals
#110755 Multipurpose Liquid Glue
#102300 Bone Folder
#103579 Paper Snips
#130148 Grid Paper
#152392 Paper Trimmer
#118490 Clear Block H
#118488 Clear Block I
#154289 Opal Rounds
 
Does attending demonstrator stamping events like OnTour sound like fun? Have you ever thought about becoming a Stampin' Up! demonstrator? Stampin' Up! is offering a fantastic joining special for new demonstrator who join from May 3rd, 2022 to May 31st, 2022.

InColor Starter Kit Joining Special Graphic
 
Join as a new demonstrator from May 3-31, 2022 for $99 USD and receive $125 USD in products in your Starter Kit plus $66.50 USD in 2022-2024 InColor product - InColor Grid Paper, InColor Ink Pad Collection, InColor Cardstock Collection Sampler Pack, and InColor Designer Series Paper Pack free!
 
Promotion Details
In Color Starter Kit 
  • New demonstrators can select any standard eligible Stampin’ Up! products up to the $125 USD │ $165 CAD value for just $99 USD │ $135 CAD. 
  • The Starter Kit includes business resources like catalogues, brochures, order forms, and postcards.
  • New team members who join Stampin’ Up! get to be a part of our amazing community of crafters. Plus, they get to enjoy sharing simple and fun crafting experiences with others, early access to products, and exclusive access to training events.
  • You’ll also get a free Paper Pumpkin kit! 

Additional Details
  • New demonstrators who submit their Independent Demonstrator Agreement (IDA) before 3 May or after 31 May will not be eligible for this promotion.
  • Refer to the Demonstrator Policies document for more information on new team member policies.
  • New team members may not use their team leader’s shipping address to ship their kit.
  • New team members may only pay for their kit using a credit card on which they are listed as an authorized user.
  •  Team leaders should verify that new team members are using their own Social Security Number (US) or Social Insurance Number (CA).
  • Failure to adhere to these rules will likely delay or invalidate your new team members’ sign-up process. 
 
  • Download the InColor Starter Kit PDF Flyer HERE.
 
I hope you enjoyed today's Uniquely Artistic thinking of you card! If you want to recreate this card need some of the stamping supplies, please call me or shop my online store to place an order.
 
If you have any questions about today's card, stamping in general, or about the InColor Starter Kit promotion, please, email me! I would like to help you with your stamping questions and for you to join my demonstrator team!
 
Thanks for stopping by!
Beth

Friday, May 20, 2022

Sending Healing Thoughts with Nature's Harvest Bundle

Sympathy cards are one of the most challenging cards for me. The loss of a loved one is often one of the most heart breaking times in our lives. I do not want to make light of the situation or cause any further grief, but I want to show how much I care for and support the person who is grieving.


Nature's Harvest Sympathy Card

Card decorations and choosing a color palette is difficult for me when designing a card for the loss of a loved one. I feel it should be simple in decoration but tasteful and respectful.

I chose a simple color palette of blues and white to convey a feeling of peace and restfulness and was furthered by the Nature's Harvest greeting stamp.

Below are the measurements and supplies to recreate this Nature's Harvest sympathy card.


Measurements

  • Card Base: 8-1/2" x 5-1/2"; scored at 4-1/4" (Balmy Blue Cardstock)
  • 1st Mat: 3" x 3-3/4" (Night of Navy Cardstock)
  • 2nd Mat: 2-3/4" x 3-1/2" (Basic White Cardstock)
  • Greeting: 1" x 4-1/2" (Balmy Blue Cardstock)
  • Inside Mat: 4" x 5-1/4" (Basic White Cardstock)


Supplies

  • #156495 Nature's Harvest Stamp Set 
  • #156813 Nature's Harvest Bundle
  • #159276 Basic White Cardstock 
  • #146982 Balmy Blue Cardstock
  • #100867 Night of Navy Cardstock
  • #147110 Night of Navy Ink Pad
  • #104430 Dimensionals
  • #144108 Mini Dimensionals
  • #110755 Multipurpose Liquid Glue
  • #102300 Bone Folder
  • #103579 Paper Snips
  • #130148 Grid Paper
  • #152392 Paper Trimmer
  • #149653 Stampin' Cut & Emboss Machine
  • #156504 Harvest Dies
  • #117147 Clear Block B
  • #118484 Clear Block E
  • #118490 Clear Block H


Are sympathy cards difficult for you to make as well? I would love to hear from you about how you make cards for sympathy and the loss of loved ones. Leave me a comment below with your sympathy and loss card ideas.

If you would like to purchase the supplies used for today's card, please call me to place an order or you can shop my online store (link opens in a new window). If you have any questions about today's card, please let me know. I am happy to assist you!

Thanks for stopping by!

Beth
Friday, March 25, 2022

Rainbow of Happiness Pop-Up Card

Today's card is a simple pop-up card featuring the Rainbow of Happiness stamp set and die bundle. This is a card that I created for my demonstrator team's April meeting. Each month between our demonstrator team meetings, I like to send demonstrator team members an envelope with the project pieces, basic instructions, and a photograph. 


Rainbow of Happiness Pop-Up Card Thinking of You Fun Fold Card
 

Team members can assemble the card and embellish it using their favorite stamps, ribbons, and gems. Then we share what we have created at our next team meeting. Everyone's cards use the same card base but are decorated differently. It is super fun to see everyone's unique interpretation, design choices, and embellishments. It never ceases to amaze me how creative they are!


Rainbow of Happiness Pop-Up Card Thinking of You Fun Fold Card
 

The pop-up mechanism is a piece of #155426 Pattern Party Designer Series Paper folded in half and cut to create a small platform for your die cuts and embellishments to sit on. Pattern Party Designer Series Paper is a beautiful, colorful gigantic pack of Designer Series Paper that you can earn as a host or by placing a qualifying customer or demonstrator order. There are 48 total sheets of 12 double-sided patterns! One side is black and white with floral or geometric patterns, and the other side has bolder, more vibrant patterns.


Rainbow of Happiness Pop-Up Card Thinking of You Fun Fold Card
 

I used fellow demonstrator Mary Deatherage's pop-up mechanism cutting dimensions for today's card. However, you can customize the pop-up platform to be wider or narrower depending on the size of the die cut you are using. The remaining measurements and design are my own.


Rainbow of Happiness Pop-Up Card Thinking of You Fun Fold Card

The pop-up platform is a rectangle cut and scored from the center of the designer series paper. The die cut sits on the front of the pop-up platform. The designer series paper is attached to the top and the bottom of the inside of the card base, creating the mechanism and causing the die cut to pop-up when the card is opened.


Rainbow of Happiness Pop-Up Card Thinking of You Fun Fold Card

This pop-up fun fold looks more difficult than it really is and is such an unexpected surprise! I am really looking forward to seeing how the demonstrator team decorates their pop-up cards!

Pop-Up Card Measurements

  • Card Base: 4-1/4" x 11"; scored at 5-1/2"
  • Pop-Up Mechanism: 4-1/8" x 10-3/4"; scored at 5-3/8". Folded in half and cut according to the diagram below.


Rainbow of Happiness Pop-Up Card Thinking of You Fun Fold Card Template Graphic


Pop-Up Card Supplies

Stamps

  • #157721 Rainbow of Happiness Stamp Set
  • #157727 Rainbow of Happiness Bundle (stamp set and die bundle)

Paper

  • #159276 Basic White Cardstock
  • #122924 Pool Party Cardstock
  • #105118 So Saffron Cardstock
  • #155426 Pattern Party Designer Series Paper

Ink

Embellishments

Tools


I hope you enjoyed today's card! If you would like to recreate this card and need any of the supplies, please, visit my online store. If you have any stamping questions, please, don't hesitate to ask!


Thanks for stopping by!

Beth

Wednesday, February 16, 2022

May Good Things Grow Center Stair Card

Spring weather and spring flowers have been on my mind these last few days. It has been so cold and dreary here! I cannot wait until spring when the ground begins to warm, the flowers and plants are beginning to push through the dirt, and all thoughts of snow are a distant memory. Today's card is a springtime center stair fun fold card using the Dragonfly Garden stamp set.


Dragonfly Garden well wishes card center stair card center step card fun fold thinking of you card

The wildflower stamp is my favorite stamp in this set! I love the echinacea flowers and the little daisy-like flowers! The stamp reminds me of a sketch you would see in a natural field notebook or from a botanist. 


Dragonfly Garden Center Stair Card Measurements


Paper

Dimensions

Card Base

Old Olive Cardstock

8-1/2” x 5-1/2”; see template for scoring guide

Center Panel Mat

Basic White Cardstock

4” x 2-3/4”

Dragonfly

Old Olive Cardstock

1” x 1”

Inside Mat

Very Vanilla Cardstock

3” x 5-1/4”


Center Stair Fun Fold Card Template Graphic Center Step Fun Fold Card Template Graphic


There are many ways to arrange the front of this fun fold. I chose the center panel as the focal point and made the center panel layer extend down the card front in order to highlight the long wildflower image. You could also cut cardstock layers for the sides and for the bottom instead of stamping them.


Dragonfly Garden well wishes card center stair card center step card fun fold thinking of you card 


Here is a view of the center stair card from the side. The stair shape is easier to see from this angle. This card stands up on its own very well, making this fun fold a great display card option! I can see this fun fold would make a great get well card, birthday, or Christmas card to display by the bedside, on a table, or on a mantel!


Dragonfly Garden well wishes card center stair card center step card fun fold thinking of you card


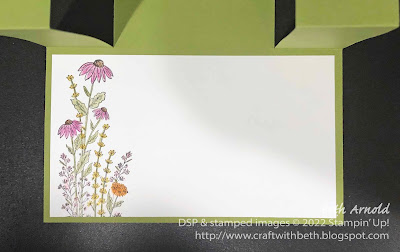
On the inside of the card, I repeated the wildflower image, leaving plenty of room to write a sweet message of encouragement to a loved one!

Dragonfly Garden well wishes card center stair card center step card fun fold thinking of you card 


On the close up of the inside of the card, you can see the soft texture that the watercolor pencils bring to this delicate wildflower image!  

 Check out the step-by-step video tutorial below!


I hope you give this sweet wildflower center stair card a try! I would love to see what you create! Email me a photo of your center stair card, and I may feature your project in my next newsletter!


Thanks for stopping by!

Beth


Dragonfly Garden Center Stair Card Supply List

Stamps

#156224 Dragonfly Garden Bundle

#154411 Dragonfly Garden Stamp Set

Paper

#159276 Basic White Cardstock

#100702 Old Olive Cardstock

Ink

#132708 Memento Tuxedo Black ink pad

#147090 Old Olive ink pad

Embellishments

#144219 Pearls Basic Jewels

Tools

#152392 Stampin’ Trimmer

#102300 Bone Folder

#103579 Paper Snips

Adhesive

Clear Acrylic Blocks

#154240 Dragonflies Punch

#141709 Watercolor Pencils Assortment 1

#149014 Watercolor Pencils Assortment 2