Thursday, September 29, 2016

CASE-ing the Catty: Gingerbread Christmas

The project samples in the Holiday Catalog are fabulous! I could not help but recreate this sweet gingerbread man Christmas card from page 4. Isn't he adorable?!?

Craft with Beth: CASE-ing the Catty Cookie Cutter Christmas Card Candy Cane Lane Baker's Twine Candy Cane Lane Designer Series Paper DSP

This card was quick and easy to make. Here's how I did it. You will need Crumb Cake, Real Red,  and Whisper White cardstock and Candy Cane Lane Designer Series Paper (DSP). Cut the paper to size according to the chart below.

Gingerbread Cookie Christmas Card Measurements

Color
Dimensions
Card Base
Crumb Cake
5-1/2” x 8-1/2”
1st Layer
Candy Cane Lane DSP
3-3/4” x 5-1/4”
Greeting Rectangle
Whisper White
1-1/2” x 4”
Gingerbread Man
Whisper White
3” x 2”
Heart Buttons
Real Red
2” x 2”
Inside Layer
Whisper White
4” x 5-1/4”

Adhere the Candy Cane Lane DSP to the Crumb Cake cardbase.

Then stamp your greeting with Early Espresso ink on the Whisper White rectangle. Stamp the gingerbread man with Crumb Cake ink on a scrap of Whisper White cardstock and punch him out.

Punch two hearts from Real Red cardstock and glue over the gingerbread man's buttons. Add dimensionals to the back of the gingerbread man.

Adhere the gingerbread man and the greeting rectangle to the card base.

Finally, tie a piece of Candy Cane Lane Baker's Twine around the left side of the card base. Your card is ready for giving!

Thanks for stopping by!
Beth


Gingerbread Cookie Christmas Card Project Supply List
Stamps
#143493 Cookie Cutter Christmas Bundle (Photopolymer Stamp Set & Punch)
Paper
#102482 Real Red
#120953 Crumb Cake
#100730 Whisper White
#141981 Candy Cane Lane DSP
Ink
#126974 Early Espresso
#126975 Crumb Cake
Embellishments
#141983 Candy Cane Lane Baker’s Twine
#104430 Stampin’ Dimensionals
Tools
#126199 Stampin’ Pierce Mat

Tuesday, September 27, 2016

September 2016 Paper Pumpkin Alternative Project

This month's kit is awesome! Even if you are only a card maker and not a 3D project maker, this kit is still amazing. There are stamps and embellishments for Halloween and Fall. Here is one of the alternative projects that I created.

Craft with Beth: September 2016 Something Good to Eat Paper Pumpkin Alternative Project Halloween Card Spooky Fun

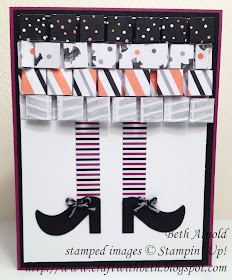
As soon as I saw the striped banner stickers, I saw witchy stockings. I love witch shoes and boots and striped stockings! Check out those shoes! Can you guess what they are made from?!? That's right - the Fox Builder Punch tail! This punch is incredible! Thank you to Melissa Leskovar who taught me how to make the tail into a shoe.

I used the Simply Scoredboard to make the pleats of the witch's skirt. I cut four 12" by 1/2" strips of Halloween Night DSP. Each strip is scored first at 1/4" then at 1/2" more. So, start at 1/4", add 1/2" and score. Then add 1/4" and score. Then add 1/2" and score. That is, score at 1/4", 3/4", 1-1/4", 1-3/4", 2-1/4", and so on until I reached the end of the strip. However, you can create any pleat that is pleasing to you.

Craft with Beth: September 2016 Something Good to Eat Paper Pumpkin Alternative Project Halloween Card Spooky Fun

The inside is stamped with the Something Good to Eat stamp set greeting and the bats from Spooky Fun (another of my favorite Halloween stamp sets). I added two banner stickers to the bottom.

What alternative projects have you made with your September 2016 Something Good to Eat Paper Pumpkin Kit? I would love to see what you make!

Don't forget! World Card Making Day is Saturday, October 1st! Let's celebrate together. I'm holding a FREE Make and Take from 10am to 12pm. Stop on by to make a cute Christmas card and check out some of the Holiday Catalog products in person. I look forward to seeing you!

Thanks for stopping by!
Beth

Friday, September 23, 2016

Sesame Street Side-Step Card

My niece will be turning three this weekend! I cannot believe how quickly she is growing! I created a side step birthday card for her using the Fox Builder Punch with three of her favorite Sesame Street characters - Zoe, Elmo, and Cookie Monster.

Craft with Beth: Side-Step Fold Sesame Street Character Elmo Zoe Cookie Monster Birthday Card Punch Art Fox Builder Punch

I was inspired by the plethora of characters and animals that are on the interest using the Fox Builder Punch! I used the designs from Joanne Hodge for the Elmo and the Cookie Monster. However, Zoe is my own punch art creation.

Craft with Beth: Side-Step Fold Sesame Street Character Elmo Zoe Cookie Monster Birthday Card Punch Art Fox Builder Punch

This is my very first punch art creation! I'm really pleased with the results and astonished by how awesome the Fox Builder Punch truly is! I used the Fox Builder Punch, the small bow die from Santa's Sleigh Thinlits, the heart and small circles from the Owl Builder Punch, the smallest flower from the Blossom Builder Punch, and the 1/8" Circle Punch to create Zoe.

The side step card is perfect to display, so my niece can look at her favorite characters even after her birthday. This is how I made it.

First, cut a piece of cardstock 5-1/2" by 8-1/2. With the 5-1/2" side along the bottom of the paper trimmer, line up the right edge of the paper to the 3" mark. Cut from the 1" line on the trimmer cutting guide to the 6-1/2" line on the trimmer cutting guide. This will make a 5-1/2" slit slightly off center and will help create your stair case.

Craft with Beth: Side-Step Fold Template

Next rotate your cardstock so that the 2-1/2" side is along the bottom of your paper trimmer. You are going to make 5 score lines from the 5-1/2" slit to edge of the cardstock only on the 2-1/2" side. Score at 1", 2", 3-1/4", 4-1/2", and 6-1/2".

Then rotate your cardstock so that the 3" side is along the bottom of your paper trimmer. Score at 4-1/4" from the 5-1/2" slit to the edge of the cardstock.

Fold your card in half just like you would a regular side fold card. Then fold the steps. Fold each score line down and away from you. This will make 3 peaks or steps.

On the front of each step I added a heart embossed piece of Whisper White cardstock.

Step, Front, & Inside Mat Measurements

Color
Dimensions
1st Step Mat
Whisper White
15/16” x 2-3/8”
2nd Step Mat
Whisper White
1-1/8” x 2-3/8”
3rd Step Mat
Whisper White
1-7/8” x 2-3/8”
Front Mat
Whisper White
4-1/8” x 2-3/8”
Inside Mat
Whisper White
4-1/8” x 2-3/8”

Finally, attach your characters.

You can attach flowers, flamingos, fruit, trucks, dinosaurs, snow flakes, Christmas trees, myriads of cute animals, and more to the steps. I bet this would make a gorgeous garden using any of our flowers stamp sets and dies. What embellishments would you choice to attach? I would love to see what you make!

Thanks for stopping by!
Beth


Sesame Street Side-Step Birthday Card Project Supply List
Stamps
#140653 Number of Years (Photopolymer)
Paper
#121045 Basic Black
#102482 Real Red
#131203 Soft Sky
#105117 Pumpkin Pie
#101889 Perfect Plum
#111351 Pink Pirouette
#120953 Crumb Cake
#111350 Pacific Point
#100730 Whisper White
#122922 Wisteria Wonder
Ink
#126985 Wisteria Wonder
#140931 Basic Black Archival
#131261 Neutrals Markers (Chocolate Chip)
Embellishments
#141428 Sweet Sugarplum Ruched Ribbon
Tools
#126889 Stampin’ Trimmer
#126199 Stampin’ Pierce Mat
#137364 Happy Heart TIEF
#118074 Owl Builder Punch
#140312 Blossom Builder Punch
#141470 Fox Builder Punch
#134365 1/8” Handheld Circle Punch