Monday, April 4, 2016

Party Wishes Birthday Gift Card Holder

My team leader Colleen Magness showed us how to make this gift card holder at our March monthly meeting. This was perfect timing for my husband's birthday. My husband loves gift cards! I got him three gift cards to one of his favorite restaurants. He was like a kid in a candy store opening this gift card holder! I really do think that taking the time to make something special for your family and your friends creates a closer bond and community. What other better way is there to show how much you care than on the day your loved ones were born?!

Occasions Catalog 2016 Birthday Gift Card Holder Party Wishes

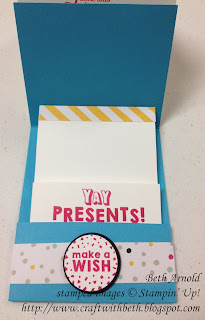
This festive gift card holder features the Party Wishes Bundle from the 2016 Occasions catalog. This bundle was the second top item on my Occasions catalog wish list. The stamps and the punches are fabulous! I also ordered two packs of It's My Party DSP!

Not only does this gift card holder contain a surprise pop up feature, it can hold more than one gift card thanks to the belly band!

Occasions Catalog 2016 Birthday Gift Card Holder Party Wishes

Let's make one! You will need Tempting Turquoise, Whisper White, and Basic Black cardstock and It's My Party DSP Stack. You will also need Melon Mambo, Tempting Turquoise, and Daffodil Delight ink pads and Party Wishes stamp set with coordinating punches.

Here are the project pieces' measurements.

Party Wishes Gift Card Holder Measurements

Color
Dimensions
Gift Card Holder Base
Tempting Turquoise
4-1/4” x 11”
Inside Gift Card Pouch
Whisper White
3-3/4” x 6-3/4”
Belly Band
It’s My Party DSP Stack
1” x 9”
DSP Strip
It’s My Party DSP Stack
½” x 3-3/4”
Outside Decoration Mat
Basic Black
3-1/2” x 3”
Outside Decoration Center
Whisper White
3” x 2-1/2”
Cupcakes, Balloons, & Candle
Whisper White
scrap
Make a Wish Circle
Whisper White
scrap
Make a Wish Circle Mat
Basic Black
scrap

Get out your Stampin' Trimmer and your Score Board. 

Occasions Catalog 2016 Birthday Gift Card Holder Party Wishes

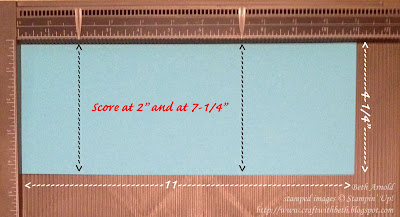
Cut an 11" x 4-1/4" piece of Tempting Turquoise. Place it on your Score Board with the 11" side along the top edge. Score at 2" and at 7-1/4".

Occasions Catalog 2016 Birthday Gift Card Holder Party Wishes

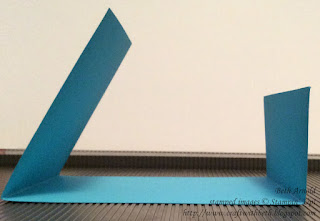
Fold each score line upwards as shown in the photograph above (valley folds). This is the gift card holder base. Put this piece aside for now.

Occasions Catalog 2016 Birthday Gift Card Holder Party Wishes

Cut a 6-3/4" by 3-3/4" piece of Whisper White cardstock. Place it on your Score Board with the 6-3/4" side along the top edge. Score at 1-3/4" and at 6".

Occasions Catalog 2016 Birthday Gift Card Holder Party Wishes

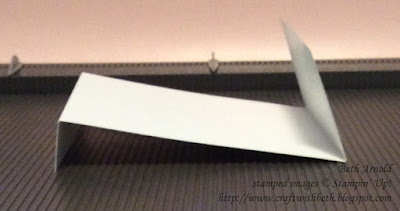
Fold the 1-3/4" score line downwards (mountain fold). Fold the 6" score line upwards (valley fold). This piece forms the pouch the gift card will sit in.

Occasions Catalog 2016 Birthday Gift Card Holder Party Wishes

Stamp Yay Presents! in Melon Mambo ink on the front of the 6" score line end. Stamp the sentiment more towards the top edge. The bottom edge will be tucked into the belly band area and not be seen.

Occasions Catalog 2016 Birthday Gift Card Holder Party Wishes

Cut a 1/2" x 3-3/4" piece of It's My Party DSP Stack. Here I used the diagonal striped design, but you can use any of the designs in this DSP Stack. Glue the DSP to the top but underneath the score line. The cardstock flap passed the DSP strip is what will make the pop up feature. Put this piece to the side to dry for a few minutes.

Occasions Catalog 2016 Birthday Gift Card Holder Party Wishes

Cut a 1" by 9" strip of DSP. I used the polka dot design, but you can use any of the designs in this DSP Stack. This is the belly band that will hold the gift card holder together like a little pocket.

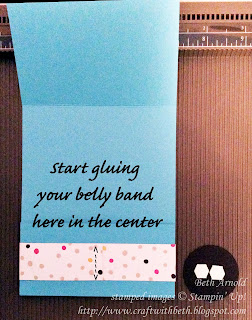
Put liquid glue on the back of the DSP strip. Starting in the center of the gift card holder base, place one end of the DSP strip down, wrap the DSP strip around the back of the gift card holder base, and back around to the center, pressing down along the way. Having the seams meet in the center, will make it easier to hide them later.

Occasions Catalog 2016 Birthday Gift Card Holder Party Wishes

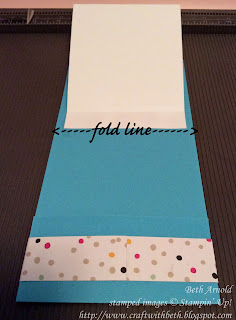
Pick up the Whisper White cardstock pouch. Put some liquid glue on the flap above the DSP strip. Position the flap just above the fold line on the Tempting Turquoise base and adhere. Make sure that the DSP strip and sentiment are facing AWAY from you.

Occasions Catalog 2016 Birthday Gift Card Holder Party Wishes

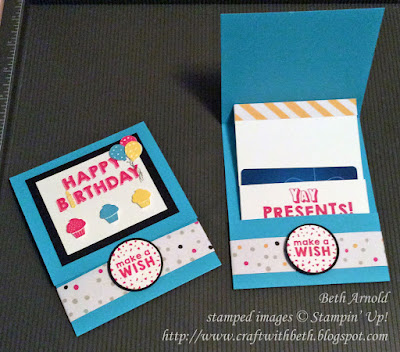
Once the glue is dry, bring the pouch down and tuck it into the belly band pocket. To make the closure, stamp Make a Wish sentiment on scrap Whisper White cardstock using Melon Mambo ink. Punch out the sentiment with a 1-3/8" circle punch. Punch out a 1-1/2" circle from Basic Black cardstock. Put liquid glue on the back of the sentiment and center it on the Basic Black circle. Add some dimensionals to the back of the circle in the center. Place the circle in the center of the belly band. The belly band seams are now hidden!

Occasions Catalog 2016 Birthday Gift Card Holder Party Wishes

Now, let's make the outside decoration! Cut a 3-1/2" by 3" piece of Basic Black cardstock. Cut a 3" by 2-1/2" piece of Whisper White cardstock. Stamp Happy Birthday sentiment using Melon Mambo in toward the top of the Whisper White cardstock.

On scrap Whisper White cardstock, stamp the cupcake and the balloon in each of the following colors: Tempting Turquoise, Melon Mambo, and Daffodil Delight. Stamp the candle in Daffodil Delight. Punch out the cupcakes, the balloons, and the candle.

Adhere the candle with liquid glue to the letter I in birthday. Add a dimensional to the back of each cupcake and each balloon. Adhere them to the Whisper White cardstock as shown in the photograph below or as desired.

Add strings to the balloons using a Stampin' Write marker. In the samples, I used two different markers - Basic Black and Sahara Sand.

Adhere the decorated birthday sentiment to the center of the Basic Black rectangle. Then adhere that to the center of the gift card holder front as shown in the photograph below.

Occasions Catalog 2016 Birthday Gift Card Holder Party Wishes

Slide your gift card in the pouch, and your gift is ready to give! Please let me know if you have questions about how to make this gift card holder.

I appreciate you stopping by!
Beth


Party Wishes Gift Card Holder Project Supply List
Stamps
Party Wishes
Paper
Whisper White Cardstock
Tempting Turquoise Cardstock
Basic Black Cardstock
It’s My Party DSP Stack
Ink
Daffodil Delight Ink Pad
Melon Mambo Ink Pad
Tempting Turquoise Ink Pad
Basic Black Stampin’ Write Marker
Sahara Sand Stampin’ Write Marker
Embellishments
Stampin’ Dimensionals
Tools
Stampin’ Trimmer
Score Board
Bone Folder
Clear Acrylic Block A, C, D, H
Grid Paper
Stampin’ Mist Cleaner
Stampin’ Scrub
SNAIL Adhesive
Multipurpose Liquid Glue
Party Pack Punch Set
1-3/8” Circle Punch
1-1/2” Circle Punch
Click here to start shopping!
 

Thursday, March 31, 2016

Farewell to Sale-A-Bration 2016!

This is the final day of Sale-A-Bration 2016! I can't believe it is here already! I wanted to share one last Sale-A-Bration project with you. The final project is a CASE from the Sale-A-Bration Catalog. It is the gift bag from page 14 featuring the Honeycomb Happiness stamp set.

Craft with Beth: Sale-A-Bration Honeycomb Happiness You're So Sweet Gift Bag

 I wanted to say thank you to all of my customers! I have the best customers! Thank you for helping me achieve and far exceed my Sale-A-Bration goals! I am so appreciative of all of you! Without you this would not have been possible!

I changed the gift bag into a coordinating card. The color scheme is Crumb Cake, Mint Macaron, Whisper White, and Blushing Bride.

Craft with Beth: Sale-A-Bration Honeycomb Happiness You're So Sweet Thank You Card

The card base is stamped with the balloon stamp using Versamark ink then heat embossed with white embossing powder.

The striped banner is from the 2015-2017 In Colors DSP. I cut the striped paper on the diagonal to make the stripes look vertically oriented instead of diagonally oriented. The strip is 2" x about 8". Once the strip was cut, I punched the end using the Triple Banner Punch. I glued the banner on the cardbase, leaving the excess cardstock hanging off the top. After the glue dried, I trimmed the excess cardstock with paper snips.

The ice cream tag is a 2" x 8.5" strip of Whisper White cardstock. I punched one end with the Ornate Tag Topper Punch. I stamped the ice cream in Crumb Cake ink. I stamped the sentiment in Blushing Bride. Once I was happy with the stamping, I trimmed the excess cardstock with the Stampin' Trimmer. To complete the tag, I added a honeycomb embellishment, a little Crumb Cake circle at the top, a bow, and a few rhinestones.

I was so excited about this project, I completely forgot to use the Embossing Buddy. I had a few spots of errant embossing powder. I covered them with rhinestones! Rhinestones make excellent mistake covers!

Craft with Beth: Sale-A-Bration Honeycomb Happiness You're So Sweet Thank You Card

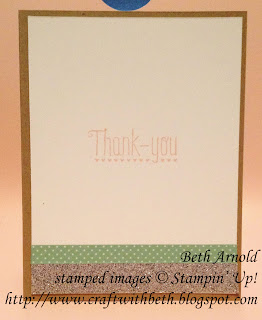
The inside is matted with Whisper White cardstock. The thank you sentiment is from Many Thanks in the Annual catalog. The bottom is lined with Mint Macaron washi tape from the Occasions catalog hostess section and Silver Glimmer Paper.

I hope you have enjoyed Sale-A-Bration as much as I have! There are a few more hours to place your final Sale-A-Bration orders. Click here to start shopping!

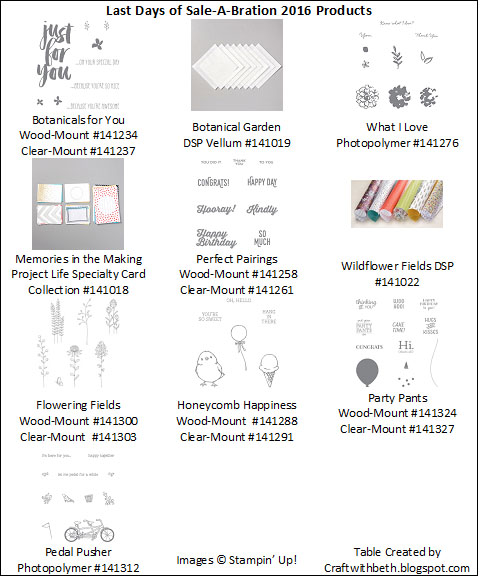
Craft with Beth: Sale-A-Bration Product Chart

I appreciate you stopping by!
Beth

Wednesday, March 30, 2016

The Final Days of Sale-A-Bration 2016!

Today and tomorrow are the last days of Sale-A-Bration! These are the final two days of earning free products with every qualifying order! I am sad that Sale-A-Bration is coming to end for this year, but I also truly enjoyed using all of the free products! I love the Wildflower Fields DSP (Item #141022). I wanted to showcase it one more time before it's gone.

Sale-A-Bration 2016 Wildflower Fields DSP

As you know, one of my goals this year is to improve my gift packaging skills. On my last order, I purchased the Gift Bag Punch Board (Item #135862). I made seven gift bags using the Wildflower Fields DSP and the Gift Bag Punch Board!

Sale-A-Bration 2016 Gift Bag Punch Board Gift Bag Collage

The first gift bag is a medium sized bag. To make the folded over edge, score 1/2" or 1" from the top edge of the bag using your Scoring Board and fold it over to reveal the other side of the DSP. The bow is punched using the Bow Builder punch and Blushing Bride cardstock. A metal rimmed pearl accents the center of the bow (and on sale this week!). The bag is held closed with hook and loop tape.

Sale-A-Bration 2016 Gift Bag Punch Board Gift Bag

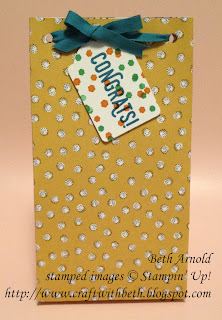
The second gift bag is a large sized bag. I made a taller bag by adding two inches to the width, making the DSP dimensions 8" x 12". If your bag is too tall, the scoring lines on the Gift Bag Punch Board will not fully extend across your DSP. Just flip the DSP around, line up your scoring lines, and complete them. Or, you can use your Scoring Board to complete the scoring lines.

Sale-A-Bration 2016 GIft Bag Punch Board Wildflower Fields DSP

The bag is tied with a cotton ribbon in Island Indigo. A tag stamped with congrats from Perfect Pairings and confetti from Party Pants completes the bag. The congrats is stamped in Island Indigo ink. The confetti is stamped in Tangelo Twist and in Cucumber Crush ink.

The third bag is a medium sized bag. I added Basic Black satin ribbon handles. I added 1/2" circles to reinforce the handles. This is not structurally necessary. I thought it was a cute addition. The balloons are punched using the Balloon Bouquet punch. The sentiment is from Balloon Celebration. It is difficult to tell from the photo, but the sentiment is embossed with black embossing powder. The sentiment banner is made with the Triple Banner punch.

Sale-A-Bration 2016 GIft Bag Punch Board Wildflower Fields DSP

The fourth bag is another large sized bag, but the starting DSP dimensions are 6" x 12". This makes a slightly shorter bag. The bag is tied with a satin ribbon in Pacific Point and also holds a thank you tag. The thank you tag uses the stamp set What I Love.

Sale-A-Bration 2016 GIft Bag Punch Board Wildflower Fields DSP

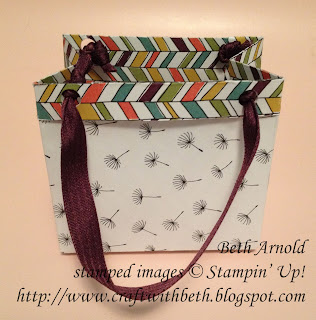
The fifth bag is a small sized bag with a 1/2" folder over edge. I added satin ribbon handles in Blackberry Bliss.

Sale-A-Bration 2016 GIft Bag Punch Board Wildflower Fields DSP

The sixth bag is a medium sized bag with a 1" folded over edge. The bag is closed with a satin ribbon in Basic Black.

Sale-A-Bration 2016 GIft Bag Punch Board Wildflower Fields DSP

The seventh and final bag is a medium sized bag with a 1" folded over edge. The bag is closed with a satin ribbon in Hello Honey. The banner tag is punched using the Triple Banner Punch and stamped with a sentiment from the Perfect Pairings stamp set.

Sale-A-Bration 2016 GIft Bag Punch Board Wildflower Fields DSP

I am working on a few more gift bags and will be sharing them shortly!

Sale-A-Bration 2016 Metallics Glitter Tape

The Metallics Glitter Tape was so popular that it has sold out completely and is no longer available. However, these Sale-A-Bration Products are still available as of this post.

Sale-A-Bration 2016 Product Chart

I hope you have enjoyed Sale-A-Bration as much as I have! There is still today and tomorrow to place your final Sale-A-Bration orders. Click here to start shopping!

I appreciate you stopping by!
Beth

Tuesday, March 29, 2016

Weekly Deals: 3/28/16 - 4/4/16 & Retiring In Color Products Lists

Weekly Deals Title Graphic

Check out this week's deals! This is an awesome week if you have been eying the bigger ticket items like the gift box punch board or the framelit sets!

Weekly Deals: Leaflet Framelits, Hearth & Home Framelits, Metal Rimmed Pearls, Gift Box Punch Board, Hamburger Bigz XL Die

Don't forget that the 2014 - 2016 In Colors are retiring this year. If you love them, buy them now before the mad rush in April. There are a few days left to earn free Sale-A-Bration products with each qualifying order. What a great way to earn free products and stock up on your favorite 2014 - 2016 In Color products! Below are the In Color Products that are retiring at the end of May.

Retiring 2014-2016 In Color Products

In Color embellishments and In Color DSP retire each year. That means, the 2015 - 2017 In Colors Dotted Lace Ribbon and DSP are also retiring. Below are the 2015 - 2017 In Color Products that are retiring this year.

Craft with Beth: Retiring 2015-2017 In Color Products Chart


I appreciate you stopping by! Please let me know of you questions about retiring In Color products.
Beth

Sunday, March 27, 2016

Happy Easter & Easter Bunny Banner

Happy Easter! I hope you are having a wonderful day! I wanted to share one more Easter project with you!

Craft with Beth: Easter Bunny Banner Closeup

Jessica Williams from Stampin' Up!'s Artisan Design Team created an adorable bunny banner using framelits! Jessica used the Circle Framelits to form the body and head and the Flower Faire Framelits to create the ears. Each section of the bunny is cut separately. Start with the body, then cut the head, and finally cut each ear. The framelits overlap each other to form one cohesive bunny shape. Amazing!

Craft with Beth: Easter Bunny Banner Framelits Needed

Jessica's design inspired me to create my own Easter bunny banner!

Craft with Beth: Easter Bunny Banner Completed

I used the Party Pennants Bigz Die (on the Clearance Rack) to die cut each of the banner pennants. I wanted something more pastel for this project, so I used Wisteria Wonder, Marina Mist, Pink Pirouette, Soft Sky, So Saffron, Wild Wasabi, and Crumb Cake cardstock as a base for the pennants.

Craft with Beth: Easter Bunny Banner Party Pennants Bigz Die

Once the banner pennants were cut, I started cutting the bunny. Using a Crumb Cake pennant, place the fourth Circle Framelit from the center at the bottom of the banner and run it through the Big Shot machine.

Craft with Beth: Easter Bunny Banner How to Cut the Bunny Pennant

Place the second Circle Framelit from the center at the top of and slightly overlapping the body circle. Run it through the Big Shot machine.

Craft with Beth: Easter Bunny Banner How to Cut the Bunny Pennant
 
Position the smallest petal above the head and a bit to the left. Run it through the Big Shot machine.

Craft with Beth: Easter Bunny Banner How to Cut the Bunny Pennant

Position the smallest petal above the head and a bit to the right. Run it through the Big Shot machine.

Craft with Beth: Easter Bunny Banner How to Cut the Bunny Pennant

This is a bit time consuming but well worth the effort! I really admire the creativity that went into figuring out how to make this bunny! It makes me wonder what other animals can be made with framelits!

Craft with Beth: Easter Bunny Banner How to Cut the Bunny Pennant

Cut another banner pennant in a contrasting color to back the bunny cutout.

Craft with Beth: Easter Bunny Banner How to Cut the Bunny Pennant

Glue the bunny cutout to the contrasting banner pennant. If you do not like the look of the extra embossing line from the framelits, flip the bunny cutout over. Voila! No extra embossing lines show.

Craft with Beth: Easter Bunny Banner How to Cut the Bunny Pennant

You can add a pom pom or a honeycomb embellishment as the tail. I used Whisper White Baker's Twine to make a pom pom.

Craft with Beth: Easter Bunny Banner How to Cut the Bunny Pennant

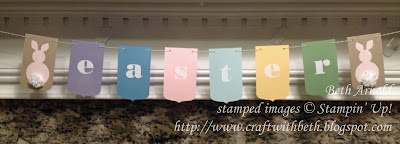
For the other banner pennants, I wanted something simple but festive. I stamped each letter with Versamark and embossed them with white embossing powder.

Craft with Beth: Easter Bunny Banner How to Complete the Letter Pennants

The holes are punched with 1/8" circle punch. Then I strung each pennant with Old Olive Baker's Twine.

Craft with Beth: Easter Bunny Banner Completed

I hope you have a terrific Easter!

Thanks for stopping by!
Beth


Easter Bunny Banner Project Supply List
Stamps

Paper
Crumb Cake Cardstock
Wisteria Wonder Cardstock
Marina Mist Cardstock
Pink Pirouette Cardstock
Soft Sky Cardstock
So Saffron Cardstock
Wild Wasabi Cardstock
Subtles Designer Series Paper Stack
Ink
Versamark Ink Pad
Embellishments
Old Olive Baker’s Twine
Whisper White Baker’s Twine
White Embossing Powder
Tools
Stampin’ Trimmer
Paper Snips
Bone Folder
Clear Acrylic Block B
Grid Paper
Stampin’ Mist Cleaner
Stampin’ Scrub
Big Shot Die Cutting Machine
Circles Framelit Dies
Flower Faire Framelit Dies
Party Pennants BIgz Die
Multipurpose Liquid Glue
Embossing Buddy
Heat Tool
1/8” Handheld Circle Punch
Click here to start shopping!