Tuesday, March 24, 2020
NEW Sale-A-Bration Products Added!
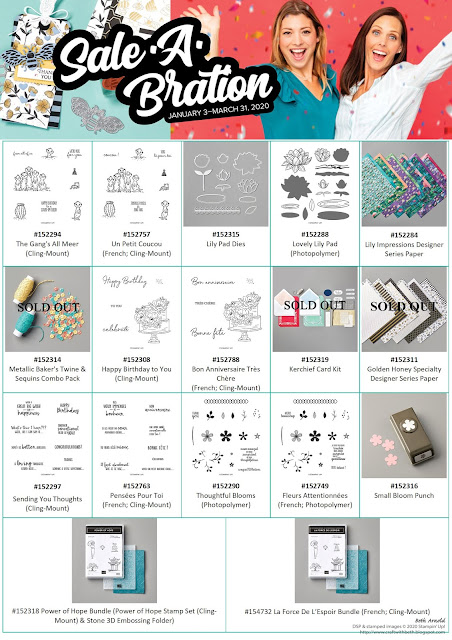
Stampin' Up! has added 9 new products that you can earn for FREE during the last week of Sale-A-Bration! These 9 products come from the 2019-2020 Annual Catalog and are in addition to the previously released Sale-A-Bration products.
Please note that for these Annual Catalog products, there are special Sale-A-Bration item numbers that need to used when you place your order, so that the products register as free. I recommend printing the graphic below or the promotion flyer and keep it handy to refer to when placing your order.
Below is a graphic of each of the new Sale-A-Bration additions!
We are in our final week of Sale-A-Bration and Coordination Products! If there is something that you have had your eye on, now is the time to place your order! I don't want you to miss out on your favorite Sale-A-Bration and Coordination Products!
Here is a refresher of all of the available previously released Sale-A-Bration and Coordination Product stamping goodies!
The Little Ladybug stamp set will only be available for one more week too! There is still time to host a workshop or place a single qualifying $300 order or more to earn the Little Ladybug stamp set for FREE! Don't miss out on this adorable stamp set!
The Sale-A-Bration Joining Special also ends on March 31st, 2020. This is one of the best joining specials that I have seen since I joined as a demonstrator!
The mini paper trimmer is so handy for smaller pieces of cardstock and designer series paper! The Designer Series Paper Sampler Pack is just full of gorgeous patterns! Best of all, you get to choose a FREE stamp set (minus Sale-A-Bration sets and Host sets)! What a phenomenal special!
I would love for you to be a part of my team the Purrfect Stampers and the Stampin' Up! community!
Thanks for stopping by!
Beth
Wednesday, March 18, 2020
Outdoor Barbecue Masculine Birthday Card
My husband grew up in Texas where beef is king of the meats in BBQ. Needless to say, he loves beef! I think he would eat it at every meal, even dessert! When I saw the Outdoor Barbecue stamp set in the January-June Mini Catalog, I knew this would be the stamp set that I would create all kinds of projects for my husband.
This is the card that I created for my husband's birthday and was the first project that I thought of when I saw Outdoor Barbecue in the catalog! I imagined a grill that you could lift up the top to reveal a birthday message inside!
To achieve an operable grill lid, I knew it had to be stamped in multiple pieces. I first stamped the grill image onto Whisper White cardstock with Memento Tuxedo Black ink and will act as the base for the operable grill lid.
Then I stamped the grill image a second time onto Smoky Slate cardstock with Basic Gray ink. I cut out the top section of the grill with my paper snips. Then I cut the grill top in half horizontally to separate the bottom of the grill from the lid of the grill. I scored the top of the grill lid with my paper trimmer to create a hinge. I glued the hinge area right over top of the first grill. Next I glued the bottom of the grill over top of the bottom of the first grill.
I stamped the "holy smokes; it's your birthday" greeting onto a scrap of Whisper White cardstock and fussy cut it with my paper snips. You could mask the greeting or use your Stampin' Write Marker to ink half of the greeting at a time. However, the writing is so close that it very difficult to separate the lines of text.
The Poppy Parade gingham designer series paper, from the Brights Designer Series Paper Pack, adds to the cookout theme too.
The ketchup bottle and the hamburger images are repeated on the inside of the card to connect the outside homemade designer series paper on the front. You could also draw in a plate with the Stampin' Blends underneath the hamburger or add a strip of the Poppy Parade gingham patterned paper below the stamped images to create a tablecloth look. How cute would that be!?
Have you tried the Outdoor Barbecue stamp set in the January-June Mini Catalog yet? What stamps in this set are your favorites? I would love to see what you have created with the Outdoor Barbecue stamp set! Post a project photo on my Facebook Page today!
Thanks for stopping by!
Beth
Outdoor Barbecue Masculine
Birthday Card
|
|
Stamps
|
#151553 Outdoor Barbecue
(Cling-Mount)
|
Paper
|
#100730 Whisper White
Cardstock
#111350 Pacific Point
Cardstock
#131202 Smoky Slate
Cardstock
#149613 Brights Designer
Series Paper
|
Ink
|
#132708 Memento Tuxedo
Black Ink Pad
#149165 Basic Gray Ink Pad
#147113 Smoky Slate Ink
Pad
#147115 Soft Suede Ink Pad
#147084 Real Red Ink Pad
#147273 Soft Suede Stampin’
Blends Combo Pack
#145058 Smoky Slate
Stampin’ Blends Combo Pack
#147274 Granny Apple Green Stampin' Blends Combo Pack
#149555 Light So Saffron Stampin' Blend
#147275 Poppy Parade Stampin' Blend Combo Pack
|
Embellishments
|
#104430 Dimensionals
#146282 Metallic Pearls
|
Tools
|
#152392 Stampin’ Trimmer
#102300 Bone Folder
#126200 Stampin’ Scrub
#102394 Stampin’ Mist
#103579 Paper Snips
#110755 Tombow Mono Multi
Liquid Glue
Corresponding Clear
Acrylic Blocks
Die Cutting Machine
#148551 Stitched
Rectangles Dies
|
Sunday, March 8, 2020
Second Sunday Sketches #11 Starts Today!
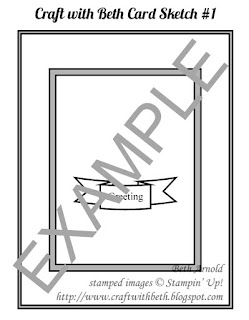
It is time for another Second Sunday Sketches challenge! If you are new to Second Sunday Sketches, please review the rules here or below. Each second Sunday of the month, I will post a card sketch. A sketch is graphic or drawing of how the elements of a card are layed out.
You will then use the sketch as a guide to create your own card. Your card must be a new creation and reflect the challenge guidelines. Your card must include the major elements of the card sketch, such as the number of layers and the general position of the embellishments and/or die cuts. You can rotate the sketch for a top-folding card or for a side-folding card.
You choose the occasion and the color palette as well as the stamp set(s) and the embellishments. I do ask that you use Stampin' Up! products (current or retired).
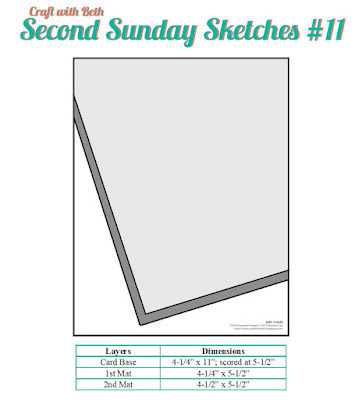
The measurements will also be included in the blog post for each Second Sunday Sketches sketch challenge. You can use the measurements as given or increase them or decrease them. For example, if a greeting is stamped on a 1" circle on the sketch, but the greeting you choose is 1-3/4", then increase the size of the circle to 1-3/4". You can also change the shape. Instead of a circle, you can use an oval, a square, a daisy punch, etc.
The challenge will run from the second Sunday of the month until the last day of that month.
This Month's Card Sketch
Below is March's card sketch.Challenge Dates
March's challenge will run from March 8th, 2020 until March 31st, 2020 at 5pm EST.If you would like to participate in the Second Sunday Sketches sketch challenge, please create a card using the sketch above and email me a photo of your card by March 31st, 2020 at 5pm EST with the subject line Second Sunday Sketches Entry.
Prize Drawing
The day after the last day of the month (April 1st), I will place all of the names of the participants in a hat and randomly draw a winner. The winner will receive a prize! The prize each month will change and will be announced at the start of each challenge. March's Second Sunday Sketches sketch challenge prize is Item #151327 Peaceful Poppies Elements and three hand-made cards from me.Winner Announcement
If you are the winner, I will notify you by email. Please respond to my email with your complete mailing address, and I will mail you your prize! If the winner does not respond to my email within 7 days, I will draw another winner.I will also post all of the entries on my blog (with your names attached to the photos) and the name of the winner.
Card Sketch Sample
Here is a sample of how I interpreted this card sketch using the Best Dressed Designer Series Paper, the Daisy Punch, and the Timeless Tulips stamp set. I made the Designer Series Paper the main focal area of the card front and embellished it with a Highland Heather daisy.Second Sunday Sketches #11 Card Assembly Tip: When you create your own card, the rectangular mats will over hang the card front edges. Once you are satisfied with the placement of the first mat, adhere it to the card front and then trim the cardstock that overhangs the card front edges. You can add more adhesive after trimming as needed. Then place, adhere, and trim the second mat.
Some Ideas on How to Make this Card Sketch Your Own
There are many ways to change this card to make it your own! You can rotate the card layout 90 degrees, decrease the sizes of the mats, flip the angle of the mats, use an embossing folder on one of the mats, and more!Share Second Sunday Sketches with a Friend
Be sure to join in on the fun and share with a friend! Starting in March 2020, if you enter the Second Sunday Sketches challenge, you can get a bonus surprise prize by sharing this challenge with a friend and having your friend submit their card entry (for US residents only)! Here's how to get a bonus surprise prize. Limit two bonus surprise prizes per person per month. Bonus surprise prizes will be sent out on the first of the following month (the same day the winner is announced or the next business day).- Enter into this month's Second Sunday Sketches challenge
- Share this month's Second Sunday Sketches challenge with a friend (that hasn't participated before)
- Have your friend submit their this month's challenge card entry
- Email me that your friend has submitted their card entry. Submit your complete mailing address and the name of the friend that you shared with. I will confirm their entry and then send you a bonus surprise prize.
I am looking forward to seeing your personal take on the tenth Second Sunday Sketches sketch challenge! If you have any questions about this card sketch challenge, please let me know! I am happy to assist!
Happy Stamping!
Beth
Wednesday, March 4, 2020
Fable Friends Easter Greeting Z-Fold Card
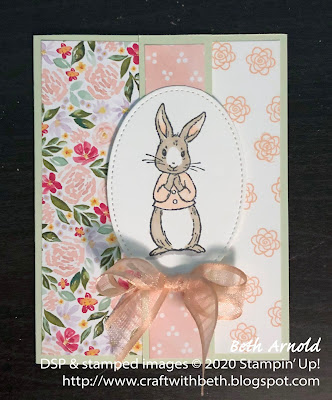
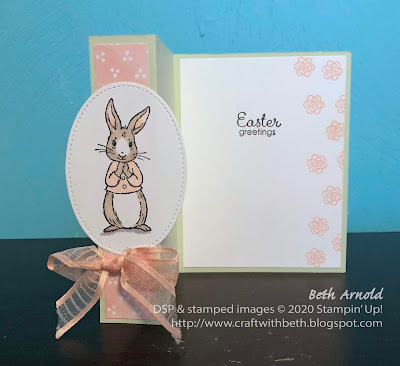
Today's project is an Easter z-fold card featuring the Fable Friends stamp set. I saw a similar card to today's project on Pinterest that I had to recreate! It was so beautiful! Unfortunately, I didn't pin it and do not recall who the originator of this z-fold Easter card is. If you know who originally layed out this card using the Fable Friends stamp set and the large pink bow in the front, please, let me know. I would love to credit you.
I didn't have all of the same stamps and designer series papers as the original card, so I substituted with a similar floral stamp from the Varied Vases stamp set and the Best Dressed Designer Series Paper.
I used the Varied Vases stamp set for the Petal Pink flowers on the right side of the card to create a decorative border to add interest when the card is closed and on display. The flowers stamps in Varied Vases are so delicate and pair well with the Best Dressed Designer Series Paper.
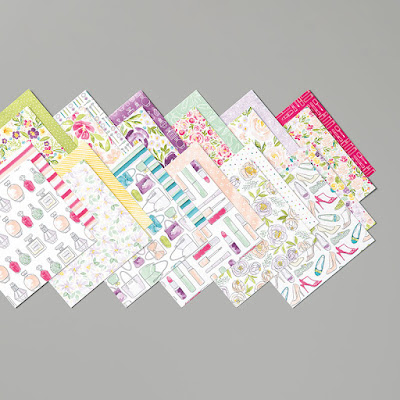
At first glance, the Best Dressed Designer Series Paper does not strike me as an Easter-themed patterned paper.
However, if you flip the paper over to the back, you will see soft floral patterns and pastel backgrounds with stripes and polka dots that are more traditionally associated with spring and Easter.
Both sides of the Best Dressed Designer Series Paper go so well together as well as separately, stretching this designer series paper pack's versatility and possibilities even further! Occasions and holidays such as birthdays, Mother's Day, anniversaries, girls' day out invitations, birthday invitations, and more come to mind! I know my niece would love to receive a card with perfume and lipstick themed patterned paper on it! She is really into make up and fashion!
I love this paper so much that I bought two packs and am planning on purchasing a third before the January-June Mini Catalog sales period ends at the beginning of June!
The z-fold fun fold card base is easy to create. The measurements are listed below.
Start with an 8-1/2" by 5-1/2" card base and score at 1-1/4" and at 4-1/4". Fold the card in half at the 4-1/4" score line and burnish the score line.
Then, with the card base still folded, fold the 1-1/4" score line back towards you, like you are partially opening a book's cover. Burnish the 1-1/4" score line.
Stamp the small 6-petal flower image from Varied Vases with Petal Pink ink randomly down the right side of the inside mat. Stamp the "Easter greetings" image with Memento Tuxedo Black ink in the upper center of the inside mat and adhere the inside mat to the inside of the card base.
Next adhere the Best Dressed Designer Series Paper pieces to the card base. Adhere the 1st Designer Series Paper Mat to the outside of the card base as shown below.
Adhere the 2nd Designer Series Paper Mat to the narrow area between the edge of the card base and the 1-1/4" score line.
Stamp the bunny image onto a piece of Whisper White cardstock and color the bunny image in with Dark and Light Petal Pink and Dark and Light Crumb Cake Stampin' Blends. Die cut the bunny image with the largest stitched oval die. Adhere the stitched oval die cut to the center of the narrow area between the edge of the card base and the 1-1/4" score line, as shown in the photograph above.
Tie a bow from the Petal Pink Organdy Ribbon and adhere with glue dots(r) beneath the stitched oval die cut.
I hope you give the z-fold fun fold a try! There are many ways to customize this z-fold card! You can change color palette, the occasion, the embellishments, and more to really make this card your own! How will you decorate your z-fold card? I would love to see what you create! Post a project photo on my Facebook page today!
If you would like to purchase the supplies I used to create this card, please use the supply list below to shop in my online store. I would love to be your Stampin' Up! demonstrator!
Thanks for stopping by!
Beth
I didn't have all of the same stamps and designer series papers as the original card, so I substituted with a similar floral stamp from the Varied Vases stamp set and the Best Dressed Designer Series Paper.
I used the Varied Vases stamp set for the Petal Pink flowers on the right side of the card to create a decorative border to add interest when the card is closed and on display. The flowers stamps in Varied Vases are so delicate and pair well with the Best Dressed Designer Series Paper.
At first glance, the Best Dressed Designer Series Paper does not strike me as an Easter-themed patterned paper.
However, if you flip the paper over to the back, you will see soft floral patterns and pastel backgrounds with stripes and polka dots that are more traditionally associated with spring and Easter.
Both sides of the Best Dressed Designer Series Paper go so well together as well as separately, stretching this designer series paper pack's versatility and possibilities even further! Occasions and holidays such as birthdays, Mother's Day, anniversaries, girls' day out invitations, birthday invitations, and more come to mind! I know my niece would love to receive a card with perfume and lipstick themed patterned paper on it! She is really into make up and fashion!
I love this paper so much that I bought two packs and am planning on purchasing a third before the January-June Mini Catalog sales period ends at the beginning of June!
The z-fold fun fold card base is easy to create. The measurements are listed below.
Fable Friends Easter Greeting Z-Fold Card Measurements
|
||
Paper
|
Dimensions
|
|
Card Base
|
Soft Sea Foam
Cardstock
|
8-1/2” x
5-1/2”; scored at 4-1/4” & at 1-1/4”
|
1st Mat
|
Best Dressed
DSP
|
2-3/4” x 4”
|
2nd Mat
|
Best Dressed
DSP
|
1” x 4”
|
Stitched Oval
|
Whisper White
Cardstock
|
3” x 4”
|
Inside Mat
|
Whisper White
Cardstock
|
4” x 5-1/4”
|
Start with an 8-1/2" by 5-1/2" card base and score at 1-1/4" and at 4-1/4". Fold the card in half at the 4-1/4" score line and burnish the score line.
Then, with the card base still folded, fold the 1-1/4" score line back towards you, like you are partially opening a book's cover. Burnish the 1-1/4" score line.
Stamp the small 6-petal flower image from Varied Vases with Petal Pink ink randomly down the right side of the inside mat. Stamp the "Easter greetings" image with Memento Tuxedo Black ink in the upper center of the inside mat and adhere the inside mat to the inside of the card base.
Next adhere the Best Dressed Designer Series Paper pieces to the card base. Adhere the 1st Designer Series Paper Mat to the outside of the card base as shown below.
Adhere the 2nd Designer Series Paper Mat to the narrow area between the edge of the card base and the 1-1/4" score line.
Stamp the bunny image onto a piece of Whisper White cardstock and color the bunny image in with Dark and Light Petal Pink and Dark and Light Crumb Cake Stampin' Blends. Die cut the bunny image with the largest stitched oval die. Adhere the stitched oval die cut to the center of the narrow area between the edge of the card base and the 1-1/4" score line, as shown in the photograph above.
Tie a bow from the Petal Pink Organdy Ribbon and adhere with glue dots(r) beneath the stitched oval die cut.
I hope you give the z-fold fun fold a try! There are many ways to customize this z-fold card! You can change color palette, the occasion, the embellishments, and more to really make this card your own! How will you decorate your z-fold card? I would love to see what you create! Post a project photo on my Facebook page today!
If you would like to purchase the supplies I used to create this card, please use the supply list below to shop in my online store. I would love to be your Stampin' Up! demonstrator!
Thanks for stopping by!
Beth
Fable Friends Easter
Greetings Z-Fold Card Supply List
|
|
Stamps
|
#148670 Fable Friends
(Cling-Mount)
#146644 Varied Vases
(Photopolymer)
|
Paper
|
#100730 Whisper White
Cardstock
#146988 Soft Sea Foam
Cardstock
#151319 Best Dressed Designer Series Paper
|
Ink
|
#132708 Memento Tuxedo Black
Ink Pad
#147108 Petal Pink Ink Pad
#147272 Petal Pink Stampin’
Blends Combo Pack
#144601 Crumb Cake Stampin’
Blends Combo Pack
|
Embellishments
|
#149441 5/8” Petal Pink Organdy Striped Ribbon
|
Tools
|
#152392 Stampin’ Trimmer
#102300 Bone Folder
#103579 Paper Snips
#152323 Stitched Shapes
Dies
|
Subscribe to:
Comments (Atom)


