This month's kit is awesome! Even if you are only a card maker and not a 3D project maker, this kit is still amazing. There are stamps and embellishments for Halloween and Fall. Here is one of the alternative projects that I created.
As soon as I saw the striped banner stickers, I saw witchy stockings. I love witch shoes and boots and striped stockings! Check out those shoes! Can you guess what they are made from?!? That's right - the Fox Builder Punch tail! This punch is incredible! Thank you to Melissa Leskovar who taught me how to make the tail into a shoe.
I used the Simply Scoredboard to make the pleats of the witch's skirt. I cut four 12" by 1/2" strips of Halloween Night DSP. Each strip is scored first at 1/4" then at 1/2" more. So, start at 1/4", add 1/2" and score. Then add 1/4" and score. Then add 1/2" and score. That is, score at 1/4", 3/4", 1-1/4", 1-3/4", 2-1/4", and so on until I reached the end of the strip. However, you can create any pleat that is pleasing to you.
The inside is stamped with the Something Good to Eat stamp set greeting and the bats from Spooky Fun (another of my favorite Halloween stamp sets). I added two banner stickers to the bottom.
What alternative projects have you made with your September 2016 Something Good to Eat Paper Pumpkin Kit? I would love to see what you make!
Don't forget! World Card Making Day is Saturday, October 1st! Let's celebrate together. I'm holding a FREE Make and Take from 10am to 12pm. Stop on by to make a cute Christmas card and check out some of the Holiday Catalog products in person. I look forward to seeing you!
Thanks for stopping by!
Beth
Showing posts with label pleat fold. Show all posts
Showing posts with label pleat fold. Show all posts
Tuesday, September 27, 2016
Wednesday, June 29, 2016
Curtain Fold Thank You Card Two Ways
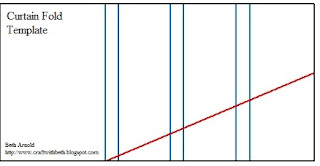
I love fun folds! They add a lot of interest and dimension to paper crafting projects! This thank you card features the curtain fold (also called the pleated fold). The curtain fold mimics the pleats in a curtain being drawn open.
This effect is made by adding score lines at specific intervals or at alternating intervals. I have seen many different measurements for this fun fold.
For this card, I cut a 3" x 6" piece of Playful Palette DSP. I scored it at 2", 2-1/4", 3-1/4", 3-1/2", 4-1/2", and 4-3/4". Then I measured 1-1/4" from the top right corner and made a mark. I lined up this mark with the 2" score line in the cutting track of the trimmer and cut. Next, I folded each pleat and adhered them in place.
I think the widths of and the number of pleats are personal choice. Try varying the width and number of pleats until you find what is most pleasing to you.
For the inside, I cut a 4" x 5-1/4" Very Vanilla matte and a 1" x 4" Playful Palette DSP strip. I wasn't entirely happy with the front of the card. I had already glued everything down and could not move anything without tearing the paper. So, I made a second curtain fold card.
Instead of a plain piece of Very Vanilla underneath the curtain, I embossed the Very Vanilla with the Elegant Dots TIEF. I also changed the flower and added a pearl. The inside is the same except I used the back of the DSP used in the first card. I also changed the mark on the upper right corner to 1" instead of 1-1/4".
I hope you give the curtain fold a try! I would love to see what you make!
Thanks for stopping by!
Beth
Curtain Fold Card Card Project
Supply List
|
|
Stamps
|
One Big Meaning
Flower Shop
|
Paper
|
Very Vanilla
Basic Black
Playful
Palette DSP Stack
Sweet
Sugarplum
Emerald Envy
|
Ink
|
Sweet
Sugarplum ink pad
Basic Black
Archival ink pad
|
Embellishments
|
Basic Pearl
Elements
Emerald Envy
Ruched Ribbon
|
Tools
|
Stampin’
Trimmer
Scoreboard
Bone Folder
Clear
Acrylic Block C
Grid Paper
Paper Snips
Stampin’
Mist Cleaner
Stampin’
Scrub
Stampin’
Pierce Mat
SNAIL
Adhesive
Pansy Punch
Elegant Dots
TIEF
|
Click here to start
shopping!
|
|
Subscribe to:
Comments (Atom)


