Monday, February 17, 2020

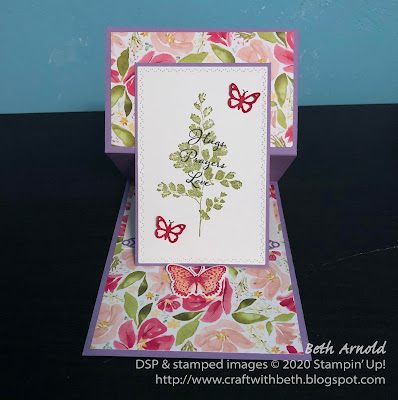
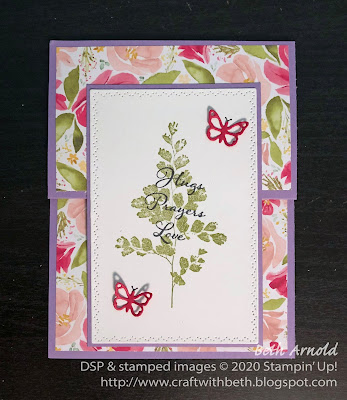
Positive Thoughts Reverse Easel Card

I saw the Reverse Easel Card fun fold on Sam Calcott's website. I had never seen the Reverse Easel Card fold before and was inspired by Sam's card to try this intriguing fun fold!

I created a thinking of you card using the Positive Thoughts stamp set (Item #151490) and the coordinating Nature's Thoughts Dies (Item #153586). The Nature's Thoughts Dies was the first Coordination Project I had to have!

If you love the Nature's Thoughts Dies too, please, place your order soon! The Nature's Thoughts Dies are only available until March 31st or while supplies last!

Craft with Beth: Stampin' Up! card stamping fun fold reverse easel card positive thoughts stamp set all dressed up designer series paper butterflies floral flowers cheery

The Reverse Easel Card is, essentially, the same as the regular Easel Card, except that the 2-3/4" score line is folded in the opposite direction. This small change makes the card base look taller and more elongated. It is a unique way to display a card!

I also think that folding the 2-3/4" score line in the opposite direction shows off more of the upper section of the card base, which means more places to add my new favorite designer series paper, Best Dressed Designer Series Paper (Item #151319)!

Craft with Beth: Stampin' Up! card stamping fun fold reverse easel card positive thoughts stamp set all dressed up designer series paper butterflies floral flowers cheery

The Bested Dressed Designer Series Paper is too gorgeous to cover up! So, I made the inside greeting area smaller to highlight the spring-time flower pattern!

The inside greeting area features the intricate lace die that is part of the Nature's Thoughts Dies and makes a delicate pair with the Best Dressed Designer Series Paper.

Craft with Beth: Stampin' Up! card stamping fun fold reverse easel card positive thoughts stamp set all dressed up designer series paper butterflies floral flowers cheery

I applied Clear Wink of Stella all over the butterfly die cut that acts as the card's stopper. However, I didn't intend for my butterfly to be filled in with a lighter shade of red ink. I had recently used my Clear Wink of Stella with Poppy Parade ink on a Painted Poppies card and forgot to clean the brush. There was still some leftover Poppy Parade ink on the brush tip when I painted the butterfly die cut.

Whoops. It turned out beautiful anyway!

Craft with Beth: Stampin' Up! card stamping fun fold reverse easel card positive thoughts stamp set all dressed up designer series paper butterflies floral flowers cheery

Since the Reverse Easel Card can stand up on its own and be displayed, I put the personal message area on the back of the card between the 2-3/4" score line and the 5-1/2" score line to keep your personal message more private.

Craft with Beth: Stampin' Up! card stamping fun fold reverse easel card positive thoughts stamp set all dressed up designer series paper butterflies floral flowers cheery

The Reverse Easel Card can be folded flat and mailed in a regular-sized card envelope. Next time I make this fun fold, I would center the front panel more when the card is closed.

Craft with Beth: Stampin' Up! card stamping fun fold reverse easel card positive thoughts stamp set all dressed up designer series paper butterflies floral flowers cheery template

Above is a template that I made to illustrate how to cut and assemble the card base and front panel.

To make the designer series paper mats subtract 1/4" from the total width and from the total length of the area to be matted on the card base.

For example, let's make a mat for the inside of the card. The width of the card base here is 4-1/4". Subtract 1/4", which gives you 4" for the width of the inside mat. The length of the card base here is 5-1/2". Subtract 1/4", which gives you 5-1/4" for the length of the inside mat. So, for the inside mat, you would cut a 4" x 5-1/4" piece of the Best Dressed Designer Series Paper.

If you would like your border to be smaller, subtract 1/8" from the total width and from the total length of the area to be matted on the card base.

I hope you give the Reverse Easel Card a try! What designer series paper and stamps will you use to decorate your Reverse Easel Card? I would love to see what you create! Post your project photos on my Facebook page!

Thanks for stopping by!
Beth

Positive Thoughts Reverse Easel Card
Stamps
#151490 Positive Thoughts (Cling-Mount)
Paper
#100730 Whisper White Cardstock
#115320 Melon Mambo Cardstock
#146986 Highland Heather Cardstock
#151319 Best Dressed Designer Series Paper
Ink
#132708 Memento Tuxedo Black Ink Pad
#147090 Old Olive Ink Pad
#147051 Melon Mambo Ink Pad
#147050 Poppy Parade Ink Pad
#100082 Basic Black Stampin’ Write Marker
Embellishments
#104430 Dimensionals
#141897 Clear Wink of Stella
Tools
#152392 Stampin’ Trimmer
#102300 Bone Folder
Die Cutting Machine
#153586 Nature’s Thoughts Dies
 

Wednesday, February 12, 2020

Outdoor Barbecue Pocket Card Invitation

It is still winter, but I am dreaming of the warm summer months when my husband and I can grill outside in the backyard! My husband's favorite food to grill is steak. I like grilled zucchini, mushrooms, tomatoes, and flatbread pizzas! I can smell the char from the grill marks already! Yum! In my mind I am planning our first cookout...

Craft with Beth: Stampin' Up! Outdoor Barbecue stamp set card invitation pocket card invitation bbq

 ...and designing the invitations!

I was inspired by the pocket card invitation sample featuring the Outdoor Barbecue stamp set in the 2019-2020 Annual Catalog.

Craft with Beth: Stampin' Up! Outdoor Barbecue stamp set card invitation pocket card sample from the 2019-2020 Annual Catalog graphic

I mimicked the angle of the pocket card above by angling the Whisper White cardstock on the Pacific Point designer series paper on the front of the invitation base.

I stamped each of the grilled food stamps in Crushed Curry, Cherry Cobbler, Soft Suede, and Garden Green inks across the Whisper White cardstock. I imagined a gingham tablecloth with all of the grilled food spread out on the table with my family and friends gathered around to share a meal together.

Craft with Beth: Stampin' Up! Outdoor Barbecue stamp set card invitation pocket card invitation bbq

The base of the pocket card is created from a 9-1/4" by 6" piece of Crumb Cake cardstock. I scored it parallel to the 9-1/4" side at 5/8" and to the 6" side at 2-3/4" and at 7".

Craft with Beth: Stampin' Up! Outdoor Barbecue stamp set card invitation pocket card invitation bbq template

Remove the lower left and lower right tabs as shown in the template above. Then notch the lower middle tab as shown in the template above. Fold and burnish the scored lines well.

Add strong glue such as Tombow multi liquid glue or Tear and Tape Adhesive vertically from the topmost right edge to the bottom most right edge on the back of the card base (on the rightmost panel between the 7" score line and the rightmost edge of the cardstock) and horizontally along the back of the middle lower tab. Remove the adhesive backings.

With the back of the card base facing up, fold the left panel in to the center of the card base. Then fold the right panel in to the center of the card base. Finally, fold bottom tab up and press into place.

Craft with Beth: Stampin' Up! Outdoor Barbecue stamp set card invitation pocket card invitation bbq

For the pull tab at the top, I sandwiched two Crushed Curry cardstock circles between the front and the back of the card for added strength and stamped the "You're Invited" greeting with Memento Tuxedo ink at the top of the circle, so it could be seen when the card is inside the pocket.

Craft with Beth: Stampin' Up! Outdoor Barbecue stamp set card invitation pocket card invitation bbq

After your cut the Whisper White cardstock for the card, you can either print the cookout party information by hand or print it out from the computer using a word processing program.

Craft with Beth: Stampin' Up! Outdoor Barbecue stamp set card invitation pocket card invitation bbq
 
If you are going to print out the cookout party information using a word processing program, I recommend creating a new document and placing 3-3/4" x 5" text boxes evenly spaced on the page. Then type your party details in the text boxes. Print as many of the text boxes as you need for your invitations. Next cut them out and adhere them to the 4" x 5-1/4" Pacific Point designer series paper.

Craft with Beth: Stampin' Up! Outdoor Barbecue stamp set card invitation pocket card invitation bbq

Punch 2 1-1/2" Crushed Curry cardstock circles. Stamp the "You're Invited" greeting on the top of one circle and adhere one to the front of the card and one circle on the back directly behind the circle on the front. Side the card into the pocket card base. And, you are all ready to send off your invitations!

I hope you enjoyed today's Outdoor Barbecue invitation project! If need any of the supplies, to recreate this invitation, please use the supply list below to purchase from my online store. I would love to earn your business and be your Stampin' Up! demonstrator!

Thanks for stopping by!
Beth


Outdoor Barbecue Masculine Birthday Card
Stamps
#151553 Outdoor Barbecue (Cling-Mount)
Paper
#100730 Whisper White Cardstock
#120953 Crumb Cake Cardstock
#131199 Crushed Curry Cardstock
#149613 Brights Designer Series Paper
Ink
#132708 Memento Tuxedo Black Ink Pad
#149165 Basic Gray Ink Pad
#147083 Cherry Cobbler Ink Pad
#147087 Crushed Curry Ink Pad
#147089 Garden Green Ink Pad
#174115 Soft Suede Ink Pad
Embellishments

Tools
#152392 Stampin’ Trimmer
#102300 Bone Folder
#126200 Stampin’ Scrub
#102394 Stampin’ Mist
#110755 Tombow Mono Multi Liquid Glue
#138995 Tear and Tape Adhesive
Corresponding Clear Acrylic Blocks
#138299 1-1/2” Circle Punch