Wednesday, June 29, 2022

Fourth of July Mini Faux Firecracker Treat Holders

You will never guess what today's Fourth of July mini faux firecracker treat holders were inspired by - a toilet paper roll. There are so many great craft ideas that can be made with a toilet paper roll. Don't worry these treat holders were inspired by the shape of them and not don't use actual toilet paper rolls.


Fourth of July 4th of July mini faux firecracker treat holders


I was trying to design a new container shape for a Fourth of July celebration. I have made a lot a boxes, bags, and wrappers over the years. I was really stumped for new ideas.


Fourth of July 4th of July mini faux firecracker treat holders


I brainstormed all of the symbols, colors, traditions, etc. associated with the Fourth of July. I kept coming back to firecrackers. I have made firecracker treat holders before, but not as the container themselves. I kept thinking what shapes do we have that I can make a firecracker shape from. What shape is a firecracker? The same shape as a toilet paper roll, and you can roll designer series paper to make a tube. This treat holder is what I came up with.

Fourth of July 4th of July mini faux firecracker treat holders

I rolled a 3" x 3" piece of Celebrate Everything Designer Series Paper and adhered the ends together with both Tear & Tape Adhesive and liquid glue. I am not good at lining up edges of paper, so I used liquid glue to provide a little more time to work with the Tear & Tape Adhesive.

The scalloped circles are adhered to the top and bottom of the rolled designer series paper. The designer series paper edges are pretty narrow, so I scored 1/2" from each end and snipped every 1/4" or so to make tabs for the scalloped circles to adhere to. The tabs act almost like mini platforms for the scalloped circles to sit on.

Fourth of July 4th of July mini faux firecracker treat holders

Below is my first firecracker treat holder prototype. I used a scalloped circle that was just too small to fit the designer series paper tube onto, and the sparkler is huge. However, there is a better view of the tabs that hold the scalloped circle onto the designer series paper in this photo. Look at the top scalloped circle on the right side.

Fourth of July 4th of July mini faux firecracker treat holders

The sparklers are made with narrow strips of Silver Foil Paper adhered together in an asterisk shape. The bottom of the sparkler stem is scored to create a place to put adhesive and glue it to the top of the treat holder.

Fourth of July 4th of July mini faux firecracker treat holders

Below are the measurements and supplies to recreate these Fourth of July mini firecracker treat holders.

Measurements

  • Designer Series Paper: 3" x 3"; scored at 1/2" & 2-1/2" (Celebrate Everything Designer Series Paper)
  • Scalloped Circles (cut 2): 2-1/2" x 2-1/2" (Pacific Point Cardstock or Sweet Sorbet Cardstock)
  • Greeting Circle: 1-3/4" x 1-3/4" (Celebrate Everything Designer Series Paper) - use the 1-1/2" circle die
  • Greeting: 3" x 1" (Basic White Cardstock)
  • Sparkler: 2" x 1/8" (cut 1) and 1-1/2" x 1/8" (cut 3) (Silver Foil Paper) - score the 2" x 1/8" piece at 1/4"

Supplies

#152517 Celebrate Sunflowers Stamp Set
#159268 Sweet Sorbet Cardstock
#111350 Pacific Point Cardstock
#159276 Basic White Cardstock
#159913 Celebrate Everything Designer Series Paper
#159216 Sweet Sorbet Ink Pad
#147098 Pacific Point Ink Pad
#132708 Memento Tuxedo Black Ink Pad
#104430 Dimensionals
#110755 Multipurpose Liquid Glue
#102300 Bone Folder
#103579 Paper Snips
#130148 Grid Paper
#152392 Paper Trimmer
#149653 Stampin' Cut & Emboss Machine
#118490 Clear Block H
#151770 Layering Circle Dies

The Celebrate Everything Designer Series Paper pack is a 48-sheet pack of patterned paper that will be a HOST special in the upcoming July-December Mini Catalog. The July-December Mini Catalog will debut on July 1st. I know that is not a lot of time to place a qualifying order for this designer series paper. However, I wanted to share with you the versatility of this paper pack not only for fall and winter holidays but for summer holidays too. I know you are going to love the Celebrate Everything Designer Series Paper.


Celebrate Everything Designer Series Paper DSP Graphic


For today's faux firecracker treat holders, I recommend substituting with another designer series paper or stamping a 6" x 6" piece of Basic White cardstock with the solid flower image from the Color and Contour stamp set (#154994) to create a firework pattern.  

I hope you enjoyed today's mini faux firecracker treat holders and make them for your Fourth of July celebration! If you would like to recreate this treat holders and need some supplies, please, shop my online store HERE

If you have any questions about today's project, please, don't hesitate to ask me. I am happy to help you with your stamping questions!

Thanks for stopping by! Have a great day!
Beth

Monday, June 27, 2022

Fourth of July Mini Cupcake Sparkler Decorations

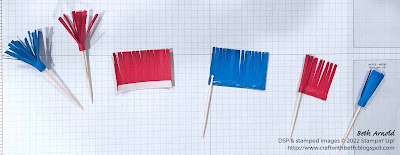
My family and I are having a get together on the Fourth of July. I wanted to bring something for dessert that would be fun and festive. I saw these patriotic mini cupcakes at the grocery store and could not resist! To make these even more celebratory, I created sparkler cupcake toppers with Real Red and Pacific Point cardstock and toothpicks to decorate each of the mini cupcakes.

Fourth of July 4th of July mini cupcake sparkler toppers decorations cupcake decorations


Two types of mini cupcakes came in the package - chocolate cake with marshmellow icing and vanilla cake with blue tinted vanilla frosting. Both varieties are topped with red, white, and blue sprinkle stars. Could they not get cuter than that?

Fourth of July 4th of July mini cupcake sparkler toppers decorations cupcake decorations


These sparklers came together quickly and easily. I made about twenty in less than 15 minutes, including preparation time. To make more use of my cardstock scraps, I used long strips of scraps. I cut them to a 1-1/4" width and followed the steps 1-6 below. Then I cut the strips into 2" long pieces.

Fourth of July 4th of July mini cupcake sparkler toppers decorations cupcake decorations


To make the sparkler cupcake decorations:

  1. First, gather your supplies and cut your cardstock.
  2. Then with the 1-1/2" side parallel to the paper trimmer's bottom ruler, score the cardstock at 1/4".
  3. Fold and burnish the score line. This score line is to help the sparkler ends to puff out into a ball shape and to also know where to stop cutting the sparkler ends.
  4. Curl the cardstock with a bone folder. This will help you roll the sparkler more easily.
  5. Cut fringe along the 2" side, stopping at the score line.
  6. Place Tear and Tape Adhesive along the scored area on the back of the sparkler.
  7. Remove the adhesive backing and add a line of liquid glue. This will help the wooden toothpick stick better and give you more maneuverability to roll up the cardstock.
  8. Let the toothpick sit in the liquid glue for a few seconds. Then roll up the cardstock. Hold the end of the cardstock for a few seconds to help the cardstock adhere in place.
  9. Shape the sparkler by bringing the fringed ends of the cardstock down and out in a semi-spherical shape.
  10. Add the sparkler decoration to your mini cupcake.


Fourth of July 4th of July mini cupcake sparkler toppers decorations cupcake decorations


Because I used mainly long scraps for these sparkler decorations, there would be some cardstock left over that was not quite 2" long. One strip of cardstock only had about 1-1/4" left. So, I thought why not try it and see how full and puffy a 1-1/4" strip of cardstock would be. You can see in the photo below that the 1-1/4" strip of cardstock is not as full or as puffy as the 2" strips of cardstock, but it still looks really cute!

Fourth of July 4th of July mini cupcake sparkler toppers decorations cupcake decorations


It would be fun to experiment with different lengths of cardstock to see which length makes the sparkler size and shape that you like the best!

Fourth of July 4th of July mini cupcake sparkler toppers decorations cupcake decorations


Below are the measurements and supply list to make these Fourth of July sparkler cupcake decorations.

Measurements

  • Sparkler: 1-1/2" x 2"; scored at 1/4" (Real Red and Pacific Point Cardstock)


Supplies

#102482 Real Red Cardstock
#111350 Pacific Point Cardstock
#102300 Bone Folder
#103579 Paper Snips
#130148 Grid Paper
#152392 Paper Trimmer
#154031 Tear & Tape Adhesive
#110755 Multipurpose Liquid Glue
Toothpicks
Mini Cupcakes

Fourth of July 4th of July mini cupcake sparkler toppers decorations cupcake decorations


I would love to hear about your Fourth of July celebrations! Leave a comment below telling me how you are celebrating the Fourth of July.

If you would like to recreate these treat holders and need some supplies, please, shop my online store HERE.

If you have any questions about today's project, please, don't hesitate to ask me. I am happy to help you with your stamping questions!

Thanks for stopping by! Have a great day!
Beth

Friday, June 24, 2022

Sneak Peek: Scary Cute Sponged & Embossed Halloween Card

Are you ready for another sneak peek from the 2022 July-December Mini Catalog? Today's card features the Scary Cute Stamp Set and Scary Silhouette Dies as well as sponging with the blending brushes and embossing with the Simply Scored Scoring Tool.

Scary Cute Scary Silhouette Dies Halloween Card Sponging Blending Brushes Embossing


Did you know that you can create embossed patterns with the Simply Scored Scoring Tool? That's right! You can! I used the Simply Scored Scoring Tool to create an embossed grid on a piece of Smoky Slate cardstock. I placed the Smoky Slate cardstock in the upper left corner of the Simply Scored and scored every 1/4" across the cardstock. Then I rotated the cardstock 90 degrees and scored every 1/4" across the cardstock. This created an embossed grid pattern.

Scary Cute Scary Silhouette Dies Halloween Card Sponging Blending Brushes Embossing


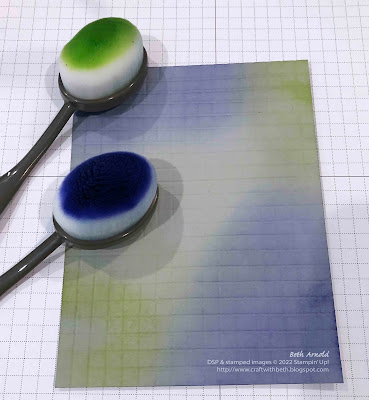
Next I sponged Starry Sky and Parakeet Party around the edges of the Smoky Slate cardstock to highlight the embossed grid pattern.

I also sponged the Parakeet Party ink all over the Basic White cardstock mat with the stamped Frankenstein's monsters cardstock mat and Orchid Oasis ink around the edges to give it a creepy Halloween glow to the center.

On the inside of the Card Base I stamped the moon image in the upper right corner and the group of trick-or-treaters in the lower left corner with Momento Tuxedo Black in. It looks like the moon was not stamped correctly, however, this is the texture of the stamp. I also got a "seagull" or an extra line of ink around the right side of the trick-or-treaters.

Scary Cute Scary Silhouette Dies Halloween Card Sponging Blending Brushes Embossing


This extra line of ink is from pressing the stamp into the ink pad too hard and from rocking the stamp's edges into the stamp pad. My best friend's mom calls these extra lines of ink "seagulls".

Instead of editing the photo to remove the "seagull," I am leaving it in for two reasons.

  • One reason is that even demonstrators and stampers that have been stamping for a long time make stamping mistakes.
  • The second reason is that the "seagull" acts as a motion or action line, giving the impression that the trick-or-treaters are running to get more candy. It is a great way to make a stamping mistake into a design element. That is the story, and I am sticking with! Lol!


Below are the measurements and supplies to recreate this sponged and emboss Scary Cute Halloween card.

Measurements

  • Card Base: 4-1/4" x 11"; scored at 5-1/2" (Thick Basic White Cardstock)
  • 1st Mat: 4-1/4" x 5-1/2" (Smoky Slate Cardstock)
  • 2nd Mat: 3-3/4" x 5" (Orchid Oasis Cardstock)
  • 3rd Mat: 3-5/8" x 4-7/8" (Basic White Cardstock)
  • Greeting: 2-1/4" x 1-1/4" (Orchid Oasis Cardstock)
  • Greeting Banner: 1/4" x 2-1/2" (Basic White Cardstock)


Supplies

#159850 Scary Cute Stamp Set (also available as a bundle - #159852 Scary Cute Bundle)
#159276 Basic White Cardstock
#159229 Thick Basic White Cardstock
#159267 Orchid Oasis Cardstock
#131202 Smoky Slate Cardstock
#132708 Memento Tuxedo Black Ink Pad
#159214 Orchid Oasis Ink Pad
#159208 Parakeet Party Ink Pad
#104430 Dimensionals
#110755 Multipurpose Liquid Glue
#102300 Bone Folder
#103579 Paper Snips
#130148 Grid Paper
#152392 Paper Trimmer
#149653 Stampin' Cut & Emboss Machine
#118487 Clear Block A
#117147 Clear Block B
#118486 Clear Block C
#153611 Blending Brushes
#159851 Scary Silhouette Dies


I know I will be making more of these cards for my favorite tricker-or-treaters! The Scary Cute stamp set will be in the July-December Mini Catalog which is debuting on July 1st - only a week away. I hope you enjoyed today's Scary Cute Halloween card and add the Scary Cute Bundle to your wish list!  Then shop my online store HERE starting July 1st.

If you have any questions about today's project, please, don't hesitate to ask me. I am happy to help you with your stamping questions!

Thanks for stopping by! Have a great day!
Beth

Wednesday, June 22, 2022

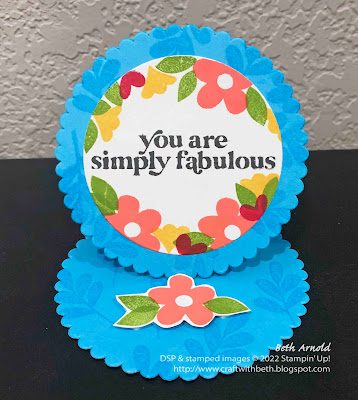
You are Simply Fabulous Circle Easel Card

Today's project is a circle easel card featuring the Simply Fabulous stamp set. The Simply Fabulous stamp set is one of my top must-have stamp sets from the 2022-2023 Annual Catalog. It has cute little flowers and leaves stamps along with greetings perfect for friendship, encouragement, and celebration.

Simply Fabulous Circle Easel Card


The varied scale of the flowers and leaves stamps ranges from small to large and makes this a fantastic set for building bouquets, wreaths, clusters, and more! Use the larger flowers and leaves for focal images. Sprinkle in the smaller flowers and leaves to fill in the spaces between to create a cohesive bouquet or wreath!

Simply Fabulous Circle Easel Card


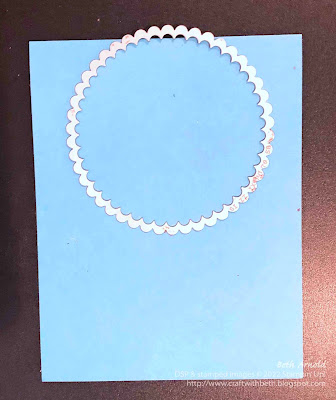
The base for the circle easel card is made of two connected scalloped circles. To connect the scalloped circles, I cut a piece of Tahitian Tide cardstock and folded it in half, then I placed the largest Layering Circle die on the Tahitian Tide cardstock with about 1/8" of the die above the fold, and ran it through the Stampin' Cut & Emboss Machine.

Simply Fabulous Circle Easel Card


Moving the topmost edge of the scalloped circle die above the fold line means that the area that the die is not touching the cardstock will not be cut.

Simply Fabulous Circle Easel Card


A second scalloped circle is die cut and adhered to one of the card base scallop circles to make the easel stand up.

 
Below are the measurements and supplies to recreate this Simply Fabulous Circle Easel Card.

Measurements

  • Card Base: 4-1/4" x 8"; scored at 4" (Tahitian Tide Cardstock)
  • Scalloped Circle: 3-1/2" x 3-1/2" (Tahitian Tide Cardstock)
  • Circles: 5" x 2-3/4" (Basic White Cardstock) - cut 2 of the 2-3/8" circles from this piece of cardstock and cut 1 of them in half
  • Stopper: 2" x 3"


Supplies

#159133 Simply Fabuous Stamp Set
#159261 Tahitian Tide Cardstock
#102283 Versamark Watermark Ink Pad
#147052 Flirty Flamingo Ink Pad
#147094 Daffodil Delight Ink Pad
#147095 Granny Apple Green Ink Pad
#147051 Melon Mambo Ink Pad
#132708 Momento Tuxedo Black Ink Pad
#104430 Dimensionals
#110755 Multipurpose Liquid Glue
#102300 Bone Folder
#103579 Paper Snips
#130148 Grid Paper
#152392 Paper Trimmer
#149653 Stampin' Cut & Emboss Machine
#118487 Clear Block A
#117147 Clear Block B
#118490 Clear Block H
#151770 Layering Circle Dies


A circle easel card makes a great display card. I chose "You are simply fabulous" for the greeting on this circle easel card. It is a kind reminder that we are fabulous too! It can be easy to focus more on the care of others and forget to care for and appreciate yourself too. This card could be a visual reminder that you are simply fabulous too!

I hope you give this circle easel a card and make one for each of your best friends! I think you will really enjoy stamping with the Simply Fabulous stamp set! If you need supplies to make this card, please, shop my online store HERE.

If you have any questions about today's project, please, don't hesitate to ask me. I am happy to help you with your stamping questions!

Thanks for stopping by! Have a great day!
Beth

Monday, June 20, 2022

Free Shipping Promotion Tomorrow June 21st!

Free Shipping Promotion Banner Graphic June 21st, 2022


Time for us to stock up and save on your favorite Stampin’ Up! products! What’s the big occasion? On 21st June 2022 only, Stampin' Up! is offering FREE shipping on orders subtotaling $75 USD | $100 CAD or more. This incredible deal lasts for 24 hours only, so head over to social media and start sharing the news today!


Promotion Ordering Information

  • All order types qualify for this promotion (customer, demonstrator, workshop, and online).
  • Free shipping applies after the qualifying amount (per market) has been met.
  • The minimum qualifying amount to receive free shipping is $75 USD | $100 CAD or more (before tax).
  • If you or your customers are using a coupon code or product credit, please remember that they are non-commissionable and will lower the order’s retail amount. The order must still meet the qualifying threshold to be eligible for free shipping.
  • Free shipping only applies during the 24-hour period the promotion is live in each market; this means that the order must be opened and closed on 21 June 2022.
  • With the exception of month-to-month Paper Pumpkin subscriptions, all Stampin’ Up! products qualify for the promotion.
  • Prepaid Paper Pumpkin subscriptions are eligible for FREE shipping under the same rules as all other Stampin’ Up! items during the promotion.
  • Month-to-month Paper Pumpkin subscriptions are NOT eligible for free shipping. Subscriptions billed and shipped this month will be charged for the normal amount ($23.50 USD | $32.50 CAD shipping included) + tax.
  • The free shipping promotion does not cover the additional cost for expedited shipping.
  • Ordering Deadlines:
    • Phone: Tuesday, 21 June 2022; 6:50 p.m. (MT)
    • OEX/Online: Tuesday, 21 June 2022; 11:59 p.m. (MT)
  • Inventory Alerts:
    • Since 1st December 2021, Stampin’ Up! is no longer taking orders for products that are not in stock. In other words, Stampin’ Up! no longer accept backorders. See full details here.
    • Demonstrators: Need to check an item’s availability? See the current Inventory Status Report (ISR).


Woohoo!! I am so excited to get a free shipping promotion not once but twice this year!! We had a free shipping day also in April. That is such a special treat! 


Why is this a great offer?

This free shipping promotion is a great way to get a smaller order in, especially if you forgot one or two products on your last order or didn't order that bundle you had been eying. I know I have done that before! It is also a great time to stock up on your favorite retiring products from the Last Chance Product Sale. Why not take advantage of this free shipping promotion?! Treat yourself!


Prepare Your Order List Now


To Order List Printable Graphic Thumbnail

I am working on my ordering list now to get it ready for tomorrow. I have a few things that I forgot to order on my last order - including envelopes. That way I am not scrambling tomorrow and lessen my chances of forgetting something again. 

This is also why I created my To Order List printable. Download and print your To Order List HERE or click the To Order List graphic above, so you too can get ready for tomorrow's free shipping promotion!


free shipping promotion graphic June 21, 2022

Shop My Online Store June 21st, 2022

Then place your order on my online store tomorrow, June 21st, 2022, HERE!


If you have any questions about this promotion, please, don't hesitate to ask. I am happy to help answer your stamping questions! Don't forget to download your To Order List HERE and shop my online store tomorrow! Happy shopping!

Beth


Friday, June 17, 2022

Stamped and Sponged Beauty of Friendship Card

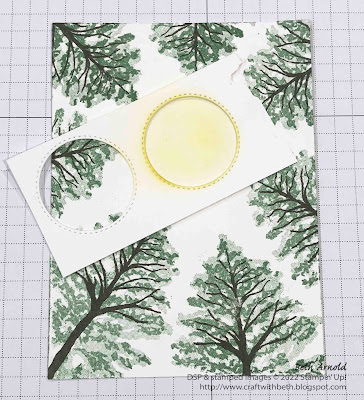
There are some times when we need encouragement or support in trying or difficult times. I created this card as a thinking of you and support card for those times. I was inspired by the beautiful trees and the bright sunny days that we have been having lately and how much joy a warm sunny day brings me. 


Beauty of Friendship Encouragement Thinking of You Support Card Sponging Blending Brushes Masking Reverse Masking

Looking up at the sky, seeing the trees circled around me and the sun above seemed like kind friends. The inside of the card is stamped with a tree in the lower left corner, leaving room for a comforting message.


Beauty of Friendship Encouragement Thinking of You Support Card Sponging Blending Brushes Masking Reverse Masking

The looking up at the tree and sun scene is created by first stamping the tree leaves and tree trunk images around the edges of the 2nd Mat. I knew where I wanted to place the sun, so I was careful to leave plenty of room for the sun.

Next I created a mask and a reverse mask for the sun. I used a piece of Basic White cardstock and die cut the 2nd smallest stitched circle from it. I kept both the circle die cut and the piece of cardstock. The piece of cardstock with the circle cut out of it will become the mask. I used a blending brush to sponge So Saffron ink through the mask to make a sun shape.


Beauty of Friendship Encouragement Thinking of You Support Card Sponging Blending Brushes Masking Reverse Masking


Then I removed the mask and replaced it with the reverse mask - the circle die cut. I added the tiniest bit of Stampin' Seal adhesive to the back of the circle die cut to temporarily attach the circle die cut to the 2nd Mat. The circle die cut will keep the ink from covering the sun area while I sponged the sky.

I lightly added Tahitian Tide ink to a blending brush and applied it to the 2nd Mat in a swirling motion. I left some areas with patches of the white cardstock showing through to give the idea of sunlight shining through a whisper of clouds.


Beauty of Friendship Encouragement Thinking of You Support Card Sponging Blending Brushes Masking Reverse Masking


The greeting with stamped on a piece of Basic White cardstock and added to the lower right corner of the 2nd Mat. The 2nd Mat was adhered to the center of the 1st Mat and then to the card front.

You can use sticky note paper or computer paper in place of the Basic White cardstock for the mask and reverse mask. I had cut an extra circle for another project that I ended up not using, so it was right next to me on my desk.

Below are the measurements and supply list for this stamped and sponged Beauty of Friendship card.


Measurements

  • Card Base: 4-1/4" x 11"; scored at 5-1/2" (Thick Basic White Cardstock)
  • 1st Mat: 4" x 5-1/4" (Early Espresso Cardstock)
  • 2nd Mat: 3-5/8" x 4-7/8" (Basic White Cardstock)
  • Greeting: 1/2" x 1-3/4" (Basic White Cardstock)
  • Circle Mask/Reverse Mask: 2" x 3" (Basic White Cardstock, sticky note paper, or computer paper) - use the 2nd smallest stitched circle die


Supplies

  • #154983 Beauty of Friendship Stamp Set
  • #159229 Thick Basic White Cardstock
  • #119686 Early Espresso Cardstock
  • #159276 Basic White Cardstock
  • #147089 Garden Green Ink Pad
  • #159210 Tahitian Tide Ink Pad
  • #147109 So Saffron Ink Pad
  • #147114 Early Espresso Ink Pad
  • #110755 Multipurpose Liquid Glue
  • #152813 Stampin' Seal Adhesive
  • #118485 Clear Block D
  • #118490 Clear Block H
  • #118489 Clear Block G
  • #102300 Bone Folder
  • #103579 Paper Snips
  • #130148 Grid Paper
  • #152392 Paper Trimmer
  • #149653 Stampin' Cut & Emboss Machine
  • #159183 Stylish Shapes Dies
  • #153611 Blending Brushes 
  • Optional: sticky note paper or computer paper


I hope you enjoyed today's card! I hope you give this stamped and sponged Beauty of Friendship card a try! If you need supplies to make this card, please shop my online store HERE

Thanks for stopping by!

Beth


Wednesday, June 15, 2022

Sneak Peek: Scary Cute Luminaries

I am so excited to share with you a sneak peek from the upcoming 2022 July-December Mini Catalog! Today's projects are a pair of Halloween tea light luminaries features the Scary Silhouette Dies.


Scary Silhouettes Dies Halloween Luminary Tea Light Candle Home Decor decoration 3D

There are so many wonderful new products in the 2022 July-December Mini Catalog that I know you are going to love! It was so hard to choose what to share first! I am starting with Halloween because it is one of my favorite holidays and because it is one of the first holidays in fall.


Scary Silhouettes Dies Halloween Luminary Tea Light Candle Home Decor decoration 3D

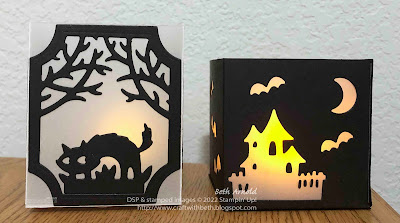
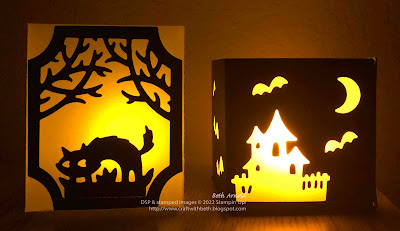
I created these luminaries to highlight the Scary Silhouettes Dies versatility and to display on my mantle in my family room for the Halloween season. Luminaries were the first idea that I had when I saw these dies! I noticed how the tree label shaped die could be used to cut a window out of the center of the solid label shaped die and thought how fun that would be to be a panel on a luminary!


Scary Silhouettes Dies Halloween Luminary Tea Light Candle Home Decor decoration 3D


I was determined to make luminaries this year even before I saw the July-December Mini Catalog. I have been sitting on this idea since early January when I made treat bags for Valentine's Day with hearts die cut around the tops of the bags. I thought they would be a perfect shape for a luminary!


Scary Silhouettes Dies Halloween Luminary Tea Light Candle Home Decor decoration 3D


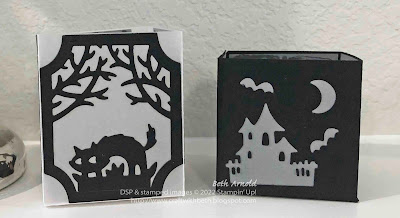
The size and shape of my luminary was determined by the size of the solid label die. I measured the solid label die and drew up a template on my grid paper. The Basic Black cardstock luminary was my first prototype. I was really happy with my first attempt, but I quickly realized that I was a half an inch short for the solid label die. So, I used the other dies in the Scary Silhouettes Dies to cut bats, haunted houses, and moons out of the Basic Black cardstock. I adhered squares of vellum to the inside of the luminary and added a tea light candle inside.


Scary Silhouettes Dies Halloween Luminary Tea Light Candle Home Decor decoration 3D

I adjusted my measurements and cut a second luminary with vellum cardstock. My second attempt was a success! The solid label die cuts fit perfectly on each of the four sides of the luminary.


I die cut four solid labels and then cut the tree label from the center of each solid label to make each of the four side panels. Then I die cut cats, haunted houses, and bats to decorate each panel and placed a tea light candle inside.


Scary Silhouettes Dies Halloween Luminary Tea Light Candle Home Decor decoration 3D

Look at beautiful they look at night! You can really see how the vellum intensifies the light from the candle through the die cut areas!


Scary Silhouettes Dies Halloween Luminary Tea Light Candle Home Decor decoration 3D


I hope you enjoyed today's projects! How would you decorate your own luminaries? Below are the measurements and the supply lists for both versions of the Scary Silhouettes Halloween luminaries.


Vellum Luminary Measurements

  • Luminary Base: 5-1/2" x 10-1/2"; scored at 2-1/2", 5", 7-1/2", and 10" then rotate 90 degrees and score at 2-1/2"
  • Cardstock Side Pieces (cut 4): 3-1/2" x 3" (Basic Black Cardstock)
  • Cat: 2-1/2" x 2" (Basic Black Cardstock)
  • Haunted House (cut 2): 3" x 3" (Basic Black Cardstock)
  • Bats: 2" x 2" (Basic Black Cardstock)

Cardstock Luminary Measurements

  • Luminary Base: 5" x 10-1/2"; scored at 2-1/2", 5", 7-1/2", and 10" then rotate 90 degrees and score at 2-1/2"
  • Vellum Pieces (cut 4): 2-3/8" x 2-3/8" (Vellum Cardstock)


Supplies

  • #101856 Vellum Cardstock
  • #121045 Basic Black Cardstock
  • #110755 Multipurpose Liquid Glue
  • #102300 Bone Folder
  • #103579 Paper Snips
  • #130148 Grid Paper
  • #152392 Paper Trimmer
  • #149653 Stampin' Cut & Emboss Machine
  • #159851 Scary Silhouettes Dies 
  • Tea light battery-operated candles


EDITED: Below is a template for the vellum luminary. 

Scary Cute Vellum Halloween Luminary Template


The July-December Mini Catalog is coming July 1st! The Scary Silhouettes Dies will become available starting July 1st which is only a few weeks away. I hope you add the Scary Silhouette Dies to the top of your wish list!

Starting July 1st, if you would like to recreate these luminaries and need some supplies, please, shop my online store HERE. If you have any stamping questions, I am happy to help!

Thanks for stopping by!

Beth
Monday, June 13, 2022

Lakeside Father's Day S'mores Treat Cups and Bag Topper

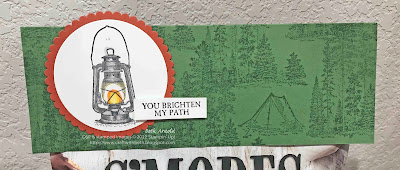
My older brother inspired me to create today's projects - a bag topper tag and s'mores treat cups featuring the Campology stamp set (#152553). He and his family live by a lake in New Hampshire. They love to hike the trails, take bike rides, and kayak on the lake.


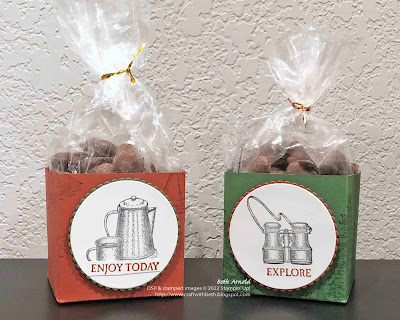
S'mores Snack Mix Treat Bag Topper and S'mores Treat Cups for Father's Day Lakeside Cookout Party Favor

With Father's Day fast approaching, I knew some last minute treat holders would perfect for a lakeside cookout. I created a treat bag topper to decorate a host gift - a bag of s'mores snack mix.


S'mores Snack Mix Treat Bag Topper and S'mores Treat Cups for Father's Day Lakeside Cookout Party Favor Campology Stamp Set

The s'mores snack mix is made of chocolate covered mini graham crackers and mini marshmallows. It is delicious and surprisingly difficult to put down! When I found it at one of our local grocery stores, I immediately thought of sitting around the fire pit with my brothers and our families last summer. It was nice to all be together!


S'mores Snack Mix Treat Bag Topper and S'mores Treat Cups for Father's Day Lakeside Cookout Party Favor Campology Stamp Set

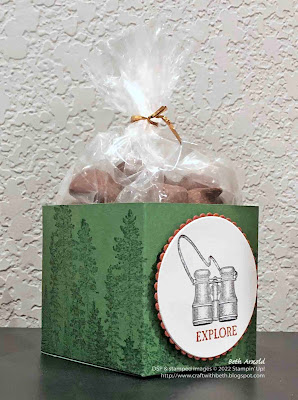
I also created some 2-1/2" cubed treat cups filled with a bag of s'more mix for immediate enjoyment around the lake and by the campfire. The treat cups are stamped with the tent, binoculars, trees, and coffee pot with a cup images as well as two of the greetings on a simple open-topped box.


S'mores Snack Mix Treat Bag Topper and S'mores Treat Cups for Father's Day Lakeside Cookout Party Favor Campology Stamp Set

I used gusseted cellophane bags and the gold twist ties that come with the cellophane bags. If the treat cups were for party favors to take home instead of enjoying during the cookout, I would have used a ribbon to close the bags. I recommend placing the cellophane bag in the treat cup first to make it easier to fill.


Below are the measurements and the supply lists for both the bag topper and the treat cups.


Bag Topper Measurements

  • Tag Topper: 8-1/2" x 6"; scored at 3" (Garden Green Cardstock)
  • Scalloped Circle: 3-1/2" x 3-1/2" (Cajun Craze Cardstock) - use the 3-1/16" diameter scalloped circle die
  • Circle: 3-1/2" x 3-1/2" (Basic White Cardstock) - use the 2-5/8" diameter circle die
  • Greeting: 1/2" x 1-3/4" (Basic White Cardstock)


Treat Cup Measurements

  • Treat Cup Base: 5" x 10-1/2"; scored at 2-1/2", 5", 7-1/2", and 10" then rotate 90 degrees and score at 2-1/2" (Garden Green and Cajun Craze Cardstock)
  • Scalloped Circle: 2-1/2" x 2-1/2" (Garden Green and Cajun Craze Cardstock) - use the 2-1/4" scalloped circle die
  • Circle: 2-1/2" x 2-1/2" (Basic White Cardstock) - use the 2-1/8" diameter circle die


Supplies

  • #152553 Campology Stamp Set
  • #102584 Garden Green Cardstock
  • #119684 Cajun Craze Cardstock
  • #159276 Basic White Cardstock
  • #147089 Garden Green Ink Pad
  • #147085 Cajun Craze Ink Pad
  • #132708 Momento Tuxedo Black Ink Pad
  • #154904 Smokey Slate Stampin' Blends Combo Pack
  • #154883 Daffodil Delight Stampin' Blends Combo Pack
  • #154897 Pumpkin Pie Stampin' Blends Combo Pack
  • #110755 Multipurpose Liquid Glue
  • #118486 Clear Block C
  • #118485 Clear Block D
  • #118489 Clear Block G
  • #118490 Clear Block H
  • #104430 Dimensionals
  • #102300 Bone Folder
  • #103579 Paper Snips
  • #130148 Grid Paper
  • #152392 Paper Trimmer
  • #149653 Stampin' Cut & Emboss Machine
  • #151770 Layering Circle Dies
  • 3-1/4" x 11" Gusseted Cellophane Bags with Twist Ties 
  • S'more Snack Mix


I hope you enjoyed today's projects and make them for Father's Day or your next get together! If you would like to recreate this treat holders and need some supplies, please, shop my online store HERE. If you have any stamping questions, I am happy to help!

Thanks for stopping by!

Beth

Sunday, June 12, 2022

Second Sunday Sketches #38 Starts Today

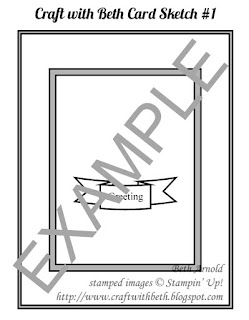
 Craft with Beth Second Sunday Sketches graphic title graphic banner card sketch challenge with measurements


It is time for another Second Sunday Sketches challenge! If you are new to Second Sunday Sketches, please review the rules here or below. Each second Sunday of the month, I will post a card sketch. A sketch is graphic or drawing of how the elements of a card are arranged.

Craft with Beth: Stampin' Up! Second Sunday Sketches sketch card sketch challenge sample graphic

You will then use the sketch as a guide to create your own card. Your card must be a new creation and reflect the challenge guidelines. Your card must include the major elements of the card sketch, such as the number of layers and the general position of the embellishments and/or die cuts. You can rotate the sketch for a top-folding card or for a side-folding card.

You choose the occasion and the color palette as well as the stamp set(s) and the embellishments. I do ask that you use Stampin' Up! products (current or retired).

The measurements will also be included in the blog post for each Second Sunday Sketches sketch challenge. You can use the measurements as given or increase them or decrease them. For example, if a greeting is stamped on a 1" circle on the sketch, but the greeting you choose is 1-3/4", then increase the size of the circle to 1-3/4". You can also change the shape. Instead of a circle, you can use an oval, a square, a daisy punch, a monogram, etc.

The challenge will run from the second Sunday of the month until the last day of that month.

Below is June's card sketch.

Craft with Beth Second Sunday Sketches card sketch challenge graphic #38 with measurements
Challenge Dates

June's challenge will run from June 12th, 2022 until June 30th, 2022 at 5pm EDT.

If you would like to participate in the Second Sunday Sketches sketch challenge, please create a card using the sketch above and email me a photo of your card by June 30th, 2022 at 5pm EDT with the subject line Second Sunday Sketches Entry.
Prize Drawing

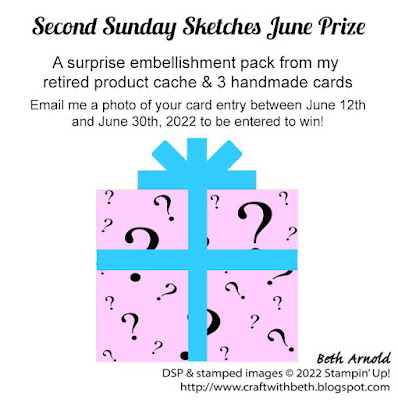
The day after the last day of the month (July 1st), I will place all of the names of the participants in a proverbial hat and randomly draw a winner. The winner will receive a prize (US Residents only)! The prize each month will change and will be announced at the start of each challenge. June's Second Sunday Sketches sketch challenge prize is a surprise embellishment pack from my retired product cache and three hand-made cards from me.

June 2022 Second Sunday Sketches #38 card challenge sketch challenge prize graphic

Winner Announcement

If you are the winner, I will notify you by email. Please respond to my email with your complete mailing address, and I will mail you your prize! If the winner does not respond to my email within 7 days, I will draw another winner.

I will also post all of the entries on my blog (with your names attached to the photos) and the name of the winner.


Some Ideas on How to Make this Card Sketch Your Own

There are many ways to change this card to make it your own! You can rotate the card layout 90 degrees, change the oval to another shape like flowers or letters, make a z-fold card with a 2nd z-fold piece along the bottom to look like the horizontal rectangle like my mom suggests, use your favorite designer series paper or stencil as the 1st Mat, use embossing folders to add more texture to a mat layer, and more!

Share Second Sunday Sketches with a Friend

Be sure to join in on the fun and share with a friend! If you enter the Second Sunday Sketches challenge, you can get a bonus surprise prize by sharing this challenge with a friend (for US residents only)! Here's how to get a bonus surprise prize. Limit two bonus surprise prizes per person per month.
  1. Enter into this month's Second Sunday Sketches challenge
  2. Share this month's Second Sunday Sketches challenge with a friend (that hasn't participated before)
  3. Have your friend submit their this month's challenge card entry
  4. Email me that your friend has submitted their card entry. Submit your complete mailing address and the name of the friend that you shared with. I will confirm their entry and then send you a bonus surprise prize.

I am looking forward to seeing your personal take on the 38th Second Sunday Sketches sketch challenge! If you have any questions about this card sketch challenge, please let me know! I am happy to assist!

Happy Stamping!
Beth

Monday, June 6, 2022

Sunny Splash Fold Flat Triple Box Card

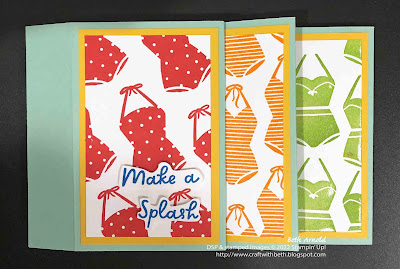
Today's Fold Flat Triple Box fun fold card features the Sunny Splash stamp set. I was inspired by a triple box card made by fellow demonstrator Heidi Smith. I was so captured by her fun fold that I had to make one right away! I used her imperial measurements to create my own version of her fold flat triple box card. I used the Sunny Splash stamp set from the 2022-2022 Annual Catalog.


Sunny Splash Fold Flat Triple Box Card Fun Fold Card

This fun fold is deceptively simple! First make three boxes. Then adhere them together! You can see from the photo below that the three boxes are adhered together in a staggered pattern on the right back panels. Adhering them together this way is what enables the card to fold flat for mailing.


Sunny Splash Fold Flat Triple Box Card Fun Fold Card

By flattening the right back panels, the boxes can be placed into an envelope. The card be "opened" back up after being taken out of the envelope and is ready for display!


Sunny Splash Fold Flat Triple Box Card Fun Fold Card


I added a cardstock panel on the back of the card to write a message. I like adding the message to the back of the card, so that the front of the card can be on display as a decorative element too.


Sunny Splash Fold Flat Triple Box Card Fun Fold Card


Below are the imperial measurements and supply list for the Fold Flat Triple Box Card.


Measurements

  • Boxes (cut 3): 4-1/8" x 8"; scored at 1", 3-3/4", 4-3/4", and 7-1/2" (Mint Macaron Cardstock)
  • Smaller Front Panels (cut 2): 2-1/8" x 3-7/8" (Crushed Curry Cardstock)
  • Smaller Stamping Panels (cut 2): 1-7/8" x 3-5/8" (Basic White Cardstock)
  • Larger Stamping Panels (cut 2): 2-1/4" x 3-5/8" (Basic White Cardstock)
  • Larger Panels (cut 2): 2-1/2" x 3-7/8" (Crushed Curry Cardstock)


Supplies

  • #158784 Sunny Splash Stamp Set
  • #138337 Mint Macaron Cardstock
  • #131199 Crushed Curry Cardstock
  • #159276 Basic White Cardstock
  • #147084 Real Red Ink Pad
  • #147086 Pumpkin Pie Ink Pad
  • #147095 Granny Apple Green Ink Pad
  • #147098 Pacific Point Ink Pad
  • #110755 Multipurpose Liquid Glue
  • #118486 Clear Block C
  • #118490 Clear Block H
  • #102300 Bone Folder
  • #103579 Paper Snips
  • #130148 Grid Paper
  • #152392 Paper Trimmer


I hope you enjoyed today's Sunny Splash triple box card! I hope you give this fun fold a try! If you need supplies to make this card, please shop my online store HERE

Thanks for stopping by!

Beth

Friday, June 3, 2022

Stampin' Cut & Emboss Magnetic Plate Update

It was very exciting to see the Magnetic Plate for the Stampin' Cut & Emboss Machine re-released this year. However, there appears to be a difficulty that is causing the plate layers to separate. Unfortunately, the Magnetic Plate will no longer be available for purchase at this time.


Magnetic Plate Product Update Graphic

Because the quality of the Magnetic Plate does not meet the standard of quality that Stampin' Up! expects, Stampin' Up! is stopping the sale of the Magnetic Plate immediately and placing the development of the Mini Magnetic Plate on hold.

Stampin' Up! is issuing refunds for those that have purchased the relaunched Magnetic Plate to the same method of payment used to purchase the Magnetic Plate. If a demonstrator purchased the Magnetic Plate for you (for example, if you used a check or cash at a workshop), please, contact your demonstrator about receiving a refund.

Stampin' Up! made this announcement today about the relaunch of the Stampin' Cut & Emboss Machine's Magnetic Plates.


"As you may know, we’ve been eagerly anticipating the relaunch of the Magnetic Cutting Plate for some time. After redesigning and rigorously testing the plate, we felt that we had a successful model for a relaunch of the product. Unfortunately, we’re now finding that with mass production, a defect in the manufacturing process is causing the plate layers to separate after use. This is not an issue we’ve experienced in the past and we are currently working with our manufacturer to determine its cause.

After extensive additional testing (and fair amount of heartbreak), we’ve determined that the relaunched Magnetic Cutting Plate does not meet the standard of quality that we expect for our products. As a result, we have made the decision to turn this item off (effective immediately) for the foreseeable future. Additionally, we will be putting the development of our Mini Magnetic Cutting Plate on hold.

We stand by our offering of the highest quality products, so if you or your customers purchased the Magnetic Cutting Plate (item 161128), you will be issued a refund within 45 days, regardless of whether you’ve encountered issues with the product. If you ordered the Magnetic Cutting Plate but have not received it yet, you will still receive the product as well as a refund. Please do not contact Demonstrator Support for your refund, as it will be automatically issued to your original form of payment. If you paid for any orders on behalf of your customers, you are responsible for reimbursing those customers.

We share in your disappointment and frustration. Please, do not try to repair or alter defective plates, as they may damage the machine. If you would like to improve the alignment of your open dies and stamps without a Magnetic Cutting Plate, you can use temporary adhesives such as washi tape, masking tape, or Post-it Notes to secure your die and paper together before running them through the machine.

Thank you for your understanding and we apologize for any inconvenience this may have caused."


This is heartbreaking news, for sure, but I have confidence in Stampin' Up! and that they are making the best decision about the Magnetic Plate.


If you have any questions about the Magnetic Plate update, please, contact me. I am happy to answer your stamping questions!

Beth

Wednesday, June 1, 2022

NEW: Love This Memory Kit added to the Kits Collection

Get ready for the latest addition to the Kits Collection by Stampin’ Up! The Love This Memory Notebook Kit has everything you need to create a simple and colorful keepsake full of cherished memories. 


Love this Memory Kit Graphic


Details

  • #160168 Love This Memory Notebook Kit
  • $25 USD | $34 CAD
  • Available starting 1 June
  • Also available in French
  • Kit Includes:
    • Kit includes one 8-1/2" x 5-1/4" (21.6 x 13.3 cm) kraft notebook
    • Includes sticker sheets, washi tape, and printed cards to decorate with
    • Includes the exclusive Love This Photopolymer Stamp Set and a Parakeet Party Classic Stampin’ Spot
    • Includes Tear & Tape Adhesive to help finish your project
    • Coordinating colors: Basic Black, Flirty Flamingo, Mango Melody, Parakeet Party, Pumpkin Pie, Tahitian Tide


Love this Memory Notebook Kit Stamp Set
 
This would be a fantastic kit to record summer vacations, camping trips, or even treasured family recipes with journaling from a beloved grandmother, precious grandfather, or a favorite aunt! The possibilities are endless!


Love this Memory Notebook Kit Example Pages


Check out the NEW Love This Memory Notebook Kit today in my online store HERE and starting creating your memory notebook (link opens in a new window)! I can't wait to see what you create!

Thanks for stopping by!

Beth

The January-June Mini Catalog Last Chance List is now available!

Last Chance Product List for the January-June 2022 Mini Catalog Graphic Banner

The January–June 2022 Mini Catalog will be retiring soon! It’s always bittersweet to see a classic Stampin’ Up! catalog take a trip to retirement. But, we’re looking forward to all the new products on their way—and we hope you are, too!

Stock up on your favorite products before they’re gone for good! Save up to 50% on essential craft supplies. What are you waiting for? Start shopping! After all, this selection of Last Chance Products is only available while supplies last.


Get the Last Chance Product Lists

The Last Chance Product List is available in two formats - PDF and Excel Spreadsheet. The font size on both of the lists is pretty small. I recommend downloading the Excel Spreadsheet, enlarging the text size to a size that you are more comfortable reading, and then printing the list. Use the list to mark what is retiring in your 2022 January-June Mini Catalog.

  • Click HERE to download the PDF version of the Last Chance Product List
  • Click HERE to download the Excel Spreadsheet version of the Last Chance Product List


Get Your Wish List Ready

Download and print out your wish list with my Wish List Printable HERE. Make a list of your favorite retiring products. Then check out my online store to shop your wish list.


Check My Online Store

You can also view the Last Chance Products on my online store HERE. Checking my online store is the fastest way to see if you favorite retiring products are still available.


Last Chance Products Promotion Details

  • Each Last Chance Products promotion typically includes a Retiring List (products that will no longer be available once the catalog retires) and a Carryover List (products that will still be available once the catalog retires). For this catalog’s Last Chance Products promotion, a Carryover List will not be provided; carryover products can be viewed in the 2022–2023 Annual Catalog.
  • Discounts are not always available with the Retiring List. When they are, they will vary from one market to another depending on product performance.
  • All products are available while supplies last, and there are no purchase limits.
  • You can start creating your marketing plan right away! Share the list with your customers as soon as you’d like.
  • Discounted items can be added to a Starter Kit and redeemed as a 50% off item or with Stampin’ Rewards.
  • Only orders opened and closed during the promotion period apply
  • Stamp Sets are not guaranteed during this promotion and are while supplies last
  • Sales Period
    • Starts: 1 June 2022 at 12:00 AM (MT)
    • Ends: 30 June 2022 at 11:50 PM (MT)
  • Order Deadlines
    • Phone: 30 June 2022 at 6:50 PM (MT)
    • Online: 30 June 2022 at 11:50 PM (MT)


Last Chance Product Graphic


Retiring products are available while supplies last, so don't delay. Make your wish list and shop today! If you have any questions about the 2022 January-June Mini Catalog Last Chance Product List, please leave a comment below or send me an email. I am happy to help with your stamping questions!

Happy shopping!

Beth