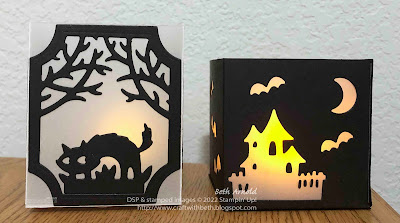
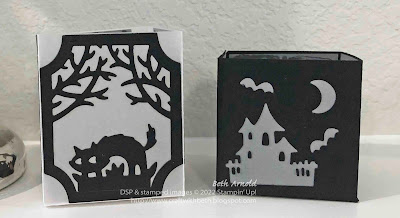
I am so excited to share with you a sneak peek from the upcoming 2022 July-December Mini Catalog! Today's projects are a pair of Halloween tea light luminaries features the Scary Silhouette Dies.
There are so many wonderful new products in the 2022 July-December Mini Catalog that I know you are going to love! It was so hard to choose what to share first! I am starting with Halloween because it is one of my favorite holidays and because it is one of the first holidays in fall.
I created these luminaries to highlight the Scary Silhouettes Dies versatility and to display on my mantle in my family room for the Halloween season. Luminaries were the first idea that I had when I saw these dies! I noticed how the tree label shaped die could be used to cut a window out of the center of the solid label shaped die and thought how fun that would be to be a panel on a luminary!
I was determined to make luminaries this year even before I saw the July-December Mini Catalog. I have been sitting on this idea since early January when I made treat bags for Valentine's Day with hearts die cut around the tops of the bags. I thought they would be a perfect shape for a luminary!
The size and shape of my luminary was determined by the size of the solid label die. I measured the solid label die and drew up a template on my grid paper. The Basic Black cardstock luminary was my first prototype. I was really happy with my first attempt, but I quickly realized that I was a half an inch short for the solid label die. So, I used the other dies in the Scary Silhouettes Dies to cut bats, haunted houses, and moons out of the Basic Black cardstock. I adhered squares of vellum to the inside of the luminary and added a tea light candle inside.
I adjusted my measurements and cut a second luminary with vellum cardstock. My second attempt was a success! The solid label die cuts fit perfectly on each of the four sides of the luminary.
I die cut four solid labels and then cut the tree label from the center of each solid label to make each of the four side panels. Then I die cut cats, haunted houses, and bats to decorate each panel and placed a tea light candle inside.
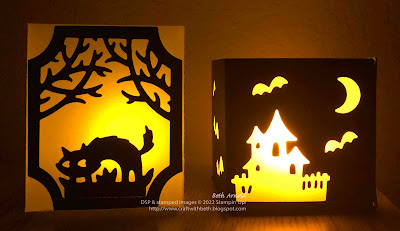
Look at beautiful they look at night! You can really see how the vellum intensifies the light from the candle through the die cut areas!
I hope you enjoyed today's projects! How would you decorate your own luminaries? Below are the measurements and the supply lists for both versions of the Scary Silhouettes Halloween luminaries.
Vellum Luminary Measurements
- Luminary Base: 5-1/2" x 10-1/2"; scored at 2-1/2", 5", 7-1/2", and 10" then rotate 90 degrees and score at 2-1/2"
- Cardstock Side Pieces (cut 4): 3-1/2" x 3" (Basic Black Cardstock)
- Cat: 2-1/2" x 2" (Basic Black Cardstock)
- Haunted House (cut 2): 3" x 3" (Basic Black Cardstock)
- Bats: 2" x 2" (Basic Black Cardstock)
Cardstock Luminary Measurements
- Luminary Base: 5" x 10-1/2"; scored at 2-1/2", 5", 7-1/2", and 10" then rotate 90 degrees and score at 2-1/2"
- Vellum Pieces (cut 4): 2-3/8" x 2-3/8" (Vellum Cardstock)
Supplies
- #101856 Vellum Cardstock
- #121045 Basic Black Cardstock
- #110755 Multipurpose Liquid Glue
- #102300 Bone Folder
- #103579 Paper Snips
- #130148 Grid Paper
- #152392 Paper Trimmer
- #149653 Stampin' Cut & Emboss Machine
- #159851 Scary Silhouettes Dies
- Tea light battery-operated candles
EDITED: Below is a template for the vellum luminary.
The July-December Mini Catalog is coming July 1st! The Scary Silhouettes Dies will become available starting July 1st which is only a few weeks away. I hope you add the Scary Silhouette Dies to the top of your wish list!
Starting July 1st, if you would like to recreate these luminaries and need some supplies, please, shop my online store HERE. If you have any stamping questions, I am happy to help!
Thanks for stopping by!
Beth


Love these!
ReplyDeleteThank you so much for your kind words! I am so glad you enjoyed the Scary Cute luminaries!
DeleteI LOVE Halloween, too, and I love these lanterns. My 8 yo son saw this post with me and asked if we could make them - you know it! Can't wait!
ReplyDeleteThank you so much for your kind words! I can't wait to see your lanterns! Please, post a photo of your lanterns on my Facebook page at facebook.com/craftwithbeth. I would love to see what you create!
DeleteSo cute! Want to make these with friend. One question about the measurement for the vellum, why 5 1/2" high? The die cut pieces are not that high. Am I missing something? Thank you for sharing!!
ReplyDeleteThank you so much for your comments! The vellum is 5-1/2" high to accommodate the height of the vellum for the sides and for the bottom tabs of the luminary.
DeleteI just came across these adorable luminaries. Is the bottom supposed to be loose or did I just miss something.
ReplyDeleteThank you so much for your kind words! The finished luminary is open on the top, so the battery-operated candle is easier to put inside.
DeleteSo the extra flap is actually the top and would sit down over the candle?
ReplyDeleteThe top area of the template will become the 4 sides of the box. The flap on the right side of the template is to close the sides to form the box shape. The bottom flaps are to close the bottom of the box. The candle will sit in the center of the box on top of the bottom flaps.
ReplyDelete