Showing posts with label vellum. Show all posts

Wednesday, June 15, 2022

Sneak Peek: Scary Cute Luminaries

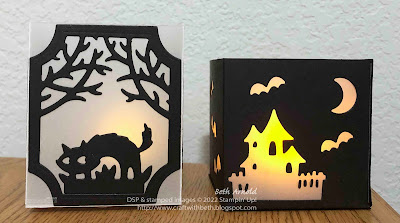
I am so excited to share with you a sneak peek from the upcoming 2022 July-December Mini Catalog! Today's projects are a pair of Halloween tea light luminaries features the Scary Silhouette Dies.


Scary Silhouettes Dies Halloween Luminary Tea Light Candle Home Decor decoration 3D

There are so many wonderful new products in the 2022 July-December Mini Catalog that I know you are going to love! It was so hard to choose what to share first! I am starting with Halloween because it is one of my favorite holidays and because it is one of the first holidays in fall.


Scary Silhouettes Dies Halloween Luminary Tea Light Candle Home Decor decoration 3D

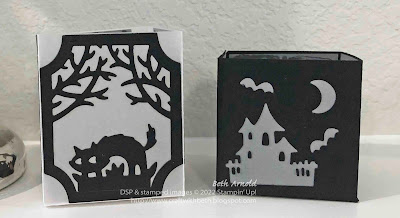
I created these luminaries to highlight the Scary Silhouettes Dies versatility and to display on my mantle in my family room for the Halloween season. Luminaries were the first idea that I had when I saw these dies! I noticed how the tree label shaped die could be used to cut a window out of the center of the solid label shaped die and thought how fun that would be to be a panel on a luminary!


Scary Silhouettes Dies Halloween Luminary Tea Light Candle Home Decor decoration 3D


I was determined to make luminaries this year even before I saw the July-December Mini Catalog. I have been sitting on this idea since early January when I made treat bags for Valentine's Day with hearts die cut around the tops of the bags. I thought they would be a perfect shape for a luminary!


Scary Silhouettes Dies Halloween Luminary Tea Light Candle Home Decor decoration 3D


The size and shape of my luminary was determined by the size of the solid label die. I measured the solid label die and drew up a template on my grid paper. The Basic Black cardstock luminary was my first prototype. I was really happy with my first attempt, but I quickly realized that I was a half an inch short for the solid label die. So, I used the other dies in the Scary Silhouettes Dies to cut bats, haunted houses, and moons out of the Basic Black cardstock. I adhered squares of vellum to the inside of the luminary and added a tea light candle inside.


Scary Silhouettes Dies Halloween Luminary Tea Light Candle Home Decor decoration 3D

I adjusted my measurements and cut a second luminary with vellum cardstock. My second attempt was a success! The solid label die cuts fit perfectly on each of the four sides of the luminary.


I die cut four solid labels and then cut the tree label from the center of each solid label to make each of the four side panels. Then I die cut cats, haunted houses, and bats to decorate each panel and placed a tea light candle inside.


Scary Silhouettes Dies Halloween Luminary Tea Light Candle Home Decor decoration 3D

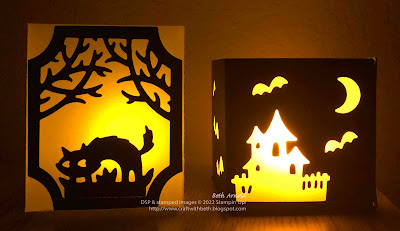
Look at beautiful they look at night! You can really see how the vellum intensifies the light from the candle through the die cut areas!


Scary Silhouettes Dies Halloween Luminary Tea Light Candle Home Decor decoration 3D


I hope you enjoyed today's projects! How would you decorate your own luminaries? Below are the measurements and the supply lists for both versions of the Scary Silhouettes Halloween luminaries.


Vellum Luminary Measurements

  • Luminary Base: 5-1/2" x 10-1/2"; scored at 2-1/2", 5", 7-1/2", and 10" then rotate 90 degrees and score at 2-1/2"
  • Cardstock Side Pieces (cut 4): 3-1/2" x 3" (Basic Black Cardstock)
  • Cat: 2-1/2" x 2" (Basic Black Cardstock)
  • Haunted House (cut 2): 3" x 3" (Basic Black Cardstock)
  • Bats: 2" x 2" (Basic Black Cardstock)

Cardstock Luminary Measurements

  • Luminary Base: 5" x 10-1/2"; scored at 2-1/2", 5", 7-1/2", and 10" then rotate 90 degrees and score at 2-1/2"
  • Vellum Pieces (cut 4): 2-3/8" x 2-3/8" (Vellum Cardstock)


Supplies

  • #101856 Vellum Cardstock
  • #121045 Basic Black Cardstock
  • #110755 Multipurpose Liquid Glue
  • #102300 Bone Folder
  • #103579 Paper Snips
  • #130148 Grid Paper
  • #152392 Paper Trimmer
  • #149653 Stampin' Cut & Emboss Machine
  • #159851 Scary Silhouettes Dies 
  • Tea light battery-operated candles


EDITED: Below is a template for the vellum luminary. 

Scary Cute Vellum Halloween Luminary Template


The July-December Mini Catalog is coming July 1st! The Scary Silhouettes Dies will become available starting July 1st which is only a few weeks away. I hope you add the Scary Silhouette Dies to the top of your wish list!

Starting July 1st, if you would like to recreate these luminaries and need some supplies, please, shop my online store HERE. If you have any stamping questions, I am happy to help!

Thanks for stopping by!

Beth
Monday, April 6, 2020

Ornate Garden Embossed Vellum Overlay Thank You Card

I have been busy making tons of projects using the Ornate Garden Product Suite! The Ornate Garden Product Suite is so cheerful and happy! It is a bright spot in my day, for sure!

Craft with Beth: Stampin' Up! card Ornate Garden Ornate Thank You Ornate Styles Stampin' Blends Vellum Overlay Heat Embossing Stitched Rectangle Dies

My demonstrator team Purrfect Stampers and I have been have twice weekly stamping sessions on Zoom. We check in with each with what is happening in our lives and with our families, chat about and share our stamping projects, and set team challenges. Each stamping session we agree on a project to work on. This week's challenge was to create a project using vellum.

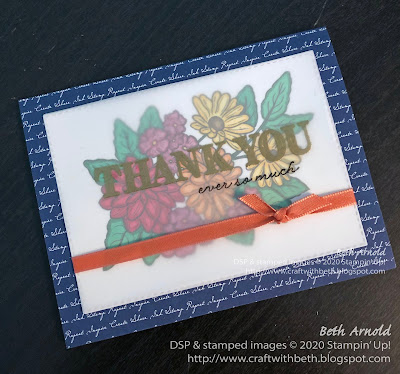
I created a thank you card using the Ornate Garden product suite and heat embossing with vellum. I die cut a piece of vellum using the 2nd largest stitched rectangle die.

Then I stamped the "thank you" greeting from Ornate Styles stamp set with Versamark Watermark ink in the upper center of the vellum die cut stitched rectangle. Added gold embossing powder all over the Versamark Watermark ink and heat set it with the Heat Tool.

Craft with Beth: Stampin' Up! card Ornate Garden Ornate Thank You Ornate Styles Stampin' Blends Vellum Overlay Heat Embossing Stitched Rectangle Dies

Underneath the embossed thank you, I stamped the "ever so much" greeting with Stazon Jet Black ink.

Because vellum is plastic and has a slippery surface, it needs an ink that can stick on to the plastic, not smudge, and be permanent. Stazon ink is a solvent, alcohol-based ink, is permenant, and can "stick" on to the plastic vellum. Without being to scientific, vellum plastic is made from alcohol and Stazon is made from alcohol, so the two like to bond to each other. Vellum and Stazon ink are a great match.

Craft with Beth: Stampin' Up! card Ornate Garden Ornate Thank You Ornate Styles Stampin' Blends Vellum Overlay Heat Embossing Stitched Rectangle Dies

I set the vellum aside to dry for a few moments while I die cut a second stitched rectangle out. This time from Whisper White cardstock. I stamped the large floral bouquet image from the Ornate Styles stamp set in the center of the Whisper White stitched rectangle die cut using Memento Tuxedo Black ink.

I used Memento Tuxedo Black ink here because I didn't want the Stampin' Blends to smear the ink. Memento Tuxedo Black ink is water-based. Stampin' Blends are alcohol-based. Water and alcohol repel each other, so the Memento Tuxedo Black ink will stay nice and crisp when you color with Stampin' Blends. The Memento Tuxedo Black Ink Pad and Stampin' Blends are a great match. I used two different black ink pads because each type of ink has a different application.

Then I used my Stampin' Blends to color in the floral bouquet. I used
  • #144598 Cherry Cobbler Stampin' Blend Combo Pack (flower petals)
  • #144599 Pumpkin Pie Stampin' Blend Combo Pack (flower petals)
  • #144603 Daffodil Delight Stampin' Blend Combo Pack (flower petals and flower centers)
  • #147282 Call Me Clover Stampin' Blend Combo Pack (leaves)
  • #147932 Blackberry Bliss Stampin' Blend Combo Pack (flower petals)
  • #147273 Soft Suede Stampin' Blend Combo Pack (flower centers)

I traced the Memento Jet Black ink lines with the darker shade of the Stampin' Blend and then filled in each flower and petal with the lighter shade of Stampin' Blend. This is a quick and easy way to create highlights and shadows without it being overly complicated. I really like the results too!

Craft with Beth: Stampin' Up! card Ornate Garden Ornate Thank You Ornate Styles Stampin' Blends Vellum Overlay Heat Embossing Stitched Rectangle Dies

Next I adhered the vellum piece on top of the Whisper White cardstock with the floral bouquet stamped image.

Adhering vellum can be tricky because the adhesive can show through the vellum and be seen. I used snail tape adhesive only on the back of the vellum where the gold embossed "thank you" greeting is. So, the gold embossed "thank you" greeting blocks the snail adhesive from showing through to the front of the card.

I also adhered the Terracotta Tile Ribbon across the front of the vellum and around to the back of the Whisper White cardstock to keep the two layers together. There is a glue dot(r) underneath the knot to add more stability too.

Craft with Beth: Stampin' Up! card Ornate Garden Ornate Thank You Ornate Styles Stampin' Blends Vellum Overlay Heat Embossing Stitched Rectangle Dies

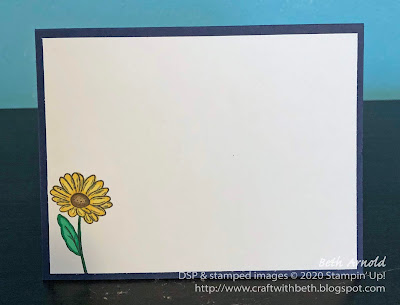
I stamped the daisy image in the lower left corner of the inside of the card, leaving ample room to write a personal message. You can see I used the outlining method of coloring with Stampin' Blends here again. It is very pretty!

Below are the measurements to recreate this card.

Ornate Garden Embossed Vellum Thank You Card Measurements

Paper
Dimensions
Card Base
Night of Navy Cardstock
5-1/2” x 8-1/2”; scored at 4-1/4”
Front Panel
Neutral Designer Series Paper (Night of Navy Script Pattern)
5-1/2” x 4-1/4”
Stitched Rectangle #1
Whisper White Cardstock
5” x 4-1/4”; die cut with the 2nd largest stitched rectangle die
Stitched Rectangle #2
Vellum
5” x 4-1/4”; die cut with the 2nd largest stitched rectangle die
Inside Mat
Whisper White Cardstock
4” x 5-1/4”

How have you used vellum in your projects? I would love to what you create with vellum! Post a project photo on my Facebook page today!

I hope you enjoyed today's Ornate Garden embossed vellum overlay thank you card! If you would like to purchase the supplies I used to create this card, please use the supply list below. I would love to be your Stampin' Up! demonstrator!

Thanks for stopping by!
Beth


Ornate Garden Embossed Vellum Thank You Card Supply List
Stamps
#152572 Ornate Style (Cling-Mount)
#149471 Ornate Thanks (Photopolymer)
Paper
#100730 Whisper White Cardstock
#101856 Vellum
#100867 Night of Navy Cardstock
#149614 Neutrals Designer Series Paper
Ink
#101406 Stazon Jet Black Ink Pad
#132708 Memento Tuxedo Black Ink Pad
#102283 Versamark Watermark Ink Pad
#144598 Cherry Cobbler Stampin’ Blends Combo Pack
#144603 Daffodil Delight Stampin’ Blends Combo Pack
#144599 Pumpkin Pie Stampin’ Blends Combo Pack
#147282 Call Me Clover Stampin’ Blends Combo Pack
#147932 Blackberry Bliss Stampin’ Blends Combo Pack
#147273 Soft Suede Stampin’ Blends Combo Pack
Embellishments
#109129 Gold Embossing Powder
#152479 Ornate Garden Ribbon Combo Pack
Tools
#152392 Stampin’ Trimmer
#102300 Bone Folder
#103579 Paper Snips
Corresponding Clear Acrylic Blocks
Die Cutting Machine
#129053 Heat Tool
#103083 Embossing Buddy
#148551 Rectangle Stitched Dies