Showing posts with label stampin' blends. Show all posts

Thursday, December 15, 2022

Send a Sweet Simply Succulent Card to a Special Someone

Each Tuesday I send out my stamping newsletter to my email list. On December 20th, I will be sharing this thank you card featuring the Simply Succulent stamp set and some embossing folders.

simply succulents friendship thank you card


This Simply Succulents card is only available to my email list subscribers. If you are already on my email list, you will automatically receive the project supply list, measurements, and instructions for this card.

If you are not on my email list and would like to receive the project supply list, measurements, and instructions for this Christmas card, please, sign up for my email list by December 19th, 2022.

Sign up for my mailing list today HERE or in the bright blue sign up box in the upper right corner of my blog. I can't wait to welcome you as a subscriber!

Beth

Friday, November 18, 2022

2-in-1 Thanksgiving Pumpkin Treat Holder and Placecard

Is it a treat holder or a place card? Why not be both!? Delight your Thanksgiving guests with this a pumpkin chocolate kiss triangle treat holder!

Hello Harvest, Rustic Pumpkin Dies, Thanksgiving place card chocolate kiss treat holder, table setting, 3D, home decor

This style of treat holder is so easy, quick to make, and can be customizable to the materials that you have on hand.

The base is a piece of cardstock bent into the shape of a triangle. Then a die cut or punched shape is adhered to 2 sides of the triangle and then adhered together. Lastly, a chocolate kiss is placed in the center of the triangle.

Hello Harvest, Rustic Pumpkin Dies, Thanksgiving place card chocolate kiss treat holder, table setting, 3D, home decor


You may be familiar with this treat holder style with my plethora of cat punch treat holders for Valentine's Day and Halloween. Now that the cat punch is retired, I had to brainstorm other punches and dies that I could make the triangle treat holder with.

Don't worry. I didn't sell my cat punch after it retired. The cat punch is one punch that I plan on keeping for a long time regardless of its current or retired status. So, you may see some projects in the future with the cat punch.

With Thanksgiving coming soon, the pumpkin stamp and die from the #159634 Hello Harvest stamp set and the #159643 Rustic Pumpkin Dies was a great place to start!

Hello Harvest, Rustic Pumpkin Dies, Thanksgiving place card chocolate kiss treat holder, table setting, 3D, home decor


Once I made the treat holders, I added a name tag across the front of the pumpkin to add the name of a guest. I wrote the names for these samples with my computer. However, I recommend a Basic Black Stampin' Write Marker or a Basic Black Stampin' Blend to write the name of your guest before you attach the name tag to the pumpkin.

Hello Harvest, Rustic Pumpkin Dies, Thanksgiving place card chocolate kiss treat holder, table setting, 3D, home decor

These treat holder place cards are versatile. Use them during the dinner or after. The place cards can be put at each guest's place setting or on a side table for guests to pick up when they arrive or for when they leave.


Below are the measurements and the supply list for my pumpkin place card and treat holder. If you need supplies to recreate this project, please, shop my online store HERE.

Measurements

  • Triangle Base: 1" x 2-1/2"; scored at 3/4" and 1-3/4" (Pumpkin Pie Cardstock)
  • Pumpkins (cut 1 of each color of cardstock): 2-1/2" x 2-1/2" (Pumpkin Pie Cardstock and Basic White Cardstock)
  • Name Tag: 1/2" x 2" (Basic White Cardstock)


Supplies

Stamps
#159634 Hello Harvest
#159644 Hello Harvest Bundle

Ink
#147114 Early Espresso Ink Pad
#154897 Pumpkin Pie Stampin' Blends Combo Pack (both)
# Soft Suede Stampin' Blends Combo Pack (both)

Paper
#105117 Pumpkin Pie Cardstock
#159276 Basic White Cardstock

Embellishments
#104199 Linen Thread

Tools
#159643 Rustic Pumpkin Dies
#103683 Mini Glue Dots
#110755 Multipurpose Liquid Glue
#102300 Bone Folder
#103579 Paper Snips
#130148 Grid Paper
#152392 Paper Trimmer
#149653 Stampin' Cut & Emboss Machine
#126200 Stampin' Scrub
#153648 Stampin' Mist Cleaner
#118485 Clear Block D
Chocolate Kisses

I hope you enjoyed today's pumpkin place card and treat holder. I know your Thanksgiving guest are going to love receiving this sweet treat holder at your Thanksgiving dinner!

Hello Harvest, Rustic Pumpkin Dies, Thanksgiving place card chocolate kiss treat holder, table setting, 3D, home decor

Have you tried this triangle style treat holder? What stamps, punches, and dies did you use? Post a photo on social media and tag me with the hashtag #craftwithbeth, so I can find your projects. I would love to see what you create!

If you need supplies to make this project, please, shop my online store HERE.

If you have any questions about today's project, please, don't hesitate to ask me.

Thanks for stopping by!
Beth

Monday, April 6, 2020

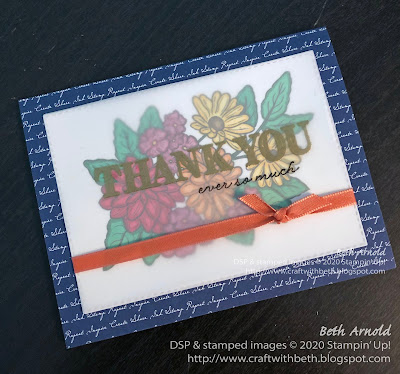
Ornate Garden Embossed Vellum Overlay Thank You Card

I have been busy making tons of projects using the Ornate Garden Product Suite! The Ornate Garden Product Suite is so cheerful and happy! It is a bright spot in my day, for sure!

Craft with Beth: Stampin' Up! card Ornate Garden Ornate Thank You Ornate Styles Stampin' Blends Vellum Overlay Heat Embossing Stitched Rectangle Dies

My demonstrator team Purrfect Stampers and I have been have twice weekly stamping sessions on Zoom. We check in with each with what is happening in our lives and with our families, chat about and share our stamping projects, and set team challenges. Each stamping session we agree on a project to work on. This week's challenge was to create a project using vellum.

I created a thank you card using the Ornate Garden product suite and heat embossing with vellum. I die cut a piece of vellum using the 2nd largest stitched rectangle die.

Then I stamped the "thank you" greeting from Ornate Styles stamp set with Versamark Watermark ink in the upper center of the vellum die cut stitched rectangle. Added gold embossing powder all over the Versamark Watermark ink and heat set it with the Heat Tool.

Craft with Beth: Stampin' Up! card Ornate Garden Ornate Thank You Ornate Styles Stampin' Blends Vellum Overlay Heat Embossing Stitched Rectangle Dies

Underneath the embossed thank you, I stamped the "ever so much" greeting with Stazon Jet Black ink.

Because vellum is plastic and has a slippery surface, it needs an ink that can stick on to the plastic, not smudge, and be permanent. Stazon ink is a solvent, alcohol-based ink, is permenant, and can "stick" on to the plastic vellum. Without being to scientific, vellum plastic is made from alcohol and Stazon is made from alcohol, so the two like to bond to each other. Vellum and Stazon ink are a great match.

Craft with Beth: Stampin' Up! card Ornate Garden Ornate Thank You Ornate Styles Stampin' Blends Vellum Overlay Heat Embossing Stitched Rectangle Dies

I set the vellum aside to dry for a few moments while I die cut a second stitched rectangle out. This time from Whisper White cardstock. I stamped the large floral bouquet image from the Ornate Styles stamp set in the center of the Whisper White stitched rectangle die cut using Memento Tuxedo Black ink.

I used Memento Tuxedo Black ink here because I didn't want the Stampin' Blends to smear the ink. Memento Tuxedo Black ink is water-based. Stampin' Blends are alcohol-based. Water and alcohol repel each other, so the Memento Tuxedo Black ink will stay nice and crisp when you color with Stampin' Blends. The Memento Tuxedo Black Ink Pad and Stampin' Blends are a great match. I used two different black ink pads because each type of ink has a different application.

Then I used my Stampin' Blends to color in the floral bouquet. I used
  • #144598 Cherry Cobbler Stampin' Blend Combo Pack (flower petals)
  • #144599 Pumpkin Pie Stampin' Blend Combo Pack (flower petals)
  • #144603 Daffodil Delight Stampin' Blend Combo Pack (flower petals and flower centers)
  • #147282 Call Me Clover Stampin' Blend Combo Pack (leaves)
  • #147932 Blackberry Bliss Stampin' Blend Combo Pack (flower petals)
  • #147273 Soft Suede Stampin' Blend Combo Pack (flower centers)

I traced the Memento Jet Black ink lines with the darker shade of the Stampin' Blend and then filled in each flower and petal with the lighter shade of Stampin' Blend. This is a quick and easy way to create highlights and shadows without it being overly complicated. I really like the results too!

Craft with Beth: Stampin' Up! card Ornate Garden Ornate Thank You Ornate Styles Stampin' Blends Vellum Overlay Heat Embossing Stitched Rectangle Dies

Next I adhered the vellum piece on top of the Whisper White cardstock with the floral bouquet stamped image.

Adhering vellum can be tricky because the adhesive can show through the vellum and be seen. I used snail tape adhesive only on the back of the vellum where the gold embossed "thank you" greeting is. So, the gold embossed "thank you" greeting blocks the snail adhesive from showing through to the front of the card.

I also adhered the Terracotta Tile Ribbon across the front of the vellum and around to the back of the Whisper White cardstock to keep the two layers together. There is a glue dot(r) underneath the knot to add more stability too.

Craft with Beth: Stampin' Up! card Ornate Garden Ornate Thank You Ornate Styles Stampin' Blends Vellum Overlay Heat Embossing Stitched Rectangle Dies

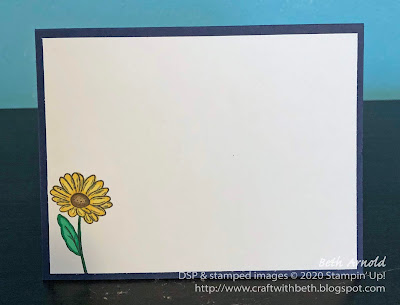
I stamped the daisy image in the lower left corner of the inside of the card, leaving ample room to write a personal message. You can see I used the outlining method of coloring with Stampin' Blends here again. It is very pretty!

Below are the measurements to recreate this card.

Ornate Garden Embossed Vellum Thank You Card Measurements

Paper
Dimensions
Card Base
Night of Navy Cardstock
5-1/2” x 8-1/2”; scored at 4-1/4”
Front Panel
Neutral Designer Series Paper (Night of Navy Script Pattern)
5-1/2” x 4-1/4”
Stitched Rectangle #1
Whisper White Cardstock
5” x 4-1/4”; die cut with the 2nd largest stitched rectangle die
Stitched Rectangle #2
Vellum
5” x 4-1/4”; die cut with the 2nd largest stitched rectangle die
Inside Mat
Whisper White Cardstock
4” x 5-1/4”

How have you used vellum in your projects? I would love to what you create with vellum! Post a project photo on my Facebook page today!

I hope you enjoyed today's Ornate Garden embossed vellum overlay thank you card! If you would like to purchase the supplies I used to create this card, please use the supply list below. I would love to be your Stampin' Up! demonstrator!

Thanks for stopping by!
Beth


Ornate Garden Embossed Vellum Thank You Card Supply List
Stamps
#152572 Ornate Style (Cling-Mount)
#149471 Ornate Thanks (Photopolymer)
Paper
#100730 Whisper White Cardstock
#101856 Vellum
#100867 Night of Navy Cardstock
#149614 Neutrals Designer Series Paper
Ink
#101406 Stazon Jet Black Ink Pad
#132708 Memento Tuxedo Black Ink Pad
#102283 Versamark Watermark Ink Pad
#144598 Cherry Cobbler Stampin’ Blends Combo Pack
#144603 Daffodil Delight Stampin’ Blends Combo Pack
#144599 Pumpkin Pie Stampin’ Blends Combo Pack
#147282 Call Me Clover Stampin’ Blends Combo Pack
#147932 Blackberry Bliss Stampin’ Blends Combo Pack
#147273 Soft Suede Stampin’ Blends Combo Pack
Embellishments
#109129 Gold Embossing Powder
#152479 Ornate Garden Ribbon Combo Pack
Tools
#152392 Stampin’ Trimmer
#102300 Bone Folder
#103579 Paper Snips
Corresponding Clear Acrylic Blocks
Die Cutting Machine
#129053 Heat Tool
#103083 Embossing Buddy
#148551 Rectangle Stitched Dies