Showing posts with label Thanksgiving. Show all posts

Friday, November 18, 2022

2-in-1 Thanksgiving Pumpkin Treat Holder and Placecard

Is it a treat holder or a place card? Why not be both!? Delight your Thanksgiving guests with this a pumpkin chocolate kiss triangle treat holder!

Hello Harvest, Rustic Pumpkin Dies, Thanksgiving place card chocolate kiss treat holder, table setting, 3D, home decor

This style of treat holder is so easy, quick to make, and can be customizable to the materials that you have on hand.

The base is a piece of cardstock bent into the shape of a triangle. Then a die cut or punched shape is adhered to 2 sides of the triangle and then adhered together. Lastly, a chocolate kiss is placed in the center of the triangle.

Hello Harvest, Rustic Pumpkin Dies, Thanksgiving place card chocolate kiss treat holder, table setting, 3D, home decor


You may be familiar with this treat holder style with my plethora of cat punch treat holders for Valentine's Day and Halloween. Now that the cat punch is retired, I had to brainstorm other punches and dies that I could make the triangle treat holder with.

Don't worry. I didn't sell my cat punch after it retired. The cat punch is one punch that I plan on keeping for a long time regardless of its current or retired status. So, you may see some projects in the future with the cat punch.

With Thanksgiving coming soon, the pumpkin stamp and die from the #159634 Hello Harvest stamp set and the #159643 Rustic Pumpkin Dies was a great place to start!

Hello Harvest, Rustic Pumpkin Dies, Thanksgiving place card chocolate kiss treat holder, table setting, 3D, home decor


Once I made the treat holders, I added a name tag across the front of the pumpkin to add the name of a guest. I wrote the names for these samples with my computer. However, I recommend a Basic Black Stampin' Write Marker or a Basic Black Stampin' Blend to write the name of your guest before you attach the name tag to the pumpkin.

Hello Harvest, Rustic Pumpkin Dies, Thanksgiving place card chocolate kiss treat holder, table setting, 3D, home decor

These treat holder place cards are versatile. Use them during the dinner or after. The place cards can be put at each guest's place setting or on a side table for guests to pick up when they arrive or for when they leave.


Below are the measurements and the supply list for my pumpkin place card and treat holder. If you need supplies to recreate this project, please, shop my online store HERE.

Measurements

  • Triangle Base: 1" x 2-1/2"; scored at 3/4" and 1-3/4" (Pumpkin Pie Cardstock)
  • Pumpkins (cut 1 of each color of cardstock): 2-1/2" x 2-1/2" (Pumpkin Pie Cardstock and Basic White Cardstock)
  • Name Tag: 1/2" x 2" (Basic White Cardstock)


Supplies

Stamps
#159634 Hello Harvest
#159644 Hello Harvest Bundle

Ink
#147114 Early Espresso Ink Pad
#154897 Pumpkin Pie Stampin' Blends Combo Pack (both)
# Soft Suede Stampin' Blends Combo Pack (both)

Paper
#105117 Pumpkin Pie Cardstock
#159276 Basic White Cardstock

Embellishments
#104199 Linen Thread

Tools
#159643 Rustic Pumpkin Dies
#103683 Mini Glue Dots
#110755 Multipurpose Liquid Glue
#102300 Bone Folder
#103579 Paper Snips
#130148 Grid Paper
#152392 Paper Trimmer
#149653 Stampin' Cut & Emboss Machine
#126200 Stampin' Scrub
#153648 Stampin' Mist Cleaner
#118485 Clear Block D
Chocolate Kisses

I hope you enjoyed today's pumpkin place card and treat holder. I know your Thanksgiving guest are going to love receiving this sweet treat holder at your Thanksgiving dinner!

Hello Harvest, Rustic Pumpkin Dies, Thanksgiving place card chocolate kiss treat holder, table setting, 3D, home decor

Have you tried this triangle style treat holder? What stamps, punches, and dies did you use? Post a photo on social media and tag me with the hashtag #craftwithbeth, so I can find your projects. I would love to see what you create!

If you need supplies to make this project, please, shop my online store HERE.

If you have any questions about today's project, please, don't hesitate to ask me.

Thanks for stopping by!
Beth

Thursday, November 10, 2022

Practice your Stampin' Blends skills with these friendship cards

Each Tuesday I send out my stamping newsletter to my email list. On November 15th, I will be sharing two autumnal friendship cards featuring the Hello Harvest Stamp Set and Die Bundle.


Hello Harvest autumnal floral friendship thinking of you card


These floral friendship cards is only available to my email list subscribers. If you are already on my email list, you will automatically receive the project supply list, measurements, and instructions for this card.

If you are not on my email list and would like to receive the project supply list, measurements, and instructions for this Christmas card, please, sign up for my email list by Monday, November 14th, 2022.

Sign up for my mailing list today HERE or in the bright blue sign up box in the upper right corner of my blog. I can't wait to welcome you as a subscriber!

Beth

Wednesday, November 9, 2022

Make a Sweet Gift with this Turkey Punch Art Treat Holder

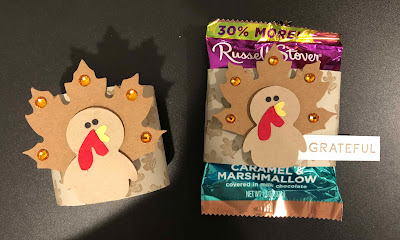
I am back with a second way to use Libby Fen's amazing turkey punch art! Today's project is a sweet chocolate marshmallow punch candy treat wrapper featuring Libby's turkey punch art.

turkey punch art candy wrapper. cardstock candy wrapper is wrapped around a chocolate marshmallow pumpkin candy. Thanksgiving, punch art, penguin builder punch, Painted Pheasant, 3D, treat holder


The candy wrapper starts off the same way the turkey punch art napkin ring on Monday did. Stamp the leaves image with Crumb Cake ink all over the Sahara Sand wrapper base.

stamp the leaves on the candy wrapper base. Thanksgiving, punch art, penguin builder punch, Painted Pheasant, 3D, treat holder

Curl the wrapper base with a bone folder to help wrap it around the candy. Wrap the wrapper base around the candy starting in the center of the front. Wrap the cardstock around the candy, so that the ends meet in the center of the front of the candy. Adhere the ends together with liquid glue or tear and Tape Adhesive.


adhere the turkey punch art candy wrapper ends together. cardstock candy wrapper is wrapped around a chocolate marshmallow pumpkin candy. Thanksgiving, punch art, penguin builder punch, Painted Pheasant, 3D, treat holder

Stamp the grateful greeting with Crumb Cake ink onto a Basic White cardstock rectangle. Stamp the greeting toward the right side, so that you can tuck the left side of the greeting underneath of the turkey punch art.

Adhere the greeting to candy wrapper on the right side and slightly to the right of the center.


turkey punch art candy wrapper. cardstock candy wrapper is wrapped around a chocolate marshmallow pumpkin candy. Thanksgiving, punch art, penguin builder punch, Painted Pheasant, 3D, treat holder

Build the turkey punch art. Punch the body of the turkey using the Penguin Builder Punch and Crumb Cake cardstock. Punch the eyes from the Whale Builder Punch and Basic Black cardstock. Punch the wattle from the Whale Builder Punch spout and Real Red cardstock. Punch the beak from the Song Bird Punch and Daffodil Delight cardstock. Adhere the eyes, wattle, and beak to the turkey's body.


add dimensionals to the punch art. Thanksgiving, punch art, penguin builder punch, Painted Pheasant, 3D, treat holder

Add three dimensionals vertically down the center of the back of the turkey's body. Attach a maple leaf die cut from the Leaf Label and Amber Gems Combo Pack to the back of the turkey's body. Add amber gems to each of the ends of the feathers.

Then add 4 dimensionals vertically down the center of the back of the maple leaf. In the photo above, you will see 3 dimensionals on the leaf. Add 1 more dimensional right on top of the dimensional at the bottom of the turkey body. This will form a double layer of dimensionals to evenly support and level the punch art on the candy wrapper.


side view of add dimensionals to the punch art. Thanksgiving, punch art, penguin builder punch, Painted Pheasant, 3D, treat holder

Below are the measurements and the supply list for my Thanksgiving turkey candy wrapper. If you need supplies to recreate this project, please, shop my online store HERE.

Measurements

  • Candy Wrapper: 2" x 7-1/2" (Sahara Sand Cardstock)
  • Greeting: 1/2" x 2-1/4" (Basic White Cardstock)
  • Turkey: 2" x 2-1/4" (Crumb Cake Cardstock)
  • Turkey Beak: 1" x 2" (Daffodil Delight Cardstock)
  • Turkey Wattle: 1" x 2" (Real Red Cardstock)
  • Turkey Eyes: 1" x 2" (Basic Black Cardstock)
  • Feathers: use a leaf from the Leaf Label and Amber Gems Combo Pack


Supplies

Stamps
#159846 Painted Pheasant

Ink
#147116 Crumb Cake Ink Pad

Paper
#121043 Sahara Sand Cardstock
#120953 Crumb Cake Cardstock
#119683 Daffodil Delight Cardstock
#102482 Real Red Cardstock
#121045 Basic Black Cardstock

Embellishments
#159969 Leaf Label and Amber Gems Combo Pack
#104430 Dimensionals

Tools
#152699 Whale Builder Punch
#158726 Song Bird Punch
#156452 Penguin Builder Punch
#154031 Tear and Tape Adhesive
#117147 Clear Block B
#118489 Clear Block G
#110755 Multipurpose Liquid Glue
#102300 Bone Folder
#103579 Paper Snips
#130148 Grid Paper
#152392 Paper Trimmer
#126200 Stampin' Scrub
#153648 Stampin' Mist Cleaner


turkey punch art candy wrapper and turkey punch art napkin ring. cardstock candy wrapper is wrapped around a chocolate marshmallow pumpkin candy. Thanksgiving, punch art, penguin builder punch, Painted Pheasant, 3D, treat holder
 
There are so many more ways to decorate for Thanksgiving with this delightful turkey punch art! I would love to see how you use this turkey punch art for your Thanksgiving celebration! Post a photo of your turkey punch art project and tag me on social media with #craftwithbeth. I can't wait to see what you create!

I hope you enjoyed today's turkey punch art candy wrapper. If you need supplies to make this project, please, shop my online store HERE.

Thanks for stopping by!
Beth

Monday, November 7, 2022

Set Your Thanksgiving Table with Turkey Punch Art Decor!

When I saw Libby Fen's punch art turkey card using the Penguin Builder Punch, I just had to create a project using her punch art design! Libby's turkey punch art is so perfect, festive, and adorable! It is great for your Thanksgiving guests of all ages! Today's project is a custom napkin ring for your Thanksgiving table.

Thanksgiving napkin ring with a punch art turkey on the front. A maple leaf die cut is used for the turkey's feathers. Thanksgiving, punch art, penguin builder punch, Painted Pheasant, 3D, table setting, home decor


I made a napkin ring for the Thanksgiving table featuring Libby's punch art turkey. The napkin ring base is Sahara Sanda cardstock stamped with the leaves from Painted Pheasant. Attached to the front is the turkey punch art. I love the addition of the amber gems to the ends of the turkey's "feathers"! How clever and beautiful!

Thanksgiving napkin ring with a punch art turkey on the front. A maple leaf die cut is used for the turkey's feathers. Thanksgiving, punch art, penguin builder punch, Painted Pheasant, 3D, table setting, home decor
 

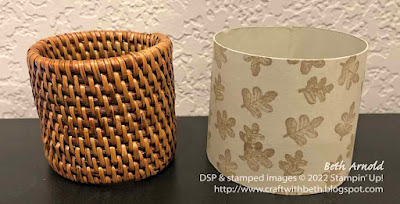
First, I stamped the leaves image with Crumb Cake ink on a 2" x 7-3/4" piece of Sahara Sand cardstock. Then I added a piece of Tear and Tape Adhesive vertically to the left edge of the cardstock.

Stamp the leaves on the napkin ring base, add adhesive, and curl. Thanksgiving, punch art, penguin builder punch, Painted Pheasant, 3D, table setting, home decor


Next I curled the cardstock with a bone folder to  help the cardstock become a cylinder shape.

Form the napkin ring shape around a store bought napkin ring. Thanksgiving, punch art, penguin builder punch, Painted Pheasant, 3D, table setting, home decor

I used a napkin ring that I had to help shape the cardstock napkin ring. This is not necessary, but it was helpful for me to form the napkin ring cyclinder shape. Remove the Tear and Tape Adhesive and adhere the cardstock ends together to complete the napkin ring base.

cardstock napkin ring wrapped around the store bought napkin ring to help make the cylindrical shape. Thanksgiving, punch art, penguin builder punch, Painted Pheasant, 3D, table setting, home decor


If you are using a store bought napkin ring as a form, you can now remove it from the cardstock napkin ring base.

cardstock napkin ring wrapped around the store bought napkin ring to help make the cylindrical shape. Thanksgiving, punch art, penguin builder punch, Painted Pheasant, 3D, table setting, home decor

Build the turkey punch art. Punch the body of the turkey using the Penguin Builder Punch and Crumb Cake cardstock. Punch the eyes from the Whale Builder Punch and Basic Black cardstock. Punch the wattle from the Whale Builder Punch spout and Real Red cardstock. Punch the beak from the Song Bird Punch and Daffodil Delight cardstock. Adhere the eyes, wattle, and beak to the turkey's body.
 

Thanksgiving, punch art, penguin builder punch, Painted Pheasant, 3D, table setting, home decor

Add 3 dimensionals vertically down the center of the back of the turkey's body. Attach a maple leaf die cut from the Leaf Label and Amber Gems Combo Pack to the back of the turkey's body. Add amber gems to each of the ends of the feathers.

Then add 4 dimensionals vertically down the center of the back of the maple leaf. In the photo below, you will see 3 dimensionals on the leaf. Add 1 more dimensional right on top of the dimensional at the bottom of the turkey body. This will form a double layer of dimensionals to evenly support and level the punch art on the napkin ring.

add dimensionals to the back of the punch art and the leaf to attach it to the napkin ring base. Thanksgiving, punch art, penguin builder punch, Painted Pheasant, 3D, table setting, home decor

Adding dimensionals down the center of the punch art enables the cardstock to move and bend when being used without tearing or being too fragile.

Below are the measurements and the supply list for my Thanksgiving napkin ring. If you need supplies to recreate this project, please, shop my online store HERE.

Measurements

  • Napkin Ring Base: 2" x 7-3/4" (Sahara Sand Cardstock)
  • Turkey: 2" x 2-1/4" (Crumb Cake Cardstock)
  • Turkey Beak: 1" x 2" (Daffodil Delight Cardstock)
  • Turkey Wattle: 1" x 2" (Real Red Cardstock)
  • Turkey Eyes: 1" x 2" (Basic Black Cardstock)
  • Feathers: use a leaf from the Leaf Label and Amber Gems Combo Pack


Supplies

Stamps
#159846 Painted Pheasant

Ink
#147116 Crumb Cake Ink Pad

Paper
#121043 Sahara Sand Cardstock
#120953 Crumb Cake Cardstock
#119683 Daffodil Delight Cardstock
#102482 Real Red Cardstock
#121045 Basic Black Cardstock

Embellishments
#159969 Leaf Label and Amber Gems Combo Pack
#104430 Dimensionals

Tools
#152699 Whale Builder Punch
#158726 Song Bird Punch
#156452 Penguin Builder Punch
#154031 Tear and Tape Adhesive
#117147 Clear Block B
#110755 Multipurpose Liquid Glue
#102300 Bone Folder
#103579 Paper Snips
#130148 Grid Paper
#152392 Paper Trimmer
#126200 Stampin' Scrub
#153648 Stampin' Mist Cleaner
Napin Ring (optional)


For today's project I used a cloth napkin. However, A paper napkin would be just as festive too! There are so many beautiful, seasonal paper napkins available too.

Not a fan of napkin rings? Check back here on my blog on Wednesday, I will show you how to turn this turkey punch art into something sweet!

I hope you enjoyed today's fun Penguin Builder Punch Thanksgiving napkin ring. If you need supplies to make this project, please, shop my online store HERE.

If you have any questions about today's project, please, don't hesitate to ask me.

Thanks for stopping by!
Beth

Friday, November 4, 2022

Make your Thanksgiving Extra Special with these Festive Treat Boxes

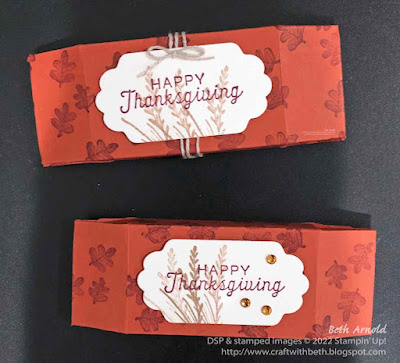
Today's Thanksgiving treat boxes were inspired by a project shared by fellow demonstrator Julie DeMatteo. Julie shared a treat box that she modified from fellow demonstrator Katja Hamann. Julie resized Katja's original box to fit a Reese's peanut butter egg. I am using Julie's resized box measurements for my Thanksgiving treat box.

Thanksgiving rectangular treat boxes. the ends of the boxes are bent at slight angles to give a cinched appearance. Thanksgiving, treat holder, box, gift packaging, Painted Pheasant, 3D


I enjoy creating and making different shaped treat holders. When I saw both Julie's and Katja's boxes, I thought that the shape and construction was very intriguing. I had to try it!

I made two treat boxes right away! I decorated both treat boxes with the leaves stamp from the Painted Pheasant stamp set and Rich Razzleberry ink.

I die cut the small label from the Seasonal Dies and a piece of Very Vanilla cardstock. The Happy Thanksgiving greeting is stamped in the center with Rich Razzleberry ink. The grassy reeds are stamped with Crumb Cake ink with full strength ink and stamped off strength ink.

On one of the boxes I wrapped linen thread and added a box to the top of the greeting. On the other box I added 3 amber gems to the right of the greeting and the grassy reeds.


Thanksgiving rectangular treat boxes. the ends of the boxes are bent at slight angles to give a cinched appearance. Thanksgiving, treat holder, box, gift packaging, Painted Pheasant, 3D


Below are the measurements and the supply list for my Thankgiving treat boxes. If you need supplies to recreate these treat boxes, please, shop my online store HERE.


Measurements

  • Treat Holder Base: 6-1/4" x 5-3/8"; scored on the 6-1/4" side at 5/8", 1-5/8", 4-5/8"; scored on the 5-3/8" side at 3/4", 2-1/2", 3-1/4", and 5"; scored on the 5-3/8" side only down to the 1st horizontal score line at 3/8" and 2-7/8" (flip the cardstock to score on the opposite side)
  • Greeting Label: 2" x 3" (Very Vanilla Cardstock)


Supplies

Stamps
#159846 Painted Pheasant Stamp Set

Paper
#119684 Cajun Craze Cardstock
#101650 Very Vanilla Cardstock

Ink
#147091 Rich Razzleberry Ink Pad
#147116 Crumb Cake Ink Pad

Embellishments
#159969 Leaf Label and Amber Gems Combo Pack
#104199 Linen Thread
#104430 Dimensionals

Tools
#156299 Seasonal Label Dies
#122334 Simply Scored Scoring Tool
#110755 Multipurpose Liquid Glue
#102300 Bone Folder
#103579 Paper Snips
#130148 Grid Paper
#152392 Paper Trimmer
#149653 Stampin' Cut & Emboss Machine
#126200 Stampin' Scrub
#153648 Stampin' Mist Cleaner
#117147 Clear Block B
#118490 Clear Block H
1/2" Circle Punch
Corner Rounder Punch


I hope you enjoyed today's Thanksgiving treat boxes and give them a try! You can also put other treats in this box, including other types of chocolate or candy, small gifts, puzzle pieces, and more! What will you put in your treat boxes?

I would love to see what treat boxes you make! Post your treat box photos on social media and be sure to tag me with #craftwithbeth. I can't wait to see what you create!

If you need supplies to make these boxes, please, shop my online store HERE.

If you have any questions about today's project, please, don't hesitate to ask me.

Thanks for stopping by!
Beth

Thursday, November 3, 2022

Use Stencils to Create a Cozy Thanksgiving Card

Each Tuesday I send out my stamping newsletter to my email list. On November 8th, I will be sharing a Thanksgiving card and how to make a stenciled background with harvest colors.

Thanksgiving card with a pumpkin and a maple leaf with a plaid pattern in the background, Thanksgiving, stenciling, Painted Pheasant, stencil, technique


This Thanksgiving card is only available to my email list subscribers. If you are already on my email list, you will automatically receive the project supply list, measurements, and instructions for this card.

If you are not on my email list and would like to receive the project supply list, measurements, and instructions for this harvest card, please, sign up for my email list by November 7th, 2022.

Sign up for my mailing list today HERE or in the bright blue sign up box in the upper right corner of my blog. 

I can't wait to welcome you as a subscriber!
Beth

Friday, September 23, 2022

Treelined Landscape Display Panel Fun Fold Thanksgiving Card

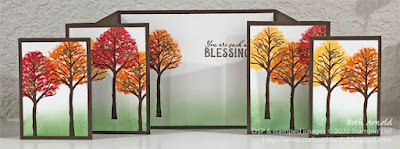
I was excited to try this new to me fun fold! It is called the Landscape Display Panel Card and was made by fellow Stampin' Up! demonstator Heidi Smith based on the portrait version made by fellow Stampin' Up! demonstrator Susan Campfield. Susan called her card a freestanding floating panel card.


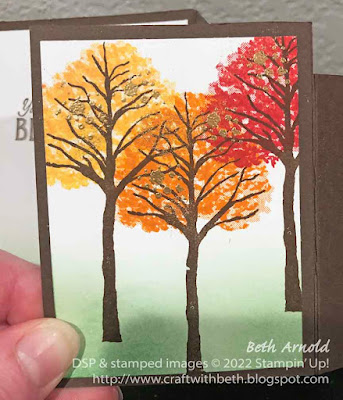
Beauty of Friendship Treelined Thanksgiving Landscape Display Panel Fun Fold Card


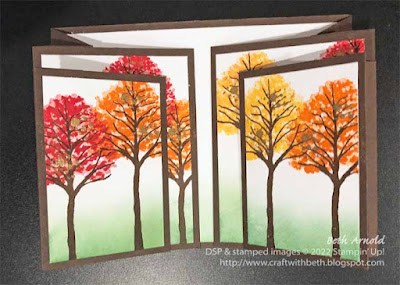
This fun fold card can stand up on its own, making it an idea display card! You can see from the overhead view photo below that there are three panel areas - a smaller panel in the front, a larger panel behind it, and a center panel across the back of the card base.


Beauty of Friendship Treelined Thanksgiving Landscape Display Panel Fun Fold Card


For my landscape display panel card, I envisioned a tree lined forest scene with leaves changing to reds, oranges, and yellows with just a touch of gold embossing powder. I used the tree stamps from the Beauty of Friendship stamp set to make the row of trees across each of the panels. The grass is made by lightly swirling Garden Green ink along the bottom of the panels. I wanted the emphasis to be on the tree leaves and the greeting.

Beauty of Friendship Treelined Thanksgiving Landscape Display Panel Fun Fold Card


The gold embossing powder adds a bright metallic shine that pairs well with the brilliant red, orange, and yellow of the trees' leaves. The embossing powder also embellishes the card without adding extra bulk to this already thick fun fold card.

Beauty of Friendship Treelined Thanksgiving Landscape Display Panel Fun Fold Card heat embossing


This fun fold card does fit in a A2 envelope and does fold flat. However, this fun fold is bulky because of the scoring and the layers of panels. I don't recommend adding too many 3 dimensional embellishments to your card to avoid having to purchase a special gusseted envelope.

Beauty of Friendship Treelined Thanksgiving Landscape Display Panel Fun Fold Card heat embossing folded flat


There is plenty of room on the back of the card to write a special message. I repeated the trees growing together from the center front of the card to the back of the card.

Beauty of Friendship Treelined Thanksgiving Landscape Display Panel Fun Fold Card heat embossing


Below are the measurements and the supply list for my landscape display panel Thanksgiving card. If you need supplies to recreate this card, please, shop my online store HERE.


Measurements

  • Card Base: 4-1/8" x 9-1/2"; scored at 1", 2", 7-1/2", & 8-1/2" (Early Espresso Cardstock)
  • Mechanism (cut 2): 2-1/2" x 3-1/8"; scored on the short side at 3/4" & 1-3/4" (Early Espresso Cardstock)
  • Large Panel (cut 2): 2-3/4" x 3-5/8" (Early Espresso Cardstock)
  • Small Panel (cut 2): 2-1/4" x 3-1/8" (Early Espresso Cardstock)
  • Large Tree Panel (cut 2): 2-1/2" x 3-3/8" (Basic White Cardstock)
  • Small Tree Panel (cut 2): 2" x 2-7/8" (Basic White Cardstock)
  • Center Mat (cut 2): 3-7/8" x 5-1/4" (Basic White Cardstock) - 1 mat for the front center of the card and 1 mat for the back center of the card


Supplies

Stamps

  • #154983 Beauty of Friendship Stamp Set
  • #159634 Hello Harvest Stamp Set
  • #159644 Hello Harvest Bundle (10% savings)


Ink

  • #147084 Real Red Ink Pad
  • #147086 Pumpkin Pie Ink Pad
  • #147094 Daffodil Delight Ink Pad
  • #147089 Garden Green Ink Pad
  • #147114 Early Espresso Ink Pad
  • #102283 Versamark Clear Watermark Ink Pad


Paper

  • #119586 Early Espresso Cardstock
  • #159276 Basic White Cardstock


Embellishments & Tools

  • #155555 Metallics Emboss Powders (Gold)
  • #129053 Heat Tool
  • #118487 Clear Block A
  • #118486 Clear Block C
  • #118490 Clear Block H
  • #159971 Embossing Additions Tool Kit
  • #153611 Blending Brushes
  • #110755 Multipurpose Liquid Glue
  • #102300 Bone Folder
  • #103579 Paper Snips
  • #130148 Grid Paper
  • #152392 Paper Trimmer
  • #126200 Stampin' Scrub
  • #153648 Stampin' Mist Cleaner


I hope you enjoyed today's fun fold card. How would you decorate your landscape display panel card? I would love to hear from you! Leave me a comment below telling me what stamps and ink you would use for your landscape display panel card.

If you need supplies to make this autumnal tree thanksgiving card, please, shop my online store HERE.

If you have any questions about today's project, please, don't hesitate to ask me.

Thanks for stopping by!
Beth

Wednesday, September 21, 2022

Floral Pumpkin Thanksgiving Card

For today's card I created an autumnal Thanksgiving card featuring the Hello Harvest stamp set (#159634) and Rustic Pumpkin Dies (#159643) as well as the Painted Pheasant stamp set (#159846). This card layout is also easy to replicate and make multiples for your family and friends.


Hello Harvest Thanksgiving Leaf Fall 3D Embossing Folder Card Rustic Harvest Designer Series Paper DSP

I like the thanksgiving greeting stamp from Painted Pheasant for this card (and also in general) because the fonts are easy to read and it does not overshadow the pumpkin floral element in the center of the card.

I stamped the thanksgiving greeting on Daffodil Delight cardstock to tie the greeting to the sunflowers and to the squash on the designer series paper.

I was originally going to stamp the pumpkin in the center of the Basic White rectangle and adhere the floral spray with dimensionals on top of the pumpkin. However, the background looked too bare and the pumpkin receded into the background.

So, I die cut the pumpkin and added dimensionals to the back of both the pumpkin and the floral spray. Then I used the Leaf Fall 3D Embossing Folder to add a delicate layer of interest behind the pumpkin and floral die cuts without overwhelming the rest of the card.


Inside of the card is plenty of room to write a thanksgiving message. At the bottom I added a 3/4" strip of the Rustic Harvest Designer Series Paper.
 

Hello Harvest Thanksgiving Leaf Fall 3D Embossing Folder Card Rustic Harvest Designer Series Paper DSP


Pro Tip: You can cut each of the designer series paper panels separately or cut 1 piece that measures 3-5/8" x 5-1/4" and cut it into 3 panels as indicated in the measurements list below. You should be able to cut 6 panels of 3-5/8" x 5-1/4" and 6 pieces that measure 4" x 3/4" for the inside DSP strip using a 12" x 12" piece of designer series paper.


Hello Harvest Thanksgiving Leaf Fall 3D Embossing Folder Card Rustic Harvest Designer Series Paper DSP cutting diagram template

Below are the measurements and the supply list for my 3-panel designer series paper Thanksgiving card. If you need supplies to recreate this card, please, shop my online store HERE.

Measurements

  • Card Base: 4-1/4" x 11"; scored at 5-1/2" (Merry Merlot Cardstock)
  • DSP Panel #1: 1-1/4" x 5-1/4" (Rustic Harvest DSP)
  • DSP Panel #2: 3/4" x 5-1/4" (Rustic Harvest DSP)
  • DSP Panel #3: 1-5/8" x 5-1/4" (Rustic Harvest DSP)
  • Rectangle #1: 3" x 3-1/2" (Merry Merlot Cardstock)
  • Rectangle #2: 2-3/4" x 3-1/4" (Basic White Cardstock)
  • Greeting: 2-1/2" x 1 (Daffodil Delight Cardstock)
  • Pumpkin: 3" x 2-1/2" (Basic White Cardstock)
  • Sunflowers: 2-1/4" x 3" (Basic White Cardstock)
  • Inside Mat: 4" x 5-1/4" (Basic White Cardstock)
  • Inside DSP Strip: 3/4" x 4" (Rustic Harvest DSP)


Supplies

Stamps

  • #159634 Hello Harvest Stamp Set (also available with the Rustic Pumpkin Dies as a bundle with item #159644)
  • #159846 Painted Pheasant Stamp Set


Ink

  • #147114 Early Espresso Ink Pad
  • #154880 Cherry Cobbler Stampin' Blends Combo Pack (dark)
  • #154883 Daffodil Delight Stampin' Blends Combo Pack (both)
  • #154906 Soft Suede Stampin' Blends Combo Pack (both)
  • #154890 Mossy Meadow Stampin' Blends Combo Pack (both)
  • #154906 Crumb Cake Stampin' Blends Combo Pack (light)
  • #154897 Pumpkin Pie Stampin' Blends Combo Pack (both)


Paper

  • #146979 Merry Merlot Cardstock
  • #159276 Basic White Cardstock
  • #119683 Daffodil Delight Cardstock
  • #159633 Rustic Harvest Designer Series Paper (DSP)


Embellishments & Tools

  • #159643 Rustic Pumpkin Dies
  • #159847 Leaf Fall 3D Embossing Folder
  • #104430 Dimensionals
  • #110755 Multipurpose Liquid Glue
  • #102300 Bone Folder
  • #103579 Paper Snips
  • #130148 Grid Paper
  • #152392 Paper Trimmer
  • #149653 Stampin' Cut & Emboss Machine (with the Specialty Plate)
  • #126200 Stampin' Scrub
  • #153648 Stampin' Mist Cleaner
  • #118485 Clear Block D
  • #118490 Clear Block H


I hope you enjoyed today's card. If you need supplies to make this autumnal harvest thanksgiving card, please, shop my online store HERE.

If you have any questions about today's project, please, don't hesitate to ask me.

Thanks for stopping by!
Beth


Tuesday, September 6, 2022

September's Newsletter is now available!

Happy September! I just sent my September newsletter to my email list. This month I share how to use the Baby Wipe Technique for fall and beyond cards and projects.


Hello Harvest Pleasant Pheasant Treat Cup 3D box Thanksgiving Baby Wipe Technique


Christmas Lights Baby Wipe Technique Card Snowflakes Lights Aglow Product Suite

Christmas Lights Baby Wipe Technique Card Christmas Tree Lights Aglow Product Suite Peace

I also share tips to care for your Simply Shammy and resize a die to fit your project. These are projects and tips that I only share with my email list. So, you have to be an email list subscriber to receive these project instructions and tips.


sign up for my email list here graphic


September's newsletter is available all September long when you sign up for my email list. If you are not an email list subscriber, you can subscribe today and receive September's newsletter.

I would love to welcome you to my email list! Sign up for my email list by entering your name and email in the sign up form at the top right corner of my blog.


Craft with Beth Card Tracker Chart Graphic
 

And, when you sign up for my email list I will also send you a card tracking chart (as a PDF) to help you keep track of which cards you send to whom. Track cards that you send for birthdays, Christmas, Valentine's Day, Thanksgiving, and more, so you never send the same card twice to the same person. 

I can't wait to see you on my email list! Sign up today in the upper right corner of my blog.

Thanks for stopping by!

Beth

Wednesday, July 27, 2022

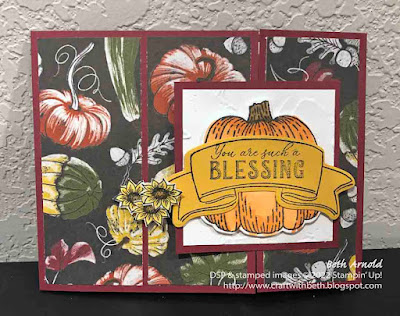
Hello Harvest Offset Gatefold Card

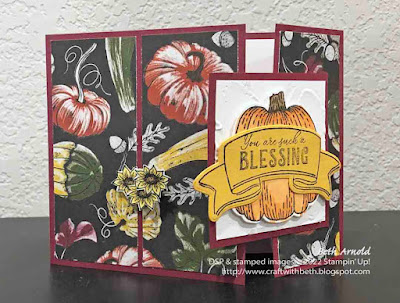
Fun folds, like this offset gate fold card, are a great way to feature designer series papers, especially with larger prints and scenes. The Rustic Harvest Designer Series Paper in the 2022 July-December Mini Catalog is perfectly suited. It has larger patterns with fall squashes and gourds and large chrysanthemums that could almost fill the entire card front. 

 Hello Harvest Offset Gate Fold Thanksgiving card grateful gratitude friendship fun fold card Rustic Harvest DSP

You can cut the designer series paper piece in one continuous scene or cut three individual strips of designer series paper. For today's card, I cut the designer series paper in a large panel and then cut it into three individual l pieces to create continuous scene. 

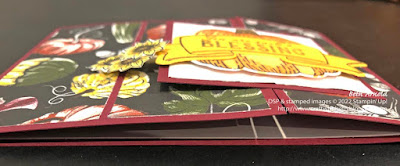
The offset gate fold card is similar to the regular gate fold card. It keeps the same card base, but the front opening is moved to one side. You can move the opening to the right or to the left side of the card. You can hold the card vertically or horizontally, like in today's project.

Hello Harvest Offset Gate Fold Thanksgiving card grateful gratitude friendship fun fold card Rustic Harvest DSP

Below are the measurements and supply list for this Hello Harvest offset gate fold card. 

Measurements

  • Card Base: 4-1/4" x 11"; scored at 1-7/8" & 7-3/8" (Merry Merlot Cardstock)
  • Designer Series Paper (cut 3): 4" x 4-7/8" and then cut into 3 - 1-5/8" x 4" pieces (Rustic Harvest Designer Series Paper)
  • Square Mat: 2-3/4" x 2-3/4" (Merry Merlot Cardstock)
  • Square: 2-1/2" x 2-1/2" (Basic White Cardstock)
  • Pumpkin: 2-1/2" x 2-1/2" (Basic White Cardstock)
  • Banner: 4" x 2" (Crushed Curry Cardstock)
  • Sunflowers (stamp 3): 3" x 1" (Basic White Cardstock)
  • Inside Mat: 4" x 5-1/4" (Basic White Cardstock)
  • Cardstock Scrap to reinforce underneath of the sunflowers: about 1/2" x 1/2"

Supplies:

  • #159634 Hello Harvest Stamp Set
  • #159644 Hello Harvest Bundle
  • #146979 Merry Merlot Cardstock
  • #159276 Basic White Cardstock
  • #131199 Crushed Curry Cardstock
  • #159633 Rustic Harvest Designer Series Paper
  • #132708 Memento Tuxedo Black Ink Pad
  • #147112 Merry Merlot Ink Pad
  • #147111 Mossy Meadow Ink Pad
  • #100082 Basic Black Stampin' Write Marker
  • #154897 Pumpkin Pie Stampin' Blends Combo Pack
  • #154906 Soft Suede Stampin' Blends Combo Pack
  • #154883 Daffodil Delight Stampin' Blends Combo Pack
  • #141897 Clear Wink of Stella
  • #154317 Painted Texture 3D Embossing Folder
  • #118487 Clear Block A
  • #117147 Clear Block B
  • #118485 Clear Block D
  • #118490 Clear Block H
  • #104430 Dimensionals
  • #102300 Bone Folder
  • #103579 Paper Snips
  • #110755 Liquid Glue
  • #130148 Grid Paper
  • #152392 Paper Trimmer
  • #149653 Stampin' Cut & Emboss Machine with the Specialty Plate
  • #159643 Rustic Pumpkin Dies

Hello Harvest Offset Gate Fold Thanksgiving card grateful gratitude friendship fun fold card Rustic Harvest DSP

The card closes by securing the left tail of the banner underneath a grouping of three sunflowers. I adhered the sunflowers in a cluster to a small scrap of cardstock to reinforce the strength of the closure. The card functions without the reinforcement, so the extra cardstock underneath the sunflowers is not essential.
 
Hello Harvest Offset Gate Fold Thanksgiving card grateful gratitude friendship fun fold card Rustic Harvest DSP


I hope you give this offset gate fold card featuring the Hello Harvest Bundle a try! If you need supplies to make this fun fold card, please, shop my online store HERE

If you have any questions about today's project, please, don't hesitate to ask me. I am happy to help you with your stamping questions!


Thanks for stopping by! Have a great day!
Beth

Monday, October 5, 2020

Happy Fall, Y’all! Baby Wipe Ink Refill Technique

I host Zoom stamping sessions twice a week on most weeks - Monday evening and Friday afternoon. All of my current customers and my demonstrator team members are welcome to join in and stamp with us. Email me for the Zoom meeting information. I would love for you to stamp with us!
During tonight's Zoom stamping session we made cards using the Baby Wipe Technique. The Baby Wipe Technique is a way of creating your own variegated "ink pad" using a baby wipe and ink refills.

Craft with Beth: Baby Wipe Technique fall autumn autumnal card Rooted in Nature Banner Year stamp sets

The Baby Wipe Technique truly lends itself for autumnal colors! I love the deep oranges, reds, browns, yellows, and even purples that fall is so known for! Fall is my absolute favorite season! I think that is why I tend to create with it during the latter half of the year.

Start with a baby wipe and fold it in half or in quarters, depending on how large or small the stamp that you are using is. You want your baby wipe to be about 1/4" or 1/2" larger than the stamp you are using, so that you have plenty of ink coverage. Place the baby wipe on a water-resistant surface such as a folded paper towel or the silicone craft mat to help keep your work surface clean.


Craft with Beth: Baby Wipe Technique fall autumn autumnal card Rooted in Nature Banner Year stamp sets

Choose 3 or 4 different ink refills that coordinate well together - anymore and the color may become muddled. I chose Real Red, Pumpkin Pie, and Rich Razzleberry ink refills. Start with your lightest ink refill and randomly drop ink onto the baby wipe.


Craft with Beth: Baby Wipe Technique fall autumn autumnal card Rooted in Nature Banner Year stamp sets

Go to your next lightest ink refill and randomly drop ink onto the baby wipe. Spread the ink droplets around the baby wipe.


Craft with Beth: Baby Wipe Technique fall autumn autumnal card Rooted in Nature Banner Year stamp sets

Then repeat with your darkest ink refill.


Craft with Beth: Baby Wipe Technique fall autumn autumnal card Rooted in Nature Banner Year stamp sets

It is ok to leave some areas of the baby wipe without ink. The more you stamp with this "ink pad", the more the ink droplet starts to fill in and to blend together.


Craft with Beth: Baby Wipe Technique fall autumn autumnal card Rooted in Nature Banner Year stamp sets

Take your stamp and pounce around the baby wipe "ink pad" to fully cover the stamp with ink and stamp onto your cardstock. Is there enough ink on your stamp? Do you like the way the ink refills are blending together? If not, try adding more ink refill to the baby wipe.

Once you are satisfied with your "ink pad," continue stamping your project.

You can stamp several projects with one baby wipe, but add more ink refills to the baby wipe if you notice that the baby wipe is starting to dry out, or as needed.


Craft with Beth: Baby Wipe Technique fall autumn autumnal card Rooted in Nature Banner Year stamp sets

Once you are finished using the baby wipe, you can use the remaining ink to create backgrounds for cards and 3D projects. Simply, scrunch up the baby wipe with the ink facing outwards and swipe across your cardstock. Repeat swiping across the cardstock until it is fully covered with ink. You can also pounce the baby wipe all over your cardstock to create a sponged look.


Craft with Beth: Baby Wipe Technique fall autumn autumnal card Rooted in Nature Banner Year stamp sets Thanksgiving

For the inside of these cards, I stamped the large leaves from Rooted in Nature with Rich Razzleberry ink onto one of the ink-swiped backgrounds and cut it to fit the width of the card base.


Craft with Beth: Baby Wipe Technique fall autumn autumnal card Rooted in Nature Banner Year stamp sets Thanksgiving

This card layout is simple and straightforward to show off the baby wipe ink refill technique and is very easy to customize. You can change the greeting and the leaf stamps to suite any occasion. 

Craft with Beth: Baby Wipe Technique fall autumn autumnal card Rooted in Nature Banner Year stamp sets Thanksgiving

The "Happy Thanksgiving" greeting stamp is also included with the Banner Greetings stamp set., but you don't have to limit this technique to only the fall months. Can you imagine how beautiful butterflies or tulips would be with spring colors?!

Craft with Beth: Baby Wipe Technique fall autumn autumnal card Rooted in Nature Banner Year stamp sets Thanksgiving

I hope you give the Baby Wipe Technique a try! What stamp sets and ink refill colors will you use for your card? I would love to see what you create! Post project photo on my Facebook Page or email your project photo. I would love to feature your project photo in one of my upcoming newsletters!

Thanks for stopping by!

Beth