Showing posts with label punch art. Show all posts

Wednesday, November 9, 2022

Make a Sweet Gift with this Turkey Punch Art Treat Holder

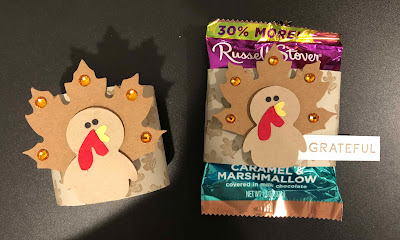
I am back with a second way to use Libby Fen's amazing turkey punch art! Today's project is a sweet chocolate marshmallow punch candy treat wrapper featuring Libby's turkey punch art.

turkey punch art candy wrapper. cardstock candy wrapper is wrapped around a chocolate marshmallow pumpkin candy. Thanksgiving, punch art, penguin builder punch, Painted Pheasant, 3D, treat holder


The candy wrapper starts off the same way the turkey punch art napkin ring on Monday did. Stamp the leaves image with Crumb Cake ink all over the Sahara Sand wrapper base.

stamp the leaves on the candy wrapper base. Thanksgiving, punch art, penguin builder punch, Painted Pheasant, 3D, treat holder

Curl the wrapper base with a bone folder to help wrap it around the candy. Wrap the wrapper base around the candy starting in the center of the front. Wrap the cardstock around the candy, so that the ends meet in the center of the front of the candy. Adhere the ends together with liquid glue or tear and Tape Adhesive.


adhere the turkey punch art candy wrapper ends together. cardstock candy wrapper is wrapped around a chocolate marshmallow pumpkin candy. Thanksgiving, punch art, penguin builder punch, Painted Pheasant, 3D, treat holder

Stamp the grateful greeting with Crumb Cake ink onto a Basic White cardstock rectangle. Stamp the greeting toward the right side, so that you can tuck the left side of the greeting underneath of the turkey punch art.

Adhere the greeting to candy wrapper on the right side and slightly to the right of the center.


turkey punch art candy wrapper. cardstock candy wrapper is wrapped around a chocolate marshmallow pumpkin candy. Thanksgiving, punch art, penguin builder punch, Painted Pheasant, 3D, treat holder

Build the turkey punch art. Punch the body of the turkey using the Penguin Builder Punch and Crumb Cake cardstock. Punch the eyes from the Whale Builder Punch and Basic Black cardstock. Punch the wattle from the Whale Builder Punch spout and Real Red cardstock. Punch the beak from the Song Bird Punch and Daffodil Delight cardstock. Adhere the eyes, wattle, and beak to the turkey's body.


add dimensionals to the punch art. Thanksgiving, punch art, penguin builder punch, Painted Pheasant, 3D, treat holder

Add three dimensionals vertically down the center of the back of the turkey's body. Attach a maple leaf die cut from the Leaf Label and Amber Gems Combo Pack to the back of the turkey's body. Add amber gems to each of the ends of the feathers.

Then add 4 dimensionals vertically down the center of the back of the maple leaf. In the photo above, you will see 3 dimensionals on the leaf. Add 1 more dimensional right on top of the dimensional at the bottom of the turkey body. This will form a double layer of dimensionals to evenly support and level the punch art on the candy wrapper.


side view of add dimensionals to the punch art. Thanksgiving, punch art, penguin builder punch, Painted Pheasant, 3D, treat holder

Below are the measurements and the supply list for my Thanksgiving turkey candy wrapper. If you need supplies to recreate this project, please, shop my online store HERE.

Measurements

  • Candy Wrapper: 2" x 7-1/2" (Sahara Sand Cardstock)
  • Greeting: 1/2" x 2-1/4" (Basic White Cardstock)
  • Turkey: 2" x 2-1/4" (Crumb Cake Cardstock)
  • Turkey Beak: 1" x 2" (Daffodil Delight Cardstock)
  • Turkey Wattle: 1" x 2" (Real Red Cardstock)
  • Turkey Eyes: 1" x 2" (Basic Black Cardstock)
  • Feathers: use a leaf from the Leaf Label and Amber Gems Combo Pack


Supplies

Stamps
#159846 Painted Pheasant

Ink
#147116 Crumb Cake Ink Pad

Paper
#121043 Sahara Sand Cardstock
#120953 Crumb Cake Cardstock
#119683 Daffodil Delight Cardstock
#102482 Real Red Cardstock
#121045 Basic Black Cardstock

Embellishments
#159969 Leaf Label and Amber Gems Combo Pack
#104430 Dimensionals

Tools
#152699 Whale Builder Punch
#158726 Song Bird Punch
#156452 Penguin Builder Punch
#154031 Tear and Tape Adhesive
#117147 Clear Block B
#118489 Clear Block G
#110755 Multipurpose Liquid Glue
#102300 Bone Folder
#103579 Paper Snips
#130148 Grid Paper
#152392 Paper Trimmer
#126200 Stampin' Scrub
#153648 Stampin' Mist Cleaner


turkey punch art candy wrapper and turkey punch art napkin ring. cardstock candy wrapper is wrapped around a chocolate marshmallow pumpkin candy. Thanksgiving, punch art, penguin builder punch, Painted Pheasant, 3D, treat holder
 
There are so many more ways to decorate for Thanksgiving with this delightful turkey punch art! I would love to see how you use this turkey punch art for your Thanksgiving celebration! Post a photo of your turkey punch art project and tag me on social media with #craftwithbeth. I can't wait to see what you create!

I hope you enjoyed today's turkey punch art candy wrapper. If you need supplies to make this project, please, shop my online store HERE.

Thanks for stopping by!
Beth

Monday, November 7, 2022

Set Your Thanksgiving Table with Turkey Punch Art Decor!

When I saw Libby Fen's punch art turkey card using the Penguin Builder Punch, I just had to create a project using her punch art design! Libby's turkey punch art is so perfect, festive, and adorable! It is great for your Thanksgiving guests of all ages! Today's project is a custom napkin ring for your Thanksgiving table.

Thanksgiving napkin ring with a punch art turkey on the front. A maple leaf die cut is used for the turkey's feathers. Thanksgiving, punch art, penguin builder punch, Painted Pheasant, 3D, table setting, home decor


I made a napkin ring for the Thanksgiving table featuring Libby's punch art turkey. The napkin ring base is Sahara Sanda cardstock stamped with the leaves from Painted Pheasant. Attached to the front is the turkey punch art. I love the addition of the amber gems to the ends of the turkey's "feathers"! How clever and beautiful!

Thanksgiving napkin ring with a punch art turkey on the front. A maple leaf die cut is used for the turkey's feathers. Thanksgiving, punch art, penguin builder punch, Painted Pheasant, 3D, table setting, home decor
 

First, I stamped the leaves image with Crumb Cake ink on a 2" x 7-3/4" piece of Sahara Sand cardstock. Then I added a piece of Tear and Tape Adhesive vertically to the left edge of the cardstock.

Stamp the leaves on the napkin ring base, add adhesive, and curl. Thanksgiving, punch art, penguin builder punch, Painted Pheasant, 3D, table setting, home decor


Next I curled the cardstock with a bone folder to  help the cardstock become a cylinder shape.

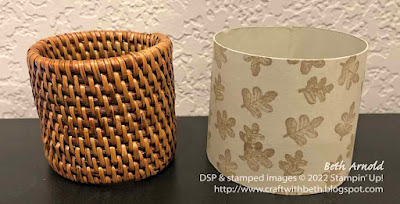
Form the napkin ring shape around a store bought napkin ring. Thanksgiving, punch art, penguin builder punch, Painted Pheasant, 3D, table setting, home decor

I used a napkin ring that I had to help shape the cardstock napkin ring. This is not necessary, but it was helpful for me to form the napkin ring cyclinder shape. Remove the Tear and Tape Adhesive and adhere the cardstock ends together to complete the napkin ring base.

cardstock napkin ring wrapped around the store bought napkin ring to help make the cylindrical shape. Thanksgiving, punch art, penguin builder punch, Painted Pheasant, 3D, table setting, home decor


If you are using a store bought napkin ring as a form, you can now remove it from the cardstock napkin ring base.

cardstock napkin ring wrapped around the store bought napkin ring to help make the cylindrical shape. Thanksgiving, punch art, penguin builder punch, Painted Pheasant, 3D, table setting, home decor

Build the turkey punch art. Punch the body of the turkey using the Penguin Builder Punch and Crumb Cake cardstock. Punch the eyes from the Whale Builder Punch and Basic Black cardstock. Punch the wattle from the Whale Builder Punch spout and Real Red cardstock. Punch the beak from the Song Bird Punch and Daffodil Delight cardstock. Adhere the eyes, wattle, and beak to the turkey's body.
 

Thanksgiving, punch art, penguin builder punch, Painted Pheasant, 3D, table setting, home decor

Add 3 dimensionals vertically down the center of the back of the turkey's body. Attach a maple leaf die cut from the Leaf Label and Amber Gems Combo Pack to the back of the turkey's body. Add amber gems to each of the ends of the feathers.

Then add 4 dimensionals vertically down the center of the back of the maple leaf. In the photo below, you will see 3 dimensionals on the leaf. Add 1 more dimensional right on top of the dimensional at the bottom of the turkey body. This will form a double layer of dimensionals to evenly support and level the punch art on the napkin ring.

add dimensionals to the back of the punch art and the leaf to attach it to the napkin ring base. Thanksgiving, punch art, penguin builder punch, Painted Pheasant, 3D, table setting, home decor

Adding dimensionals down the center of the punch art enables the cardstock to move and bend when being used without tearing or being too fragile.

Below are the measurements and the supply list for my Thanksgiving napkin ring. If you need supplies to recreate this project, please, shop my online store HERE.

Measurements

  • Napkin Ring Base: 2" x 7-3/4" (Sahara Sand Cardstock)
  • Turkey: 2" x 2-1/4" (Crumb Cake Cardstock)
  • Turkey Beak: 1" x 2" (Daffodil Delight Cardstock)
  • Turkey Wattle: 1" x 2" (Real Red Cardstock)
  • Turkey Eyes: 1" x 2" (Basic Black Cardstock)
  • Feathers: use a leaf from the Leaf Label and Amber Gems Combo Pack


Supplies

Stamps
#159846 Painted Pheasant

Ink
#147116 Crumb Cake Ink Pad

Paper
#121043 Sahara Sand Cardstock
#120953 Crumb Cake Cardstock
#119683 Daffodil Delight Cardstock
#102482 Real Red Cardstock
#121045 Basic Black Cardstock

Embellishments
#159969 Leaf Label and Amber Gems Combo Pack
#104430 Dimensionals

Tools
#152699 Whale Builder Punch
#158726 Song Bird Punch
#156452 Penguin Builder Punch
#154031 Tear and Tape Adhesive
#117147 Clear Block B
#110755 Multipurpose Liquid Glue
#102300 Bone Folder
#103579 Paper Snips
#130148 Grid Paper
#152392 Paper Trimmer
#126200 Stampin' Scrub
#153648 Stampin' Mist Cleaner
Napin Ring (optional)


For today's project I used a cloth napkin. However, A paper napkin would be just as festive too! There are so many beautiful, seasonal paper napkins available too.

Not a fan of napkin rings? Check back here on my blog on Wednesday, I will show you how to turn this turkey punch art into something sweet!

I hope you enjoyed today's fun Penguin Builder Punch Thanksgiving napkin ring. If you need supplies to make this project, please, shop my online store HERE.

If you have any questions about today's project, please, don't hesitate to ask me.

Thanks for stopping by!
Beth

Friday, June 28, 2019

Fourth of July Fireworks and Daisy Lane Treat Holders

Get your Fourth of July celebration ready with these patriotic treat holders! I created three different treat holders for your cookout - a mini treat box topped with a patriotic gerber daisy, a matchbox with cardstock firecrackers, and a peanut butter cup treat bag with bunting tag topper.

Craft with Beth: Stampin' Up! Fourth of July 4th Patriotic 3D treat holder matchbox Medium Daisy Punch Daisy Punch Punch Art Tag Tag Topper Gift Packaging Party Favors Mini Treat Box Circle Punch Scalloped Circle Punch Fireworks Mini Firework Embellishments gerber daisy

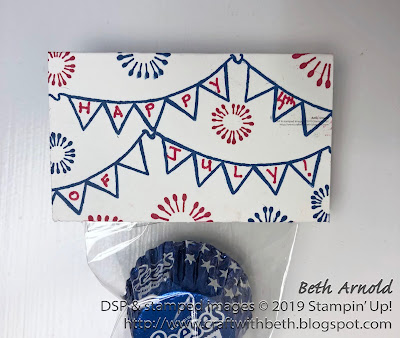
First up is a cello bag filled with patriotic peanut butter cups topped with a banner and fireworks tag.

Craft with Beth: Stampin' Up! Fourth of July 4th Patriotic 3D treat holder matchbox Medium Daisy Punch Daisy Punch Punch Art Tag Tag Topper Gift Packaging Party Favors Mini Treat Box Circle Punch Scalloped Circle Punch Fireworks Mini Firework Embellishments gerber daisy

The banner/bunting image is from the Above the Clouds stamp set (Item #149404). I stamped the banner image four times across the tag and hand wrote "Happy 4th of July!" on the pennants with a Lovely Lipstick Stampin' Write Marker (Item #147159 2018-2020 In Color Stampin' Write Markers). The fireworks are from the Birthday Backgrounds stamp set (Item #151260).

Craft with Beth: Stampin' Up! Fourth of July 4th Patriotic 3D treat holder matchbox Medium Daisy Punch Daisy Punch Punch Art Tag Tag Topper Gift Packaging Party Favors Mini Treat Box Circle Punch Scalloped Circle Punch Fireworks Mini Firework Embellishments gerber daisy

I used the retired 2" by 8" cellophane bags. I love this size for making treat holder! I was sure to stock up when they were retiring this past June. However, you find a similarly sized cellophane bag at local craft stores and online.

Craft with Beth: Stampin' Up! Fourth of July 4th Patriotic 3D treat holder matchbox Medium Daisy Punch Daisy Punch Punch Art Tag Tag Topper Gift Packaging Party Favors Mini Treat Box Circle Punch Scalloped Circle Punch Fireworks Mini Firework Embellishments gerber daisy

To create the belly band around the tiny clear treat box (Item #141699), I cut a 3/4" by 11" piece of Whisper White cardstock and stamped the strings of stars stamp from the Making Christmas Bright stamp set (Item #148046) along the length of the belly band. Then I put Tear and Tape Adhesive at one 3/4" side end on top of the stamped images. To finish the belly band, I wrapped the cardstock around the box, starting at the center of the top of the box and creasing at each box edge. The belly band is secured in place in the center of the box top. Any excess cardstock can be trimmed at this time. The belly band join is covered by the patriotic daisy embellishment.

Craft with Beth: Stampin' Up! Fourth of July 4th Patriotic 3D treat holder matchbox Medium Daisy Punch Daisy Punch Punch Art Tag Tag Topper Gift Packaging Party Favors Mini Treat Box Circle Punch Scalloped Circle Punch Fireworks Mini Firework Embellishments gerber daisy

The daisy embellishment is a combination of layering the two daisy punches, the 1-1/8" scalloped circle punch, and the 1/2" circle punch. Punch 4 daisies using the Daisy Punch (Item #143713) from Real Red cardstock. Punch 4 medium daisies using the Medium Daisy Punch (Item #149517) from Whisper White cardstock. Punch two 1-1/8" scalloped circles (Item #146138) from Blueberry Bushel cardstock. Punch one 1/2" circle (Item #119869) from Daffodil Delight cardstock.

Using a bone folder curl the petals of all of the daisies. Adhere the red daisies together, off setting each layer from the layer immediately below it. Adhere the white daisies together, off setting each layer from the layer immediately below it. Adhere the stack of white daisies to the center of the stack of red daisies.

Cut in between each scallop on the scallop circles towards the center of the circle but not all the way to the center. Curl each "petal" upwards with a bone folder. Adhere the two scalloped circles together, offsetting them as best as possible. Then adhere them to the center of the white daisies.

Place the Daffodil Delight 1/2" circle on top of the Paper Piercing Mat (Item #126199). Use a stylus to make the daisy center more 3D. Move the stylus in a circular motion around the edge of the circle a few times and then again closer to the center of the circle. The circle will start to look like a little bowl.

Place a mini dimensional in the center of the white daisy stack. Remove the mini dimensional backing and stick the Daffodil Delight 1/2" circle on top.

Craft with Beth: Stampin' Up! Fourth of July 4th Patriotic 3D treat holder matchbox Medium Daisy Punch Daisy Punch Punch Art Tag Tag Topper Gift Packaging Party Favors Mini Treat Box Circle Punch Scalloped Circle Punch Fireworks Mini Firework Embellishments gerber daisy

The last treat holder is a version of my Thanksgiving Pumpkin Pie matchbox treat holder. I created my own fireworks designer series paper using the fireworks stamp from the Birthday Background stamp set (Item #151260) and Whisper White cardstock.

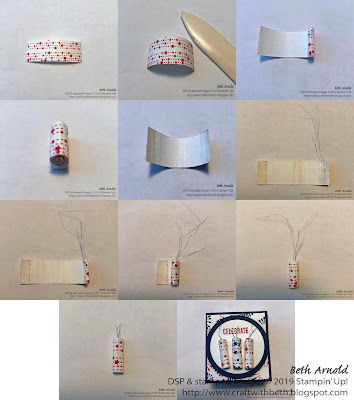
The firework embellishments use the same strings of stars stamp from Making Christmas Bright as on the mini treat box belly band. Stamp the strings of stars stamp on a 3/4" by 2-1/2" piece of Whisper White cardstock. Curl the cardstock with a bone folder. Turn the cardstock over, so that the back is facing up. Roll up the cardstock into a tight tube. Unroll the cardstock. Put a piece of Tear and Tape Adhesive on both of the short ends and remove the backing. Stick 5 pieces of Silver Thread to one of the pieces of Tear and Tape Adhesive (cut the Silver Thread about 2" long pieces or so). Roll up the cardstock and press the end securely in place. Trim the Silver Thread. Make two more firework embellishments and adhere them to the top of the matchbox with liquid glue.

Craft with Beth: Stampin' Up! Fourth of July 4th Patriotic 3D treat holder matchbox Medium Daisy Punch Daisy Punch Punch Art Tag Tag Topper Gift Packaging Party Favors Mini Treat Box Circle Punch Scalloped Circle Punch Fireworks Mini Firework Embellishments gerber daisy how to

How will you decorate your table at your Fourth of July cookout? I would love to see what Fourth of July treat holders you have created! Please leave a comment below (click on the pencil icon)! I would love to hear from you!

You can find the measurements and a supply list for this project at the end of the post. I hope you enjoyed this project!

Thanks for stopping by!
Beth

++++++++++++++++++
Shop Online 24/7 in my Online Store
Check out the Clearance Rack
Sign Up for Classes, Events, and Retreat Days
Sign up for my newsletter and mailing list or request a catalog
Sign Up for Paper Pumpkin
Join my Stampin' Team - the Purrfect Stampers!

Host Codes & Current Promotions:
June Host Code - WMKPWCCH
When placing an order, please use host code WMKPWCCH for orders under $150 USD. Please don't use the host code if your order is more than $150. Use Host Code WMKPWCCH if you are attending the Stamp of the Month Class long distance to have your Stamp of the Month Bundle mailed directly to you.

Craft with Beth: Stampin' Up! Storage by Stampin' Up! organization stamp craft room Banner Graphic

Stampin' Up! is launching a NEW line of storage solutions called Storage by Stampin' Up! for ink pads, Stampin' Write Markers, Stampin' Blends, and accessories! Each of the modular cubes, trays, and bins are stackable and can be configured in hundreds of ways! Check out the new storage solution on my online store. Check out the product flyer here and the configuration idea flyer here.

Craft with Beth: Stampin' Up! Paper Pumpkin Graphic Banner Jul 2019 Summertime Fun

Paper Pumpkin is giving us a sneak peek into July's Project Kit! Summer is the perfect time to kick back, relax, and enjoy yourself. You may even be planning some time for creativity. Paper Pumpkin's got you covered. Our July kit gives you everything you need for summertime paper crafting bliss. Each kit comes with 9 cards in 3 designs. Plus, it coordinates with 3 Product Suites in the new 2019-2020 Annual Catalog. Mix and match with Come Sail Away, Garden Lane, and Woven Threads Product Suites, and you will have projects for days! Long summer days, that is! July's project kit's coordinating colors are gold, kraft, Mossy Meadow, Old Olive, Pear Pizzazz, Pretty Peacock, Sahara Sand, Seaside Spray, Terracotta Tile, and Whisper White. I can't wait to see what is in store for July's kit! Sign up for Paper Pumpkin by July 10th to receive July's Kit!

Craft with Beth: Stampin' Up! 2019-2020 Annual Catalog Graphic Banner

June 4th, 2019 - June 2nd, 2020 - Shop from the 2019-2020 Annual Catalog for all of your stamping needs! This catalog is bursting with must have stamp sets, dies, embossing folders, ribbons, rhinestones, and more! I love the entire catalog! I think you will too! Check out all of the new products today!

http://www.stampinup.com/ecweb/category/110090/experience-creativity-projects?dbwsdemoid=2123316

Are you new to stamping? The Beginner Brochure may be the right place to start! The Beginner Brochure features a collection of stamp sets, kits, and bundles that are specifically designed to help you build your stamping skills! Check out our Beginner Brochure today! View the Beginner Brochure products in my online store. Download the Beginner Brochure here.

P.S. If you are a Magnolia Lane Product Suite Fan, there is a companion stamp set Magnolia Blooms (Item #152729) in the Beginner Brochure!

Do you love Stampin' Up! products? Do you enjoy sharing the joy of stamping with others? Have you considered joining Stampin' Up! as a demonstrator even for the discount? I would love to have you be a part of my Purrfect Stampers Demonstrator Team! You can build your own Starter Kit (valued at $125 USD) for $99 +tax! Join Stampin' Up! and build your own Starter Kit today!


Fourth of July Daisy Mini Treat Box Supply List
Stamps
#148046 Making Christmas Bright (Photopolymer)
Paper
#100730 Whisper White Cardstock
#146968 Blueberry Bushel Cardstock
#102482 Real Red Cardstock
#119683 Daffodil Delight Cardstock
Ink
#147084 Real Red Ink Pad
Embellishments
#144108 Mini Dimensionals
Tools
#126889 Stampin’ Trimmer
#102300 Bone Folder
#122334 Simply Scored (for the stylus)
#146138 1-1/8” Scalloped Circle Punch
#143713 Daisy Punch
#149517 Medium Daisy Punch
#103579 Paper Snips
#141699 Mini Treat Box
#138995 Tear & Tape Adhesive
#126199 Paper Piercing Mat
Peanut Butter Cups

Fourth of July Daisy Mini Treat Box Measurements

Paper
Dimensions
Red Daisies
Real Red Cardstock
3” x 11” (punch 4 red daisies)
White Daisies
Whisper White Cardstock
3” x 11” (punch 4 white daisies)
Blue Scalloped Circles
Blueberry Bushel Cardstock
2” x 4” (punch 2 scalloped circles)
Daisy Center
Daffodil Delight Cardstock
1” x 2” (punch one 1/2" circle)
Belly Band
Whisper White Cardstock
3/4" x 11”
 
 
Fourth of July Peanut Butter Cup Treat Bag Supply List
Stamps
#151260 Birthday Backgrounds (Cling-Mount)
#149404 Above the Clouds (Photopolymer)
Paper
#100730 Whisper White Cardstock
Ink
#147140 Lovely Lipstick Ink Pad
#147110 Night of Navy Ink Pad
#147159 2018-2020 In Color Marker Set
Embellishments

Tools
#126889 Stampin’ Trimmer
#102300 Bone Folder
#138995 Tear & Tape Adhesive
2” x 8” Cellophane Bag
Stapler and staples
Peanut Butter Cups


Fourth of July Fireworks Matchbox Treat Holder Supply List
Stamps
#151260 Birthday Backgrounds (Cling-Mount)
#148046 Making Christmas Bright (Photopolymer)
#151331 Itty Bitty Greetings (Cling-Mount)
Paper
#100730 Whisper White Cardstock
#146968 Blueberry Bushel Cardstock
Ink
#147084 Real Red Ink Pad
#147138 Blueberry Bushel Ink Pad
Embellishments
#138402 Silver Thread
#104430 Dimensionals
Tools
#126889 Stampin’ Trimmer
#102300 Bone Folder
#138299 1-1/2” Circle Punch
1-3/4” Circle Punch or #141705 Layering Circles Dies
#138995 Tear & Tape Adhesive or liquid glue
Peanut Butter Cups

Fourth of July Fireworks Matchbox Treat Holder Measurements

Paper
Dimensions
Box Base
Blueberry Bushel Cardstock
3-3/4” x 3-7/8”; scored at 1” on all 4 sides
Box Cover
Blueberry Bushel Cardstock
2” x 6”; scored at 7/8”, 2-11/16”, 3-3/4”, & 5-9/16”
Top Mat
Whisper White Cardstock
1-11/16” x 1-7/8”
Long Side Mats (cut 2)
Whisper White Cardstock
7/8” x 1-7/8”
Short Side Mats (cut 2)
Whisper White Cardstock
7/8” x 1-5/8”
Greeting Circle
Whisper White Cardstock
2” x 2”
Greeting Circle Mat
Blueberry Bushel Cardstock
2-1/2” x 2-1/2”
Firecrackers (cut 3)
Whisper White Cardstock
3/4" x 2-1/2”
Silver Thread (cut 5)
Silver Thread
2” long