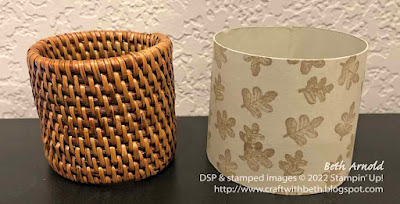
Showing posts with label home decor. Show all posts

Friday, November 18, 2022

2-in-1 Thanksgiving Pumpkin Treat Holder and Placecard

Is it a treat holder or a place card? Why not be both!? Delight your Thanksgiving guests with this a pumpkin chocolate kiss triangle treat holder!

Hello Harvest, Rustic Pumpkin Dies, Thanksgiving place card chocolate kiss treat holder, table setting, 3D, home decor

This style of treat holder is so easy, quick to make, and can be customizable to the materials that you have on hand.

The base is a piece of cardstock bent into the shape of a triangle. Then a die cut or punched shape is adhered to 2 sides of the triangle and then adhered together. Lastly, a chocolate kiss is placed in the center of the triangle.

Hello Harvest, Rustic Pumpkin Dies, Thanksgiving place card chocolate kiss treat holder, table setting, 3D, home decor


You may be familiar with this treat holder style with my plethora of cat punch treat holders for Valentine's Day and Halloween. Now that the cat punch is retired, I had to brainstorm other punches and dies that I could make the triangle treat holder with.

Don't worry. I didn't sell my cat punch after it retired. The cat punch is one punch that I plan on keeping for a long time regardless of its current or retired status. So, you may see some projects in the future with the cat punch.

With Thanksgiving coming soon, the pumpkin stamp and die from the #159634 Hello Harvest stamp set and the #159643 Rustic Pumpkin Dies was a great place to start!

Hello Harvest, Rustic Pumpkin Dies, Thanksgiving place card chocolate kiss treat holder, table setting, 3D, home decor


Once I made the treat holders, I added a name tag across the front of the pumpkin to add the name of a guest. I wrote the names for these samples with my computer. However, I recommend a Basic Black Stampin' Write Marker or a Basic Black Stampin' Blend to write the name of your guest before you attach the name tag to the pumpkin.

Hello Harvest, Rustic Pumpkin Dies, Thanksgiving place card chocolate kiss treat holder, table setting, 3D, home decor

These treat holder place cards are versatile. Use them during the dinner or after. The place cards can be put at each guest's place setting or on a side table for guests to pick up when they arrive or for when they leave.


Below are the measurements and the supply list for my pumpkin place card and treat holder. If you need supplies to recreate this project, please, shop my online store HERE.

Measurements

  • Triangle Base: 1" x 2-1/2"; scored at 3/4" and 1-3/4" (Pumpkin Pie Cardstock)
  • Pumpkins (cut 1 of each color of cardstock): 2-1/2" x 2-1/2" (Pumpkin Pie Cardstock and Basic White Cardstock)
  • Name Tag: 1/2" x 2" (Basic White Cardstock)


Supplies

Stamps
#159634 Hello Harvest
#159644 Hello Harvest Bundle

Ink
#147114 Early Espresso Ink Pad
#154897 Pumpkin Pie Stampin' Blends Combo Pack (both)
# Soft Suede Stampin' Blends Combo Pack (both)

Paper
#105117 Pumpkin Pie Cardstock
#159276 Basic White Cardstock

Embellishments
#104199 Linen Thread

Tools
#159643 Rustic Pumpkin Dies
#103683 Mini Glue Dots
#110755 Multipurpose Liquid Glue
#102300 Bone Folder
#103579 Paper Snips
#130148 Grid Paper
#152392 Paper Trimmer
#149653 Stampin' Cut & Emboss Machine
#126200 Stampin' Scrub
#153648 Stampin' Mist Cleaner
#118485 Clear Block D
Chocolate Kisses

I hope you enjoyed today's pumpkin place card and treat holder. I know your Thanksgiving guest are going to love receiving this sweet treat holder at your Thanksgiving dinner!

Hello Harvest, Rustic Pumpkin Dies, Thanksgiving place card chocolate kiss treat holder, table setting, 3D, home decor

Have you tried this triangle style treat holder? What stamps, punches, and dies did you use? Post a photo on social media and tag me with the hashtag #craftwithbeth, so I can find your projects. I would love to see what you create!

If you need supplies to make this project, please, shop my online store HERE.

If you have any questions about today's project, please, don't hesitate to ask me.

Thanks for stopping by!
Beth

Monday, November 7, 2022

Set Your Thanksgiving Table with Turkey Punch Art Decor!

When I saw Libby Fen's punch art turkey card using the Penguin Builder Punch, I just had to create a project using her punch art design! Libby's turkey punch art is so perfect, festive, and adorable! It is great for your Thanksgiving guests of all ages! Today's project is a custom napkin ring for your Thanksgiving table.

Thanksgiving napkin ring with a punch art turkey on the front. A maple leaf die cut is used for the turkey's feathers. Thanksgiving, punch art, penguin builder punch, Painted Pheasant, 3D, table setting, home decor


I made a napkin ring for the Thanksgiving table featuring Libby's punch art turkey. The napkin ring base is Sahara Sanda cardstock stamped with the leaves from Painted Pheasant. Attached to the front is the turkey punch art. I love the addition of the amber gems to the ends of the turkey's "feathers"! How clever and beautiful!

Thanksgiving napkin ring with a punch art turkey on the front. A maple leaf die cut is used for the turkey's feathers. Thanksgiving, punch art, penguin builder punch, Painted Pheasant, 3D, table setting, home decor
 

First, I stamped the leaves image with Crumb Cake ink on a 2" x 7-3/4" piece of Sahara Sand cardstock. Then I added a piece of Tear and Tape Adhesive vertically to the left edge of the cardstock.

Stamp the leaves on the napkin ring base, add adhesive, and curl. Thanksgiving, punch art, penguin builder punch, Painted Pheasant, 3D, table setting, home decor


Next I curled the cardstock with a bone folder to  help the cardstock become a cylinder shape.

Form the napkin ring shape around a store bought napkin ring. Thanksgiving, punch art, penguin builder punch, Painted Pheasant, 3D, table setting, home decor

I used a napkin ring that I had to help shape the cardstock napkin ring. This is not necessary, but it was helpful for me to form the napkin ring cyclinder shape. Remove the Tear and Tape Adhesive and adhere the cardstock ends together to complete the napkin ring base.

cardstock napkin ring wrapped around the store bought napkin ring to help make the cylindrical shape. Thanksgiving, punch art, penguin builder punch, Painted Pheasant, 3D, table setting, home decor


If you are using a store bought napkin ring as a form, you can now remove it from the cardstock napkin ring base.

cardstock napkin ring wrapped around the store bought napkin ring to help make the cylindrical shape. Thanksgiving, punch art, penguin builder punch, Painted Pheasant, 3D, table setting, home decor

Build the turkey punch art. Punch the body of the turkey using the Penguin Builder Punch and Crumb Cake cardstock. Punch the eyes from the Whale Builder Punch and Basic Black cardstock. Punch the wattle from the Whale Builder Punch spout and Real Red cardstock. Punch the beak from the Song Bird Punch and Daffodil Delight cardstock. Adhere the eyes, wattle, and beak to the turkey's body.
 

Thanksgiving, punch art, penguin builder punch, Painted Pheasant, 3D, table setting, home decor

Add 3 dimensionals vertically down the center of the back of the turkey's body. Attach a maple leaf die cut from the Leaf Label and Amber Gems Combo Pack to the back of the turkey's body. Add amber gems to each of the ends of the feathers.

Then add 4 dimensionals vertically down the center of the back of the maple leaf. In the photo below, you will see 3 dimensionals on the leaf. Add 1 more dimensional right on top of the dimensional at the bottom of the turkey body. This will form a double layer of dimensionals to evenly support and level the punch art on the napkin ring.

add dimensionals to the back of the punch art and the leaf to attach it to the napkin ring base. Thanksgiving, punch art, penguin builder punch, Painted Pheasant, 3D, table setting, home decor

Adding dimensionals down the center of the punch art enables the cardstock to move and bend when being used without tearing or being too fragile.

Below are the measurements and the supply list for my Thanksgiving napkin ring. If you need supplies to recreate this project, please, shop my online store HERE.

Measurements

  • Napkin Ring Base: 2" x 7-3/4" (Sahara Sand Cardstock)
  • Turkey: 2" x 2-1/4" (Crumb Cake Cardstock)
  • Turkey Beak: 1" x 2" (Daffodil Delight Cardstock)
  • Turkey Wattle: 1" x 2" (Real Red Cardstock)
  • Turkey Eyes: 1" x 2" (Basic Black Cardstock)
  • Feathers: use a leaf from the Leaf Label and Amber Gems Combo Pack


Supplies

Stamps
#159846 Painted Pheasant

Ink
#147116 Crumb Cake Ink Pad

Paper
#121043 Sahara Sand Cardstock
#120953 Crumb Cake Cardstock
#119683 Daffodil Delight Cardstock
#102482 Real Red Cardstock
#121045 Basic Black Cardstock

Embellishments
#159969 Leaf Label and Amber Gems Combo Pack
#104430 Dimensionals

Tools
#152699 Whale Builder Punch
#158726 Song Bird Punch
#156452 Penguin Builder Punch
#154031 Tear and Tape Adhesive
#117147 Clear Block B
#110755 Multipurpose Liquid Glue
#102300 Bone Folder
#103579 Paper Snips
#130148 Grid Paper
#152392 Paper Trimmer
#126200 Stampin' Scrub
#153648 Stampin' Mist Cleaner
Napin Ring (optional)


For today's project I used a cloth napkin. However, A paper napkin would be just as festive too! There are so many beautiful, seasonal paper napkins available too.

Not a fan of napkin rings? Check back here on my blog on Wednesday, I will show you how to turn this turkey punch art into something sweet!

I hope you enjoyed today's fun Penguin Builder Punch Thanksgiving napkin ring. If you need supplies to make this project, please, shop my online store HERE.

If you have any questions about today's project, please, don't hesitate to ask me.

Thanks for stopping by!
Beth

Wednesday, October 26, 2022

Quick and Easy Rustic Harvest Aromatherapy Air Freshener

During one of my demonstrator team get togethers we made different spa and home decor recipes, including a body butter, an oatmeal and chamomile facial, and this autumnal scented air freshener.

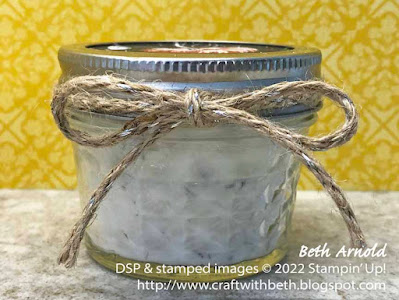
aromatherapy air freshener in a glass pint canning jar decorated with fall patterned paper, Rustic Harvest DSP, home decor, aromatherapy, air freshener
 

It was a big hit! First we traced the outside of the bottom of the jar ring (the part with the threads) with a pencil onto a piece of Rustic Harvest Designer Series Paper. We cut out the circle with paper snips and inserted the circle into the jar ring.

Then we filled the glass canning pint jars half full with Epsom salts and dried lavender flowers. We added the essential oils and stirred it well to combine. The essential oils are optional. The lavender flowers smell amazing on their own too. Gently crush them in your hands before adding them to the Epsom salts.

side view of the aromatherapy air freshener in a glass pint canning jar decorated with fall patterned paper showing the lavender flowers and epsom salts, Rustic Harvest DSP, home decor, aromatherapy, air fresheners


Next we added Epsom salts and lavender flower buds to fill the rest of the jar, added a few more drops of essential oil, and stirred well to combine. Adding the Epsom salts and lavender in two parts makes it a lot less messy. The first time I made these air fresheners I made a mess with the Epsom salts all over my kitchen island.

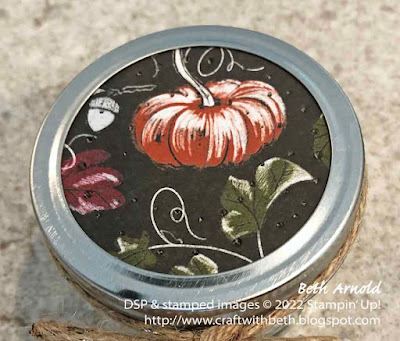
Finally, we put the lid on and added some holes to the designer series paper with the Take Your Pick Tool to allow the scent to fill the room.

top of an aromatherapy air freshener in a glass pint canning jar decorated with fall patterned paper, Rustic Harvest DSP, home decor, aromatherapy, air freshener
 

Please, note that this air freshener is intended to be placed in an area away from children and pets. This blog post is not intended to treat or diagnose anything, and is not advice of any kind. This blog post is anecdotal only of the steps we took to make this air freshener.

I put this air freshener in the powder bathroom in my house. The door stays closed almost all of the time, so the cats don't have access to it unsupervised.

Below are the measurements and supply list to recreate this fall scented air freshener. If you need supplies to recreate this home decor project, please, shop my online store HERE.


Measurements

  • Designer Series Paper Lid: 3-3/4" x 3-3/4" (Rustic Harvest Designer Series Paper (DSP))


Supply List

Paper
#159633 Rustic Harvest Designer Series Paper (DSP)


Embellishments
#159662 Silver-Threaded Twine


Tools
#103579 Paper Snips
#130148 Grid Paper
#152392 Paper Trimmer
#144107 Take Your Pick Tool
Glass Canning Jar with Lid Ring
Epsom Salts
Essential Oils (optional)
Dried Lavender Flowers
Fork


I could have added more decoration, but I didn't want the decorations to get wet or get soap on them. If this air freshener were for another room, I would definitely add more decorations like the banner stamp and die from the Hello Harvest Bundle. 

How would you decorate your air freshener? Leave me a comment below telling me what embellishments you would add.

I hope you enjoyed today's Rustic Harvest aromatherapy air freshener. If you need supplies to make this autumnal air freshener, please, shop my online store HERE.

If you have any questions about today's project, please, don't hesitate to ask me.

Thanks for stopping by!
Beth

Monday, June 27, 2022

Fourth of July Mini Cupcake Sparkler Decorations

My family and I are having a get together on the Fourth of July. I wanted to bring something for dessert that would be fun and festive. I saw these patriotic mini cupcakes at the grocery store and could not resist! To make these even more celebratory, I created sparkler cupcake toppers with Real Red and Pacific Point cardstock and toothpicks to decorate each of the mini cupcakes.

Fourth of July 4th of July mini cupcake sparkler toppers decorations cupcake decorations


Two types of mini cupcakes came in the package - chocolate cake with marshmellow icing and vanilla cake with blue tinted vanilla frosting. Both varieties are topped with red, white, and blue sprinkle stars. Could they not get cuter than that?

Fourth of July 4th of July mini cupcake sparkler toppers decorations cupcake decorations


These sparklers came together quickly and easily. I made about twenty in less than 15 minutes, including preparation time. To make more use of my cardstock scraps, I used long strips of scraps. I cut them to a 1-1/4" width and followed the steps 1-6 below. Then I cut the strips into 2" long pieces.

Fourth of July 4th of July mini cupcake sparkler toppers decorations cupcake decorations


To make the sparkler cupcake decorations:

  1. First, gather your supplies and cut your cardstock.
  2. Then with the 1-1/2" side parallel to the paper trimmer's bottom ruler, score the cardstock at 1/4".
  3. Fold and burnish the score line. This score line is to help the sparkler ends to puff out into a ball shape and to also know where to stop cutting the sparkler ends.
  4. Curl the cardstock with a bone folder. This will help you roll the sparkler more easily.
  5. Cut fringe along the 2" side, stopping at the score line.
  6. Place Tear and Tape Adhesive along the scored area on the back of the sparkler.
  7. Remove the adhesive backing and add a line of liquid glue. This will help the wooden toothpick stick better and give you more maneuverability to roll up the cardstock.
  8. Let the toothpick sit in the liquid glue for a few seconds. Then roll up the cardstock. Hold the end of the cardstock for a few seconds to help the cardstock adhere in place.
  9. Shape the sparkler by bringing the fringed ends of the cardstock down and out in a semi-spherical shape.
  10. Add the sparkler decoration to your mini cupcake.


Fourth of July 4th of July mini cupcake sparkler toppers decorations cupcake decorations


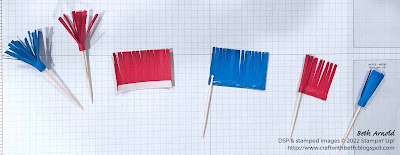
Because I used mainly long scraps for these sparkler decorations, there would be some cardstock left over that was not quite 2" long. One strip of cardstock only had about 1-1/4" left. So, I thought why not try it and see how full and puffy a 1-1/4" strip of cardstock would be. You can see in the photo below that the 1-1/4" strip of cardstock is not as full or as puffy as the 2" strips of cardstock, but it still looks really cute!

Fourth of July 4th of July mini cupcake sparkler toppers decorations cupcake decorations


It would be fun to experiment with different lengths of cardstock to see which length makes the sparkler size and shape that you like the best!

Fourth of July 4th of July mini cupcake sparkler toppers decorations cupcake decorations


Below are the measurements and supply list to make these Fourth of July sparkler cupcake decorations.

Measurements

  • Sparkler: 1-1/2" x 2"; scored at 1/4" (Real Red and Pacific Point Cardstock)


Supplies

#102482 Real Red Cardstock
#111350 Pacific Point Cardstock
#102300 Bone Folder
#103579 Paper Snips
#130148 Grid Paper
#152392 Paper Trimmer
#154031 Tear & Tape Adhesive
#110755 Multipurpose Liquid Glue
Toothpicks
Mini Cupcakes

Fourth of July 4th of July mini cupcake sparkler toppers decorations cupcake decorations


I would love to hear about your Fourth of July celebrations! Leave a comment below telling me how you are celebrating the Fourth of July.

If you would like to recreate these treat holders and need some supplies, please, shop my online store HERE.

If you have any questions about today's project, please, don't hesitate to ask me. I am happy to help you with your stamping questions!

Thanks for stopping by! Have a great day!
Beth

Monday, March 11, 2019

Grown with Kindness Sampler CASE

I just cannot get enough of February's Paper Pumpkin Kit Grown with Kindness!! I have a few pieces left from the kit and wanted to display how gorgeous these patterned papers are!


I am a part of the Paper Pumpkin Fan Club on Facebook and when I saw Rachel Tessman's sampler, I had to make it for my house!


This sampler was originally designed for an 8" by 8" shadow box frame. However, I used a 9" by 9" shadow box frame. The sampler can be easily adapted for a 9" by 9" shadow box frame by substituting a 9" by 9" piece of cardstock for the 8" by 8" piece or adding a 9" by 9" piece of cardstock behind the 8" by 8" cardstock piece for a layered look. My shadow box frame has woven fabric backing piece that highlighted the sampler, so I didn't add an additional cardstock layer.

What alternative projects have you made with your Grown with Kindness Paper Pumpkin Kit? I would love to see what you create! Post a comment below or a project photo on my Facebook page today!

You can find the measurements and a supply list at the end of this post.

Thanks for stopping by!
Beth

++++++++++++++++++
Shop Online 24/7 in my Online Store
Check out the Clearance Rack
Sign Up for a Class
Sign up for my newsletter and mailing list or request a catalog
Sign Up for Paper Pumpkin
Join my Stampin' Team - the Purrfect Stampers!

Host Codes & Current Promotions:
March Host Code - BMZ4XUUB
When placing an order, please use host code BMZ4XUUB for orders under $150 USD. Please don't use the host code if your order is more than $150. Use Host Code BMZ4XUUB if you are attending the Stamp of the Month Class long distance to have your Stamp of the Month Bundle mailed directly to you.

Craft with Beth: Stampin' Up! Paper Pumpkin April 2019 Distinktive Project Kit Promotion Banner Graphic

Paper Pumpkin is giving us a sneak peek into April's Project Kit! April's kit will feature a distinktive stamp set and will make 9 cards (3 each of 3 designs). The color palette has also been revealed! It is Basic Black, Calypso Coral, Flirty Flamingo, Gray Granite, Mint Macaron, and So Saffron. Sound beautiful! Sign up for Paper Pumpkin by April 10th to receive April's Distinktive Kit!

Craft with Beth: Craft and Carry Stamparatus Bag Title Graphic

December 5th, 2018 - Starting on December 5th, 2018, a NEW Stamparatus carry bag will be available for purchase. You can store your Stamparatus and accessories all in one handy, zippered tote bag! Demonstrators can pre-order the bag starting November 12th, 2018.

Craft with Beth: Stampin' Up! Craft and Carry Tote Bag Title Graphic

January 3rd, 2019 - March 31st, 2019 - If you join Stampin' Up! as a demonstrator during Sale-A-Bration (01/03/2019 - 03/31/2019), you can add a Craft and Carry Tote to your Starter Kit! This sturdy canvas tote bag can hold a myriad of supplies, including your Paper Trimmer, punches, framelits, embellishments, and stamp sets! It even has a removable divider, lots of pockets, and a padded shoulder strap! I would love to have you join my demonstrator team Purrfect Stampers! Contact me or join my team today! This offer is for a limited time only! Don't miss out!

Craft with Beth: Stampin' Up! Occasions Catalog Title Graphic 2019

January 3rd, 2019 - June 3rd, 2019 - Shop from the 2019 Occasions Catalog. The Occasions Catalog is chock full of NEW stamp sets, framelits, Designer Series Paper, embellishments, tools, and more that celebrate holidays and occasions from midwinter through the beginning of summer such as weddings, birthdays, Valentine's Day, Mother's Day, Father's Day, anniversaries, baby showers, and more!

Craft with Beth: Stampin' Up! Sale-A-Bration Catalog Title Graphic 2019

January 3rd, 2019 - March 31st, 2019 - Would you like to earn FREE products? During Sale-A-Bration, for every qualifying purchase, you can earn FREE Sale-A-Bration Catalog products! This year there are two levels of FREE products - $50 and $100. Each FREE product is labeled with their respective price levels in the Sale-A-Bration Catalog. Every every $50 you purchase before tax and shipping, you can earn a FREE product from the Sale-A-Bration Product Catalog at the $50 level. For every $100 you purchase before tax and shipping, you can earn a FREE product from the Sale-A-Bration Product Catalog at the $100 level. For example, if you purchase $100 in product from the Occasions Catalog, Annual Catalog, or Clearance Rack, you earn one $100 level product or two $50 level products from the Sale-A-Bration Catalog. Sale-A-Bration runs from January 3rd, 2019 through March 31st, 2019.Check out my online store to see the Sale-A-Bration products!

Craft with Beth: Stampin' Up! Annual Catalog Title Graphic

June 1st, 2018 - June 3, 2019 - Shop from the 2018-2019 Annual Catalog for all of your stamping needs! This year's catalog is one of my favorites! With all of the new gorgeous stamp sets, embellishments, and Designer Series Paper, I want to try everything! I know you will too! Check it out today!

Craft with Beth: Stampin' Up! Join my team title graphic

Do you love Stampin' Up! products? Do you enjoy sharing the joy of stamping with others? Have you considered joining Stampin' Up! as a demonstrator even for the discount? I would love to have you be a part of my Purrfect Stampers Demonstrator Team! Join during Sale-A-Bration for a special joining promotion! You can build your own Starter Kit (valued at $175 USD) for $99 +tax! Join Stampin' Up! and build your own Starter Kit today!


Grown with Kindness Sampler CASE Measurements

Paper
Dimensions
Base
Basic Black Cardstock
8” x 8”
Mat 1
Fresh Fig Cardstock
3-1/8″ x 5-1/8″      
Mat 2
Fresh Fig Cardstock
3-1/8″ x 1-7/8″
Mat 3
Fresh Fig Cardstock
3-7/8″ x 2-1/8″
Mat 4
Fresh Fig Cardstock
3-7/8″ x 4-7/8″
Circle Mat
Fresh Fig Cardstock
2-3/4″ x 2-3/4”
Greeting Circle
Whisper White Cardstock
2-1/2” x 2-1/2”
Upper Left
You Succulent Photo Paper
3” x 5”
Upper Right
Tea Cup Photo Photo Paper
3” x 1-3/4” (use 1 piece of photo paper to cut both the upper right and the lower left)
Lower Left
Tea Cup Photo Photo Paper
3-3/4” x 2”
Lower Right
Succulent Photo Paper
3-3/4” x 4-3/4”

Grown with Kindness Sampler CASE Supply List
Stamps
Paper Pumpkin February 2019 Grown with Kindness Kit
Paper
#121045 Basic Black Cardstock
#100730 Whisper White Cardstock
#144242 Fresh Fig Cardstock
Ink
#132708 Memento Tuxedo Black Ink Pad
Embellishments
#147801 Frosted and Clear Epoxy Droplets
Tools
#126889 Stampin’ Trimmer
#133782 2” Circle Punch
#143720 2-1/4” Circle Punch
8” x 8” Shadow Box Frame or 9” x 9” Shadow Box Frame