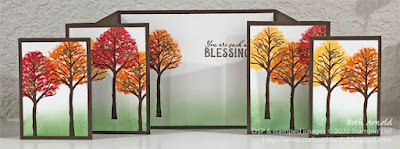
I was excited to try this new to me fun fold! It is called the Landscape Display Panel Card and was made by fellow Stampin' Up! demonstator Heidi Smith based on the portrait version made by fellow Stampin' Up! demonstrator Susan Campfield. Susan called her card a freestanding floating panel card.
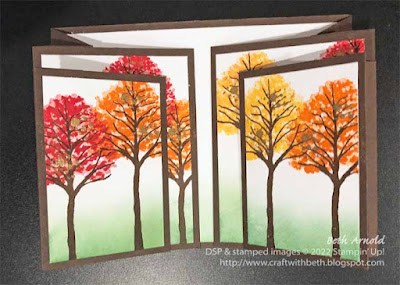
This fun fold card can stand up on its own, making it an idea display card! You can see from the overhead view photo below that there are three panel areas - a smaller panel in the front, a larger panel behind it, and a center panel across the back of the card base.
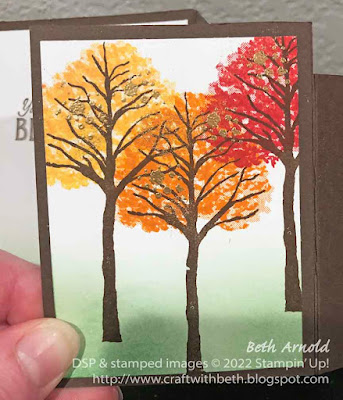
For my landscape display panel card, I envisioned a tree lined forest scene with leaves changing to reds, oranges, and yellows with just a touch of gold embossing powder. I used the tree stamps from the Beauty of Friendship stamp set to make the row of trees across each of the panels. The grass is made by lightly swirling Garden Green ink along the bottom of the panels. I wanted the emphasis to be on the tree leaves and the greeting.
The gold embossing powder adds a bright metallic shine that pairs well with the brilliant red, orange, and yellow of the trees' leaves. The embossing powder also embellishes the card without adding extra bulk to this already thick fun fold card.
This fun fold card does fit in a A2 envelope and does fold flat. However, this fun fold is bulky because of the scoring and the layers of panels. I don't recommend adding too many 3 dimensional embellishments to your card to avoid having to purchase a special gusseted envelope.
There is plenty of room on the back of the card to write a special message. I repeated the trees growing together from the center front of the card to the back of the card.
Below are the measurements and the supply list for my landscape display panel Thanksgiving card. If you need supplies to recreate this card, please, shop my online store HERE.
Measurements
- Card Base: 4-1/8" x 9-1/2"; scored at 1", 2", 7-1/2", & 8-1/2" (Early Espresso Cardstock)
- Mechanism (cut 2): 2-1/2" x 3-1/8"; scored on the short side at 3/4" & 1-3/4" (Early Espresso Cardstock)
- Large Panel (cut 2): 2-3/4" x 3-5/8" (Early Espresso Cardstock)
- Small Panel (cut 2): 2-1/4" x 3-1/8" (Early Espresso Cardstock)
- Large Tree Panel (cut 2): 2-1/2" x 3-3/8" (Basic White Cardstock)
- Small Tree Panel (cut 2): 2" x 2-7/8" (Basic White Cardstock)
- Center Mat (cut 2): 3-7/8" x 5-1/4" (Basic White Cardstock) - 1 mat for the front center of the card and 1 mat for the back center of the card
Supplies
Stamps
- #154983 Beauty of Friendship Stamp Set
- #159634 Hello Harvest Stamp Set
- #159644 Hello Harvest Bundle (10% savings)
Ink
- #147084 Real Red Ink Pad
- #147086 Pumpkin Pie Ink Pad
- #147094 Daffodil Delight Ink Pad
- #147089 Garden Green Ink Pad
- #147114 Early Espresso Ink Pad
- #102283 Versamark Clear Watermark Ink Pad
Paper
- #119586 Early Espresso Cardstock
- #159276 Basic White Cardstock
Embellishments & Tools
- #155555 Metallics Emboss Powders (Gold)
- #129053 Heat Tool
- #118487 Clear Block A
- #118486 Clear Block C
- #118490 Clear Block H
- #159971 Embossing Additions Tool Kit
- #153611 Blending Brushes
- #110755 Multipurpose Liquid Glue
- #102300 Bone Folder
- #103579 Paper Snips
- #130148 Grid Paper
- #152392 Paper Trimmer
- #126200 Stampin' Scrub
- #153648 Stampin' Mist Cleaner
I hope you enjoyed today's fun fold card. How would you decorate your landscape display panel card? I would love to hear from you! Leave me a comment below telling me what stamps and ink you would use for your landscape display panel card.
If you need supplies to make this autumnal tree thanksgiving card, please, shop my online store HERE.
If you have any questions about today's project, please, don't hesitate to ask me.
Thanks for stopping by!
Beth


This is very nice. I like all the fall colors. I recently made one of these cards as well. It was lots easier than it looked -- just a lot of cutting.
ReplyDeleteThank you for your kind words! I am so glad you enjoyed my display panel card! I agree! It is a lot of cutting, for sure!
Delete