Thank you so much for a wonderful retreat day on Saturday! It was a full house, but we had tons of fun stamping, chatting, eating, and playing games! I am so glad that you enjoyed the Make a Card Relay Game! Each team worked together so well to complete the card. I am so glad that you cheered each other on! I hope you enjoyed the card projects, the prizes, and the Valentine Thank you favors too!
Below are the instructions for your Take and Make Projects we started on Saturday. Use the instructions below to assemble your card. Take a photo of your card and email me it to me with the subject line Take and Make Ladybug Card or post your card photo on
my Facebook Page. I would love to see how yours turned out!
My Take and Make project was inspired by a mini card from Tammy
Shaia. She created a lovely and cute mini square card using the Little
Ladybug stamp set and the Layering Circles Dies with a similar layout.
I changed many elements on the inspiration card. I
changed the card dimensions to make it a 4-1/4" x 5-1/2" card. I used a
stitched circle and a plain circle to frame my ladybug image. I changed
the shape of the greeting from a die cut to a rectangle. I also used
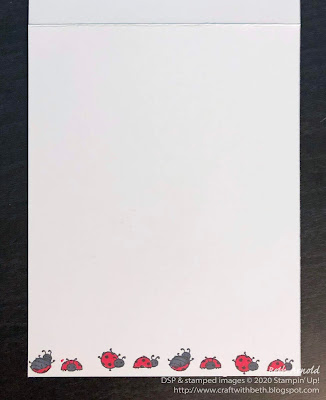
the Brights and the Regals Designer Series Paper Pack as the featured patterned paper. I added the row of ladybugs image to the inside of my card base.
Project Pieces
In your Take and Make packets, you should have the following
- 4-1/4" x 11" Thick Whisper White Card Base; scored at 5-1/2"
- 3/4" x 3" Whisper White Greeting Rectangle
- Whisper White Stitched Circle Die Cut
- Basic Black Layering Circle Die Cut
- 3" x 4-1/4" Designer Series Paper Mat in either Real Red or in Poppy Parade
- 3-1/4" x 4-1/2" Basic Black Mat
Stamped at the Retreat Day Pieces
At our retreat day, you should have stamped
- the ladybug image of your choice on the Whisper White Stitched Circle Die Cut
- the greeting "Hey, Lady!" on the Whisper White Greeting Rectangle
- the row of ladybugs image along the bottom edge of the inside of your Card Base
Card Assembly Instructions
- First, fold and burnish your Card Base.
- Color in your ladybug images. Because we used water-based Memento Tuxedo Black ink to stamp our images, I used alcohol-based coloring tools to avoid smearing the Memento ink. I used Stampin' Blends - Dark Real Red, Dark Basic Black, and Light Basic Black - to color in the ladybug on the front of the card and on the inside of the card. You could also use colored pencils as long as you don't use water or the blending pens to smooth your pencil lines.
- Next adhere the Designer Series Paper Mat to the center of the Basic Black Mat. Adhere them to the center of your card front.
- Then adhere the Whisper White stitched circle die cut to the center of the Basic Black circle die cut and add dimensionals to the back of the Basic Black circle die cut. Adhere to the card front in the lower right corner, so that the circles are overlapping both the Designer Series Paper Mat and the Card Base, or as desired.
- Trim your Whisper White Greeting Rectangle as desired. You could cut both ends like I did, cut one banner tail, cut two banner tails, and more! Adhere the Whisper White Greeting Rectangle to the card front in the lower left corner but still on the Designer Series Paper Mat, or as desired.
I hope you enjoyed this project and our retreat day! I can't wait for our next retreat in the summer!
Happy Stamping!
Beth
++++++++++++++++++
Shop Online 24/7 in my
Online Store
Check out the
Clearance Rack
Sign up for
Classes, Events, and Retreat Days
Sign up for
my newsletter and mailing list or request a catalog
Sign up for
Paper Pumpkin
Join my
Stampin' Team - the Purrfect Stampers!
Visit
my YouTube Channel
Follow me Social Media! I post on
Pinterest,
Twitter and
Facebook
Follow me on
Instagram
Host Codes & Current Promotions:
January Host Code - GKCKC3MP
When placing an order, please use host code
GKCKC3MP for orders under $150 USD. Please don't use the host code if your order is more than $150. Use Host Code
GKCKC3MP if you are attending the Stamp of the Month Class long distance to have your Stamp of the Month Bundle mailed directly to you.
The
January-June Mini Catalog is now the new name for the Occasions
Catalog. The January-June Mini Catalog will run from January 3rd, 2020
through June 2nd, 2020. It is filled to the brim with a multitude of
stamping goodies for all kinds of spring and early summer holidays and
occasions, including weddings, Easter, Valentine's Day, anniversaries,
Mother's Day, Father's Day, and more! Visit
my online store to see all of the January-June Mini Catalog products!
Sale-A-Bration
is a three month long special promotion that for each qualifying
purchase you can earn FREE products from the Sale-A-Bration Catalog!
From January 3rd, 2020 through March 31st, 2020 for every $50 you spend
before tax and shipping, you can earn a Level 1 product from the
Sale-A-Bration Catalog. For every $100 you spend before tax and
shipping, you earn a Level 2 product from the Sale-A-Bration Catalog.
For more details and information, check out my blog post
HERE. View the Sale-a-Bration products in my online store
HERE.
When
you host a workshop or place a single order of $300 USD or more during
Sale-A-Bration 2020, you earn a FREE Little Lady Bug Stamp Set (Item
#152384). This is an adorable lady bug stamp set that is sure to bring
cheer to every project! The Little Lady Bug stamp set is not for
purchase and can only be earned on qualifying orders during
Sale-A-Bration 2020. For more details and information, check out my blog
post
HERE.
During Sale-A-Bration 2020 (January 3rd, 2020 through March 31st, 2020), when you
join
Stampin' Up! as a new demonstrator you also receive a Mini Paper
Cutter, a sampler pack of 6" x 6" Designer Series Paper, and the stamp
set of your choice (excluding host sets and Sale-A-Bration sets) in
addition to the $125 USD in product for $99 USD, free shipping, a free
Paper Pumpkin Kit, and free business supplies! This is one of the best
joining specials that I have seen since I became a demonstrator! For
more information, check out my blog post
here or contact me today. I would love for you to
join my team the Purrfect Stampers!
Coordination
Products are coming soon! There will be 5 die sets and 1 Designer
Series Paper Sampler Pack that coordinate with Sale-A-Bration and
January-June Mini Catalog stamp sets and punches! The Little Ladybug
Stamp Set will also have coordinating dies! No more fussy cutting!
Woohoo! These coordinating products are only available while supplies
last. The customer launch will be on February 4th, 2020 and will
continue through March 31st, 2020 or while supplies last. Please, review
the products below, make your wish lists, and set a reminder on your
calendar for February 4th! I don't want you to miss out! For more
information, click
here to see my blog post.
Get
a sneak peek of February's Paper Pumpkin Kit! February's kit theme is A
Lovely Day. This month's kit is all about celebrating! It will make 9
cards and 9 coordinating
envelopes. February's kit also coordinates with the Happy Birthday to
You Stamp Set (Item 152308) in the Sale-A-Bration Catalog, providing
even more versatility!
Sign up for Paper Pumpkin by February 10th to receive February's Kit! Click
here for more information about February's Paper Pumpkin kit!
June 4th, 2019 - June 2nd, 2020 -
Shop from the 2019-2020 Annual Catalog
for all of your stamping needs! This catalog is bursting with must have
stamp sets, dies, embossing folders, ribbons, rhinestones, and more! I
love the entire catalog! I think you will too!
Check out all of the new products today!
Are you new to stamping? The
Beginner Brochure
may be the right place to start! The Beginner Brochure features a
collection of stamp sets, kits, and bundles that are specifically
designed to help you build your stamping skills! Check out our Beginner
Brochure today!
View the Beginner Brochure products in my online store. Download the Beginner Brochure
here.
P.S. If you are a Magnolia Lane Product Suite Fan, there is a companion stamp set Magnolia Blooms (
Item #152729) in the
Beginner Brochure!


