Showing posts with label 2016 On Stage. Show all posts

Thursday, July 21, 2016

My Best Stories: Fresh Fruit Card Set Part Two

This is the second card Kim Williams demonstrated at On Stage 2016, featuring the pear image. The combination of Emerald Envy, Pear Pizzazz, and Tangerine Tango make a fresh, vibrant look to this birthday card.

Craft with Beth: Fresh Fruit Card Set: Part Two Birthday Stampin' Up! Fruit Stand DSP #imbringingbirthdaysback

All of the cards in this set will use stamping on watercolor paper and masking. This birthday card uses the Decorative Label Punch as the masking shape instead of just a rectangle.

Start by cutting all of the paper. You will need Emerald Envy, Tangerine Tango, Whisper White, and Watercolor Paper.


My Best Stories Birthday Card Measurements

Color
Dimensions
Card Base
Emerald Envy
5-1/2” x 8-1/2”; scored at 4-1/4"
1st Mat
Tangerine Tango
5-1/4” x 4”
2nd Mat
Watercolor
5” x 3-3/4”
Inside Mat
Whisper White
5-1/4” x 4”

Next punch out a Decorative Label shape from a sticky note. Press it in the center of the water color paper so that the short edges are at the top & bottom and the long edges are on the sides.

Stamp the pear image randomly all over the watercolor paper with Pear Pizzazz ink.

Stamp the leaf image at the top of each pear with Emerald Envy ink.

Then stamp the small circle with Tangerine Tango ink to fill in the extra space.

Once the ink is dry, remove the Decorative Label mask and stamp "We age not by years, but by stories" sentiment in the center with Basic Black Archival ink.

Adhere the watercolor paper to the center of the Tangerine Tango mat and then adhere that to the Emerald Envy card base.

Craft with Beth: Fresh Fruit Card Set: Part Two Birthday Stampin' Up! Fruit Stand DSP #imbringingbirthdaysback

On the inside of the card, I stamped the pear image in the lower right corner and the sentiments Happy Birthday and P.S. My best stories are with you slightly above the center. For some added whimsy and cheer, I stamped the small circle randomly around the top of the card, leaving some space for a personalized message. None of the On Stage samples showed the insides of the cards, so all of the insides are my own design.

I think this card would be great for a man's birthday or for a woman's birthday. I think this would be especially endearing for my husband's next birthday!

Tune in next time for another Fresh Fruit example!

Thanks for stopping by!
Beth


My Best Stories Birthday Card Project Supply List
Stamps
Fresh Fruit
Paper
Watercolor
Whisper White
Emerald Envy
Tangerine Tango
Ink
Basic Black Archival
Pear Pizzazz
Emerald Envy
Tangerine Tango
Embellishments

Tools
Stampin’ Trimmer
Bone Folder
Grid Paper
Stampin’ Mist Cleaner
Stampin’ Scrub
Stampin’ Pierce Mat
Paper Snips
SNAIL Adhesive
Multipurpose Liquid Glue
Sticky Note
Acrylic Blocks A, B, C, and D
Decorative Label Punch
Click here to start shopping!

Wednesday, July 20, 2016

Peachy Keen: Fresh Fruit Card Set Part One

At On Stage 2016, Kim Williams showed us a gorgeous set of cards using the Fresh Fruit stamp set and watercolor paper. Her demonstration truly amazed me! I wanted my own Fresh Fruit stamp set right then and there! I want to share these little gems with you.

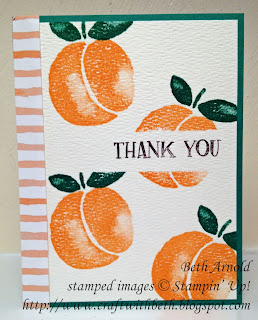
The first card Kim demonstrated is a bright, cheery thank you card featuring the peach image, Emerald Envy, and Peekaboo Peach.

This card uses two techniques - stamping on watercolor paper and masking. These stamps are already shaded for a watercolor look,  so using watercolor paper adds even more texture. The fruit looks almost good even to eat!

Craft with Beth: Fresh Fruit Card Set: Part One

First cut all of your paper. You will need Emerald Envy, Fruit Stand DSP, Whisper White, and Watercolor Paper.


Peachy Keen Thank You Card Measurements

Color
Dimensions
Card Base
Emerald Envy
5-1/2” x 8-1/2”; scored at 4-1/4”
1st Mat
Watercolor
5-1/4” x 3-3/4”
DSP Strip
Fruit Stand DSP
5-3/4” x 1/2”
Inside Mat
Whisper White
5-1/4” x 4”
 

The thank you sentiment area is masked first with a strip of sticky note 3/4" by 4". Cut your sticky note to at least 4" so some overhangs each edge. This helps secure your watercolor paper to your work surface.

Stamp the peach image with Peekaboo Peach across the watercolor paper. Stamp the leaf image with Emerald Envy ink above each peach. Once the ink is dry remove the sticky note mask and stamp thank you with Basic Black Archival ink.

Adhere the watercolor color paper to the card base, leaving approximately an 1/8" on the right side. Adhere the DSP strip to the left edge. The DSP strip will be longer than your card base. Allow the glue to dry. Then trim the excess. Cutting the strip longer ensures full coverage and a clean edge.

Craft with Beth: Fresh Fruit Card Set: Part One

On the inside of the card, I stamped the peach image in the lower right corner, leaving the rest blank for a personalized message. None of the On Stage samples showed the insides of the cards, so all of the insides are my own design.

I hope you give this luscious peach thank you card a try. I would love to see what you make!

Stay tuned for more Fresh Fruit cards next time.

Thanks for stopping by!
Beth


Peach Thank You Card Project Supply List
Stamps
Fresh Fruit
Paper
Watercolor
Whisper White
Emerald Envy
Fruit Stand DSP
Ink
Basic Black Archival
Peekaboo Peach
Emerald Envy
Embellishments

Tools
Stampin’ Trimmer
Bone Folder
Grid Paper
Stampin’ Mist Cleaner
Stampin’ Scrub
Stampin’ Pierce Mat
Paper Snips
SNAIL Adhesive
Multipurpose Liquid Glue
Sticky Note
Acrylic Blocks B, C, and G
Click here to start shopping!