Thursday, October 26, 2017

Make this Purr-fectly Spooky Cat Treat Tote

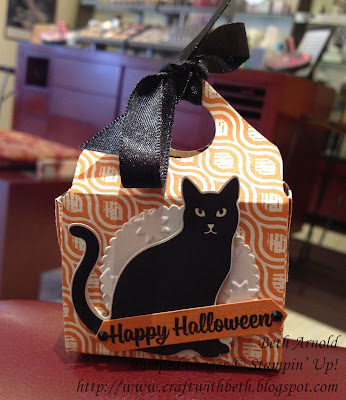
I was inspired to create this Halloween treat tote from one made by fellow Stampin' Up! Demonstrator Dee Slater. She created this cute treat tote shape using the Envelope Punch Board for a birthday treat. I thought what a purr-fect way to hold some spooky treats!

Craft with Beth: Spooky Cat Envelope Punch Board Treat Tote Halloween Cat Punch Stampin Up Stamping treat holder

I used her basic measurements but changed the paper, stamp set, and embellishments to feature the Spooky Cat Bundle and Spooky Night Designer Series Paper - my favorite Halloween product suite!

Gather the materials and cut the cardstock.

Cat Envelope Punch Board Treat Tote Measurements

Color
Dimensions
Treat Box Base
Spooky Night Designer Series Paper
6” x 6”
Circle
Very Vanilla
 2” x 2”; die cut 1-3/4” scalloped circle & emboss with Oh My Stars Embossing Folder
Cat
Spooky Night Designer Series Paper
Punch out 1 cat from the cat patterned paper
Greeting Banner
Pumpkin Pie
3” x 3/4"; stamp Happy Halloween in Basic Black Archival ink & punch out with the Classic Label Punch

Using the Envelope Punch Board and the 6" x 6" piece of Spooky Night Designer Series Paper, create the treat box base. 
  1. First slide the Designer Series Paper to the 1-3/8” mark on the Envelope Punch Board, punch, and score. 
  2. Move the paper over to the 4” mark, punch, and score. 
  3. Rotate 90 degrees counterclockwise. Line up the notch with the previous score line, punch, and score. Move the paper over to the second previous score line, punch, and score. 
  4. Rotate 90 degrees counterclockwise and repeat. Repeat on all four sides.
  5. Round all four corners using the corner rounder punch on the back of the Envelope Punch Board.
  6. Carefully burnish all of the score lines. Designer Series Paper is thinner than cardstock, so it will not need as much pressure to create a nice creased score line.
  7. Cut the side flaps as shown below.


  8. Add tape to each of the larger side flaps. Adhere to the center panels. 
  9. Add tape to each of the smaller side flaps. Flip the smaller side flap taps to the outside of the box and adhere.

  10. Craft with Beth: Spooky Cat Envelope Punch Board Treat Tote Halloween Cat Punch Stampin Up Stamping treat holder

  11. Punch a 3/4" circle from a sticky note. Place on 1 of the larger side flaps, bring the two larger side flaps together, and punch. Remove the sticky note.
  12. Thread the shimmery ribbon through the punched circle and tie a bow.
  13. Die cut the circle from the Very Vanilla cardstock and emboss with the Oh, My Stars Embossing Folder.
  14. Punch out cat from the cat patterned paper from the Spooky Night Designer Series Paper pack. Adhere the cat to the center of the embossed circle. Add a dimensional to the back of the circle and adhere to the side of the treat tote.
  15. Stamp Happy Halloween onto Pumpkin Pie cardstock with Archival Basic Black ink. Punch out the greeting with the Classic Label Punch. Add a black rhinestone to either end of the greeting. Add dimensionals to the back of the greeting and adhere to the bottom of the cat at an angle, as shown in the photograph.
  16. Fill the tote with treats.

Craft with Beth: Spooky Cat Envelope Punch Board Treat Tote Halloween Cat Punch Stampin Up Stamping treat holder

These treat totes are just the right side for a handful of mini peanut butter cups, a few chocolate squares, a pack of mints, and so much more. You could also put nonfood treats in here, such as some fun pencil erasers, a box of stitch markers, a small puzzle, or jewelry.

How would decorate your treat tote? I would love to see what you make!

Thanks for stopping by!
Beth

Cat Envelope Punch Board Treat Tote Supply List
Stamps
146014 Spooky Cat Bundle
Paper
144610 Spooky Night Designer Series Paper
101650 Very Vanilla
105117 Pumpkin Pie
Ink
140931 Basic Black Archival
Embellishments
104430 Dimensionals
144129 Black Shimmery Ribbon
144639 Black Rhinestones
Tools
133774 Envelope Punch Board
143710 Oh My Stars Embossing Folder
141705 Layering Circles Framelits
143263 Big Shot
141491 Classic Label Punch
138995 Tear & Tape


Tuesday, October 24, 2017

Create a Spooky Owl-oween Treat Box

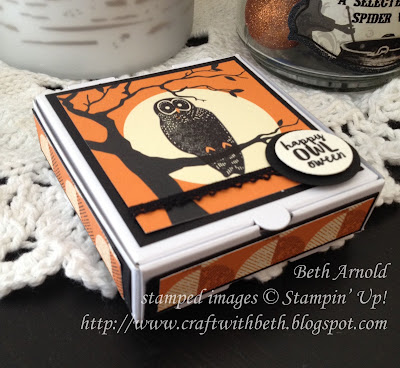
Your trick-or-treaters are sure to get into the spirit of Halloween with this spooky treat box. This food safe pizza box comes precut, scored, and ready to assemble, and is the perfect size to put a few small or a larger cookie or other sweet morsels inside.

Craft with Beth: Happy Halloween Owloween Pizza Treat Box Treat Holder Spooky Cat stampin up

Let's get started. Gather your supplies and cut your cardstock.


Color
Dimensions
Treat Box Base
Pizza Box
3-1/2” x 3-1/2” x 1”
1st Matte (cut 4)
Basic Black
3-3/8” x 3/4"
2nd Matte (cut 4)
Spooky Night Designer Series Paper
3-1/4” x 5/8”
1st Top Matte
Basic Black
3-1/4” x 3-1/4”
2nd Top Matte
Spooky Night Designer Series Paper
3” x 3”
Greeting Circle
Very Vanilla
2” x 2”; stamp the Owl-oween image & punch out only the Happy Owl-oween part with a 1” circle punch
Greeting Circle Matte
Basic Black
Punch a 1-1/4” circle

    1. Fold and assemble the pizza box. 
    2. Adhere the Spooky Night Designer Series Paper mattes to the Basic Black mattes. 
    3. Then adhere to the four sides of the pizza box.
    4. Adhere the Basic Black matte to the top of the pizza box.
    5. Stamp the Owl-oween image and punch out only the Happy Owl-oween part with a 1” circle punch.
    6. Cut a 3” square from the tree branch pattern paper out of the Spooky Night Designer Series Paper.
    7. Stamp the owl image with Basic Black Archival ink on the tree branch. Stamp the beak and talons with Pumpkin Pie ink on the owl image.
    8. Adhere Black Crocheted Trim along the bottom portion of the Spooky Night Designer Series Paper. 
    9. Adhere the Spooky Night Designer Series Paper to the Basic Black matte on top of the pizza box.
    10. Punch a 1-1/4” circle from Basic Black cardstock.
    11. Adhere the Owl-oween circle to the Basic Black circle.
    12. Add a dimensional to the back of the Basic Black circle.
    13. Adhere the Owl-oween circle to the right corner of the Spooky Night Designer Series Paper on top of the pizza box.

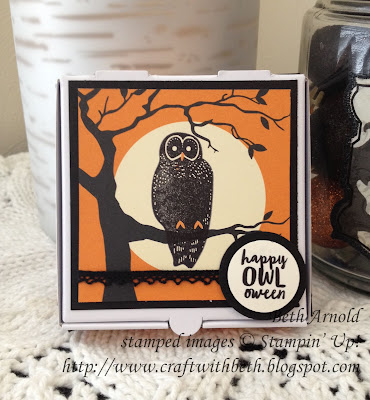
    Craft with Beth: Happy Halloween Owloween Pizza Treat Box Treat Holder Spooky Cat stampin up

    These pizza boxes would also be fa-boo-lous for school parties and teacher gifts.
    The 4 sides of the box are all the same length and width, so you can easily swap the Spooky Night Designer Series Paper for another patterned paper or occasion.

    How would decorate your pizza box? I would love to see what you create!

    Thanks for stopping by!
    Beth


    Happy Owl-oween Pizza Treat Box
    Stamps
    144749 Spooky Cat Stamp Set
    146014 Spooky Cat Bundle
    Paper
    144610 Spooky Night Designer Series Paper
    121045 Basic Black
    101650 Very Vanilla
    Ink
    140931 Basic Black Archival
    126945 Pumpkin Pie
    Embellishments
    104430 Dimensionals
    144611 Black Crocheted Trim
    Tools
    144645 Pizza Box
    119861 1-1/4" Circle Punch
    119868 1” Circle Punch
     

    Monday, October 2, 2017

    Happy October!

    I know I say this every year, but I still think it is true. This year has gone by so quickly! I'm glad it has because fall is my favorite time of year. I love the crisp air, getting new school supplies, and snuggling up with a warm scarf or blanket. Fall is also the time of year for several fabulous promotions. October kicks off with two great promotions!

    Craft with Beth: Designer Series Paper Sale 2017 Buy 3 Get 1 Free DSP Sale Graphic

    From October 1st to 31st, 2017, when you purchase 3 packs of Designer Series Paper from the selected Designer Series Paper list, you get 1 Designer Series Paper pack from the list for FREE. That is right! That is a savings of up to $13!

    Craft with Beth: Designer Series Paper Sale 2017 Buy 3 Get 1 Free DSP Sale Graphic

    I look forward to this promotion because it is the time I stock up on my favorites (Painted Autumn, Birthday Memories, and Whole Lot of Lovely Designer Series Paper) as well as on Christmas Designer Series Paper. I ordered more Designer Series Paper as well as the coordinating solid cardstock packs to create my Christmas cards. This year I stocked up on Be Merry Designer Series Paper, Garden Green, Whisper White, and Cherry Cobbler cardstock. Isn't the little reindeer on the Be Merry Designer Series Paper adorable?

    Craft with Beth: Be Merry Designer Series Paper Coordinating Products Graphic

    Best of all, all order types qualify for this sale (customer, workshop, & demonstrator) and there is no limit to how many times you can purchase 3 packages of Designer Series Paper. However, Designer Series Paper purchased as part of a Demonstrator Started Kit and purchases with Stampin' Rewards don't quality for this sale. Phone orders must be received by 6:50pm MT and Online orders by 11:50pm MT.

    What is your favorite Designer Series Paper pack? Click here to stock up and save on your favorite Designer Series Paper packs. Click here to see the entire flyer.

    Craft with Beth: World Card Making Day 2017 Sale Graphic

    World Card Making Day is a day dedicated to doing what you love most—making handmade cards! It celebrates the creativity and personal connection handmade cards create between loved ones, and it’s a great time to make your own cards to send to their family and friends. This year the world celebrates the day on October 7th, but why not celebrate a little longer? For ten days (October 1–10, 2017), you can get 15% off card making essentials like notecards & envelopes and select stamp sets. Also, when you buy Fast Fuse Adhesive, you’ll get two refills for FREE (a USD $15 value)!

    Craft with Beth: World Card Making Day Sale 2017 Product Graphic Chart

    Click here to shop and save 15% on your favorite card making essentials. Click here to see the entire World Card Making Day Flyer.

    All order types qualify for this sale. However, the Fast Fuse Adhesive deal cannot be used to order a Starter Kit or with Stampin’ Rewards. All other items may be added to a Starter Kit or with Stampin’ Rewards at the sale price. Phone orders must be received by October 10th, 2017 by 6:50pm MT and online orders by October 10th, 2017 by 11:50pm MT.

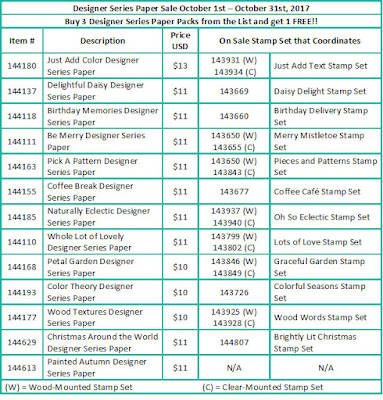
    P.S. The Designer Series Paper Sale coordinates with the World Card Making Day Sale. Woohoo!  Check out which stamp sets coordinate with which Designer Series Paper packs in the chart below.

    Craft with Beth: Designer Series Paper Sale 2017 DSP Coordinating World Card Making Day Sale 2017 Products Chart

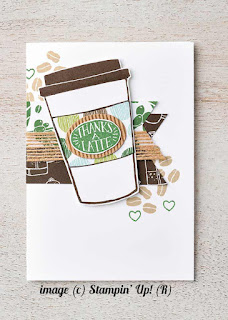
    You can make this sweet and simple thank you card using my favorite Coffee Cafe stamp set and Coffee Break Designer Series Paper in no time flat!

    Craft with Beth: World Card Making Day Sale 2017 Coffee Cafe sample card

    This is still time to sign up or renew your Paper Pumpkin subscription. During October and November Paper Pumpkin is offering two straight months of perfectly coordinated Christmas card making & gifting projects. Stampin' Up! is known for their coordinating products, and these Paper Pumpkin kits are no exception. These two matching kits are two months of fantastic seasonally-themed kits to help you get ready for the holidays!

    Craft with Beth: Paper Pumpkin October and November 2017 Kits will coordinate graphic renew your subscription by Oct 10th, 2017 to avoid missing out

    I know with the holiday season quickly approaching, your time is precious. Paper Pumpkin kits come with the supplies you need to create cards and gifting projects pre-cut and ready to craft to help you make gorgeous cards, which helps save time and stress when planning large projects like holiday cards.

    I cannot wait to share what is in store for us in October and in November's kits! Judging by the box covers shown above, can you guess what may be inside? Subscribe or renew your subscription by October 10th to ensure you don't miss either kit.

    And, don't miss our Paper Pumpkin Parties to assemble our kits on October 28th from 1-4pm.

    Craft with Beth: Merry Patterns limited edition stamp set host promotion title graphic

    This is also still time to earn the limited edition Merry Patterns stamp set (Item #144973). From now until October 31st, 2017 if you host a workshop with a total of or place a single order of $300.00USD or more, you will receive the FREE stamp set Merry Patterns (Item # 144973).
     
    Craft with Beth: Merry Patterns limited edition stamp set host promotion stamp set graphic

    Merry Patterns is a perfect winter themed two-step photopolymer stamp set. My favorite stamp in this set is the reindeer wearing the knitted sweater! Adorable! I also love the evergreen sprig wreath in the sample below. How clever!

    Craft with Beth: Merry Patterns limited edition stamp set host promotion stamp set sample

    Please contact me today or click here for more details or to host a workshop.

    Thanks for stopping by!
    Beth