Wednesday, July 27, 2016

Petals of Gratitude: Fresh Fruit Card Set Part Five

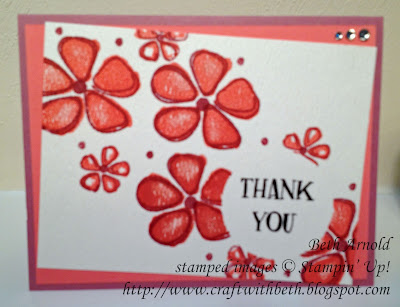
The fifth card in our Fresh Fruit Card Set also features the flower images. The petals seem to delicately float across the card!

Craft with Beth: Fresh Fruit Card Set: Part Five Thank You Stampin' Up! Fruit Stand DSP

This thank you card uses the 1-3/4" Circle Punch and a rectangle as the masking shape.

Start by cutting all of the paper. You will need Sweet Sugarplum, Flirty Flamingo, Whisper White, and Watercolor Paper.

Petals of Gratitude Card Measurements

Color
Dimensions
Card Base
Sweet Sugarplum
5-1/2” x 8-1/2”; scored at 4-1/4”
1st Mat
Flirty Flamingo
5-1/4” x 4”
2nd Mat
Watercolor
5” x 3-3/4”
Inside Mat
Whisper White
5-1/4” x 4”

Next punch out the circle from a sticky note. Press it down in the lower right corner of the water color paper.

Stamp the larger solid flower image with Flirty Flamingo ink from the upper left corner to the lower right corner.

Stamp the larger flower outline image with Sweet Sugarplum ink around each larger flower.

Stamp the larger circle image with Sweet Sugarplum ink in the center of each larger flower.

Stamp the smaller solid flower image with Flirty Flamingo ink from the upper left corner to the lower right corner.

Stamp the smaller flower outline image with Sweet Sugarplum ink around each smaller flower.

Stamp the smallest circle image with Sweet Sugarplum, filling in the spaces between the flowers and in the center of each smaller flower.

Once the ink is dry, remove the circle mask and stamp thank you in the center with Basic Black Archival ink. To create this two line thank you, first stamp thank you on a sticky note. Cut the greeting in half between the two words. Place both pieces of the mask where you want to stamp. Then remove the part you are inking. Do the same with the second word.

Adhere the watercolor paper to the Flirty Flamingo mat slightly askew and then adhere that to the Sweet Sugarplum card base.

Add three rhinestones in the upper right corner.

Craft with Beth: Petals of Gratitude: Fresh Fruit Card Set: Part Five Thank You Stampin' Up! Fruit Stand DSP

On the inside of the card, I stamped a trio of flower images in the lower right corner, leaving space for a personalized message. None of the On Stage samples showed the insides of the cards, so all of the insides are my own design.

Tune in next time for one more Fresh Fruit card for our set!

Thanks for stopping by!
Beth


Petals of Gratitude Card Project Supply List
Stamps
Fresh Fruit
Paper
Watercolor
Whisper White
Sweet Sugarplum
Flirty Flamingo
Ink
Basic Black Archival
Sweet Sugarplum
Flirty Flamingo
Embellishments
Rhinestones
Tools
Stampin’ Trimmer
Bone Folder
Grid Paper
Stampin’ Mist Cleaner
Stampin’ Scrub
Stampin’ Pierce Mat
Paper Snips
SNAIL Adhesive
Multipurpose Liquid Glue
Sticky Note
Acrylic Blocks A, C, and G
1-3/4” Circle Punch
Click here to start shopping!
 

Tuesday, July 26, 2016

Bonus Days Are Almost Over!


Bonus Days Stampin' Up! Graphic

July is almost over and so are Bonus Days! There are only a few days left to take advantage of this amazing deal!


Stampin' Up! is giving $5 coupons for each $50 increment you spend from July 7th to July 31st (11:50PM Mountain Time). For example, if you spend $100, you will receive two $5 coupons. I have earned quite a few coupons this month!

Stampin’ Up! will email you a $5 coupon for every $50 you spend from July 7th to July 31st!! You must have a valid email to receive your coupon codes. Save these emails and record the coupon codes because they cannot be recovered or resent.

Then from August 2nd to August 31st (11:50PM Mountain Time), you can redeem these coupons for anything you want in the catalog (with the exception of the Starter Kit and Paper Pumpkin Subscriptions). Bonus Day coupon codes will be entered at the checkout process. There is no limit on the number of coupons you can use on an order during the redemption period.

Minimum shipping charges will still apply to Bonus Day Redemption orders.

Shop in July to receive your coupons. Redeem your coupons in August. July is a great time to purchase items on your wish list from the new annual catalog to get Bonus Day Coupons. Then redeem your coupons for more of your wish list or stock on the essentials like cardstock, ink, and adhesives in August. Talk about a win-win!

Download the Bonus Flyer to keep as a reference and to record your email coupon codes.

Please contact if you have any questions about this amazing Bonus Day Deal. 

Thanks for stopping by!
Beth

Monday, July 25, 2016

Floral Wishes: Fresh Fruit Card Set Part Four

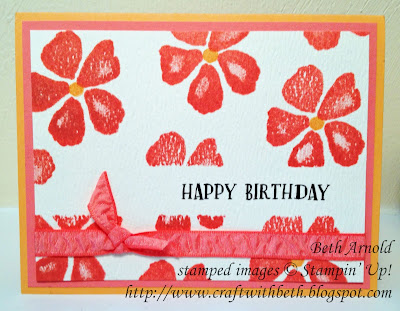
This sweet birthday card, the fourth card in our Fresh Fruit Card Set, uses the solid flower image to create a soft, floral look.

Craft with Beth: Fresh Fruit Card Set: Part   Four Birthday Stampin' Up! Fruit Stand DSP #imbringingbirthdaysback

First cut all of your paper. You will need Peekaboo Peach, Whisper White, Flirty Flamingo, and Watercolor Paper.

Floral Wishes Birthday Card Measurements

Color
Dimensions
Card Base
Peekaboo Peach
5-1/2” x 8-1/2”; scored at 4-1/4”
1st Mat
Flirty Flamingo
5-1/4” x 4”
2nd Mat
Watercolor
5” x 3-3/4”
Inside Mat
Whisper White
5-1/4” x 4”

The thank you sentiment area is masked first with a strip of sticky note 3/4" by 4". Cut your sticky note to at least 4" so some overhangs each edge. This helps secure your watercolor paper to your work surface.

Stamp the solid floral image with Flirty Flamingo across the watercolor paper. Stamp the small circle image with Peekaboo Peach ink in the center of each flower. Once the ink is dry remove the sticky note mask and stamp happy birthday with Basic Black Archival ink.

Let's make the faux bow underneath the sentiment. Cut a 6" piece of Flirty Flamingo Ruched Ribbon. Adhere the each ribbon end on the backside of the watercolor paper. Cut a 3" piece of Flirty Flamingo Ruched Ribbon. Tie a knot on the left side of the ribbon. Trim the excess ribbon. Adhere glue dots underneath the faux bow to secure in place.

Glue dots do not show as much through this ruched ribbon. I tried liquid glue first. The liquid glue will show through and stain the ribbon.

Adhere the watercolor paper to the Flirty Flamingo mat and then to the Peekaboo Peach card base.

Craft with Beth: Floral Wishes Fresh Fruit Card Set: Part Four Birthday Stampin' Up! Fruit Stand DSP #imbringingbirthdaysback

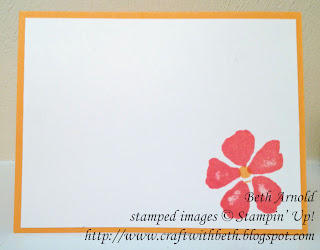
On the inside of the card, I stamped the peach image in the lower right corner, leaving the rest blank for a personalized message. None of the On Stage samples showed the insides of the cards, so all of the insides are my own design.

I hope you give this floral birthday card a try. I would love to see what you make!

Stay tuned for more Fresh Fruit cards Wednesday.

Thanks for stopping by!
Beth


Floral Wishes Birthday Card Project Supply List
Stamps
Fresh Fruit
Paper
Watercolor
Whisper White
Peekaboo Peach
Flirty Flamingo
Ink
Basic Black Archival
Peekaboo Peach
Flirty Flamingo
Embellishments
Flirty Flamingo Ruched Ribbon
Tools
Stampin’ Trimmer
Bone Folder
Grid Paper
Stampin’ Mist Cleaner
Stampin’ Scrub
Stampin’ Pierce Mat
Paper Snips
SNAIL Adhesive
Glue Dots
Multipurpose Liquid Glue
Sticky Note
Acrylic Blocks A, C, and G
Click here to start shopping!