Tuesday, October 31, 2017
Witches Brew Halloween Card
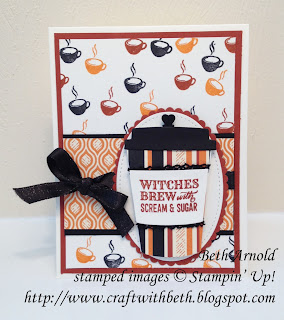
I created this interactive Halloween card featuring the Merry Cafe stamp set for my nephew. I thought he would find it humorous that the coffee cup was filled with bats instead of coffee.
Pull the heart tab on the coffee cup lid to reveal the cup's contents.
I'm sure you are thinking how did you make the cup narrow enough and short enough to fit inside the regular cup, be removable, and not interfere with the adhesive foam strips. I used the largest coffee cup framelit from the Coffee Cups Framelits set.. I cut 1 large cup from Very Vanilla cardstock. Then I placed the cup back onto the Big Shot Platform but a little to the right and a little upwards to die cut a smaller, narrower cup. I only cut part of the cup the second time. This is also called partial die cutting.
Partially die cutting the cup insert took a few tries, so once I got the size I was satisfied with, I made a template. That way next time I can go right to my template and know exactly where to cut.
After I attached the insert to the lid, I bent the bottom of the lid upwards to form a lip to catch the outer cup on.
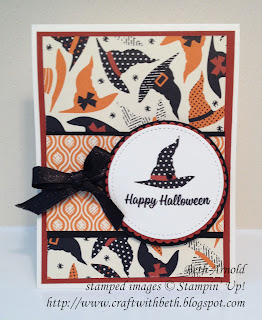
I used the same layout and similar measurements to make a second Halloween card for my niece.
I love the Spooky Night Designer Series Paper, especially the witch's hat and mosaic shaped patterns!
I wrote down my measurements. However, I made this card awhile ago and cannot find them. I have already mailed the card and cannot remeasure. I will keep looking for my notes and update if I locate them.
How have you used the Merry Cafe and Spooky Night Designer Series Paper? I would love to see what you create!
Thanks for stopping by!
Beth
Saturday, October 28, 2017
Get Your Wish Lists Ready!
My birthday is just around the corner. What better way to celebrate than with a sale! Woohoo!
On Saturday, November 4th, 2017 from 10am EST to 8pm EST, when you place an order directly with me (either in person or over the phone; this offer is NOT available online), you will receive 15% off the retail price of your order before taxes and shipping.
The details: There is no minimum purchase to qualify. The discount is on the retail amount before taxes and shipping. This offer is not redeemable for cash. This offer is directly through me and not online. You may select items from the 2017-2018 Annual Catalog or the 2017 Holiday Catalog. I reserve the right to modify or cancel this offer at any time for any reason. By making a purchase you agree to these sales terms.
Get your Wish Lists ready! I look forward to seeing you on the November 4th!
Beth
Thursday, October 26, 2017
Make this Purr-fectly Spooky Cat Treat Tote
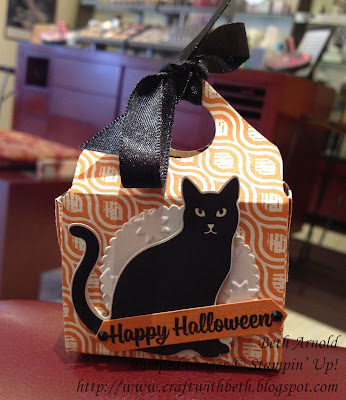
I was inspired to create this Halloween treat tote from one made by fellow Stampin' Up! Demonstrator Dee Slater. She created this cute treat tote shape using the Envelope Punch Board for a birthday treat. I thought what a purr-fect way to hold some spooky treats!
I used her basic measurements but changed the paper, stamp set, and embellishments to feature the Spooky Cat Bundle and Spooky Night Designer Series Paper - my favorite Halloween product suite!
Gather the materials and cut the cardstock.
Using the Envelope Punch Board and the 6" x 6" piece of Spooky Night Designer Series Paper, create the treat box base.
These treat totes are just the right side for a handful of mini peanut butter cups, a few chocolate squares, a pack of mints, and so much more. You could also put nonfood treats in here, such as some fun pencil erasers, a box of stitch markers, a small puzzle, or jewelry.
How would decorate your treat tote? I would love to see what you make!
Thanks for stopping by!
Beth
I used her basic measurements but changed the paper, stamp set, and embellishments to feature the Spooky Cat Bundle and Spooky Night Designer Series Paper - my favorite Halloween product suite!
Gather the materials and cut the cardstock.
Cat Envelope Punch Board
Treat Tote Measurements
|
||
Color
|
Dimensions
|
|
Treat Box Base
|
Spooky
Night Designer Series Paper
|
6” x 6”
|
Circle
|
Very Vanilla
|
2” x 2”;
die cut 1-3/4” scalloped circle & emboss with Oh My Stars Embossing
Folder
|
Cat
|
Spooky Night Designer Series Paper
|
Punch out 1 cat from the cat patterned paper
|
Greeting Banner
|
Pumpkin Pie
|
3” x 3/4"; stamp Happy Halloween in Basic
Black Archival ink & punch out with the Classic Label Punch
|
Using the Envelope Punch Board and the 6" x 6" piece of Spooky Night Designer Series Paper, create the treat box base.
- First slide the Designer Series Paper to the 1-3/8” mark on the Envelope Punch Board, punch, and score.
- Move the paper over to the 4” mark, punch, and score.
- Rotate 90 degrees counterclockwise. Line up the notch with the previous score line, punch, and score. Move the paper over to the second previous score line, punch, and score.
- Rotate 90 degrees counterclockwise and repeat. Repeat on all four sides.
- Round all four corners using the corner rounder punch on the back of the Envelope Punch Board.
- Carefully burnish all of the score lines. Designer Series Paper is thinner than cardstock, so it will not need as much pressure to create a nice creased score line.
- Cut the side flaps as shown below.
- Add tape to each of the larger side flaps. Adhere to the center panels.
- Add tape to each of the smaller side flaps. Flip the smaller side flap taps to the outside of the box and adhere.
- Punch a 3/4" circle from a sticky note. Place on 1 of the larger side flaps, bring the two larger side flaps together, and punch. Remove the sticky note.
- Thread the shimmery ribbon through the punched circle and tie a bow.
- Die cut the circle from the Very Vanilla cardstock and emboss with the Oh, My Stars Embossing Folder.
- Punch out cat from the cat patterned paper from the Spooky Night Designer Series Paper pack. Adhere the cat to the center of the embossed circle. Add a dimensional to the back of the circle and adhere to the side of the treat tote.
- Stamp Happy Halloween onto Pumpkin Pie cardstock with Archival Basic Black ink. Punch out the greeting with the Classic Label Punch. Add a black rhinestone to either end of the greeting. Add dimensionals to the back of the greeting and adhere to the bottom of the cat at an angle, as shown in the photograph.
- Fill the tote with treats.
These treat totes are just the right side for a handful of mini peanut butter cups, a few chocolate squares, a pack of mints, and so much more. You could also put nonfood treats in here, such as some fun pencil erasers, a box of stitch markers, a small puzzle, or jewelry.
How would decorate your treat tote? I would love to see what you make!
Thanks for stopping by!
Beth
Cat Envelope Punch Board
Treat Tote Supply List
|
|
Stamps
|
146014 Spooky Cat Bundle
|
Paper
|
144610 Spooky Night Designer Series Paper
101650 Very Vanilla
105117 Pumpkin Pie
|
Ink
|
140931 Basic Black Archival
|
Embellishments
|
104430 Dimensionals
144129 Black Shimmery Ribbon
144639 Black
Rhinestones
|
Tools
|
133774 Envelope Punch Board
143710 Oh My Stars Embossing Folder
141705 Layering Circles Framelits
143263 Big
Shot
141491 Classic Label Punch
138995 Tear &
Tape
|
Tuesday, October 24, 2017
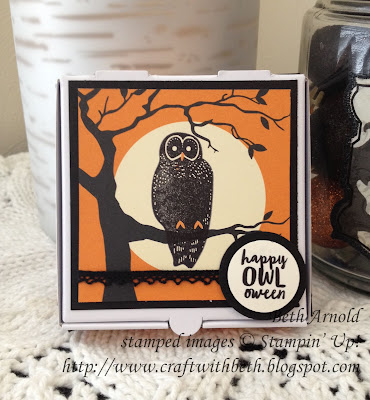
Create a Spooky Owl-oween Treat Box
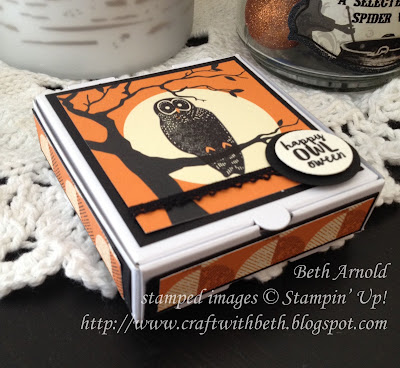
Your trick-or-treaters are sure to get into the spirit of Halloween with
this spooky treat box. This food safe pizza box comes precut, scored,
and ready to assemble, and is the perfect size to put a few small or a
larger cookie or other sweet morsels inside.
Let's get started. Gather your supplies and cut your cardstock.
These pizza boxes would also be fa-boo-lous for school parties and teacher gifts.
The 4 sides of the box are all the same length and width, so you can easily swap the Spooky Night Designer Series Paper for another patterned paper or occasion.
How would decorate your pizza box? I would love to see what you create!
Thanks for stopping by!
Beth
Let's get started. Gather your supplies and cut your cardstock.
Color
|
Dimensions
|
|
Treat Box Base
|
Pizza Box
|
3-1/2” x 3-1/2” x 1”
|
1st Matte (cut 4)
|
Basic Black
|
3-3/8” x 3/4"
|
2nd Matte (cut 4)
|
Spooky Night Designer Series Paper
|
3-1/4” x 5/8”
|
1st Top Matte
|
Basic Black
|
3-1/4” x 3-1/4”
|
2nd Top Matte
|
Spooky Night Designer Series Paper
|
3” x 3”
|
Greeting Circle
|
Very Vanilla
|
2” x 2”; stamp the Owl-oween image & punch out
only the Happy Owl-oween part with a 1” circle punch
|
Greeting Circle Matte
|
Basic Black
|
Punch a 1-1/4” circle
|
- Fold and assemble the pizza box.
- Adhere the Spooky Night Designer Series Paper mattes to the Basic Black mattes.
- Then adhere to the four sides of the pizza box.
- Adhere the Basic Black matte to the top of the pizza box.
- Stamp the Owl-oween image and punch out only the Happy Owl-oween part with a 1” circle punch.
- Cut a 3” square from the tree branch pattern paper out of the Spooky Night Designer Series Paper.
- Stamp the owl image with Basic Black Archival ink on the tree branch. Stamp the beak and talons with Pumpkin Pie ink on the owl image.
- Adhere Black Crocheted Trim along the bottom portion of the Spooky Night Designer Series Paper.
- Adhere the Spooky Night Designer Series Paper to the Basic Black matte on top of the pizza box.
- Punch a 1-1/4” circle from Basic Black cardstock.
- Adhere the Owl-oween circle to the Basic Black circle.
- Add a dimensional to the back of the Basic Black circle.
- Adhere the Owl-oween circle to the right corner of the Spooky Night Designer Series Paper on top of the pizza box.
These pizza boxes would also be fa-boo-lous for school parties and teacher gifts.
The 4 sides of the box are all the same length and width, so you can easily swap the Spooky Night Designer Series Paper for another patterned paper or occasion.
How would decorate your pizza box? I would love to see what you create!
Thanks for stopping by!
Beth
Happy Owl-oween Pizza
Treat Box
|
|
Stamps
|
144749 Spooky Cat Stamp Set
146014 Spooky Cat Bundle
|
Paper
|
144610 Spooky Night Designer Series Paper
121045 Basic Black
101650 Very Vanilla
|
Ink
|
140931 Basic Black Archival
126945 Pumpkin Pie
|
Embellishments
|
104430 Dimensionals
144611 Black Crocheted Trim
|
Tools
|
144645 Pizza Box
119861 1-1/4"
Circle Punch
119868 1” Circle Punch
|
Subscribe to:
Posts (Atom)
