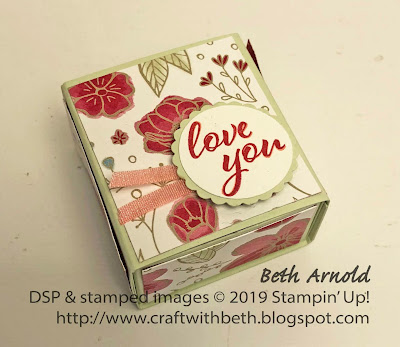
Thank you all so much for making the Catalog Launch Retreat Day such a wonderful day! It was a treat to stamp with you all! I hope you enjoyed the projects and the luncheon. My hope is that everyone will send me a photo of their finished Take and Make project. I am so excited to see your finished treat boxes!
In your Take and Make project bag you will have several pieces - a box base, a box cover, and 6 Designer Series Paper Mats - as well as two chocolate strawberry hearts, a piece of Flirty Flamingo ribbon, the scalloped circle, and the greeting circle you stamped at the party.
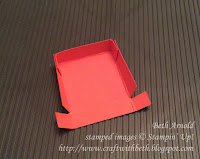
Start by assembling the box base. Cut from the bottom edge along the first score line up to where the next horizontal score line starts. Cut from the bottom edge along the rightmost score line up to where the next horizontal score line starts (the red lines on the template above). Rotate the box base 180 degrees and repeat cutting the red lines. To reduce bulkiness, cut and notch each of the side tabs. This will create four side tabs.
Fold and burnish all score lines. Add strong glue such as Tear and Tape or liquid glue to all four side tabs. Fold up each tab one by one and line them up with the corresponding long side to form the open topped box.
Adhere the short side mats to the short sides of the box base. The short sides of the box base are the sides that will show when the matchbox is closed.
Fold and burnish all of the score lines on the box cover. Add strong glue to the area between the edge of the cardstock and the 7/8" score line. Fold each side of the box cover towards you until you reach the area with the glue and adhere to the first scored section. This creates a rectangular tube to slide the box base into.
Adhere the top and bottom mats on the top of and on the bottom of the box cover. Adhere the long side mats to the long sides of the box cover. Allow the glue to dry.
Place the two chocolate hearts inside the box base. Slide the box base into the box cover.
Stamp "love you" with either Lovely Lipstick ink or Flirty Flamingo ink onto a scrap of Whisper White cardstock. Punch out the greeting with a 1" circle punch.
Punch out a 1-1/8" scalloped circle from a piece of Soft Sea Foam cardstock. Adhere the greeting circle to the center of the scalloped circle.
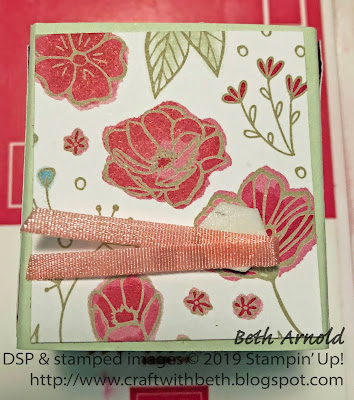
Add a dimensional to the top of the box cover in the lower right corner. Fold the Flirty Flamingo ribbon in half and stick the fold line on the dimensional.
Add the greeting circle on top of the dimensional and the ribbon. Your treat holder is now ready for gifting!
I hope you all had as wonderful of a day as I did on Saturday! Please let me know if you have any questions about your Take and Make projects. I am happy to help!
Thanks for stopping by!
Beth
Showing posts with label Catalog Kick Off Party. Show all posts
Showing posts with label Catalog Kick Off Party. Show all posts
Monday, January 28, 2019
Thursday, January 18, 2018
I Heart Stamping Party Favors
We had a fabulous time at my 2018 Occasions and Sale-A-Bration Catalog Launch Party last weekend! I love getting together with my customers, family, and friends! We played Bingo Stampin' Up! style, created some beautiful cards, and won a ton of fantastic prizes!
We had some amazing food, including two types of chili, cheesecake mini cupcakes, chocolate covered pretzels, and the hit of the party - maple pecan shortbread bars. Yummo!
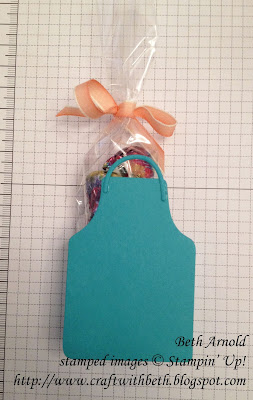
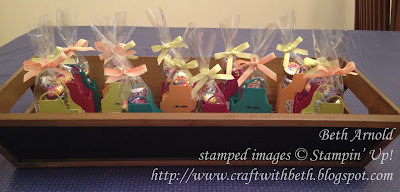
For attending the party, I gave each of my guests an I heart stamping apron party favor. How adorable are they?!?
This sweet party favor is made using the new Apron of Love Bundle (#145986). The Apron of Love Bundle truly spoke to me. I look to cook and bake. My husband loves to grill. And, it reminds me of the Stampin' Up! apron I wear at craft shows, workshops, and get togethers. Plus, I couldn't resist the "I heart stamping" stamp!
The Apron of Love Bundle was on my top three must have bundles from the 2018 Occasions Catalog. I was so excited about it that I overnighted my order!
This apron party favor consists of an open topped box sandwiched between two aprons. The aprons are wide enough to fit a box large enough that you can fill with all kinds of sweet treats. Here I added a handful of tie-dyed foil wrapped chocolate kisses.
I die cut two aprons - one for the front and one for the back. Then I attached the apron strings on top of the apron, stamped the I heart stamping image, and adhered the apron pocket.
The apron pocket is from the Picture Perfect Party Designer Series Paper Pack. I have to say this Designer Series Paper was the inspiration for the colors of the aprons - Bermuda Bay, Berry Burst, Lemon Lime Twist, and Peekaboo Peach. The color scheme/palette is so happy and festive!
The box was made in two pieces using the Simply Scored Scoring Tool. Start with a 4-1/2" x 1-3/4" piece of cardstock. With the 4-1/2" edge along the top of the Simply Scored Scoring Tool, score at 1-3/4" and 2-3/4". This piece will be the base of the box. The first scored section is glued to the back of the first apron. The second scored section is the bottom of the box. And, the third scored section is glued to the back of the second apron. Once the base is attached, the party favor will have a u-shape.
Then score a 5-1/2" x 1-3/4" piece of cardstock. With the 5-1/2" edge along the top of the Simply Scored Scoring Tool, score at 1", 2", 3-3/4", and 4-3/4". This piece will act as the sides of the box. Starting the center scored section (between the 2" and the 3-3/4" scored sections), adhere the cardstock to the center of the back of the apron (over top of the box base).
Fold the side panel between the two aprons (the area between the 1" and the 2" scored sections). Glue the 1" scored section to the left side of the 2nd apron. Bring the 4-3/4" scored section to right side of the 2nd apron and secure it with glue.
The chocolate kisses were stacked in a 2" x 8" cellophane bag and tied with Lemon Lime Twist Ombre Ribbon and with Calypso Coral Ombre Ribbon. I found the tie-dyed foil wrapped chocolate kisses at my local grocery store. I think they really add more pops of color and brightness.
You could alter the front of the apron to suit your party theme or gift theme. For a more masculine look, try using the True Gentleman Designer Series Paper (#145593), adding the grilling utensils to the apron pocket, and changing the sentiment to I heart BBQ. I hope you give this apron party favor a try! I look forward to seeing you at the next Catalog Launch Party in June!
Thanks for stopping by!
Beth
Apron Catalog Launch Party
Party Favors Supply List
|
|
Stamps
|
#145986 Apron of Love Bundle (Photopolymer)
|
Paper
|
#145559 Picture Perfect Party Designer Series Paper
#144243 Berry Burst
#144245 Lemon Lime Twist
#141417 Peekaboo Peach
#131197 Bermuda Bay
|
Ink
|
#140931 Archival Basic Black
|
Embellishments
|
#144234 Lemon Lime Twist Ombre Ribbon
#144235 Calypso Coral Ombre Ribbon
#141703 2” x 8” Cellophane Bags
|
Tools
|
#126199 Stampin’ Pierce Mat
#143263 Big Shot
#122334 Simply Scored Scoring Tool
|
Wednesday, January 3, 2018
Two New Catalogs Debut Today!
The 2018 Occasions and Sale-a-brations Catalogs debut today! There are
some amazing new stamps, thinlits, embellishments, and Designer Series
Papers in these two fabulous catalogs!
The 2018 Occasions Catalog will run from January 3rd, 2018 through May 31st, 2018. It contains new products that celebrate all kind of occasions, including Valentine's Day, birthdays, spring events, Mother's Day, Father's Day, weddings, anniversaries, friendship, Easter, and more.
Check out the digital catalog online here.
Check out the products in my online store here.
The 2018 Sale-a-Bration Catalog will run from January 3rd, 2018 through March 31st, 2018. A second mini-catalog will come out around the middle of February 2018 with a few more Sale-a-Bration treats. All of the products in the Sale-a-Bration catalogs are FREE with a qualifying purchase. This year products can be earned with qualifying purchases of $50USD or $100USD or more. Some products earned at increments of $50USD and some are earned at increments of $100USD. For example, if you purchase $100 in products before tax and shipping, you earn 2 Sale-a-Bration products at the $50USD level or 1 Sale-a-Bration product at the $100USD level. Each of the products are labeled in the catalog with their level $50USD or $100USD.
Check out the digital catalog online here.
Check out the products in my online store here.
There are some amazing promotions during Sale-A-Bration too! If you sign up to be a demonstrator between January 3rd, 2018 and March 31, 2018, you can choose $125 in Stampin' Up! products for just $99USD and choose TWO additional FREE stamp sets (excludes bundles)! What a great deal! I would love to have you join my demonstrator team!
If you host a party or place a single order of $250USD or more during Sale-A-Bration, you will also earn $25 more in Stampin' Rewards. That is an extra $25USD for products from the Annual and the Occasions Catalogs! Who doesn't love free stamping products!? I know I do!
Check out my online store for all of the new products. Be sure to stop by my house on Saturday, Janaury 13th, 2018 from 1-4pm for the Catalog Launch Party to experience many of these products in person! RSVP by January 8th to earn extra raffle tickets!
There is another great promotion this month called the Red Box Challenge. Create an alternative project using a past unused Paper Pumpkin kit (December 2017 and earlier) or buy a past kit that you've had your eye on and post it to Facebook or to Instagram using the hastag #redboxchallenge to enter in a random drawing for a chance to win the March 2018 Paper Pumpkin Kit before anyone else! The March 2018 kit will celebrate Paper Pumpkin's 5th Birthday. Can you say gorgeous and collectible!?
Here are the details:
Note: Some project ideas will be selected from the entries and featured in Paper Pumpkin's monthly newsletter and on our Facebook and Pinterest pages. Past alternative Paper Pumpkin projects you and posted on social media are not eligible for this contest.
Red Box Challenge Rules (Terms and Conditions)
Ready to take the Red Box Challenge? Here are the rules!
Spread the word about the Red Box Challenge, and have a blast putting a new twist on a past kit! Good luck!
Thanks for stopping by!
Beth
The 2018 Occasions Catalog will run from January 3rd, 2018 through May 31st, 2018. It contains new products that celebrate all kind of occasions, including Valentine's Day, birthdays, spring events, Mother's Day, Father's Day, weddings, anniversaries, friendship, Easter, and more.
Check out the digital catalog online here.
Check out the products in my online store here.
The 2018 Sale-a-Bration Catalog will run from January 3rd, 2018 through March 31st, 2018. A second mini-catalog will come out around the middle of February 2018 with a few more Sale-a-Bration treats. All of the products in the Sale-a-Bration catalogs are FREE with a qualifying purchase. This year products can be earned with qualifying purchases of $50USD or $100USD or more. Some products earned at increments of $50USD and some are earned at increments of $100USD. For example, if you purchase $100 in products before tax and shipping, you earn 2 Sale-a-Bration products at the $50USD level or 1 Sale-a-Bration product at the $100USD level. Each of the products are labeled in the catalog with their level $50USD or $100USD.
Check out the digital catalog online here.
Check out the products in my online store here.
There are some amazing promotions during Sale-A-Bration too! If you sign up to be a demonstrator between January 3rd, 2018 and March 31, 2018, you can choose $125 in Stampin' Up! products for just $99USD and choose TWO additional FREE stamp sets (excludes bundles)! What a great deal! I would love to have you join my demonstrator team!
If you host a party or place a single order of $250USD or more during Sale-A-Bration, you will also earn $25 more in Stampin' Rewards. That is an extra $25USD for products from the Annual and the Occasions Catalogs! Who doesn't love free stamping products!? I know I do!
Check out my online store for all of the new products. Be sure to stop by my house on Saturday, Janaury 13th, 2018 from 1-4pm for the Catalog Launch Party to experience many of these products in person! RSVP by January 8th to earn extra raffle tickets!
There is another great promotion this month called the Red Box Challenge. Create an alternative project using a past unused Paper Pumpkin kit (December 2017 and earlier) or buy a past kit that you've had your eye on and post it to Facebook or to Instagram using the hastag #redboxchallenge to enter in a random drawing for a chance to win the March 2018 Paper Pumpkin Kit before anyone else! The March 2018 kit will celebrate Paper Pumpkin's 5th Birthday. Can you say gorgeous and collectible!?
Here are the details:
Note: Some project ideas will be selected from the entries and featured in Paper Pumpkin's monthly newsletter and on our Facebook and Pinterest pages. Past alternative Paper Pumpkin projects you and posted on social media are not eligible for this contest.
Red Box Challenge Rules (Terms and Conditions)
Ready to take the Red Box Challenge? Here are the rules!
- By using the hastag #redboxchallenge with your entry, you agree to the terms and conditions below.
- Choose a past Paper Pumpkin kit (an kit prior to January 2018) and create an alterative project. If you wish, you may use other Stampin' Up! products to enhance your creation.
- Post a photo of your past kit alternative project on Facebook or Instagram and use the hastag #redboxchallenge
- One entry per person
- Must be 18 years of age or older to enter the drawing.
- Open to everyone
- No purchase necessary
- Submissions must be posted by January 31st, 2018 at 11:59pm (MT)
- Ten winners will be randomly selected from the entries
- Winners will be notified by email or instant message no later than February 5th, 2018 at 11:59pm (MT)
- The March Paper Pumpkin kit prize is valued at $19.95USD/$26.95CAD
- By submitting an image of your project with the hashtag #redboxchallenge, you are giving Stampin' Up! permission to use, post, and share the image in Stampin' Up! publications
- Giveaway is not available in Quebec
Spread the word about the Red Box Challenge, and have a blast putting a new twist on a past kit! Good luck!
Thanks for stopping by!
Beth
Thursday, September 21, 2017
Thankful for You!
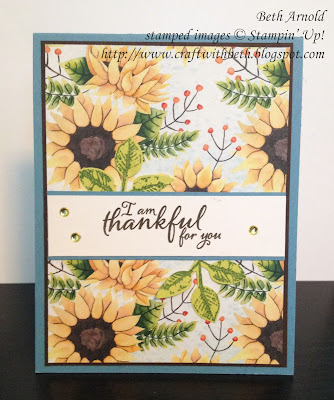
I created this card for my Holiday Catalog Launch Party Make and Take. This is a design that shows off the Painted Autumn Designer Series Paper as well as the Painted Harvest stamp set.
The entire Painted Harvest Product Suite is my absolute favorite new Holiday Catalog product! All of the Painted Harvest Suite products are so gorgeous, I couldn't simply pick one!
This card also plays with layering and matting border sizes - 1/8" borders and 1/16" borders. I love how the Early Espresso matte frames and enhances the Painted Autumn Designer Series Paper. It really stands out!
I used the Designer Series Paper to create my color palette and then echoed the colors throughout the card for a cohesive look.
On the inside I stamped the sunflower image and added a narrow border of gold washi tape from the Year of Cheer Specialty Washi Tape set. The gold washi tape almost looks like the inside matte has been embossed for an elegant detail.
The sunflower is made from stamping Crushed Curry ink for the largest set of petals, Peekaboo Peach ink for the second set of petals, and Early Espresso ink for the center. The great thing about this sunflower stamp is that no matter which direction you turn each set of petals, it still looks amazing!
I hope you give this sweet and simple card a try! Here are the measurements.
Thank you so much for baring with me during my blogging absent. It has been a tumultuous few months with unexpected medical problems and procedures as well as a death in the family. I appreciate everyone's support!
Thank you for stopping by!
Beth
The entire Painted Harvest Product Suite is my absolute favorite new Holiday Catalog product! All of the Painted Harvest Suite products are so gorgeous, I couldn't simply pick one!
This card also plays with layering and matting border sizes - 1/8" borders and 1/16" borders. I love how the Early Espresso matte frames and enhances the Painted Autumn Designer Series Paper. It really stands out!
I used the Designer Series Paper to create my color palette and then echoed the colors throughout the card for a cohesive look.
On the inside I stamped the sunflower image and added a narrow border of gold washi tape from the Year of Cheer Specialty Washi Tape set. The gold washi tape almost looks like the inside matte has been embossed for an elegant detail.
The sunflower is made from stamping Crushed Curry ink for the largest set of petals, Peekaboo Peach ink for the second set of petals, and Early Espresso ink for the center. The great thing about this sunflower stamp is that no matter which direction you turn each set of petals, it still looks amazing!
I hope you give this sweet and simple card a try! Here are the measurements.
Thankful Sunflower Card
Measurements
|
||
Paper
|
Dimensions
|
|
Card Base
|
Marina Mist
|
4-1/4” x 11”; scored at 5-1/2”
|
1st Matte
|
Early Espresso
|
5-1/4” x 4”
|
2nd Matte
|
Painted Autumn Designer Series Paper
|
3-7/8” x 5-1/8”
|
1st Greeting Banner
|
Marina Mist
|
1-1/8” x 3-7/8”
|
2nd Greeting Banner
|
Whisper White
|
1” x 3-7/8”
|
Inside Mat
|
Whisper White
|
5-1/4” x 4”
|
Leaves
|
Lemon Lime Twist
|
1-3/4” x 4”; stamp 2 leaves & punch out with
the Leaf Punch
|
Thank you so much for baring with me during my blogging absent. It has been a tumultuous few months with unexpected medical problems and procedures as well as a death in the family. I appreciate everyone's support!
Thank you for stopping by!
Beth
Subscribe to:
Posts (Atom)
