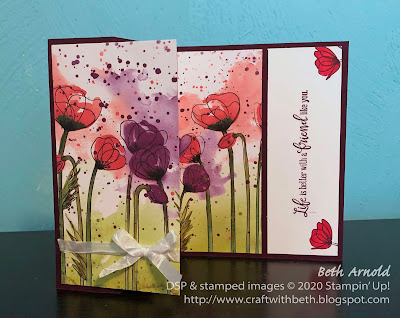
Last week my demonstrator team and I created Z-Fold cards using Designer Series Paper that created a scene like a skyline or a field of poppies or had a large scale pattern such as the lily pads from the Sale-A-Bration Designer Series Paper or the larger flowers in the Perennial Essence Designer Series Paper as one of our challenges.
This fun fold is called the Z-fold because when it is folded, it looks like the shape of the letter z. There is also only 1 additional score line needed than a traditional side-fold card, making this a great fun fold to start off with!
I chose the Painted Poppies stamp set (#151599), the Peaceful Moments stamp set (#151595) and the coordinating Peaceful Poppies Designer Series Paper (#151324). Peaceful Poppies Designer Series Paper is bright, cheerful, and has a variety of small-scale, medium-scale, and large-scale patterns to choose from.
Choosing a particular Designer Series Paper for this fun fold was important because when the card is layed out or flattened, the Designer Series Paper looks like one continuous pattern or background.
The sheet with the two rows of poppy flowers with one row across the top and one row across the bottom is perfect for this z-fold card! The scale or size of the flowers is large enough that it fills almost the entire card's height and is long enough to fit in each of the z-fold card panels.
How fun and beautiful is that Designer Series Paper!?
To make the z-fold card base, start with a 5-1/2" by 8-1/2" Blackberry Bliss card base. Then with the 8-1/2" side along the top of the Simply Scored, score at 1-1/2" and at 4-1/4".
Then cut a piece of 6" by 6" Designer Series Paper. I used the row of poppies patterned paper from the Peaceful Poppies Designer Series Paper. I, first, cut it in half horizontally to separate the two rows of poppies. Then I cut one of the halves in half to make two 6" by 6" squares. Choose one of the 6" by 6" squares for this project.
Next, cut 3/4" off of the top of the Designer Series Paper. For my patterned paper, this was the white area with the splatter dots.
Then cut it into strips. Make sure the Designer Series Paper is upright and horizontal, as in the photograph above. Cut the Designer Series Paper at 2-3/4", at 1-1/8", and at 2-1/8" (the last piece should already come out to be 2-1/8"). Tie a piece of Whisper White crinkled seam binding in a bow around the 2-3/4" wide strip, if you would like. I think this card is beautiful on its own too.
Fold and burnish your card base as follows. Fold the card base in half at the 4-1/4" score line like you are closing a book. Burnish the score line.
Stamp the large poppy image using Versamark Watermark ink randomly all over the closed card. This gives more interest to the front of the card when it is on display.
Next fold the 1-1/2" score line back like you are revealing what is inside of the card. Burnish the score line. Keep the card base closed like this.
Adhere the Designer Series Panels to the card as follows. Adhere the left side of the 2-3/4" wide strip to the left edge of the 1-1/2" panel on the card base, leaving about an 1/8" border on the left, top, and bottom of the card base. Add adhesive only where the Designer Series Paper overlaps the Blackberry Bliss cardstock.
Open the card base. Adhere the 1-1/8" wide strip to the left of the 4-1/4" score line, leaving a 1/8" border to the right, top, and bottom of the card base. Adhere the 2-1/8" wide strip to the right of the 4-1/4" score line, leaving a 1/8" border to the left, top, and bottom of the card base.
Cut a 1-3/4" by 5-1/4" piece of Whisper White cardstock. Stamp the "Life is better with a friend like you" greeting with Blackberry Bliss ink in the center of the cardstock.
Stamp the single poppy with a stem image to the left and to the right of the greeting with Blackberry Bliss ink, so that only the poppy is showing. Color the poppies with Dark Poppy Parade Stampin' Blend. Adhere the Whisper White cardstock to the right of the 2-1/8" wide strip, leaving about a 1/8" border on all sides of the Whisper White cardstock.
This z-fold card was a fun experiment in creating a mural-like card! I would love for you to join in on the fun too and make your own z-fold card! What stamps and designer series papers would you choose to create your own z-fold card? I would love to see what you create! Post a project photo on my Facebook page today!
If you would like to purchase the supplies I used to create this card, please use the supply list below to shop in my online store. I would love to be your Stampin' Up! demonstrator!
Thanks for stopping by!
Beth
Peaceful Poppies Designer Series Paper Z-Fold Card
Supply List
|
|
Stamps
|
#151599 Painted Poppies (Cling-Mount)
#151595 Peaceful Moments
(Cling-Mount)
|
Paper
|
#100730 Whisper White
Cardstock
#133675 Blackberry Bliss
Cardstock
#151324 Peaceful Poppies
Designer Series Paper
|
Ink
|
#147092 Blackberry Bliss
Ink Pad
#102283 Versamark
Watermark Ink Pad
#146879 Dark Poppy Parade
Stampin’ Blend
|
Embellishments
|
#151326 Whisper White 1/4"
Crinkled Seam Binding
|
Tools
|
#152392 Stampin’ Trimmer
#102300 Bone Folder
#103579 Paper Snips
#122334 Simply Scored
Scoring Tool
|


No comments:
Post a Comment