Showing posts with label Daisy Punch. Show all posts

Friday, April 22, 2022

Q & A: How I Make Large Amounts of Treat Holders

One of my favorite types of papercrafting projects is a treat holder. I enjoy making treat holders for different holidays and occasions. I try to make a variety of treat containers, including boxes, bags, and pockets, that fit specific types of treats. Most often the treat is candy! 


May Day Flower Peanut Butter Treats Daiy Punch Treat Holder


And, of course, you can't just make one treat holder. I make quite a large number of treat holders for each holiday and occasion and give them to family, friends, customers, and community members. 


I get a lot of questions from my family, friends, and customers about how I make my treat holders. One of the most frequent questions I get is "how do I make so many treat holders all at once?". The answer is organized batching. I make a prototype, break it down into basic components, and make a plan for each step. Let's look at my thought process further.


Make a Treat Holder Prototype

The first step is to design the treat holder itself. Determine what kind of shape you would like the treat holder to be. Use grid paper to make a to-scale drawing or sketch it on a piece of paper. Once you are happy with your design, make a treat holder prototype. The prototype should be the actual size of your treat holder designer.

Tip: Write down your measurements for each part of the treat holder. Keep those measurements handy to refer to when cutting cardstock and designer series paper.


Break Down the Steps to Make the Treat Holder

Next, think about the steps it took to create your treat holder. Did you cut cardstock? Did you score or die cut? Make a list of each step. It is ok to have simple steps, such as place the candy in the box or score at 2". 

Tip: Breaking down the steps makes your preparation and assembly more efficient and less overwhelming.


Prepare One Step at a Time

Once you have your list of steps to prepare and make your treat holder, it is time to cut your materials and gather your supplies. Cut one step at a time. For example, if you have 3 parts to your treat holder, cut all of part 1, then all of part 2, and finally all of part 3. Keep your measurements close by to refer to.

Tip: If the treat holder has both scoring and cutting, I will score all of the pieces and then cut all of the pieces instead of scoring and cutting one piece at a time. 


May Day Flower Peanut Butter Treats Daiy Punch


Assemble One Step at a Time

Clear your workspace or table before beginning the preparation. Be sure to have plenty of room for each step's pieces, punches, die cuts, etc. Complete one step for each of the treat holders. Then move on to the next step and so on.

Tip: Have a landing area ready to hold completed treat holders such as a tray, a large bowl, or a platter to keep the clutter down and to avoid knocking a treat holder on the floor.


Sometimes, I will put on music, a podcast, or the tv. I catch up the latest episodes of my favorite shows while I assemble treat holders.


I hope this post helps you to see how I make large numbers of treat holders. What stamping questions do you have? Email your stamping questions. I would love to help answer your stamping questions in a future blog post!

Thanks for stopping by!

Beth

Sunday, March 8, 2020

Second Sunday Sketches #11 Starts Today!


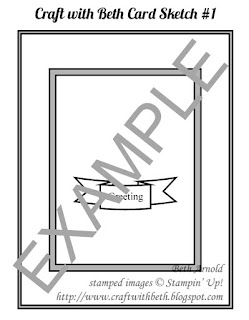
It is time for another Second Sunday Sketches challenge! If you are new to Second Sunday Sketches, please review the rules here or below. Each second Sunday of the month, I will post a card sketch. A sketch is graphic or drawing of how the elements of a card are layed out.

Craft with Beth: Stampin' Up! Second Sunday Sketches sketch card sketch challenge sample graphic

You will then use the sketch as a guide to create your own card. Your card must be a new creation and reflect the challenge guidelines. Your card must include the major elements of the card sketch, such as the number of layers and the general position of the embellishments and/or die cuts. You can rotate the sketch for a top-folding card or for a side-folding card.

You choose the occasion and the color palette as well as the stamp set(s) and the embellishments. I do ask that you use Stampin' Up! products (current or retired).

The measurements will also be included in the blog post for each Second Sunday Sketches sketch challenge. You can use the measurements as given or increase them or decrease them. For example, if a greeting is stamped on a 1" circle on the sketch, but the greeting you choose is 1-3/4", then increase the size of the circle to 1-3/4". You can also change the shape. Instead of a circle, you can use an oval, a square, a daisy punch, etc.

The challenge will run from the second Sunday of the month until the last day of that month.

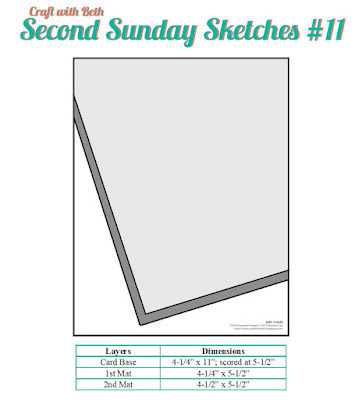
This Month's Card Sketch

Below is March's card sketch.

Craft with Beth: Stampin' Up! Second Sunday Sketches card sketch challenge graphic 11 with measurements March 2020

Challenge Dates

March's challenge will run from March 8th, 2020 until March 31st, 2020 at 5pm EST.

If you would like to participate in the Second Sunday Sketches sketch challenge, please create a card using the sketch above and email me a photo of your card by March 31st, 2020 at 5pm EST with the subject line Second Sunday Sketches Entry.

Prize Drawing

The day after the last day of the month (April 1st), I will place all of the names of the participants in a hat and randomly draw a winner. The winner will receive a prize! The prize each month will change and will be announced at the start of each challenge. March's Second Sunday Sketches sketch challenge prize is Item #151327 Peaceful Poppies Elements and three hand-made cards from me.

Craft with Beth: Stampin' Up! Second Sunday Sketches Card Sketch Challenge Prize Graphic Item #151327 Peaceful Poppies Elements

Winner Announcement

If you are the winner, I will notify you by email. Please respond to my email with your complete mailing address, and I will mail you your prize! If the winner does not respond to my email within 7 days, I will draw another winner.

I will also post all of the entries on my blog (with your names attached to the photos) and the name of the winner.

Card Sketch Sample

Here is a sample of how I interpreted this card sketch using the Best Dressed Designer Series Paper, the Daisy Punch, and the Timeless Tulips stamp set. I made the Designer Series Paper the main focal area of the card front and embellished it with a Highland Heather daisy.

Craft with Beth: Stampin' Up! Second Sunday Sketches card sketch challenge with measurements daisy punch bested dressed designer series paper timeless tulips gold faceted gems birthday card

Second Sunday Sketches #11 Card Assembly Tip: When you create your own card, the rectangular mats will over hang the card front edges. Once you are satisfied with the placement of the first mat, adhere it to the card front and then trim the cardstock that overhangs the card front edges. You can add more adhesive after trimming as needed. Then place, adhere, and trim the second mat.

Some Ideas on How to Make this Card Sketch Your Own

There are many ways to change this card to make it your own! You can rotate the card layout 90 degrees, decrease the sizes of the mats, flip the angle of the mats, use an embossing folder on one of the mats, and more!

Share Second Sunday Sketches with a Friend

Be sure to join in on the fun and share with a friend! Starting in March 2020, if you enter the Second Sunday Sketches challenge, you can get a bonus surprise prize by sharing this challenge with a friend and having your friend submit their card entry (for US residents only)! Here's how to get a bonus surprise prize. Limit two bonus surprise prizes per person per month. Bonus surprise prizes will be sent out on the first of the following month (the same day the winner is announced or the next business day).
  1. Enter into this month's Second Sunday Sketches challenge
  2. Share this month's Second Sunday Sketches challenge with a friend (that hasn't participated before)
  3. Have your friend submit their this month's challenge card entry
  4. Email me that your friend has submitted their card entry. Submit your complete mailing address and the name of the friend that you shared with. I will confirm their entry and then send you a bonus surprise prize.

I am looking forward to seeing your personal take on the tenth Second Sunday Sketches sketch challenge! If you have any questions about this card sketch challenge, please let me know! I am happy to assist!

Happy Stamping!
Beth

Wednesday, April 24, 2019

Mini May Day Basket

This mini basket pattern has been on the internet for a number of years. It is a perfect size for filling with treats and leaving them on the door knob handle on May 1st.


My mini May Day basket handle and daisy were inspired by Kelly Acheson's project. What a smart idea to use the flax ribbon for a handle! The width and sturdiness is well suited for a basket this size! Anytime I can add a daisy to a project is my kind of project!


There is plenty of room for chocolates, small toys, a set of car keys, homemade granola mix, and dozens of other delicious candy pieces.


The mini May Day Basket pattern can be adapted for a smaller or for a larger size. Keep the basket base a square that can be evenly divided into 3 equal sections. For example, 9" by 9", 3" by 3", and 12" by 12" would be easier to divide evenly into 3 equal sections of 3, 1, and 4, respectively.


You can find the measurements and a supply list at the end of this post.

Thanks for stopping by!
Beth

++++++++++++++++++
Shop Online 24/7 in my Online Store
Check out the Clearance Rack
Sign Up for a Class
Sign up for my newsletter and mailing list or request a catalog
Sign Up for Paper Pumpkin
Join my Stampin' Team - the Purrfect Stampers!

Host Codes & Current Promotions:
April Host Code - A4DUVVSJ
When placing an order, please use host code A4DUVVSJ for orders under $150 USD. Please don't use the host code if your order is more than $150. Use Host Code A4DUVVSJ if you are attending the Stamp of the Month Class long distance to have your Stamp of the Month Bundle mailed directly to you.

Craft with Beth: Stampin' Up! Last Chance Last-Chance Products 2019 Annual Occasions Catalog Promotion Graphic Banner

The Retiring Product Lists are now available for the 2018-2019 Annual and 2019 Occasions Catalogs! Select products from the 2018-2019 Annual and the 2019 Occasions Catalogs are retiring and will not be carrying over to the new annual catalog in June. This is your last chance to purchase your favorite retiring products! Check my online store for the latest inventory updates! Order today to avoid missing out!

Craft with Beth: Stampin' Up! Everything is Rosy Kit Product Medley Product Medley Graphic Banner

Starting May 1st and while supplies last Everything is Rosy Product Medley will be available for purchase! This is a limited-time only product medley is chock full of beautifully coordinating products that is only available while supplies last! If you love rose gold, Night of Navy, and Melon Mambo, Everything is Rosy is definitely your style!


Stampin' Up! is launching a NEW line of storage solutions called Storage by Stampin' Up! for ink pads, Stampin' Write Markers, Stampin' Blends, and accessories! Each of the modular cubes, trays, and bins are stackable and can be configured in hundreds of ways! Check out the new storage solution on my online store. Check out the product flyer here and the configuration idea flyer here.

Craft with Beth: Stampin' Up! Paper Pumpkin May 2019 05 Shelli's Kit Promotion Graphic Banner

Paper Pumpkin is giving us a sneak peek into May's Project Kit! May's kit will feature a project kit inspired by our cofounder Shelli Gardner! I cannot wait to see what is inside her kit! Sign up for Paper Pumpkin by May 10th to receive May's Kit! For the first time ever, Paper Pumpkin will be available outside of North America! Shelli's project kit will be available for purchase in all Stampin' Up!'s global markets starting May 15th and while supplies last! Check out my online store starting May 15th to purchase Shelli's kit while supplies last!

Craft with Beth: Stampin' Up! Occasions Catalog Title Graphic 2019

January 3rd, 2019 - June 3rd, 2019 - Shop from the 2019 Occasions Catalog. The Occasions Catalog is chock full of NEW stamp sets, framelits, Designer Series Paper, embellishments, tools, and more that celebrate holidays and occasions from midwinter through the beginning of summer such as weddings, birthdays, Valentine's Day, Mother's Day, Father's Day, anniversaries, baby showers, and more!

Craft with Beth: Stampin' Up! Annual Catalog Title Graphic

June 1st, 2018 - June 3, 2019 - Shop from the 2018-2019 Annual Catalog for all of your stamping needs! This year's catalog is one of my favorites! With all of the new gorgeous stamp sets, embellishments, and Designer Series Paper, I want to try everything! I know you will too! Check it out today!

Craft with Beth: Stampin' Up! Join my team title graphic

Do you love Stampin' Up! products? Do you enjoy sharing the joy of stamping with others? Have you considered joining Stampin' Up! as a demonstrator even for the discount? I would love to have you be a part of my Purrfect Stampers Demonstrator Team! You can build your own Starter Kit (valued at $125 USD) for $99 +tax! Join Stampin' Up! and build your own Starter Kit today!


Mini May Day Basket Supply List
Stamps

Paper
#115316 Rich Razzleberry Cardstock
#146926 Share What You Love Specialty Designer Series Paper
Ink

Embellishments
#148764 Whisper White 5/8” Flax Ribbon
Tools
#126889 Stampin’ Trimmer
#122334 Simply Scored Scoring Board
#119869 1/2” Circle Punch
#143713 Daisy Punch

Mini May Day Basket Measurements

Paper
Dimensions
Basket Base
Share What You Love Specialty Designer Series Paper
6” x 6”
Daisies
Rich Razzleberry Cardstock
3” x 6” (punch 2 daisies from one piece)
Handle
Whisper White5/8” Flax Ribbon
7” long piece