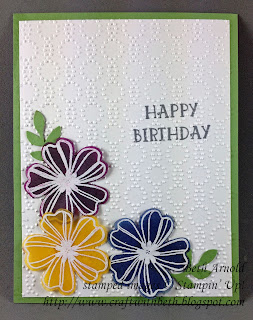
I have been working on making card front swaps for the 2016 On Stage event this week. On Stage is an amazing three day Stampin' Up! convention for Stampin' Up! demonstrators. I am so excited to attend this year's convention! As a demonstrator, we get to see new products, try new techniques, tour the Stampin' Up! home office campus, meet tons of demonstrators from around the country and world, and, best of all, see the new annual catalog! Heaven!! I can't show you anything until Stampin' Up! gives us the okay to share. But as soon as we are given the okay, I can share (P.S. This is one reason right now is an exciting time of year to become a demonstrator!).
In the meantime, here are the card fronts I made to swap with other
demonstrators. I made one card with 5 color schemes. I used the Flower
Shop and the Number of Years stamp sets to create this card.
First, I cut the 4" by 5-1/2" card base in Wild Wasabi cardstock. If you are going to recreate this as a complete card, cut each card base 8-1/2" by 5-1/2" and fold in half like a book.
Next, I cut the 4" x 5-1/4" Whisper White mat. I placed the HAPPY sentiment and the BIRTHDAY sentiment (from Number of Years) on a clear block one above the other as shown in the photo above. I stamped HAPPY BIRTHDAY in Archival Basic Gray toward the center right side.
Then I embossed the stamped mat with Elegant Dots TIEF. I glued the mat to the base and set them aside to dry. You can use SNAIL Adhesive or Multipurpose Liquid Glue.
I chose the flower stamp (from Flower Shop) that reminds me of a dogwood flower. I thought this was a cheery, spring-like flower. The dogwood is also the flower of Virginia. On a piece of vellum, I stamped the flower using Versamark ink. I covered each flower image with white embossing powder and heat embossed them. Once the flowers were completely cooled, I punched each one out with the Pansy Punch.
I then sponged the BACK of each flower with ink. I pounced the sponge on some flowers and swiped the sponge on other flowers. Pouncing, created a darker, more saturated, and more vibrant look. Swiping created a lighter, more subtle look. I liked both ways. Experiment with both to get the look you want.
Set the flowers aside to dry for about an hour or so. If the ink is still wet, the flowers will not stick to the card front.
Sponging the color on the back of the flowers allowed both the sponged ink and the white embossing to show through, making an almost stained glass effect. You can try this technique with other colors of embossing powder. I bet silver or gold would be beautiful too!
Once the flowers are thoroughly dried, adhere them to the bottom left corner of the Whisper White mat. I used glue dots and multipurpose liquid glue. I tried both to see which adhesive held better. They both worked mostly the same. Because vellum is translucent, whatever adhesive you choose will show. I glued only the center portion of each flower. That way, the white embossed area hid the glue.
Lastly, I punched out just the leaves portion of the Bird Builder Punch in Wild Wasabi cardstock and glued them on using a two-way glue pen. The two-way glue pen is less messy on these more intricately cut leaves.
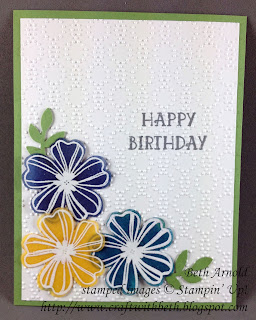
Here are the color schemes that I made for each of the 5 different card fronts.
Thanks for stopping by!
Beth
|
2016 On Stage Convention
Swap Card Project Supply List
|
|
Stamps
|
Flower Shop
Number of
Years
|
|
Paper
|
Whisper
White Cardstock
Wild Wasabi
Cardstock
Vellum
|
|
Ink
|
Rose Red Ink
Pad
Wisteria
Wonder Ink Pad
Blackberry
Bliss Ink Pad
Crushed
Curry Ink Pad
Night of
Navy Ink Pad
Melon Mambo
Ink Pad
Daffodil
Delight Ink Pad
Tempting
Turquoise Ink Pad
Blushing
Bride Ink Pad
Island
Indigo Ink Pad
Versamark
Ink Pad
Archival
Basic Gray Ink Pad
|
|
Embellishments
|
White
Embossing Powder
|
|
Tools
|
Stampin’
Trimmer
Bone Folder
Clear
Acrylic Blocks C, D
Grid Paper
Stampin’
Mist Cleaner
Stampin’
Scrub
Glue Dots
SNAIL
Adhesive
Multipurpose
Liquid Glue
Two-way Glue
Pen
Pansy Punch
Bird Builder
Punch
Elegant Dots
TIEF
Heat Tool
Embossing
Buddy
|
Click here to start
shopping!
|


