Showing posts with label masculine. Show all posts

Monday, June 6, 2016

Bloom' Love

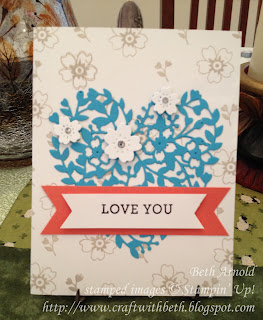
Sometimes I sneak a little note or card into my husband's lunch box. It is a small token of affection to let him know that I am thinking of him and appreciate him. I made this card using the Bloom' Love stamp set and dies.

Craft with Beth: Bloomin' Heart Card

I left the inside of the card blank. I often leave these types of cards blank or have only a simple stamped image like the flower in the background, so, a more personalized message can be written.

Bloomin' Love Card Color Scheme

The color scheme is neutral with pops of Tempting Turquoise and Calypso Coral. Tempting Turquoise is my husband's favorite Stampin' Up! color. I think he will like this card!

Thanks for stopping by!
Beth


Bloomin’ Love Card Project Supply List
Stamps
Bloomin’ Love
Paper
Whisper White cardstock
Tempting Turquoise cardstock
Calypso Coral cardstock
Ink
Sahara Sand ink pad
Archival Basic Black ink pad
Embellishments
rhinestones
Tools
Stampin’ Trimmer
Bone Folder
Clear Acrylic Blocks A, G, and H
Grid Paper
Stampin’ Mist Cleaner
Stampin’ Scrub
Stampin’ Pierce Mat
SNAIL Adhesive
Paper Snips
Fine Tipped Glue Pen
Bloomin’ Heart Thinlits Dies
Large Numbers Framelit Dies
Triple Banner Punch
Big Shot
Big Shot Die Brush
Precision Base Plate
Click here to start shopping!

Monday, May 23, 2016

Paper Pumpkin Kit: Many Manly Occasions

I often struggle with creating the perfect masculine card. I could spend an afternoon arranging and rearranging different ideas and colors trying to get the layout just right. So, I'm thrilled that this month's Paper Pumpkin Kit is all about the men in our lives!


The stamp set includes sentiments for occasions throughout the year and for dad, grandpa, son, brother, uncle, and friend. The die cut triangular and rectangular pieces are fantastic! I love the Pumpkin Pie, Pool Party, and Night of Navy together.

I really like this kit! There are so many opportunities for alternative projects! You could use the die cut background as a stencil or the negative space for the happy sentiment die cut for a great ombre effect! If you are not as big a fan of the orange as I am, you could change the background color.

My Paper Pumpkin Kit Club will meet on Saturday, May 28th from 1pm to 4pm to assemble our kits and try some alternative projects.

Thanks for stopping by!
Beth

Friday, March 18, 2016

March Monthly Meeting

Last night was our local demonstrator's meeting. I meet with a fantastic group of ladies every month to discuss products, share ideas, and swap cards. This month we made cards with a masculine theme.

Like a lot of paper crafters, I have difficulty creating cards with a masculine theme. From my husband, I have learned that the card is more pleasing when it is simple, uncluttered, and includes his favorite colors. Simple cards are often the most challenging. I'm still learning! It is easy to add embellishments but difficult to know when to stop. The key is to find the balance with each project. Plus, once you find the card or project style that they like, it will become easier to replicate for other occasions.

Here are the amazing cards from last night's swap. Can you guess which one was mine?


Craft with Beth: Going Global; Card Swap 2016 Occasions Catalog
Craft with Beth: Lovely as a Tree and The Sky is the Limit; Card Swap 2016 SAB Sale-A-Bration
Craft with Beth: By the Tide; Card Swap
Craft with Beth: Traveler and Work of Art; Card Swap
Craft with Beth: Amazing Birthday; Card Swap
Craft with Beth: Lovely as a Tree; Card Swap
Craft with Beth: In the Meadows and Guy Greetings; Card Swap 2016 Occasions Catalog
Craft with Beth: Guy Greetings; Card Swap
Craft with Beth: Awesomely Artistic; Card Swap

The sets we used were
  • Going Global (Item #140748 Wood-Mount; Item #140748 Clear-Mount ), 
  • By the Tide (Item #131910 Wood-Mount; Item #129120 Clear-Mount ), 
  • Lovely as a Tree (Item #128655 Wood-Mount; Item #127793 Clear-Mount ), 
  • Guy Greetings (Item #138825 Wood-Mount; Item #138828 Clear-Mount; Item #137178 Photopolymer ), 
  • The Sky is the Limit, 
  • In the Meadow (Item #140754 Wood-Mount; Item #140754 Clear-Mount ), 
  • Amazing Birthday (Item #134225 Wood-Mount; Item #134228 Clear-Mount ), and 
  • Awesomely Artistic (Item #138694 Wood-Mount; Item #139950 Clear-Mount ). 
I think these are all great stamp sets for the guys in our lives. What sets do you use for masculine cards?

I appreciate you stopping by!
Beth

Monday, February 15, 2016

In the Meadow Gate Fold Card

Building on yesterday's theme, here is another gate fold card. The stamp set is called In the Meadow from the 2016 Occasions catalog. This is a great stamp set for anniversaries, Valentine's Day, or birthdays. In the Meadow could be fantastic for masculine cards too.


Instead of the glimmer star, the card is kept closed with two antique brads.


You can make a gate fold card with an 8 1/2" x 11" or a 12 x 12" piece of cardstock. To recreate the card above, use an 8 1/2" x 11" piece of cardstock. Using your Paper Trimmer, cut it in half vertically. This yields 2 pieces that are 4 1/4" x 11" each. Rotate 1 piece sideways, so that the 11" edge is at the top and the 4 1/4" edge is on the side. With the scoring blade, score at 3" and at 8 1/2". This is the base of your card.

Cut four 2 1/2" x 4" pieces to make the Hello Honey DSP mats. Attach to the outside left and right panels and to the inside left and right panels on the card base.

Cut a 4" x 5 1/4" piece of Whisper White cardstock for the inside center. Stamp the sentiment "day after day, year after year" in the center. Attach to the center panel inside the card base.

Cut a 3 1/2" x 2 1/2" piece of watercolor paper to stamp and watercolor the deer on. Stamp the deer, grass, tree, and butterflies. Using the aquapainters, color in the deer, grass, tree, and butterflies. Allow to dry.

Cut a 3 3/4" x 2 3/4" piece of Cajun Craze cardstock for the mat around the watercolor. Once the watercolored, stamped image is thoroughly dry, attach it to the Cajun Craze mat.

Cut a 1 3/4" x 1/4" piece of Whisper White cardstock for the sentiment on the outside. Stamp the sentiment "To someone who is great to be around..." in the center.

Cut a 2" x 1/2" piece of Cajun Craze cardstock for the mat around the sentiment. Attach the sentiment to the Cajun Craze mat.

Position your watercolored, stamped image and sentiment in the center of the closed card base (as photographed above). Once you are satisfied with the placement of each, apply SNAIL Adhesive or Liquid Glue to ONE side of the stamped image and to ONE side of the sentiment. Attach both the image and the sentiment to the card base.

Thanks for stopping by!
Beth

The products used in this post are:
Built for Free Using: My Stampin Blog

Sunday, February 14, 2016

Happy Valentine's Day!

It will probably be no surprise that my favorite stamp set from the 2016 Occasions catalog is Going Global. So, when I saw this card from Cindy Hall I CASED it! Cindy created an amazing layout that is too sweet to miss! This card is for my husband on Valentine's Day. I changed the base color because my husband loves Lost Lagoon! I will be so sad when this color retires! Good thing I stocked up!


I added some silver glimmer stars inside but other left the rest blank to write my own message.


Hope you all have a Happy Valentine's Day!

Thanks for stopping by!
Beth

The products used in this post are:

Built for Free Using: My Stampin Blog