Saturday, August 13, 2016

Leave Your Mark!

Let everyone know that your projects are made by hand, with love!

 Craft with Beth: I Stamped This Angel Policy Stamp Set Information

Available in wood-mount or clear-mount, the I Stamped This Stamp Set includes 16 stamps, giving you a variety of ways to say that your project was created with care using quality Stampin’ Up! products. Download the flyer here to see the stamps in full size.


I Stamped This Angel Policy Stamp Set
Item #
Product Name
Retail (USD)
Wood-Mounted Stamp Set
$25.00
Clear-Mounted Stamp Set
$18.00

This set also includes two different sizes of “© Stampin' Up!” for you to stamp onto projects that you create to sell. If you do sell your cards and paper crafting projects that feature Stampin' Up! stamps, this copyright stamp should be included on your projects. Click here for more information about the Stampin' Up! Angel Policy.

I have this stamp set as well as the Angel Policy Stamp Set that just retired at the end of May. I have to say I like this one much better! The fork, knife, and spoon image is just darling! The hand stamped by image is fantastic. The from my heart image is precious! This stamp set also enhances my sense of pride in my work!

You can use these stamps for projects you don't sell too. Adding the hand stamped image lets everyone know you created something special just for them! The recipients of my cards know when they see these stamped images on the backs of my cards that I made them especially for them!

Don't limit these stamps to the backs of your projects only! Try making a tag with the hot air balloon image to include on a birthday present. Use the from my kitchen image on a recipe card or as a tag for a jar of homemade jam. Or, even stamp the one of a kind image onto the onesie stamp from the Made with Love stamp set for that special baby gift! I hope you include the I Stamped This stamp set in your next order!

Thanks for stopping by!
Beth

Friday, August 12, 2016

Sending You a Flurry of Christmas Wishes!

One of my favorite Christmas stamp sets in the Annual Catalog is Flurry of Wishes. I was so happy that is carried over from the 2015-2016 Holiday Catalog into the 2016-2017 Annual Catalog! While I was waiting for my 2016-2017 Holiday Catalog Pre-Order to arrive, I worked on a few Flurry of Wishes Christmas cards.

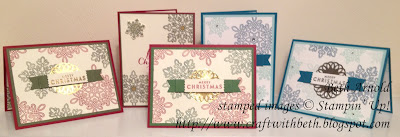
I tried a few variations of a layout with two different color palettes. Here is what I came up with.

Craft with Beth: Flurry of Wishes Christmas Cards Snowflake Stampin' Up!

I was trying to keep busy instead of looking out the window every five minutes!

Craft with Beth: Flurry of Wishes Color Palette Scheme #1A Stampin' Up!

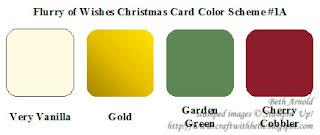
The first group of cards features the traditional reds and greens. The leftmost and the center card below use Cherry Cobbler, Always Artichoke, Very Vanilla, and Gold.

Craft with Beth: Flurry of Wishes Color Palette Scheme #1B Stampin' Up!

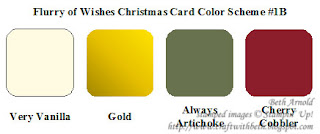
The rightmost card uses Garden Green instead of Always Artichoke.

Craft with Beth: Flurry of Wishes Christmas Cards Snowflake Stampin' Up!

I also tried using gold embossing powder on the Merry Christmas sentiment. I think the Cherry Cobbler Merry Christmas sentiment works better than the gold embossed one.

Craft with Beth: Flurry of Wishes Christmas Cards Snowflake Stampin' Up!

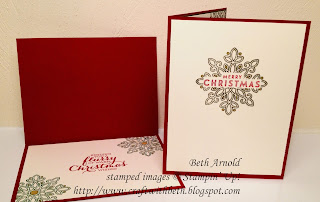
I embellished the insides of both cards. The one on the left has the Flurry of Wishes sentiment, the medium snowflake image, and Gold Wink of Stella. The one on the right has the medium snowflake and the Merry Christmas sentiment. I love how the sentiment seems to nestle right into the snowflake!

Craft with Beth: Flurry of Wishes Christmas Cards Snowflake Stampin' Up!

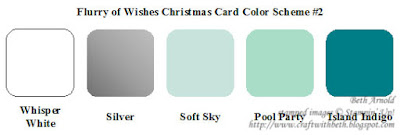
Here I used Island Indigo, Soft Sky, Pool Party, and Silver Foil for a frosty looking color palette.
 
Craft with Beth: Flurry of Wishes Color Palette Scheme #2 Stampin' Up!

The layout and the insides are essentially the same as the red and green cards.

Craft with Beth: Flurry of Wishes Christmas Cards Snowflake Stampin' Up!

To create the banner across the front of the card, I used the Cupcake Cutout Framelits and the Layering Squares Framelits. First I cut the Island Indigo banner and the Whisper White banner. I stamped Merry Christmas on the Whisper White banner and embossed with silver embossing powder. Next I placed the third from the center scalloped square on the Whisper White banner and cut. This makes a little scalloped edged tag similar to the Washi Label Punch.

Craft with Beth: My Holiday Catalog Pre-Order Arrived! Photo of Closed Box

My Pre-Order arrived this afternoon. I was so excited I almost ripped the box! Stop by tomorrow from 1:00pm to 2:00pm for a free Make and Take along with a preview of the pre-order.

Thanks for stopping by!
Beth


Flurry of Wishes Christmas Cards Project Supply List
Stamps
Flurry of Wishes
Paper
Whisper White
Always Artichoke
Garden Green
Very Vanilla
Pool Party
Island Indigo
Cherry Cobbler
Ink
Pool Party
Island Indigo
Soft Sky
Always Artichoke
Garden Green
Cherry Cobbler
Embellishments
Stampin’ Dimensionals
Silver Embossing Powder
Gold Embossing Powder
Foil Doilies
Rhinestones
Clear & Gold Wink of Stella
Tools
Stampin’ Trimmer
Bone Folder
Grid Paper
Stampin’ Mist Cleaner
Stampin’ Scrub
Stampin’ Pierce Mat
Paper Snips
SNAIL Adhesive
Multipurpose Liquid Glue
Acrylic Blocks C, D, E, and G
Big Shot Machine
Cupcake Cutouts Framelits
Snowflake Punch
Click here to start shopping!
 

Wednesday, August 10, 2016

Holiday Catalog Sneak Peek: Cable Knit Dynamic Embossing Folder

Check out this amazing 3D Cable Knitted Embossing Folder! The dimension is extraordinary and true to life stitches! I'm in love!!


I am so excited to see so many knitted textures and products! I have been knitting and crocheting for fifteen years. I love incorporated knitting stitches and the look of knitting into my decor or other crafting projects including stamping and paper crafting! Sometimes I think everything should have some knitting!

Want to see more sneak peek videos from the upcoming 2016-2017 Holiday Catalog? Check out these festive product videos below and on my Resources page.

2016-2017 Holiday Catalog Sneak Peek Videos

The 2016-2017 Holiday Catalog goes live on September 1st, 2016! If you have ordered from me in the last 12 months, you will automatically receive the Holiday Catalog. If you haven't ordered from me in the last 12 months and would like to receive the Holiday Catalog, contact me today with your catalog request. Please be sure to include your mailing address.

Craft with Beth: 2016-2017 Holiday Catalog Shareable Graphic Book your Stampin' Up! Party Today


My pre-order should arrive by Friday! As soon as it arrives, you will be the first to know! I will also have some open crafting time on Saturday to preview all of the new Holiday Catalog goodies and make a cute project!

Don't forget Bingo Night is tonight!

Thanks for stopping by!
Beth

Tuesday, August 9, 2016

BOGO Paper Pumpkin Sale!

Paper Pumpkin BOGO Buy One Get One Month Free August 11th, 2016 to October 10th, 2016

For the FIRST time ever, FIRST-time subscribers can buy their FIRST month and get their second month FREE!

Offer Dates: August 11th, 2016 to October 10th, 2016

Offer Details: For first time subscribers, buy one month of Paper Pumpkin and get the second month free!

Here’s How It Works: 
  • Go to https://mypaperpumpkin.com/en-us/signup/. Enter promo code “BOGO” in the prepaid/promo box to pay the regular price of $19.95 USD/$26.95 CAD for the first month and receive your second month for FREE!

    That means, if you subscribe with the promo code between now and September 10th, 2016, you will pay full price for the September kit, and you will get the October kit free.

    If you subscribe between September 11th and October 10th, you will pay full price for the October kit, and you will get the November kit free.

What You Should Know:
  •  IMPORTANT: Offer is invalid if subscription is suspended or cancelled during the first two months. In other words, subscribers cannot cancel or suspend their subscription during their first two months—if they do, the offer is void. You can’t put their subscription on hold or cancel until after the first two full months.
  •  After the first two months, the subscription will continue for $19.95 USD/$26.95 CAD + tax per month (shipping included) unless cancelled or suspended. Ends October 10, 2016.
  •  This offer is open to first-time subscribers only.
  •  Not valid on prepaid subscriptions.
  •  Ends October 10, 2016 (the last day to subscribe and get the October kit).

You know how much I love Paper Pumpkin! I cannot tell you how excited I am every month to receive the email that says my Paper Pumpkin Kit is on its way! I even check the package tracking information provided so I know exactly the day my kit will arrive! Paper Pumpkin is a treat I look forward to!

If you are still on the fence about signing up, now is a great time! You can try two months for the price of one! That means two exclusive stamp sets, two project kits, and two Stampin' Spot Ink Pads to try! What are you waiting for?! Sign up starting August 11th, 2016!

If you have questions about the BOGO Paper Pumpkin Sale, please contact me. I am happy to assist!

Thanks for stopping by!
Beth

Monday, August 8, 2016

Reunion Christmas Swap

My husband's family is having a reunion this month. Because we are all not able to get together again this year, we are celebrating Christmas early with a Yankee Swap.

Everyone brings a wrapped present to swap. We draw numbers to see who picks a present first, second, third, and so on. After each person picks a present, they can swap or steal from the person who went before them. For example, if you have number 3, you can steal from number 1 or number 2 or keep your present. It is great fun! Some years the swapping gets pretty involved! You never know whose present you'll end up with!

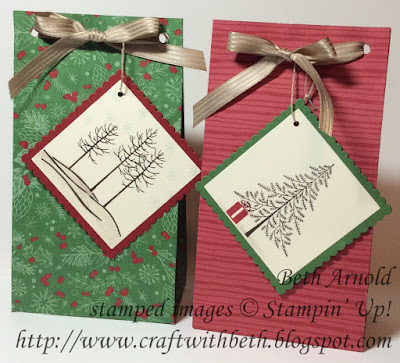
Craft with Beth:Christmas Gift Bags Stampin' Up! Gift Bag Punch Board

For our presents, I made these gift bags with the new Christmas DSP and the Gift Bag Punch Board. These gift bags are the medium size and 8" long. The bags are tied with Crumb Cake satin ribbon. This ribbon just retired, however, you can substitute Very Vanilla satin ribbon.

I used the Layering Squares Framelits and Linen Thread to create the gift tags. On the left tag, I created a little winter scene with the Thoughtful Branches stamp set and the Peaceful Pines stamp set. I stamped Soft Sky snowflakes. I used Clear Wink of Stella to add sparkle to the snow bank.

On the right tag, I used the pine tree and present images from Peaceful Pines stamp set. On the reverse of the tag is the sentiment from the Peaceful Pines stamp set.

I have been working on my gift packaging skills this year. How did I do?

Thanks for stopping by!
Beth

Saturday, August 6, 2016

Redeem Your Bonus Day Coupons

Redeem your bonus days coupons in August

Now is the time to redeem your Bonus Days Coupons you earned in July! Your Coupon Codes are easy to redeem.

Add your items into your shopping cart. Enter each code into the Coupon Code Box. Click apply coupon. Repeat for each code.

If you need to remove a code, click remove code.

Once you have entered all of your codes, verify that your order is correct and that all coupon codes have been verified. Shipping and tax are calculated once all coupon codes are applied. Then click submit order.

You can redeem your codes for any product in the catalog except for Starter Kits and for Paper Pumpkin subscriptions.

You can only use a code once. If you submit your order and then cancel it, the coupon codes cannot be recovered or reused.

What are you using your coupons for? Are you stocking up on essentials like cardstock and adhesive or getting a special stamp set?

If you have questions about redeeming your Bonus Days Coupon Codes, please contact me. I am happy to help!

Thanks for stopping by!
Beth
Friday, August 5, 2016

Floral Phrases Wedding Card

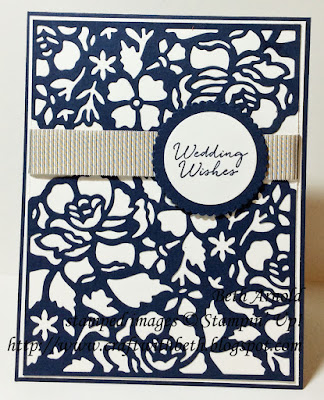
This card started out as something completely different. I attempted to cut the two Floral Phrases thinlits and place one at the top of the card and one at the bottom of the card. Then I stamped congratulations in the center of the two dies. I missed and partially stamped the top die! I was a smidgen off.

Craft with Beth: Floral Phrases Wedding Card

I was about to start over when I thought maybe a ribbon would look nice across the card instead.  I added Tip Top Taupe striped ribbon and the wedding wishes sentiment. I used the layering circles to embellish the sentiment. The mistake was covered completely.

Craft with Beth: Floral Phrases Wedding Card

I love this heartfelt sentiment on the inside of the card! Even though I didn't start out with this layout, it turned out really pretty!

Thanks for stopping by!
Beth