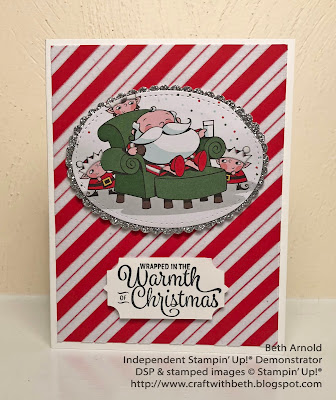
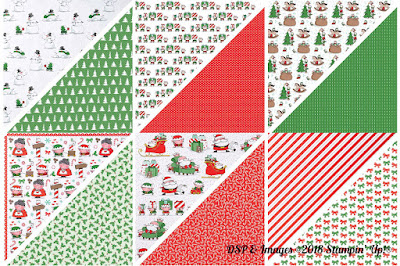
I love how Santa's Workshop Specialty Designer Series Paper has the white flocking on some of its sheets, especially this candy cane striped pattern! It is so soft and adds an extra special touch to your Christmas projects!
I also like that many of the patterns correspond with the thinlits or can be cut out and used as individual elements, like the Santa relaxing in his comfy chair with a glass of milk and a cookie.
I did not have the sentiment Judy used, so I used the "wrapped in the warmth of Christmas" sentiment from Snowflake Sentiments and punched it out using the Everyday Label Punch.
The Everyday Label is a wonderfully shaped punch, but I wanted a shape that was closer to the size of the sentiment. Did you know that you can "change" the shape and size of your punches?! Using the Everyday Label as the base, I "shrunk" the size of the punch by punching it twice. Let me show you how I did it!
First stamp your sentiment onto Whisper White Cardstock. Then line up the top of the sentiment, where it says "wrapped in the", towards the top edge of the punch.
Punch out the sentiment.
Let's "shrink" the bottom portion of the sentiment. The punched out sentiment is much smaller now and will be tricky to line up inside the punch using your hands. So, we need something small to act as a handle to hold the piece of cardstock in place while we punch out the sentiment.
Grab a long, narrow piece of scrap cardstock (for example, 1/2" x 6"). Put a small amount of SNAIL Adhesive on 1 end of the scrap and attach it to back of the punched out sentiment.
Using your scrap as a handle, slide the punched out sentiment back into the punch from the top to the bottom. Position the sentiment so that the bottom edge of the punch is a smidgen below the stamped sentiment and punch. Remove the handle from the back of the punched out sentiment.
That's it! Now you have a customized Everyday Label punch out! You can do this technique with tons of your punches - circles, ovals, the Fox Builder Punch, and so much more. Your imagination is the limit!
What punches would you like to "shrink"? I would love to see what you create!
You can find the measurements and a supply list at the end of this post.
Thanks for stopping by!
Beth
++++++++++++++++++
Shop Online 24/7 in my Online Store
Check out the Clearance Rack
Sign Up for a Class
Sign up for my newsletter and mailing list or request a catalog
Sign Up for Paper Pumpkin
Join my Stampin' Team!
Host Codes & Current Promotions:
September Host Code - J76AGWQ3
When placing an order, please use host code J76AGWQ3 for orders under $150 USD. Please don't use the host code if your order is more than $150. Use Host Code J76AGWQ3 if you are attending the Stamp of the Month Class long distance to have your Painted Glass Bundle mailed directly to you.
September 1st - 30th, 2018 - September is the time to REDEEM the Bonus Days Dollars you earned in August. Make sure you have your Coupon Codes ready when placing an order. I am using my Bonus Days Dollars towards stamps and embellishments from the Holiday Catalog. What are you using your Bonus Days Dollars towards?
August 11th - September 10th - Sign up for Paper Pumpkin by September 10th to receive this fa-boolus Halloween kit! If you are a current subscriber, make sure your subscription is up to date!
September 1st - 30th, 2018 - For the month of September, you can earn FREE Dashing Along Designer Series Paper when you host a workshop with sales totaling $250 USD (before tax and shipping)! You can also earn FREE Dashing Along Designer Series Paper when placing a single order of $250 USD (before tax and shipping)! Dashing Along Designer Series Paper is a gorgeous, traditional Christmas patterned paper perfect for making your Christmas projects pop! This exclusive Designer Series Paper is for a limited time only, so book your workshop today!
September 5th, 2018 - January 2nd, 2019 - Get your holiday projects off to the right start by shopping the NEW 2018 Holiday Catalog filled with the latest products for Halloween, Fall, Thanksgiving, Christmas and more!!
June 1st, 2018 - June 3, 2019 - Shop from the 2018-2019 Annual Catalog for all of your stamping needs! This year's catalog is one of my favorites! With all of the new gorgeous stamp sets, embellishments, and Designer Series Paper, I want to try everything! I know you will too! Check it out today!
Santa’s Workshop CASE Card
Supply List
|
|
Stamps
|
#144817 Snowflake
Sentiments (Wood-Mount)
#144820 Snowflake
Sentiments (Clear-Mount)
#147690 Signs of Santa
(Photopolymer)
|
Paper
|
#100730 Whisper White
Cardstock
#140272
Thick Whisper White Cardstock
#147809 Santa’s Workshop
Specialty Designer Series Paper
#146960 Silver Glimmer
Paper
|
Ink
|
#132708 Momento Tuxedo
Black Ink Pad
#146879 Dark Poppy Parade Stampin’
Blend
#145054 Light Smoky Slate
Stampin’ Blend
#146866 Light Petal Pink
Stampin’ Blend
#144585 Dark Daffodil
Delight Stampin’ Blend
|
Embellishments
|
#104430 Dimensionals
|
Tools
|
#126889 Stampin’ Trimmer
#126199 Stampin’ Pierce
Mat
#141706 Layering Ovals
Framelits
#145372 Stitched Shapes
Framelits
#144668 Everyday Label
Punch
|
Santa’s Workshop CASE Card
Measurements
|
||
Paper
|
Dimensions
|
|
Card Base
|
Thick Whisper White Cardstock
|
5-1/2” x 8-1/2”; scored at 4-1/4”
|
1st Mat
|
Santa’s Workshop Specialty DSP
|
4” x 5-1/4”
|
Scalloped Oval
|
Silver Glimmer Paper
|
4” x 3”
|
Stitched Oval
|
Santa’s Workshop Specialty DSP
|
4” x 3”
|
Greeting Label
|
Whisper White Cardstock
|
3” x 3”
|


