Wednesday, April 15, 2020

Woven Heirloom Quilted Thank You Card

Yesterday my demonstrator team Purrfect Stampers and I met virtually for one of our twice weekly stamping sessions. We take turns choosing a project, technique, or theme for each stamping session. Candy, one of my friends and my downline team member, suggested creating quilted cards using designer series paper for the quilt blocks and embossing folders to mimic the stitching on a quilt.


What a great idea! Although this is not a new technique, it is a fabulous way to use our designer series paper scraps and to use our embossing folders in a different, unexpected way.

Essentially, you cut up squares of designer series paper and adhere them to a piece of cardstock in a staggered pattern. Then you run that through a die cutting machine with the embossing folder of your choice.


I used the Tufted 3D Embossing Folder to make diagonal quilted lines, but you could use any embossing folder you have! Doesn't that look like a cozy blanket!?


Since we all have different stamping supplies, we choose what stamp sets, designer series paper, embellishments, etc to use for the quilted card.

I chose the Woven Threads Product Suite. It was a product suite that featured the 2019-2021 In Colors. I won the Woven Heirlooms stamp set at the demonstrator convention OnStage last April. I am sorry to say that I haven't created with as much as I would like. The Woven Heirlooms product suite is a beautiful mix of all five of the 2019-2021 In Colors - Rococo Rose, Terracotta Tile, Pretty Peacock, Seaside Spray, and Purple Posy. The stamps and the designer series paper are very textured looking and reminder of woven rugs and cloth.


After I ran the quilted part through the die cutting machine, wrapped a piece of Seaside Spray Scalloped Linen around the bottom portion and adhered the ribbon ends to the back. Next, I adhered it to a piece of Terracotta Tile cardstock and then to the card front.

To embellish the card, I created a label using the Stitched Shapes dies and the Layering Oval Dies and stamped the "thank you so much" greeting as well as the decorative flourish stamp in the center. The decorative flourishes are stamped with Terracotta Tile ink stamped off (ink the stamp, stamp onto grid paper, and then stamp on your project). Terracotta Tile is so brilliant and saturated that I didn't want it to overtake the more subtle Seaside Spray ink on the greeting stamp.

There are so many possibilities with the quilted embossing folder technique! You can use more than 2 patterned papers, can arrange the squares differently, and more! My mom made this quilted card using 3 different patterns from the Garden Impressions Designer Series Paper. My mom also staggered her squares differently, so that they aren't all the same size on the top of and on the bottom of her quilt.


Changing the designer series paper completely changes the look and feel of the card too! My mom's color palette is bright, happy, and springlike.

I would love for you to join in on the fun of making a quilted card too! Below are the measurements to recreate this embossed quilted card.

Woven Heirlooms Quilted Embossed Thank You Card Measurements

Paper
Dimensions
Card Base
Seaside Spray Cardstock
5-1/2” x 8-1/2”; scored at 4-1/4”
Quilt Base
Seaside Spray Cardstock
4” x 5-1/4”; then trim as needed
Quilt Blocks
Woven Threads DSP
1-1/4” x 1-1/4” (cut 6 squares of 1 patterned paper and 6 squares of another patterned paper for a total of 12 squares)
1st Mat
Terracotta Tile Cardstock
3-7/8” x 5-1/8”
Stitched Oval
Whisper White Cardstock
3” x 2” (die cut with the 2nd smallest stitched oval die)
Scalloped Oval
Terracotta Tile Cardstock
3” x 2”
Inside Mat
Whisper White Cardstock
4” x 5-1/4”

How will you create your own quilted card? I would love to see what you create! Post a project photo on my Facebook Page today!

If you would like to purchase the supplies I used to create this card, please use the supply list below to shop in my online store. I would love to be your Stampin' Up! demonstrator!

Thanks for stopping by!
Beth


Woven Heirlooms Quilted Embossed Thank You Card Supply List
Stamps
#149306 Woven Heirlooms (Cling-Mount)
Paper
#100730 Whisper White Cardstock
#150883 Seaside Spray Cardstock
#150884 Terracotta Tile Cardstock
#149497 Woven Threads Designer Series Paper
Ink
#150086 Terracotta Tile Ink Pad
#150085 Seaside Spray Ink Pad
Embellishments
#149707 Seaside Spray Scalloped Linen Ribbon
#104430 Dimensionals
Tools
#152392 Stampin’ Trimmer
#102300 Bone Folder
#103579 Paper Snips
Die Cutting Machine
#152323 Stitched Shapes Dies
#151771 Layering Ovals Dies
 

Monday, April 13, 2020

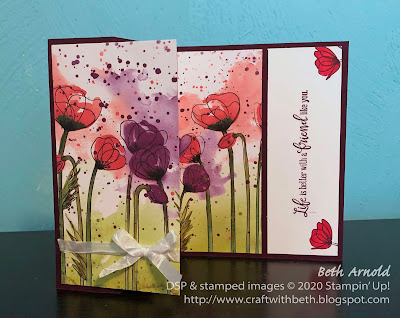
Painted Poppies Z-Fold Card

My demonstrator team Purrfect Stampers and I are continuing our weekly virtual stamping sessions on Zoom. Meeting virtually twice a week has truly been a blessing to me, especially during these difficult times! It has meant the world to me to be able to connect with loved ones virtually! I know that this has been hard for us all to adjust and adapt our routines to this new normal. I am praying and hoping that you and your loved ones are safe and healthy and for those helping and caring for us, including doctors, nurses, janitors, health-care professionals, first responders, grocery store employees, post office workers, power plant employees, sanitation workers, and all those that support our community! I am so grateful to you and to your service to us! I cannot express how much I appreciate you!


Last week my demonstrator team and I created Z-Fold cards using Designer Series Paper that created a scene like a skyline or a field of poppies or had a large scale pattern such as the lily pads from the Sale-A-Bration Designer Series Paper or the larger flowers in the Perennial Essence Designer Series Paper as one of our challenges.

This fun fold is called the Z-fold because when it is folded, it looks like the shape of the letter z. There is also only 1 additional score line needed than a traditional side-fold card, making this a great fun fold to start off with!


I chose the Painted Poppies stamp set (#151599), the Peaceful Moments stamp set (#151595) and the coordinating Peaceful Poppies Designer Series Paper (#151324). Peaceful Poppies Designer Series Paper is bright, cheerful, and has a variety of small-scale, medium-scale, and large-scale patterns to choose from.


Choosing a particular Designer Series Paper for this fun fold was important because when the card is layed out or flattened, the Designer Series Paper looks like one continuous pattern or background.

The sheet with the two rows of poppy flowers with one row across the top and one row across the bottom is perfect for this z-fold card! The scale or size of the flowers is large enough that it fills almost the entire card's height and is long enough to fit in each of the z-fold card panels.


How fun and beautiful is that Designer Series Paper!?

To make the z-fold card base, start with a 5-1/2" by 8-1/2" Blackberry Bliss card base. Then with the 8-1/2" side along the top of the Simply Scored, score at 1-1/2" and at 4-1/4".


Then cut a piece of 6" by 6" Designer Series Paper. I used the row of poppies patterned paper from the Peaceful Poppies Designer Series Paper. I, first, cut it in half horizontally to separate the two rows of poppies. Then I cut one of the halves in half to make two 6" by 6" squares. Choose one of the 6" by 6" squares for this project.

Next, cut 3/4" off of the top of the Designer Series Paper. For my patterned paper, this was the white area with the splatter dots.


Then cut it into strips. Make sure the Designer Series Paper is upright and horizontal, as in the photograph above. Cut the Designer Series Paper at 2-3/4", at 1-1/8", and at 2-1/8" (the last piece should already come out to be 2-1/8"). Tie a piece of Whisper White crinkled seam binding in a bow around the 2-3/4" wide strip, if you would like. I think this card is beautiful on its own too.

Fold and burnish your card base as follows. Fold the card base in half at the 4-1/4" score line like you are closing a book. Burnish the score line.

Stamp the large poppy image using Versamark Watermark ink randomly all over the closed card. This gives more interest to the front of the card when it is on display.

Next fold the 1-1/2" score line back like you are revealing what is inside of the card. Burnish the score line. Keep the card base closed like this.

Adhere the Designer Series Panels to the card as follows. Adhere the left side of the 2-3/4" wide strip to the left edge of the 1-1/2" panel on the card base, leaving about an 1/8" border on the left, top, and bottom of the card base. Add adhesive only where the Designer Series Paper overlaps the Blackberry Bliss cardstock.

Open the card base. Adhere the 1-1/8" wide strip to the left of the 4-1/4" score line, leaving a 1/8" border to the right, top, and bottom of the card base. Adhere the 2-1/8" wide strip to the right of the 4-1/4" score line, leaving a 1/8" border to the left, top, and bottom of the card base.


Cut a 1-3/4" by 5-1/4" piece of Whisper White cardstock. Stamp the "Life is better with a friend like you" greeting with Blackberry Bliss ink in the center of the cardstock.

Stamp the single poppy with a stem image to the left and to the right of the greeting with Blackberry Bliss ink, so that only the poppy is showing. Color the poppies with Dark Poppy Parade Stampin' Blend. Adhere the Whisper White cardstock to the right of the 2-1/8" wide strip, leaving about a 1/8" border on all sides of the Whisper White cardstock.


This z-fold card was a fun experiment in creating a mural-like card! I would love for you to join in on the fun too and make your own z-fold card! What stamps and designer series papers would you choose to create your own z-fold card? I would love to see what you create! Post a project photo on my Facebook page today!
 
If you would like to purchase the supplies I used to create this card, please use the supply list below to shop in my online store. I would love to be your Stampin' Up! demonstrator!

Thanks for stopping by!
Beth


Peaceful Poppies Designer Series Paper Z-Fold Card Supply List
Stamps
#151599 Painted Poppies (Cling-Mount)
#151595 Peaceful Moments (Cling-Mount)
Paper
#100730 Whisper White Cardstock
#133675 Blackberry Bliss Cardstock
#151324 Peaceful Poppies Designer Series Paper
Ink
#147092 Blackberry Bliss Ink Pad
#102283 Versamark Watermark Ink Pad
#146879 Dark Poppy Parade Stampin’ Blend
Embellishments
#151326 Whisper White 1/4" Crinkled Seam Binding
Tools
#152392 Stampin’ Trimmer
#102300 Bone Folder
#103579 Paper Snips
#122334 Simply Scored Scoring Tool

Sunday, April 12, 2020

Second Sunday Sketches 12 Starts Today!


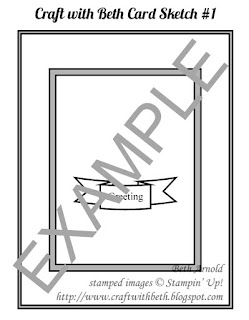
It is time for another Second Sunday Sketches challenge! If you are new to Second Sunday Sketches, please review the rules here or below. Each second Sunday of the month, I will post a card sketch. A sketch is graphic or drawing of how the elements of a card are layed out.

Craft with Beth: Stampin' Up! Second Sunday Sketches sketch card sketch challenge sample graphic

You will then use the sketch as a guide to create your own card. Your card must be a new creation and reflect the challenge guidelines. Your card must include the major elements of the card sketch, such as the number of layers and the general position of the embellishments and/or die cuts. You can rotate the sketch for a top-folding card or for a side-folding card.

You choose the occasion and the color palette as well as the stamp set(s) and the embellishments. I do ask that you use Stampin' Up! products (current or retired).

The measurements will also be included in the blog post for each Second Sunday Sketches sketch challenge. You can use the measurements as given or increase them or decrease them. For example, if a greeting is stamped on a 1" circle on the sketch, but the greeting you choose is 1-3/4", then increase the size of the circle to 1-3/4". You can also change the shape. Instead of a circle, you can use an oval, a square, a daisy punch, etc.

The challenge will run from the second Sunday of the month until the last day of that month.

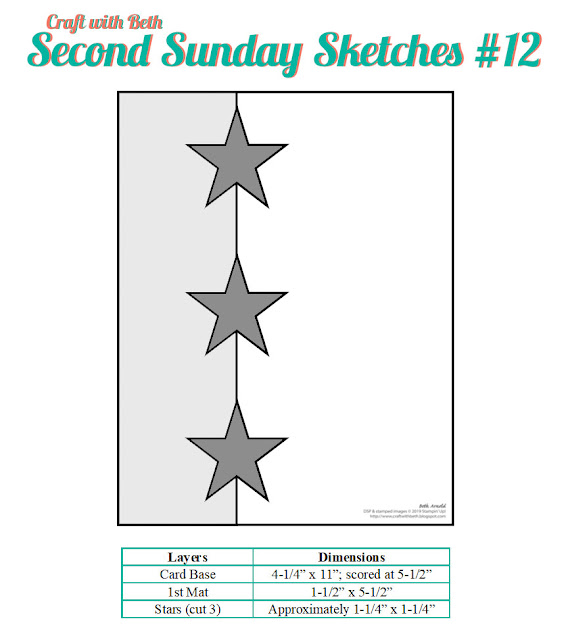
Below is April's card sketch.

Craft with Beth: Stampin' Up! Second Sunday Sketches card sketch challenge graphic 12 with measurements

Challenge Dates

April's challenge will run from April 12th, 2020 until April 30th, 2020 at 5pm EST.

If you would like to participate in the Second Sunday Sketches sketch challenge, please create a card using the sketch above and email me a photo of your card by April 30th, 2020 at 5pm EST with the subject line Second Sunday Sketches Entry.

Prize Drawing

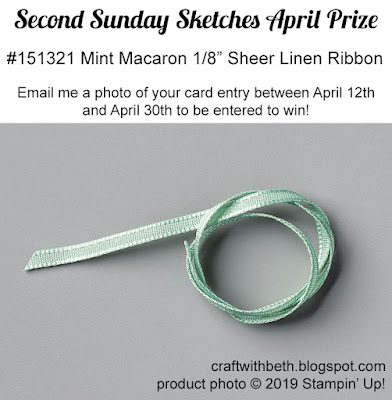
The day after the last day of the month (May 1st), I will place all of the names of the participants in a proverbial hat and randomly draw a winner. The winner will receive a prize! The prize each month will change and will be announced at the start of each challenge. April's Second Sunday Sketches sketch challenge prize is Item #151321 Mint Macaron 1/8" Sheer Linen Ribbon and three hand-made cards from me.

Craft with Beth: Stampin' Up! #151321 Mint Macaron 1/8" Sheer Linen Ribbon April 2020 Second Sunday Sketches  #12 card challenge sketch challenge prize graphic

Winner Announcement

If you are the winner, I will notify you by email. Please respond to my email with your complete mailing address, and I will mail you your prize! If the winner does not respond to my email within 7 days, I will draw another winner.

I will also post all of the entries on my blog (with your names attached to the photos) and the name of the winner.

Card Sketch Sample

Here is a sample of how I interpreted this card sketch using the Sailing Home Stamp Set and Die Bundle.

Craft with Beth: Stampin' Up! Second Sunday Sketches Card Sketch Challenge with measurements Sailing Home stamp set

Some Ideas on How to Make this Card Sketch Your Own

There are many ways to change this card to make it your own! You can rotate the card layout 90 degrees, change the stars to another shape like flowers or letters, add a mat layer beneath the stars, add a stencil, create your own Designer Series Paper, use embossing folders to add more texture, and more!

Share Second Sunday Sketches with a Friend

Be sure to join in on the fun and share with a friend! Starting in March 2020, if you enter the Second Sunday Sketches challenge, you can get a bonus surprise prize by sharing this challenge with a friend (for US residents only)! Here's how to get a bonus surprise prize. Limit two bonus surprise prizes per person per month.
  1. Enter into this month's Second Sunday Sketches challenge
  2. Share this month's Second Sunday Sketches challenge with a friend (that hasn't participated before)
  3. Have your friend submit their this month's challenge card entry
  4. Email me that your friend has submitted their card entry. Submit your complete mailing address and the name of the friend that you shared with. I will confirm their entry and then send you a bonus surprise prize.

I am looking forward to seeing your personal take on the twelfth Second Sunday Sketches sketch challenge! If you have any questions about this card sketch challenge, please let me know! I am happy to assist!

Happy Stamping!
Beth

Saturday, April 11, 2020

Sneak Peek: Paper Pumpkin May 2020 Kit!

Craft with Beth: Stampin' Up! Paper Pumpkin Kit card Graphic Banner 2020 04 April Designed with (In) Color in Mind subscription kit

The Paper Pumpkin team loves planning fun surprises, so we’ve been VERY excited to let you know what we have in store for the month of May: a fabulous kit featuring 2020–2022 In Colors, plus Purple Posy, an In Color from the 2019–2021 collection.

This means that as Paper Pumpkin subscribers, you will be first to get their hands on new In Color products. And that’s just the beginning of things to love about this kit!

The April 2020 kit contains supplies to make 12 cards with 12 coordinating envelopes (8 traditionally-sized cards and 4 note cards)
  • 8 cards (4-1/4" x 5-1/2")
  • 8 envelopes (4-1/2" x 5-3/4") 
  • 4 note cards (5" x 3-1/2")
  • 4 envelopes (5-1/8" x 3-5/8")

The coordinating colors are all related to In Colors and are Purple Posy from the 2019-2021 In Color collection and 4 NEW 2020-2022 In Colors! WOW! The NEW In Colors in this kit are still a surprise and will be revealed on April 24th. So, check back on April 24th to see what they are! I am so excited to see the new In Colors!!

Craft with Beth: Stampin' Up! Paper Pumpkin Kit card Graphic Banner 2020 04 April Designed with (In) Color in Mind subscription kit Color Scheme Color Palette Graphic

We already got a sneak peek of the new 2020-2022 In Colors in the Ornate Garden Specialty Designer Series Paper. It is called Bumble Bee and is a beautiful, bright yellow! I cannot wait to see the rest of the 2020-2022 In Colors! What do you think the NEW 2020-2022 In Colors will look like or be named?

Craft with Beth: Stampin' Up! Ornate Garden Specialty Designer Series Paper Product Graphic Item #152488

Start or renew your subscription for the May's Paper Pumpkin kit at paperpumpkin.com from April 11th through May 10th. Please note that supplies may be limited toward the end of each subscription period. So, please, don't delay in subscribing!

Craft with Beth: Stampin' Up! Paper Pumpkin Kit card Graphic Banner 2020 04 April Designed with (In) Color in Mind subscription kit

Then bring your Paper Pumpkin Kit to my VIRTUAL Paper Pumpkin Party on Thursday, March 23rd from 6pm to 8pm on Zoom. We will assemble our kits virtually and view alternative project ideas! RSVP by April 16th! Once you RSVP, I can send you the Zoom meeting information.

I look forward to stamping with you!
Beth