Saturday, March 25, 2017

March 2017 Paper Pumpkin Kit: Bunny Buddies

March's Paper Pumpkin Kit arrived in the mail! I'm loving this sweet bunny!


This month's kit includes all of the supplies to make 9 bunny treat bags and 9 cards - perfect for 3D project and card makers.

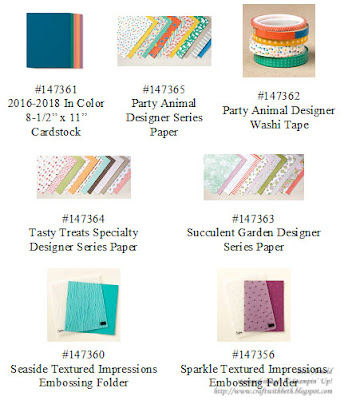
Craft with Beth: March 2017 Paper Pumpkin Kit Bunny Buddies Kit Contents

No need to hold back your “egg”-citement as you create these cute little critters! The stamp set includes stamps to give each of your bunnies their own personalities. The little noses and whiskers are precious. I know my nieces and nephews are going to love putting this kit together with me!

Craft with Beth: March 2017 Paper Pumpkin Kit Bunny Buddies Stamp Set

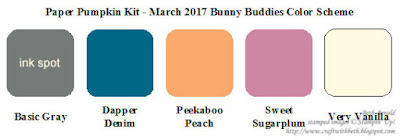
The color scheme is ready for spring! It's bright and cheery! There is a good variety of colors, making these projects gender neutral. The designer series paper in this kit reminds me of the spin art I did when I was younger. Cute!

Craft with Beth: Paper Pumpkin Kit March 2017 Bunny Buddies Color Scheme Palette Graphic

Here are some fantastic alternative project ideas from the Paper Pumpkin blog to try. I love the Easter egg card!

Craft with Beth: March 2017 Paper Pumpkin Kit Bunny Buddies Alternative Ideas

I have a few more ideas to share with you at our next Paper Pumpkin Party too!

Bunny Buddies refills (Item #144477) are now available while supplies last. Stock up on these bunny treat bags for an Easter themed party favor or for place settings at Easter dinner with family and friends!

Craft with Beth: Paper Pumpkin Kit specially designed by CEO Sara Douglas Title Graphic April 2017

Sara Douglass, our CEO, designed April's Paper Pumpkin Kit! Make sure your subscription is active and up to date to receive your specially designed kit with FREE gift! Not a Paper Pumpkin subscriber? Sign up before April 10th, 2017 to get your kit designed by Sara!

Just a reminder. There is no Paper Pumpkin Party this month. We will resume in April. You can bring both March and April's kit to April's Paper Pumpkin Party, or we can schedule another day to party for the March kit. I can't wait to see what everyone creates!

Hoppy spring!
Thanks for stopping by!
Beth

Friday, March 24, 2017

Create Your Own Easter Basket with the Window Box Thinlits

I created a little Easter basket using the Window Box Thinlits and the Basket Bunch Bundle that is perfect for filling with a little candy or a small toy!

Craft with Beth: Easter Basket Window Shopping Window Box Thinlits Framelits Basket Bunch Basket Builder Framelits Gift Packaging

First cut one hexagon framelit from the Window Box Thinlits from Tip Top Taupe cardstock.

Craft with Beth: Easter Basket Window Shopping Window Box Thinlits Framelits Basket Bunch Basket Builder Framelits Gift Packaging

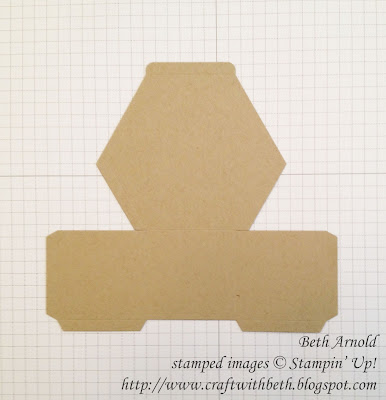
Then cut the hexagon top in half horizontally. These half hexagons will form the front and back sides of the basket.

Craft with Beth: Easter Basket Window Shopping Window Box Thinlits Framelits Basket Bunch Basket Builder Framelits Gift Packaging

Adhere the top half of the hexagon you just cut to the bottom center of the box sides. Your basket will look like a butterfly or bee now.

Craft with Beth: Easter Basket Window Shopping Window Box Thinlits Framelits Basket Bunch Basket Builder Framelits Gift Packaging

Next place the half hexagon thinlit with the rectangular cuts on the half hexagon and run it through the Big Shot.
 
Craft with Beth: Easter Basket Window Shopping Window Box Thinlits Framelits Basket Bunch Basket Builder Framelits Gift Packaging

Repeat for the other half hexagon.

Craft with Beth: Easter Basket Window Shopping Window Box Thinlits Framelits Basket Bunch Basket Builder Framelits Gift Packaging

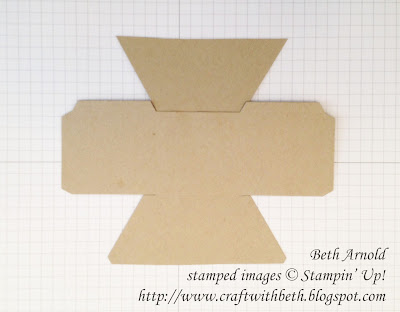
Burnish all score lines. Fold the square sides up and adhere to the front and back sides of the basket.

Craft with Beth: Easter Basket Window Shopping Window Box Thinlits Framelits Basket Bunch Basket Builder Framelits Gift Packaging

Cut a 1" by 8" strip of Tip Top Taupe cardstock for the handle. Attach the handle to the sides of the basket with brads. This enables the handle to be positional. I also added a circle of cardstock on the inside of the basket to cover the brad ends. This is an optional step. You can also glue the handle to the basket if you do not wish to use brads.

Craft with Beth: Easter Basket Window Shopping Window Box Thinlits Framelits Basket Bunch Basket Builder Framelits Gift Packaging

Once the handle is attached, add a Whisper White organza faux bow to the handle. Wrap the ribbon around the handle and adhere in place with glue dots. It is better to use a dry glue here. Glue dots won't make the ribbon soggy.

Then tie a bow separately and adhere over the center of the ribbon on the handle. Looks great and is easy-peasy.

Craft with Beth: Easter Basket Window Shopping Window Box Thinlits Framelits Basket Bunch Basket Builder Framelits Gift Packaging

Your basket is ready to decorate. For my basket, I added a Whisper White cardstock strip with the You're Egg-stra Special stamp in Chocolate Chip ink and snipped the ends to create a banner. Then I added 3 Easter eggs using Wisteria Wonder, Soft Sky, and Pink Pirouette cardstock and the Basket Builder Framelits.

Craft with Beth: Easter Basket Window Shopping Window Box Thinlits Framelits Basket Bunch Basket Builder Framelits Gift Packaging

Next fill with paper strips for grass and with your treats. You can use store bought paper grass or use the Fringe Scissors and Wild Wasabi cardstock to make your own paper grass.

You can also place the basket in a gusseted cellophane bag for giving. 

Craft with Beth: Easter Basket Window Shopping Window Box Thinlits Framelits Basket Bunch Basket Builder Framelits Gift Packaging

How would you decorate your Easter basket? I would love to see what you create!
Thanks for stopping by!
Beth


Window Box Thinlit Easter Basket Project Supply List
Stamps
#144731 Basket Bunch Bundle
Paper
#100730 Whisper White
#138336 Tip Top Taupe
#111351 Pink Pirouette
#131203 Soft Sky
#122922 Wisteria Wonder
Ink
#126979 Chocolate Chip
Embellishments
#114319 Whisper White 5/8” Organza Ribbon
#142001 6" x 17" Gusseted Cellophane Bag
Tools
#143263 Big Shot
#126199 Stampin’ Pierce Mat
#139684 Precision Base Place
#142762 Window Box Thinlits
#119868 1” Circle Punch
 

Wednesday, March 22, 2017

More Sale-A-Bration Products & Updates

Craft with Beth: 2017 Sale-A-Bration Final Days Title Graphic

I can't believe Sale-A-Bration has flown by! Times flies when you’re having fun, though, right? There are only a few days remaining during Sale-A-Bration! Stampin' Up! has added 7 additional products for you to earn to finish off Sale-A-Bration. Woohoo! These products come from the 2016-2017 Annual and 2017 Occasions Catalogs.

Don’t forget you have until March 31th, 2017 to earn FREE products!

Below are the 7 additional products you can earn for FREE during Sale-A-Bration! Please note, to receive one of the Sale-A-Bration final day’s products for free, you will need to use the item code noted below and not the regular item code.

Craft with Beth: 7 More 2017 Sale-A-Bration Products Graphic

Sale-A-Bration ends March 31st, 2017. Products are available until supplies run out. The  6" by 6" Glimmer Paper Assortment Pack and the Gold Tin have already sold out.
 
Craft with Beth: 2017 Sale-A-Bration Sold Out Products Graphic Glimmer Paper Gold Tin

 There are still many Sale-A-Bration Items to earn!
 
Craft with Beth: 2017 Sale-A-Bration Products Still Available Graphic

 Don't miss your FREE products! Please contact me today to place your order.

Thanks for stopping by!
Beth

Monday, March 20, 2017

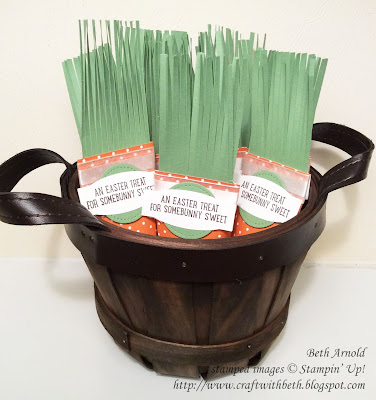
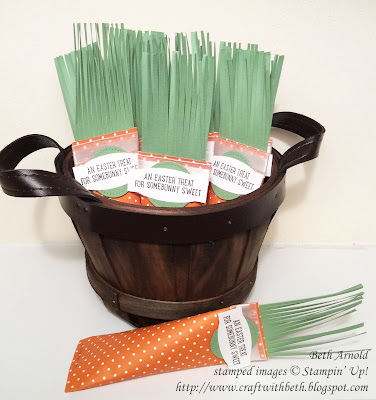
A Bushel of Easter Treats

This sour cream style carrot treat holder is the perfect addition to your little bunny's Easter basket. It's super cute and can be made in very little time. Let's make one together.

Craft with Beth: Carrot Sour Cream Container Easter Treat Holder Fringe Scissors Basket Bunch Layering Circle Framelits Stampin' Up

First, cut a 3-1/2" by 1-3/4" piece of Garden Green cardstock and score at 1/2" along the 1-3/4" side.

 Craft with Beth: Carrot Sour Cream Container Easter Treat Holder Fringe Scissors Basket Bunch Layering Circle Framelits Stampin' Up

Use the fringe scissors to create the carrot top stopping at the score line. Stopping at the score line will keep your carrot top together and be a consistent length.

Craft with Beth: Carrot Sour Cream Container Easter Treat Holder Fringe Scissors Basket Bunch Layering Circle Framelits Stampin' Up

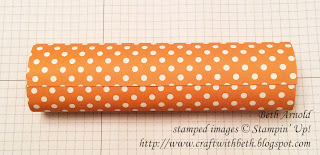
Next cut a 4-1/4" by 5-1/2" piece of Designer Series Paper (DSP). Using a thinner, less heavy sheet of paper like DSP makes it easier to roll and to keep your ends secure.

Add Tear & Tape to one long side and both short sides.

Craft with Beth: Carrot Sour Cream Container Easter Treat Holder Fringe Scissors Basket Bunch Layering Circle Framelits Stampin' Up

Remove the Tear & Tape backing from the long side and one short side. Roll the long sides of your paper together like a paper towel tube. Press along the Tear & Tape to secure. Insert your bone folder into the tube to press the Tear & Tape, if needed, to help form the tube.

Craft with Beth: Carrot Sour Cream Container Easter Treat Holder Fringe Scissors Basket Bunch Layering Circle Framelits Stampin' Up

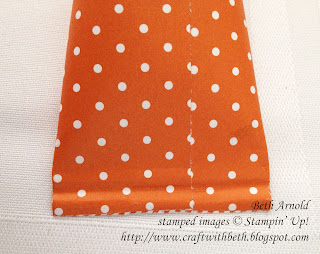
Then press down the short side to secure. Insert the bottom end into the paper crimper and turn it twice. A paper crimper will give added security to your adhesive as well as a decorative edge. The idea here is to create more surface area for the glue to attach to, to form a tighter seal, and to add strength to the paper by corrugating it. If you don't have a paper crimper, a low temperature glue may work for the bottom.

Craft with Beth: Carrot Sour Cream Container Easter Treat Holder Fringe Scissors Basket Bunch Layering Circle Framelits Stampin' Up

Then fill your carrot with treats. I added five mini chocolate foil wrapped eggs. Don't over stuff.

Turn your carrot so that the bottom edge is perpendicular to you.

Next, remove the Tear & Tape on the second short side. Shimmy the carrot top inside the carrot, stopping when the score line is flush with the opening of the carrot. Press the carrot sides together to close.

Craft with Beth: Carrot Sour Cream Container Easter Treat Holder Fringe Scissors Basket Bunch Layering Circle Framelits Stampin' Up

Wrap the organza ribbon around the top of the carrot, securing in place with glue dots.

Stamp your sentiment onto Whisper White cardstock using Chorolate Chip ink and cut out using the label framelit from Project Life Cards & Labels Framelits. Cut out the smallest stitched circle from Wild Wasabi cardtock. Adhere your sentiment to the center of the smallest stitched circle. Add your sentiment tag to the top, and your carrot is ready for the Easter basket!

Craft with Beth: Carrot Sour Cream Container Easter Treat Holder Fringe Scissors Basket Bunch Layering Circle Framelits Stampin' Up

I hope you give this sweet treat holder a try.

Thanks for stopping by!
Beth


Bushel of Easter Treats Project Supply List
Stamps
#144731 Basket Bunch Bundle
Paper
#100730 Whisper White
#108641 Wild Wasabi
#138434 Brights Designer Series Paper Stack
Ink
#126979 Chocolate Chip
Embellishments
#114319 Whisper White 5/8” Organza Ribbon
Tools
#143263 Big Shot
#145372 Stitched Shapes Framelits
#133325 Fringe Scissors
#138995 Tear & Tape
#135707 Project Life Cards & Labels Framelits
Paper Crimper

Friday, March 17, 2017

A Trio of Sticky Note Holders

Three-dimensional projects are one of my favorite paper crafts to create. Today I made a trio of sticky note holders using three stamp sets from the 2017 Occasions Catalog. These would make fantastic teacher's, hostess, and Mother's Day gifts!

Craft with Beth: Sticky Note Holders Oh, So Succulent Lift Me Up Dragonfly Dreams 3D

The first sticky note holder uses the Oh, So Succulent Bundle. It's a gorgeous stamp and thinlit set that creates 2D and 3D succulents. I used Old Olive cardstock for the succulent layers and for the sponging. The sentiment is from a retired hostess stamp set called Summer Afternoon. This was my first hostess set. My mom and I both love this quote so much I couldn't part with it, but any sentiment will be fantastic here too.

The base is Tip Top Taupe. The first mat is Succulent Garden Designer Series Paper. The second mat is Soft Sky.

Craft with Beth: Sticky Note Holders Oh, So Succulent Lift Me Up Dragonfly Dreams 3D

The second holder features the Dragonfly Dreams Thinlits and the Stitched Shapes Framelits. I love the delicate look of the dragonfly's wings paired with the Falling in Love Designer Series Paper.

The base is Blushing Bride. The first mat is the bokeh effect paper from the Falling in Love Designer Series Paper stack. The second mat and the stitched circle are Very Vanilla.

Craft with Beth: Sticky Note Holders Oh, So Succulent Lift Me Up Dragonfly Dreams 3D

The third in the trio uses the Lift Me Up Bundle and the Carried Away Designer Series Paper. The base is Soft Sky. The first mat is Whisper White and embossed with Softly Falling Embossing Folder. The second mat is the hot air balloon paper from the Sale-A-Bration Carried Away Designer Series Paper.

Craft with Beth: Sticky Note Holders Oh, So Succulent Lift Me Up Dragonfly Dreams 3D

I even stamped the back with the cloud images!

These sticky note holders come together in no time. Here's how I did it. First, cut your cardstock. You will need cardstock for the holder base, the first mat, and the second mat.

Sticky Note Holder Measurements

Dimensions
Holder Base
3-1/4” x 7””; scored at 3-1/4” & 3-3/4”
1st Mat
3” x 3”
2nd Mat
2-3/4” x 2-3/4”

This is simply how I chose to layout the cover of the sticky note holder. You can decorate the cover in the way it is most pleasing to you.

Craft with Beth: Sticky Note Holders Oh, So Succulent Lift Me Up Dragonfly Dreams 3D Sticky Note Holder Template

Then score and burnish your holder base.

Glue your sticky note pad to the inside bottom of the base. Make sure your sticky note pad is facing the direction you want.

Craft with Beth: Sticky Note Holders Oh, So Succulent Lift Me Up Dragonfly Dreams 3D

Create your holder front embellishment. Then attach it to the front of the holder.

Your sticky note holders are ready for gifting or for keeping!

How would you decorate your sticky note holder?  What stamp sets and embellishments would you use? I would love to see what you create!

Thanks for stopping by!
Beth


Lift Me Up Sticky Note Holder Project Supply List
Stamps
#144712 Lift Me Up Bundle (Clear-Mount)
#144711 Lift Me Up Bundle (Wood-Mount)
Paper
#100730 Whisper White
#131203 Soft Sky
#143608 Carried Away Designer Series Paper
Ink
#126970 Night of Navy
#138323 Watermelon Wonder
Embellishments
#119246 Rhinestones
#124262 Whisper White Baker’s Twine
Tools
#143263 Big Shot
#139672 Softly Falling Textured Impressions Embossing Folder
Sticky Note Pad


____________________________________________


Succulent Sticky Note Holder Project Supply List
Stamps
#145184 Oh, So Succulent Bundle
Paper
#100730 Whisper White
#131203 Soft Sky
#138336 Tip Top Taupe
#100702 Old Olive
#142778 Succulent Garden Designer Series Paper
Ink
#126953 Old Olive
#126979 Chocolate Chip
Embellishments
#119246 Rhinestones
Tools
#143263 Big Shot
#139684 Precision Base Plate
#126199 Stampin’ Pierce Mat
#141337 Sponges
Sticky Note Pad


____________________________________________


Dragonfly Sticky Note Holder Project Supply List
Stamps
#144728 Dragonfly Dreams Bundle
Paper
#101650 Very Vanilla
#131198 Blushing Bride
#131203 Soft Sky
#142788 Falling In Love Designer Series Paper
Ink

Embellishments
#119247 Pearl Basic Jewels
Tools
#143263 Big Shot
#139684 Precision Base Plate
#145372 Stitched Shapes Framelits
#126199 Stampin’ Pierce Mat

Sticky Note Pad