Thursday, January 25, 2018

For You Ghirardelli Square Treat Holder

January is one of my favorite times of the year for candy! My grocery cart is so full with bags of chocolate squares, foiled wrapped dark chocolate hearts, candy-coated chocolate pieces, and more that it would make my dentist cringe, for sure! However, it is not all for me or my husband. I make an incredible amount of treat holders for classes and to deliver to my customers, friends, team members, community members, and more.

Craft with Beth: Ghiradelli Chocolate Square Candy Treat Holder Scalloped Tag Topper Punch Stampin' Up Valentine St Saint Valentine's Day Birthday Blooms Wood Words Sweet and Sassy Framelits

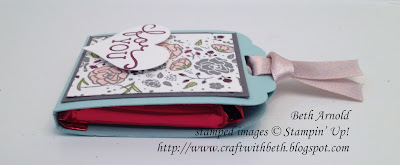
My ultimate favorite candy for this time of year is a strawberry-filled dark chocolate square! The combination of strawberries and dark chocolate is divine! I designed this chocolate square treat holder that is perfect to give to your loved ones.

Craft with Beth: Ghiradelli Chocolate Square Candy Treat Holder Scalloped Tag Topper Punch Stampin' Up Valentine St Saint Valentine's Day Birthday Blooms Wood Words Sweet and Sassy Framelits template

Start by cutting a 2" x 6" piece of Pool Party cardstock. With the 6" edge along the top of the Simply Scored Scoring Tool, score at 2-7/8" and at 3-1/8". Then punch each 2" end with the Scalloped Tag Topper Punch. Burnish the score lines. This will become the treat holder base.

Cut a 1-3/4" x 2-1/8" piece of Basic Gray cardstock. Adhere it to the front rectangle of the treat holder base.

Cut a 1-5/8" x 2" piece of Whisper White cardstock. Stamp the large floral image with Basic Gray Archival ink on top of the Whisper White cardstock rectangle, covering as much of the cardstock as possible. Allow to dry for a few moments. Then color in using Powder Pink, Fresh Fig, Berry Burst, and Lemon Lime Twist Stampin' Write Markers.

Then adhere it on top of the Basic Gray cardstock.

Stamp the "for you" greeting image from Bloom' Birthday on a 2" x 1-1/2" piece of Whisper White cardstock. Die cut with the small heart die (cut out will measure about 1-3/8" x 1-1/4") from the Sweet and Sassy Framelit collection.

Add a dimensional to the back of the heart die cut and adhere to the front lower left corner of the treat holder base.

Craft with Beth: Ghiradelli Chocolate Square Candy Treat Holder Scalloped Tag Topper Punch Stampin' Up Valentine St Saint Valentine's Day Birthday Blooms Wood Words Sweet and Sassy Framelits

Place a Ghirardelli or other chocolate square in the middle of the treat holder base. Adhere chocolate square with a glue dot.

With an 8" piece of Powder Pink 3/8" Shimmer Ribbon, tie a Lark's Head Knot through the top of the treat holder base. Start by folding the ribbon in half. With the treat holder base facing you, thread the fold of the ribbon through the hole. Pull the ribbon halfway through the hole . Then push the ribbon tails through the loop made by the folded ribbon and pull to tighten. Trim ribbon tails as desired.

Your treat holder is ready for giving! Who would you give this sweet strawberry treat to?

Thanks for stopping by!
Beth


For You Ghirardelli Chocolate Square Treat Holder Supply List
Stamps
#143925 Wood Words (Wood-Mount)
#143928 Wood Words (Clear-Mount)
#140655 Birthday Blooms (Wood-Mount)
#140658 Birthday Blooms (Clear-Mount)
Paper
#100730 Whisper White Cardstock
#121044 Basic Gray Cardstock
#122924 Pool Party Cardstock
Ink
#140932 Basic Gray Archival Ink Pad
#144082 Fresh Fig Ink Pad
#144033 2017-2019 In Color Stampin’ Write Markers
Embellishments
#104430 Stampin’ Dimensionals
#144151 Powder Pink 3/8" Shimmer Ribbon
Tools
#143263 Big Shot
#141707 Sweet and Sassy Framelits
#133324 Scalloped Tag Topper Punch
#122334 Simply Scored Scoring Tool

Wednesday, January 24, 2018

Party Panda Be Mine Treat Holder

I am so in love with the Party Panda stamp set! Party Panda is great for birthdays, hellos, Valentine's day, thinking of you, and so much more. What a sweet addition he makes to this box in a bag style treat holder!

Craft with Beth: Party Panda Valentine's Day Saint St Valentine Treat Holder Bag in a Box Layering Oval Framelits Stampin Up Bubble and Fizz Designer Series Paper 3D

Here's how I made it! First start with a 2-1/8" square piece of Thick Whisper White or Calypso Coral cardstock. Score at 3/8" on all four sides.
 
Craft with Beth: Party Panda Valentine's Day Saint St Valentine Treat Holder Bag in a Box Layering Oval Framelits Stampin Up Bubble and Fizz Designer Series Paper 3D

Burnish all of the score lines. Cut and notch the two corner tabs on the bottom and on the top. Cutting a little off of each corner tab will help make the box easier to fold and less bulky where the two sides meet.

Craft with Beth: Party Panda Valentine's Day Saint St Valentine Treat Holder Bag in a Box Layering Oval Framelits Stampin Up Bubble and Fizz Designer Series Paper 3D

Place Tear & Tape or other strong adhesive on each of the four corner tabs. Remove the tape backing and fold up the tabs one at a time.
 
Craft with Beth: Party Panda Valentine's Day Saint St Valentine Treat Holder Bag in a Box Layering Oval Framelits Stampin Up Bubble and Fizz Designer Series Paper 3D

Craft with Beth: Party Panda Valentine's Day Saint St Valentine Treat Holder Bag in a Box Layering Oval Framelits Stampin Up Bubble and Fizz Designer Series Paper 3D

Craft with Beth: Party Panda Valentine's Day Saint St Valentine Treat Holder Bag in a Box Layering Oval Framelits Stampin Up Bubble and Fizz Designer Series Paper 3D

Craft with Beth: Party Panda Valentine's Day Saint St Valentine Treat Holder Bag in a Box Layering Oval Framelits Stampin Up Bubble and Fizz Designer Series Paper 3D

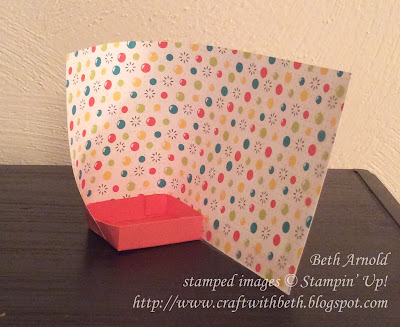
Now you have an open-topped box.

Craft with Beth: Party Panda Valentine's Day Saint St Valentine Treat Holder Bag in a Box Layering Oval Framelits Stampin Up Bubble and Fizz Designer Series Paper 3D

Next cut a 3" by 6" piece of Designer Series Paper and add Tear & Tape along the bottom edge and down one side of the Designer Series Paper. Remove the tape backing.

Craft with Beth: Party Panda Valentine's Day Saint St Valentine Treat Holder Bag in a Box Layering Oval Framelits Stampin Up Bubble and Fizz Designer Series Paper 3D

Carefully, line up the edge of the Designer Series Paper with the bottom of the box.

Craft with Beth: Party Panda Valentine's Day Saint St Valentine Treat Holder Bag in a Box Layering Oval Framelits Stampin Up Bubble and Fizz Designer Series Paper 3D
 
Wrap the Designer Series paper around the bottom of the box, pressing firmly along the way.

Craft with Beth: Party Panda Valentine's Day Saint St Valentine Treat Holder Bag in a Box Layering Oval Framelits Stampin Up Bubble and Fizz Designer Series Paper 3D

Once you reach the beginning of the Designer Series Paper, overlap the ends and press the papers together.


Punch a hole towards the top of the bag and through both layers of the Designer Series Paper with a 1/8" Hand-held Circle Punch. Cut an 8" piece of ribbon, fold it in half, and pass half of the folded ribbon through the punched hole. Push the ends of the ribbon through the ribbon loop on the other side and pull gently until the knot is snug, forming a Lark's Head Knot. Trim the ribbon ends, if desired.

Craft with Beth: Party Panda Valentine's Day Saint St Valentine Treat Holder Bag in a Box Layering Oval Framelits Stampin Up Bubble and Fizz Designer Series Paper 3D

Stamp the panda holding the envelope image onto Whisper White cardstock and fussy cut him out. Color in the heart on the envelope with a Melon Mambo marker. Then write Be Mine on the envelope with the Melon Mambo marker. Add dimensionals to the back of the panda.

Die cut the ovals and adhere the Whisper White oval to the Calypso Coral oval.

Adhere the panda to the Whisper White oval.

Add dimensionals to the back of the Calypso Coral scalloped oval and attach to the front of the treat holder.

This Party Panda treat holder will be fit about 6 chocolate kisses or similar sized treat. For a nonfood option, try fun-shaped erasers, paper clips, and stickers.

I hope you give this sweet treat holder a try. How would you decorate yours? I would love to see what you make!

Craft with Beth: Party Panda Valentine's Day Saint St Valentine Treat Holder Bag in a Box Layering Oval Framelits Stampin Up Bubble and Fizz Designer Series Paper 3D Craft with Beth: Party Panda Valentine's Day Saint St Valentine Treat Holder Bag in a Box Layering Oval Framelits Stampin Up Bubble and Fizz Designer Series Paper 3D

You can't purchase either the Party Panda stamp set or the Bubbles and Fizz Designer Series Paper are only available during Sale-A-Bration (January 3rd, 2018 - March 31st, 2018). You can earn them for FREE with a qualifying order. Don't miss out on these precious stamps and Designer Series Paper! Start shopping now or contact me for more information about Sale-A-Bration!

Thanks for stopping by!
Beth


Party Panda Valentine’s Day Treat Holder Supply List
Stamps
#147218 Party Panda (Wood-Mount)
#147221 Party Panda (Clear-Mount)
Paper
#100730 Whisper White Cardstock
#122925 Calypso Coral Cardstock
#147244 Bubbles and Fizz Designer Series Paper
Ink
#140931 Archival Basic Black
#131263 Subtles Collection Stampin’ Write Markers
Embellishments
#104430 Stampin’ Dimensionals
#145590 Whisper White 1/4" Organza Ribbon
#138995 Tear & Tape Adhesive
Tools
#143263 Big Shot
#141706 Layering Oval Framelits


Tuesday, January 23, 2018

Surrounded by Love Eclipse Card

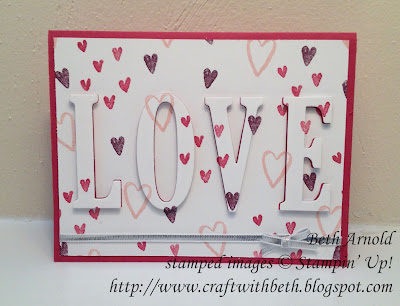
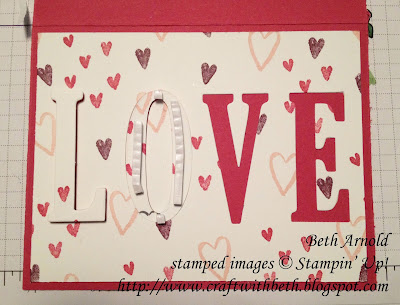
I created this eclipse Valentine's Day card for my Stamp of the Month class that I held last week. When I finished creating my cards for class back in the beginning of this year, I showed my husband the cards that I had made. He liked this card so much, I decided to share it here.

Craft with Beth: Eclipse card valentine valentine's day saint st stampin up technique designer series paper large letter framelits heart happiness stamp set

The background for the eclipse is not any Designer Series Paper listed in the catalog, but a collage of heart stamps from the Heart Happiness stamp set!

Today's card features a second way to DIY a Designer Series Paper background. After I chose my stamps, I started with the largest image to ensure that I have enough room to stamp all of the images.

I started with the largest image, the group of 6 hearts stamp, and stamped it randomly all over a 4" x 5-1/4" piece of Whisper White cardstock with Red Rose ink.

The next biggest image was the outline heart. I stamped the outline heart with Powder Pink ink to fill in some of the remaining space.

The smallest image was the smaller, single heart image. I stamped the smaller heart image with Fresh Fig ink to fill in the rest of the remaining space.

Then I positioned the L, O, V, and E framelits from the Large Letters Framelits in the center of the newly created Designer Series Paper and ran it through the Big Shot Machine. Save all of your letters and the center of the O.

Then I wrapped the silver ribbon around the front of the DYI Designer Series Paper and secured it on the back. Then I attached a silver ribbon bow to right side of the ribbon with a glue dot.

Next I adhered it to the front of the card base.

Craft with Beth: Eclipse card valentine valentine's day saint st stampin up technique designer series paper large letter framelits heart happiness stamp set

Attach Foam Adhesive Strips to the backs of each of the letters and press into their original place. It will look somewhat off center because the letters are raised. You can off set the raised letters from the Rose Red background even more by adhering each letter slightly below and to the left (or right) of their original place.

Craft with Beth: Eclipse card valentine valentine's day saint st stampin up technique designer series paper large letter framelits heart happiness stamp set

To place the center of the O in the center, first place the O in its original place WITHOUT adhering. Then put a small amount of liquid glue or tape adhesive on the back of the center of the O.

Craft with Beth: Eclipse card valentine valentine's day saint st stampin up technique designer series paper large letter framelits heart happiness stamp set
 
Carefully, lower the center of the O into the middle of the letter O and press down.

Craft with Beth: Eclipse card valentine valentine's day saint st stampin up technique designer series paper large letter framelits heart happiness stamp set

Remove the letter O and adhere to it original place. Tada! A perfectly centered center of the O!

Continue adhering the letters in their original places until all letters are adhered.

Craft with Beth: Eclipse card valentine valentine's day saint st stampin up technique designer series paper large letter framelits heart happiness stamp set

I wanted the recipient of this card to feel surrounded by loving thoughts, so I stamped two 6-heart images side by side with a "Love You" greeting on the inside of the card.

Craft with Beth: Eclipse card valentine valentine's day saint st stampin up technique designer series paper large letter framelits heart happiness stamp set

I hope you enjoyed this card as much as my husband and customers did! Have you tried the eclipse technique? What words and stamps did you use? I would love to see what you create!

Thanks for stopping by!
Beth


Monday, January 22, 2018

Create Your Own Floral Valentine Designer Series Paper with Heart Happiness

I really like the Heart Happiness stamp set in the 2018 Occasions catalog. Let's be honest, there haven't been many stamp sets lately devoted to the heart shape. So, I was overjoyed to see an entire stamp set filled with hearts in the 2018 Occasions catalog!

Craft with Beth: Heart Happiness Valentine's Day Card Teeny Tiny Wishes Stampin' Up Valentine Saint St

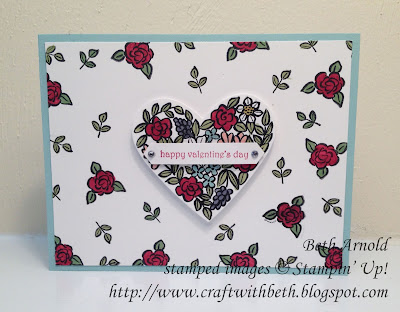
I love the different sizes of and the variety of pattern on the hearts. Hearts are fantastic for Valentine's Day, anniversaries, and weddings. The floral heart stamp featured in the center of this sweet is one of my favorite stamps in this set.

However, without greeting stamps, an all image set can seem tricky to use on its own at first. I recommend using stamps in the set that work well together, that have the same style, the same thickness of lines, or a similar shape. Then pair those stamps with other greeting stamps.

Check out how nicely the rose, small leaf, and the floral heart pair well with each other. All three of those stamps together would make a fabulous card!

For the front of the card, I randomly stamped the rose image and the small leaf image all a 4" x 5-1/4" piece of Whisper White cardstock with Basic Black Archival ink.

Next I used Stampin' Write Markers to color in the rose and the leaves. Voila! Your own Designer Series Paper!

Craft with Beth: Heart Happiness Valentine's Day Card Teeny Tiny Wishes Stampin' Up Valentine Saint St

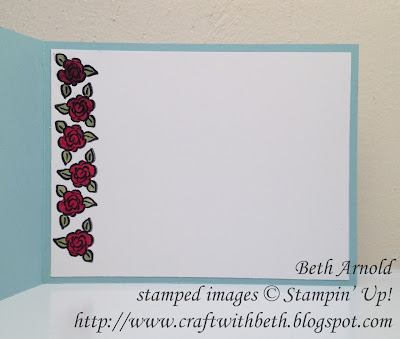
Heart Happiness also shines on the inside of this card with a row of roses climbing up the side of the card! All of the Heart Happiness stamps can be use to accent and decorate your card fronts, insides, and even envelopes.

I hope you give Heart Happiness a try!

Thanks for stopping by!
Beth