Showing posts with label St. Patrick's Day. Show all posts

Thursday, February 23, 2017

The End of the Rainbow

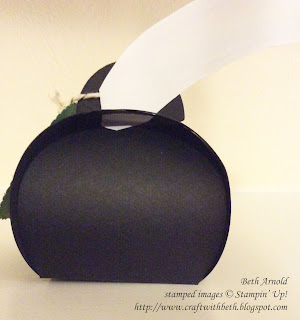
I love giving little gifts and treats to my family and friends during the holidays. The Curvy Keepsake Box Thinlits make fantastic treat holders! Here is what I came up with for St. Patrick's Day - a pot of gold at the end of the rainbow.

Craft with Beth: St. Patrick's Day Curvy Keepsake Treat Holder

The tag was made with the Layering Circles Framelit Collection. The greeting is from Teeny Tiny Wishes. The shamrock is from an older set called Itty Bitty Bolds. This was the first stamp set that my mother purchased from Stampin' Up! way back in the day. The new Every Occasion stamp set (item #141882) will work perfectly too.

The window was cut using the Layering Circle Framelit Collection. A piece of window sheet is attached inside the box to hold the caramel candy inside.

Craft with Beth: St. Patrick's Day Curvy Keepsake Treat Holder

I've had this project idea in my thoughts for quite some time, but couldn't figure out how to create the rainbow. There wasn't a die, punch, or stamp that seemed to capture the look I had in mind. Then it hit me! Why not use the large swoosh from the Work of Art stamp set and create stripes with markers instead of ink pads?!

Craft with Beth: St. Patrick's Day Curvy Keepsake Treat Holder
I drew stripes right on the swoosh stamp to create the rainbow. I used Real Red, Pumpkin Pie, Daffodil Delight, Old Olive, Pacific Point, and Rich Razzleberry markers from the Brights Marker Collection.

Craft with Beth: St. Patrick's Day Curvy Keepsake Treat Holder

I reapplied the markers each time I stamped and not always in the exact place. I noticed that the marker brush tips would pick up the neighboring color. Not to worry; simply, wipe your brush tip on a piece of scratch paper or grid paper to remove the extra ink.

Craft with Beth: St. Patrick's Day Curvy Keepsake Treat Holder

I attached the rainbow after assembling the box. I slid one end of the rainbow behind the handle and glued the tip to the top of the box. Voila! A cute pot of gold filled with caramel candy ready for giving!

I hope you give this adorable treat holder a try. I would love to see what you make!

Thanks for stopping by!
Beth

St. Patrick’s Day Curvy Keepsake Treat Box Project Supply List
Stamps
#127802 Teeny Tiny Wishes (Clear-Mount)
#128748 Teeny Tiny Wishes (Wood-Mount)
#141882 Every Occasion (Clear-Mount)
#141879 Every Occasion (Wood-Mount)
#134114 Work of Art (Clear-Mount)
#134111 Work of Art (Wood-Mount)
Paper
#100730 Whisper White
#121045 Basic Black
#102584 Garden Green
#142314 Window Sheets
Ink
#126973 Garden Green
#140931 Basic Archival Black
#131259 Brights Stampin’ Write Markers
#131262 Regals Stampin’ Write Markers (Garden Green)
Embellishments
#134586 Crushed Curry Baker’s Twine
Tools
#143263 Big Shot
#135853 Curvy Keepsake Thinlits
#141705 Layering Circles Framelits
#134363 1/16” Handheld Circle Punch

Friday, March 4, 2016

St. Patrick's Day Pin Card

+
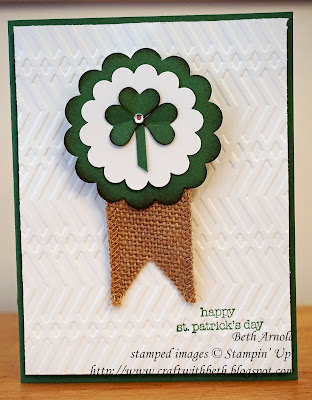
There is a custom of wearing something green on St. Patrick's Day to avoid getting pinched by the leprechauns and fairies. I created this card with a removable decorative pin to keep oneself pinch-free. Because my family is mostly Irish, I thought that they would get a kick out of this card and pin combo.

Craft with Beth: St. Patrick's Day Pin Card


This project uses many of the same stamps, colors, and materials as the burlap banner St. Patrick's Day card. The Zig Zag TIEF, to me, seems to have an interlocking design that reminds me of the way that Celtic Knots are also interlocking. The Garden Green is similar to a shamrock. The Whisper White reminds me of the Irish Filet crochet my aunt used to do.


After embossing the Whisper White cardstock, I punched two holes at the top with one of the Baker's Box handle dies to hold the pin in place. I didn't punch the Garden Green card base. I wanted to have some separation between the sharp pin point and the person opening the card just in case and because it looked tidier. If your pin back is longer or shorter, you can use a 1/4" handheld circle punch instead to get the proper spacing.


In addition, I raised the Whisper White cardstock with two dimensionals stacked on top of each other in all four corners and in the middle. This gave the pin enough height to lay flatter on top of the card.

On the inside the same Irish Blessing is printed - "May your troubles be less and your blessings be more and nothing but happiness come through your door."

The measurements for this card are:
Card Base: 5-1/2" x 8-1/2" in Garden Green (horizontal fold)
Outside Mat: 5-1/4" x 4" in Whisper White embossed with Zig Zag TIEF
Inside Mat: 5-1/4" x 4" in Whisper White
Burlap Ribbon: 2" x 1-1/4"
Shamrock Hearts: Scraps of Garden Green
Scalloped Circles: Scraps of Garden Green and Whisper White

Thanks for stopping by!
Beth

The products used in this post are:
Paper
·         Item #102584 Garden Green cardstock
·         Item #100730 Whisper White cardstock
Ink
·         Item #126973 Garden Green Ink Pad
·         Item #126978 Soft Suede Ink Pad
Stamps
·         Item #127802 Teeny Tiny Wishes Clear-Mount
·         Item #128748 Teeny Tiny Wishes Wood-Mount
Punches
·         Item #119854 1-3/4” Scalloped Circle Punch
·         Item #118874 2-3/8” Scalloped Circle Punch
·         Item #133787 Itty Bitty Accents Punch Pack
Embossing Folders/Dies
·         Item #133738 Zig Zag TIEF
·         Item #138279 Baker's Box Thinlit Dies

Embellishments
·         Item #119246 Rhinestone Basic Jewels
·         Item #132140 1-1/4” Burlap Ribbon
Adhesives
·         Item #104332 SNAIL Adhesive
·         Item #110755 Multipurpose Liquid Glue
·       Item #104430 Stampin' Dimensionals 

Tools
·         Item #126889 Trimmer
·         Item #126200 Stampin’ Scrub
·         Item #102394 Stampin’ Mist
·         Item #103579 Paper Snips
·         Item #141337 Sponges
Other
·         ·         Item #118489 Clear Block G
 ·      ·         Pin Back Finding

Monday, February 29, 2016

St. Patrick's Day Treat Bag


Here is a simple and adorable St. Patrick's Day Treat Bag to make and share! I made a bunch in no time! I started by filling a 4" x 6" Cellophane Bag with gold foil wrapped caramel candy, rainbow candy, and mini marshmallows. The caramel candy represents the pot of gold. The rainbow candy stands for the rainbow pointing to the point of the gold. Lastly, the mini marshmallows are the clouds that the rainbows come from.

I folded over the top of the bag and stapled it closed. The handheld stapler made this so much easier than a regular stapler! I didn't worry about spilling the contents or having a long enough stapler arm to fit.

I used a word processing program to make the treat topper tag. Creating the tag was really quick and is not as difficult as it sounds. I think choosing the font took the longest!
  1. Start with a new document. Insert a text box that is 4" high and 5" inches wide. Keep the single line border around the text box, so it will be easier to trim to size later.
  2. Create a second text box that is 2" high and 5" wide. Inside this text box type your phrase. I typed "You are the pot of gold at the end of the rainbow!" Remove the single line border around the smaller text box.
  3. This step is optional. Highlight one letter at a time in word rainbow and change it to rainbow colors. In the word processing program I used, I highlighted each letter and inserted the RGB color code for Real Red, Daffodil Delight, Pumpkin Pie, Old Olive, Tempting Turquoise, Pacific Point, and Rich Razzleberry, respectively, in the font menu color selector. 


  4. Color
    R
    G
    B
    Real Red
    198
    44
    58
    Pumpkin Pie
    255
    130
    1
    Daffodil Delight
    255
    211
    92
    Old Olive
    138
    151
    71
    Tempting Turquoise
    75
    196
    213
    Pacific Point
    1
    128
    181
    Rich Razzleberry
    149
    69
    103

  5. Move the smaller text box to the bottom half of the larger text box, so that the two text boxes overlap. I made two text boxes because I didn't want the words to be upside when I folded the tag in half.
  6. Then I printed the treat topper tag on Whisper White cardstock, trimmed the excess, folded it in half, and stapled it onto the top of the cellophane bag.
  7. Finally, I punched the extra gold sticker paper from February 2016's Paper Pumpkin kit with the 1/4" and 1/2" circle punches. I adhered them to the tag to look like gold coins.
I hope your family and friends like these treat bags as much as mine!

Thanks for stopping by!
Beth


The products used in this post are:
Paper
·         Item #100730 Whisper White cardstock
Ink
Stamps

Punches
·         Item #134364 ¼” Circle Punch
·         Item #119869 ½” Circle Punch
Embossing Folders/Dies

Embellishments

Adhesives

Tools
·         Item #126889 Trimmer
·         Item #139083 Handheld Stapler
Other
·         Item #102757 4” x 6” Cellophane Bag
·         Paper Pumpkin February 2016 Kit
·         Word Processing Program
·         RGB Codes for Real Red, Pumpkin Pie, Daffodil Delight, Old Olive, Pacific Point, Tempting Turquoise, and Rich Razzleberry