Showing posts with label Stylish Shapes Dies. Show all posts

Wednesday, November 30, 2022

Just a Little Reminder that You are Loved

I was looking at the peppermint snowman treat holder I made on Monday. Since the peppermint snowman chocolate candy is only available during the winter months of the year, I thought what other treats would fit in this treat holder size. A 2" Ghirardelli chocolate square fits perfectly in this treat holder size too!

This treat holder is a terrific way to add a little sweetness to a loved one's day and to show them that you are thinking of and love them!

Ghirardelli chocolate square treat holder wrapper made with the Designer Tags. The greeting says just a little reminder that you are loved. treat holder, 3D, gift packaging, Stylish Shapes Dies, Framed Florets Dies, Designer Tags Dies, flowers, floral, friendship, thinking of you


I layered the small and large flowers from the Fitting Florets stamp set with the leaf dies from the Framed Florets Dies to create a little embellishment behind the greeting banner.

Ghirardelli chocolate square treat holder wrapper made with the Designer Tags. how to add the flowers underneath of the greeting banner. treat holder, 3D, gift packaging, Stylish Shapes Dies, Framed Florets Dies, Designer Tags Dies, flowers, floral, friendship, thinking of you

To make the greeting banner, first stamp and die cut the banner from a piece of Basic White cardstock and the stitched banner die. Then adhere the banner die cut to a scrap of Daffodil Delight that is a little larger than the banner. Use paper snips to cut a banner shape from the Daffodil Delight cardstock slightly bigger than the Basic White banner die cut. You now have a Basic White cardstock banner outlined in Daffodil Delight cardstock.

Below are the measurements and the supply list for my Fitting Florets chocolate square treat holder. If you need supplies to recreate this treat holder, please, shop my online store HERE.


Measurements

  • Treat Holder Base: 1-3/4" x 6"; scored at 3" (Fitting Florets Designer Series Paper (DSP))
  • Greeting: 3-1/2" x 1" (Basic White Cardstock)
  • Greeting Mat 4" x 1-1/2" (Daffodil Delight Cardstock)
  • Ribbon: 10" long (Evening Evergreen 3/8" Open Weave Ribbon)


Supplies

Stamps
#161815 Fitting Florets Stamp Set
#162407 Fitting Florets Bundle (includes #161815 Fitting Florets Stamp Set & #160623 Framed Florets Dies at a 10% savings)

Paper
#119683 Daffodil Delight Cardstock
#155574 Evening Evergreen Cardstock
#159276 Basic White Cardstock
#161814 Fitting Florets Designer Series Paper (DSP)

Ink
#155576 Evening Evergreen Ink Pad
#132708 Memento Tuxedo Black Ink Pad
#155520 Polished Pink Stampin' Blends Combo Pack (both)
#155517 Evening Evergreen Stampin' Blends Combo Pack (dark)

Embellishments
#155573 Evening Evergreen 3/8" Open Weave Ribbon
#104430 Dimensionals

Tools
#160623 Framed Florets Dies
#159165 Designer Tags Dies
#159183 Stylish Shapes Dies
#110755 Multipurpose Liquid Glue
#102300 Bone Folder
#103579 Paper Snips
#130148 Grid Paper
#152392 Paper Trimmer
#149653 Stampin' Cut & Emboss Machine
#126200 Stampin' Scrub
#153648 Stampin' Mist Cleaner
#118490 Clear Block H

I hope you enjoyed today's Designer Tags Dies treat holder and give it a try. Post your treat holder project photo on social media and be sure to tag me with #craftwithbeth. I can't wait to see what you create!

If you need supplies to make this project, please, shop my online store HERE.

If you have any questions about today's project, please, don't hesitate to ask me.

Thanks for stopping by!
Beth

Monday, November 28, 2022

Turn a Tag into a Treat Holder with Partial Die Cutting

Today's Ghirardelli peppermint snowman treat holder was an experiment. Could I use something from the 2022-2023 Annual Catalog to replicate one of my favorite quick and easy treat holders?

peppermint snowman chocolate candy Ghirardelli wrapped in a sleeve of red and white striped patterned paper. the greeting on the front says noel and is in the shape of a light blue circle with stitching around the inside circumference of the circle. Framed and Festive, treat holder, 3D, Christmas, snowman, winter, gift packaging

I was sad to see the Scalloped Tag Topper Punch retired. I have made countless different treat holders and boxes with the decorative punch over the years.

The Scalloped Tag Topper Punch was one of my go to stamping tools! When the 2022-2023 Annual Catalog debuted, I noticed a possible replacement - #159165 Designer Tags Dies on page 170.

#159165 Designer Tags Dies graphic

This die set comes with 4 different tag dies, 1 decorative tag background die, 3 dies to cut shapes - a rose, a butterfly, and a floral sprig - and a tiny circle die.

I am excited about all of the tag shapes and decorative additions. However, the tiny circle die is what really surprised me. I thought, you know, it looks like a circle hole punch shape. That's helpful, I guess. I could just use a handheld circle punch though. 


#159165 Designer Tags Dies graphic metal dies

What's the big deal? The tiny little dot in the above graphics is not just a tiny circle die. It is a circle die that cuts the hole at the top of the tag, yes, but the actual die is in the shape of the top of the tag with the circle in the middle! Great, right!? The die's shape can be butted up to the top of the tag die for precise alignment!

No more guessing where the center of the tag is. The die lines up for you. That is why that tiny little circle in the above graphic is so great. So clever! Spread the word!

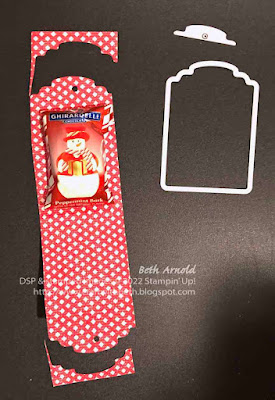
Ok. So, how did I turn a tag into a treat holder? The secret is to partially die cut only the ends of the designer series paper and not the bottom. To do this, cut the designer series paper slightly narrower than the width of the die. Fold the designer series paper in half.

Framed and Festive, treat holder, 3D, Christmas, snowman, winter, gift packaging


Slide the open end of the designer series paper from the back of the die to the front. Keep the folded end on top of the die, so the fold won't get cut. If the side view of the treat holder, I didn't crease the fold line, so you could see where the fold area goes more easily.

Line up the open end of the designer series paper with the top of the tag die. Place the circle die on top of the designer series paper at the top of the tag. Place a piece of low tact tape on the dies and run it through the Stampin' Cut and Emboss Machine.

Framed and Festive, treat holder, 3D, Christmas, snowman, winter, gift packaging


Tada! Your "tag" is now twice as long as the die and ready to add your treats to.

Framed and Festive, treat holder, 3D, Christmas, snowman, winter, gift packaging


Add the chocolate snowman with a bit of Stampin' Seal or a glue dot to the inside of the treat holder. Add the stamped and die cut stitched circle on dimensionals with some pearl basic jewels. Close up the treat holder and thread the ribbon half way through the top holes. Then tie the ribbon into a bow.

Once you make one treat holder. You will be making multiples in minutes!

Framed and Festive, treat holder, 3D, Christmas, snowman, winter, gift packaging

Below are the measurements and the supply list for my Ghirardelli peppermint snowman treat holder. If you need supplies to recreate this treat holder, please, shop my online store HERE.

Measurements

  • Treat Holder Base: 1-3/4" x 6"; scored at 3" (Sweetest Christmas Designer Series Paper (DSP))
  • Greeting: 2" x 2" (Pool Party Cardstock) - use the 3rd smallest stitched circle die
  • Ribbon: 8" long (Real Red and Garden Green 3/8" Ribbon Combo Pack)


Supplies

Stamps
#160888 Framed and Festive Stamp Set

Paper
#122924 Pool Party Cardstock
#159559 Sweetest Christmas Designer Series Paper (DSP)

Ink
#147114 Early Espresso Ink Pad

Embellishments
#159577 Real Red and Garden Green 3/8" Ribbon Combo Pack
#144219 Pearl Basic Jewels
#104430 Dimensionals

Tools
#159165 Designer Tags Dies
#159183 Stylish Shapes Dies
#110755 Multipurpose Liquid Glue
#102300 Bone Folder
#103579 Paper Snips
#130148 Grid Paper
#152392 Paper Trimmer
#149653 Stampin' Cut & Emboss Machine
#126200 Stampin' Scrub
#153648 Stampin' Mist Cleaner
#118486 Clear Block C


I made 12 treat holders with 1 sheet of 12" x 12" designer series paper and 1 piece of 8-1/2" x 11" cardstock. If you cut your 8-1/2" x 11" piece of cardstock into 2" x 11" strips, you can die cut 20 circles from one sheet of 8-1/2" x 11" cardstock, making this treat holder design very economical and a great way to use up designer series paper.

peppermint snowman chocolate candy Ghirardelli wrapped in a sleeve of red and white striped patterned paper. the greeting on the front says noel and is in the shape of a light blue circle with stitching around the inside circumference of the circle. Framed and Festive, treat holder, 3D, Christmas, snowman, winter, gift packaging

I hope you enjoyed today's snowman treat holder featuring the Designer Tags Dies and give it a try. How will you decorate your Designer Tags treat holder? Post your treat holder project photo and be sure to tag me with #craftwithbeth. I can't wait to see what treat holders you create using the Designer Tags Dies!

If you need supplies to make this project, please, shop my online store HERE.

If you have any questions about today's project, please, don't hesitate to ask me. I am happy to help you with you stamping questions!

Thanks for stopping by!
Beth

Monday, November 21, 2022

Deck the Halls this Christmas Season with the Framed and Festive Stamp Set

I love how some of the stamps in Framed and Festive stamp set are from Christmas carols! Today's Christmas card project uses the 'tis the season to be jolly and falala, which are both part of Deck the Halls.

Framed and Festive stamp set Christmas card with falala stamped in the background. The greeting on the circle die cut says 'tis the season to be jolly. behind the circle are sprigs of holly, leaves, and berries. There is a horizontal rectangle of birch tree patterned paper with a border of brown cardstock. Framed and Festive, Christmas, card, Boughs of Holly Designer Series Paper, Stylish Shapes Dies

I used 'tis the season to be jolly as my main focal greeting and stamped it on a stitched circle from the Stylish Shapes Dies with Cherry Cobbler ink. I then fussy cut holly leaves, berry sprigs, and leaves from the Boughs of Holly Designer Series Paper to highlight the greeting further.
 
I stamped falala with Versamark clear watermark ink to create a subtle background pattern across the card front. I didn't want the connection between the two greetings to be so obvious that it was too busy looking.

close up of the ribbon embellishment. Framed and Festive, Christmas, card, Boughs of Holly Designer Series Paper, Stylish Shapes Dies


The White 3/8" Glittered Organdy Ribbon embellishment was created by folding the ribbon into an S-shape on the back of the circle die cut. I chose the white organdy ribbon because it is sheer and does not detract from the fussy cut leaves and berries. The ribbon also adds an extra bit of sparkle almost reminiscent of snowflakes, enhancing the wintry feel of this card.

Inside of the card I stamped Merry Christmas with Cherry Cobbler ink and added a narrow strip of the birch patterned paper horizontally along the bottom of the Inside Mat, leaving plenty of room to write a special message to your loved ones!

inside of the card says Merry Christmas. there is a horizontal, narrow piece of the birch patterned paper across the bottom of the inside of the card. Framed and Festive, Christmas, card, Boughs of Holly Designer Series Paper, Stylish Shapes Dies

Below are the measurements and the supply list for my Framed and Festive Christmas card. If you need supplies to recreate this card, please, shop my online store HERE.

Measurements

  • Card Base: 8-1/2" x 5-1/2"; scored at 4-1/4" x 11" (Crumb Cake Cardstock)
  • 1st Mat: 2-1/4" x 5-1/2" (Early Espresso Cardstock)
  • 2nd Mat: 2" x 5-1/2" (Boughs of Holly Designer Series Paper (DSP))
  • Circle: 3" x 3" (Basic White Cardstock)
  • Leaves & Berry Sprigs: Fussy cut from the Boughs of Holly Designer Series Paper (Boughs of Holly Designer Series Paper)
  • Inside Mat: 4" x 5-1/4" (Basic White Cardstock)
  • Inside DSP Strip: 1/2" x 5-1/4" (Boughs of Holly Designer Series Paper)


Supplies

Stamps
#160888 Framed and Festive Stamp Set

Ink
#102283 Versamark Clear Watermark Ink Pad
#147083 Cherry Cobbler Ink Pad

Paper
#120953 Crumb Cake Cardstock
#119686 Early Espresso Cardstock
#159276 Basic White Cardstock
#159600 Boughs of Holly Designer Series Paper (DSP)

Embellishments
#159963 Festive Pearls
#156408 White 3/8" Glittered Organdy Ribbon
#104430 Dimensionals

Tools
#159183 Stylish Shapes Dies
#118486 Clear Block C
#118485 Clear Block D
#118489 Clear Block G
#110755 Multipurpose Liquid Glue
#102300 Bone Folder
#103579 Paper Snips
#130148 Grid Paper
#152392 Paper Trimmer
#149653 Stampin' Cut & Emboss Machine
#126200 Stampin' Scrub
#153648 Stampin' Mist Cleaner

I hope you enjoyed today's jolly Christmas card! The Framed and Festive stamp set comes with 8 total Christmas greeting stamps. We used 2 of the greeting stamps in today's Christmas card. You can also switch today's greeting with your favorite. Which greetings are your favorite from Framed and Festive?

Please, keep in mind that the Framed and Festive stamp set is a limited time only part of the Fitted Florets Early Release promotion. The Framed and Festive stamp set is only available during the Early Release sales period November 1st, 2022 - January 4th, 2023 or while supplies last, whichever comes first.

Please, place your order for the Framed and Festive stamp set timely to avoid missing out on this truly festive stamp set!

If you need supplies to make this project, please, shop my online store HERE.

If you have any questions about today's project, please, don't hesitate to ask me.

Thanks for stopping by!
Beth