Monday, February 15, 2016

In the Meadow Gate Fold Card

Building on yesterday's theme, here is another gate fold card. The stamp set is called In the Meadow from the 2016 Occasions catalog. This is a great stamp set for anniversaries, Valentine's Day, or birthdays. In the Meadow could be fantastic for masculine cards too.


Instead of the glimmer star, the card is kept closed with two antique brads.


You can make a gate fold card with an 8 1/2" x 11" or a 12 x 12" piece of cardstock. To recreate the card above, use an 8 1/2" x 11" piece of cardstock. Using your Paper Trimmer, cut it in half vertically. This yields 2 pieces that are 4 1/4" x 11" each. Rotate 1 piece sideways, so that the 11" edge is at the top and the 4 1/4" edge is on the side. With the scoring blade, score at 3" and at 8 1/2". This is the base of your card.

Cut four 2 1/2" x 4" pieces to make the Hello Honey DSP mats. Attach to the outside left and right panels and to the inside left and right panels on the card base.

Cut a 4" x 5 1/4" piece of Whisper White cardstock for the inside center. Stamp the sentiment "day after day, year after year" in the center. Attach to the center panel inside the card base.

Cut a 3 1/2" x 2 1/2" piece of watercolor paper to stamp and watercolor the deer on. Stamp the deer, grass, tree, and butterflies. Using the aquapainters, color in the deer, grass, tree, and butterflies. Allow to dry.

Cut a 3 3/4" x 2 3/4" piece of Cajun Craze cardstock for the mat around the watercolor. Once the watercolored, stamped image is thoroughly dry, attach it to the Cajun Craze mat.

Cut a 1 3/4" x 1/4" piece of Whisper White cardstock for the sentiment on the outside. Stamp the sentiment "To someone who is great to be around..." in the center.

Cut a 2" x 1/2" piece of Cajun Craze cardstock for the mat around the sentiment. Attach the sentiment to the Cajun Craze mat.

Position your watercolored, stamped image and sentiment in the center of the closed card base (as photographed above). Once you are satisfied with the placement of each, apply SNAIL Adhesive or Liquid Glue to ONE side of the stamped image and to ONE side of the sentiment. Attach both the image and the sentiment to the card base.

Thanks for stopping by!
Beth

The products used in this post are:
Built for Free Using: My Stampin Blog

Sunday, February 14, 2016

Happy Valentine's Day!

It will probably be no surprise that my favorite stamp set from the 2016 Occasions catalog is Going Global. So, when I saw this card from Cindy Hall I CASED it! Cindy created an amazing layout that is too sweet to miss! This card is for my husband on Valentine's Day. I changed the base color because my husband loves Lost Lagoon! I will be so sad when this color retires! Good thing I stocked up!


I added some silver glimmer stars inside but other left the rest blank to write my own message.


Hope you all have a Happy Valentine's Day!

Thanks for stopping by!
Beth

The products used in this post are:

Built for Free Using: My Stampin Blog

The Sky is the Limit

Time is running out for three amazing Sale-A-Bration products! These Sale-A-Bration products are only available until February 15th! Place your order before they're gone!
  • Item # 141349 Sky is the Limit (Clear Mount) Stamp Set & Item # 141282 Sky is the Limit (Wood Mount) Stamp Set
  • Item # 141021 Perfectly Artistic Designer Series Paper
  • Item # 141243 Hello (Clear Mount) Stamp Set & Item # 141240 Hello (Wood Mount) Stamp Set

Sky is the Limit is hands down my favorite 2016 Sale-A-Bration stamp set! I have used it for Valentine's Day, card swaps, and a demonstration. I have a list of ideas waiting to be made with just this stamp set. I think it could be for graduations, birthdays, anniversaries, Valentine's Day, words of encouragement or hope, Father's Day, etc.! You could even put a little banner trailing behind the airplane to spell a cute message!


Sky is the Limit pairs perfectly with the World Traveler Textured Impressions Embossing Folder (TIEF) and the Perfectly Artistic Designer Series Paper! World Traveler TIEF embosses a map of the world. Perfectly Artistic Designer Series Paper has tunning marbled swirls! The marbling adds just the right amount of texture and depth to your projects without overwhelming it. The variety of colors makes it perfect for a multitude of occasions.


What a darling airplane! It makes me want to get up and explore new places! This set reminds me of my traveling adventures with my friends. Last year we all went on a cruise to Scandinavia, Greenland, and Canada.

To me, Sky is the Limit is personal and versatile. This is one stamp set not to pass up!

Thanks for stopping by!
Beth

The products used in this post are:


Built for Free Using: My Stampin Blog

Thursday, February 11, 2016

Birthday Baker's Box

One of my goals this year is to become better at gift packaging. I can do it, but I am not consistent. Sometimes, I make a plain box and tie a plain ribbon around it. Sometimes, I go all out with bows, embossing, and stamps. Other times, there is no decoration at all, not even a ribbon. Yikes! This year I am determined to make a serious effort!

My sister-in-law's birthday is in February. What a great opportunity to work on my goal! I bought her a small heart shaped necklace. Shhh...Don't tell! The Baker's Box Thinlits are perfect for smaller presents!


I used Very Vanilla cardstock as a base. Instead of cutting the handle, I used a clothespin to keep the top closed. Then I layered stamps from the Butterfly Basics stamp set on all sides. For the flower image, I used Stampin' Write Markers in Melon Mambo and Old Olive instead of an ink pad to get a two color image. It is difficult to tell from the photo, but I also added some Clear Wink of Stella to the flower petals. The leaves on the sides are stamped with Pear Pizzazz and Old Olive.


 Finally, I attached a cute birthday sentiment tag and a bow. I stamped the sentiment in Soft Suede on Very Vanilla cardstock. Venetian Crochet Trim peaks out from underneath the sentiment. A Very Vintage Button echoes the style of the crochet trim and adds more dimension. A length of Burlap Ribbon with banner tails completes the tag.


The bow is made of Tip Top Taupe Dotted Lace Trim. I absolutely adore the 2015-2017 In Colors Dotted Lace Trim! It would also look fantastic as a border on card fronts.

I think this gift packaging is a success!

UPDATE: I added a few pearls and some antennae to the butterfly


Thanks for stopping by!
Beth

The products used in this post are:
Built for Free Using: My Stampin Blog

Tuesday, February 9, 2016

Weekly Deals: 2/9/16 - 2/15/16


Here are this week's deals! The deals run from Tuesday, 2/9/16 through Monday, 2/16/16 at 11:50pm. Five amazing products at 20% off!


Thanks for stopping by!
Beth

Monday, February 8, 2016

Ten Must Have Supplies for the Starting Stamper

10 Must Have Supplies for the Starting Stamper, Beginner, Beginning, ten

Besides ink, paper, and stamps, there are ten essential tools I recommend for every starting stamper.

1. Stampin' Trimmer - The Stampin' Trimmer is my best friend. You can cut and score with this baby! The Stampin' Trimmer is excellent because the blades slide on a track instead of a wire. Wires fray and bend, making curvy, ragged cuts instead of smooth, straight, and crisp cuts. Plus, there is a storage compartment on the back to store extra blades and tools. Love this!

2. Clear Blocks - These are vital for your clear-mounted stamps. There are 9 different sizes, ranging from 1-3/16" x 1-1/4" to 5-7/8" x 2-1/4". Each clear-mounted stamp set has the recommended clear block size listed on the package and in the catalog. It is important to use the appropriately-sized clear block to achieve a crisp, evenly stamped image. If the block is too big, it could rock and make a blurred image or ink could transfer to the clear block and mark your image with ink splotches. If the block is too small, the entire image may not be evenly inked.

3. Stampin' Scrub - This is a two-sided felt pad designed to clean (paired with Stampin' Mist Cleaner) and dry your stamps. Each felted pad is marked to show the wet side (rain drop) and the dry side (sun). Spritz Stampin' Mist Cleaner on the wet side, rub your stamp around the felt pad. Then wipe the stamp on the dry side. It's as easy and as quick as that! The Stampin' Scrub cuts down on the waste too because you don't need additional paper towels or baby wipes to clean your stamps.

4. Adhesives - There are a lot of adhesives to choose from! Each type of adhesive is tailored to specific needs from removable and low tack to permanent and stronger adhesion. They are also acid free.
  • Fast Fuse - This is a strong, instant bond tape-style adhesive. Fast Fuse is used to adhere card layers and 3D projects such as boxes and bags. Fast Fuse is stronger than SNAIL Adhesive, making it deal for dimensional paper projects. Fast Fuse is similar to Tear & Tape Adhesive in its strength. Fast Fuse is refillable.
  • SNAIL Adhesive - This is another instant bond, tape-style adhesive that is great for card layers and embellishments. SNAIL is refillable.
  • Mini Glue Dots - These are little circles of stickiness used to adhere smaller layers or embellishments.
  • Stampin' Dimensionals - These are foam hexagons with adhesive on the top and on the bottom. They adhere and raise embellishments, card stock, etc to give depth to your project.
  • Crystal Effects - Crystal Effects is a clear gel that can be used as both an adhesive and an embellishment. To use as an adhesive, use as you would the Multipurpose Liquid Glue or craft glue. You can also use Crystal Effects to adhere buttons, vellum, and window sheets. To use as embellishment, spread Crystal Effects over your project to create a lacquered look and allow to dry thoroughly.
  • Multipurpose Liquid Glue - This is a white, liquid glue that dries clear. It has a narrow tip on one end and a broad tip on the other. It has a strong bond and can be used to adhere card layers, embellishments, glitter, and 3D projects. Multipurpose Liquid Glue is quick to bond but has a few moments to shift or move around for precise placement.
  • Stampin' Glue Sticks - Stampin' Glue Sticks are diamond-shaped glue sticks. The are great for card layers and embellishments. They are fast drying with a little re-positioning time.
  • 2- Way Glue Pen - This is a blue glue pen that dries clear. You can use this pen 2 ways. The first way is as a removable, low tack adhesive. Put the adhesive on and allow it to dry completely. The second way is as a permanent adhesive. Put the adhesive on and immediately stick to the other surface. This is great for embellishments, glitter, thinner strips of paper, and card layers.
  • Tear & Tape Adhesive - This is similar to Fast Fuse. This is a strong, instant bond tape-style adhesive. This is great for 3D projects, thicker pieces of cardstock or embellisments.
  • Fine-Tipped Glue Pen - The Fine-Tipped Glue Pen is a clear gel glue with a narrow metal tip. This is ideal for smaller embellishments and thin strips of paper or delicate die cuts, such as the Butterfly Framelits and Hello You Thinlits.
5. Adhesive Remover - A cute, eraser-type square of rubber grabs onto bits of stray adhesive. This is a life saver when I put on too much glue!

6. Bone Folder - A bone folder is the sidekick to the Stampin' Trimmer. It can crease and curl. The bone folder is more precise and effective than finger creasing alone. This is a staple in my classes and day to day paper crafting.

7. Big Shot - If the Stampin' Trimmer is my best friend, the Big Shot is my second best friend! I love the Big Shot. It makes my life so much easier and quicker! The Big Shot can emboss and cut like no one else! It embosses textured impressions embossing folders (TIEFs) and cuts thinlit dies, framelit dies, Bigz dies, and Bigz XL dies like butter!

8. Grid Paper - Grid Paper is an 11" x 17" sheet of ruled paper. Use it to catch ink, write notes on, and measure and line up projects. It also has a handy wish list and note area to keep track of your favorite products, ideas, and questions.

9. Paper Snips - These are some seriously sharp scissors! Snips have shorter, sharp blades for precision cutting with professional-looking results. Snips are also part of my must have for classes and for my day to day paper crafting.

10. Simply Scored - This is an entire board of scoring grooves. Pair it with the diagonal scoring plate and score to your hearts content. I purchased Simply Scored in one of my first orders with Stampin' Up! It can score paper to make boxes, bags, rosettes, envelopes, fold card bases, textured backgrounds, etc. The possibilities are endless!

Thanks for stopping by!
Beth

The products used in this post are:
Built for Free Using: My Stampin Blog

Saturday, February 6, 2016

Grateful Bunch Thank You

With yesterday's card bases, let's create a springtime thank you card. This project features a cheerful stamp set from the Occasions 2016 catalog called Grateful Bunch. This is a fantastic stamp set for springtime and summertime projects.

This one layer card uses a simple masking technique with sticky notes to make the stamped rectangular band. A greeting is added to the bottom and to the inside of the card.


Choose one of your card bases. It can be either the horizontally folded base or the vertically folded base. Both will work. Place a piece of grid paper on your work surface. Grid paper will help to line up your card base to ensure that the masked area is straight and help to measure the space between the masks.

Masking covers the area you don't want to be stamped. Masking can be used to make a shape and to stamp only a portion of an image. Choose materials that are easy to remove and that will not damage the finished project. For this card, I used a roll of sticky notes. You can use square or rectangular sticky notes as well. Make sure what you use is long enough to cover the width of the card base plus some extra on either side to keep the card base straight and in one place.

Place a length of sticky notes 1" from the bottom of the card base. Place a second length of sticky notes 1.5" from the top of the first mask (or 2.5" from the bottom of the card base). Press along the sticky note to firmly adhere it to the card base. You will stamp between the two masks to make the rectangular band.


Take another length of sticky note and stamp the trio of daisies (in any color of ink).


Cut out each daisy, leaving a bit of space around each petal.


These daisies will also act as a mask. All three daisies are on one stamp, but I only want to stamp one daisy at a time. I don't want the other two daisies to show. Whatever I don't want to stamp, I want to block with these daisy masks.

Stamp the leaves first. Press the section of leaves you want to stamp directly into the ink pad and stamp on your card base. Then starting placing the daisies.


In the photo above, I wanted to stamp the little daisy but not the other two. Because these stamps are photopolymer, I can see right through them to line up the mask perfectly. I hover over where I want the little daisy to go, slide the two larger daisy masks underneath, and press down. Lift up and remove the daisy masks. Only the little daisy is stamped.


Keeping stamping and masking until you have filled the rectangular band to your liking.


Once you are finished, remove all of the masks. Stamp your greeting (you are totally awesome) underneath the side right of your rectangular band. Stamp your second greeting (and I am totally grateful) on the inside of the card. Well done!


Thanks for stopping by!
Beth

The products used in this post are:

Built for Free Using: My Stampin Blog

Friday, February 5, 2016

Cardstock Basics

Cardstock comes in three sizes: 8 1/2" x 12", 12" x 12", and 6" x 6".
  • 8 1/2" x 11" - This is the standard paper size in the U.S. All of the colors are available in this size. This is usually the size that I cut my card bases from. The standard size greeting card in the U.S. is 4 1/4" x 5 1/2" (folded), which is half of an 8 1/2" x 11" sheet of paper. You can cut two card bases from this paper size. It is also useful for card fronts, bags, boxes, gift tags, die cutting, etc.
  • 12" x 12" - all of the colors as well as the Designer Series Paper (patterned paper) are available in this size. This size is for card bases, card fronts, boxes, bags, mini-albums, die cutting, etc. Twelve-inch x 12" paper is also great for fun fold card where longer pieces are needed, including the accordion fold. It is also easier and with less waste to cut strips with factors of 12. For example, you can cut four 3" strips from a 12" x 12" paper whereas you can only cut two 3" strips from a 8 1/2" x 11". The Designer Series Paper is a bit thinner than cardstock, making it awesome for envelopes too.

Let's cut some paper! Grab your paper trimmer and two sheets of 8 1/2" x 11" cardstock.

1.  To cut a card that opens like a book (horizontal fold), turn the cardstock sideways so that the 11" side is at the top, slide it into your paper trimmer until it reaches the 5.5" mark, make sure the paper is straight, and cut.


Fold each in half piece in half. Press along each fold with your bone folder to get a crisp fold that will lay flatter.


Voila! You now have two card bases!


 2. To cut a card that opens from top to bottom (vertical fold), turn the cardstock so that the 8 1/2" side is at the top, slide it into your paper trimmer until it reaches the 4.25" mark, make sure the paper is straight, and cut.


Fold each in half piece in half. Press along each fold with your bone folder to get a crisp fold that will lay flatter.


 Well done! You now have two more card bases!


Save your card bases for tomorrow's springtime thank you card.
Thanks for stopping by!
Beth

The products used in this post are:
Built for Free Using: My Stampin Blog

Thursday, February 4, 2016

Stampin' Up!'s Color Collections & Ink Pad Basics

Stampin' Up! offers a wide range of colors to choose from. These colors are divided in five groups or collections. They are Brights, Subtles, Regals, Neutrals, and In Colors. Each collection has ten colors.

The Brights Collection is vibrant and cheerful.

 Craft with Beth: Brights Collection

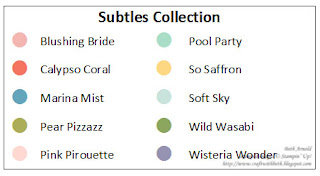
The Subtles Collection is soft and muted.

Craft with Beth: Subtles Collection

The Regals Collection is jewel-toned and rich.

Craft with Beth: Regals Collection

The Neutrals Collection contain varying shades of neutral colors, including browns, grays, black, and white.

Craft with Beth: Neutrals Collection

The In Colors are the more trendy colors. In Colors are made of two sets of five colors. Five new colors are introduced every year at the Annual catalog launch in June. These five colors last for two years, so there is always something fresh and exciting.

Craft with Beth: In Colors 2015-2017 Collection

The current In Colors are Cucumber Crush, Delightful Dijon, Mint Macaron, Tip Top Taupe, and Watermelon Wonder. These colors were introduced in the 2015-2016 Annual Catalog. They are available until May 31st, 2017.

Craft with Beth: In Colors 2014-2016 Collection

Last year's In Colors are Blackberry Bliss, Hello Honey, Lost Lagoon, Mossy Meadow, and Tangelo Twist. They were introduced in the 2014-2015 Annual Catalog. They are available until May 31st, 2016. These In Colors will be retired May 31st, 2016. If you like the 2014-2016 In Color Collection, I recommend you order them now before they run out. The In Color products (ink pads, ink refills, cardstock, ribbon, embellishments, etc.) are the first things (especially ink refills) to go when the new Annual catalog release date approaches. I ordered extras of these colors for my own order in January.

UPDATE: The 2016-2018 In Colors are Dapper Denim, Emerald Envy, Flirty Flamingo, Peekaboo Peach, and Sweet Sugarplum.

Craft with Beth: In Colors 2016-2018 Collection

All fifty of Stampin' Up!'s colors come in a wide range of products, including ink pads, ink refills, markers, cardstock, ribbons, brads, and buttons. The colors from each product are coordinated as closely as possible so that all of the products in, for example, Pool Party look the same.

I have created a printable with all of Stampin' Up! current colors for a quick reference guide. Click here to download.

Let's get started! Using the ink pads was the second thing I taught my family (Stamp Styles was the first). Check out these two great Stampin' Up! video on how to open, use, close, refill, and label your ink pads. The second video says to use a bone folder or spoon to spread the ink over the top of the ink pad when refilling the ink pad. This is a fantastic tip! However, if you don't want to stain your bone folder, you can also use an expired credit card or an expired gift card instead.


Thanks for stopping by!
Beth


Wednesday, February 3, 2016

Stampin' Up!'s Stamp Styles

Stampin' Up! has three types of stamps: wood-mounted, clear-mounted, and photopolymer.

 
Both the wood-mounted and the clear-mounted stamps are made of the traditional red rubber. The wood-mounted stamps are permanently adhered to a wooden block. Once the stamp is adhered, it is ready to use whenever you choose.


The clear-mounted stamps are not permanently adhered to a block. Clear acrylic blocks are used instead of the wooden block. The stamps cling to the clear block and can be removed when you are finishing stamping. With a clear block, you can see more clearly where you are stamping. This is easier for precise placement and alignment. You can line up multiple stamps on the same block. This is especially helpful when spelling out a name or making a collage of stamps. Clear-mounted stamps are also more compact and take up less storage space because the blocks are not stored with the stamps.


Photopolymer stamps are made of see through, flexible plastic. Like the clear-mounted stamps, photpolymer stamps are not permanently adhered to a block. Photopolymer stamps have slightly sticky backing and will stick to clear acrylic blocks. Because they are transparent, photopolymer stamps are great for precise placement, alignment, two-step stamping, and adding more ink over the same area (if there wasn't enough ink on the stamp, etc.). You can line up multiple photopolymer stamps on the same block. This is especially helpful when spelling out a name or making a collage of stamps. You can also shape and bend photopolymer stamps to add even more creativity to your projects. The blocks are also not stored with photopolymer stamps, making them more compact to store. Unlike the clear-mounted and wood-mounted stamps, photopolymer stamps do not have a little cushion of foam between the stamp and the block. To make up for this, use a piercing mat underneath your cardstock to ensure a crisp image.

The wood-mounted and clear-mounted stamp sets will come unassembled. For wood-mounted stamps, remove the stamp from the rubber sheet. Next remove the paper backing on the stamp and adhere directly to the wood block. Then adhere the coordinating sticker on top of the block.

For clear-mounted stamps, remove the stamp from the rubber sheet. Then remove the paper backing on the stamp and adhere the coordinating sticker directly on top of the foam side of the stamp.

Photopolymer stamps come between two sheets of clear acetate. One sheet has the stamped image printed on it. The other sheet is blank. To use, peel the blank sheet back, pull the stamp off the printed sheet, and place on a clear block.

Whichever stamp style you choose, you know you will great a clear, crisp image! Check out this video from Stampin' Up! to see more on how to assemble the stamps. Then take a look at my shop to see more stamps. I have create a Wish List for you to keep track of your favorites!


Thanks for stopping by!
Beth

Tuesday, February 2, 2016

Weekly Deals 2/2/16 - 2/8/16


Here are this week's deals! The deals run from Tuesday, 2/2/16 through Monday, 2/8/16 at 11:50pm. Five amazing products at 20% off! Check out the thinlits and the framelits! This is a great deal if you didn't purchase them with a bundle.
             Built for Free Using: My Stampin Blog


My favorite is the Mini Treat Bag Thinlit Die Set (Item #137547). Here is a great Valentine's treat bag ready for goodies!


This adorable treat bag was made with the following Stampin' Up! products:

Built for Free Using: My Stampin Blog

Thanks for stopping by!
Beth

Inside the Catalog


Once I receive the Annual Catalog, I like to label each of the sections so I can easily find what I am looking for or if someone has a question about a product. It also helps to familiarize myself with the new products for that year. I can locate the new designer series paper in a flash or easily create a To Order List of products that I am low on.

You can see the plethora of sticky tabs along the side. I love organizing! I labeled each stamp category, but you can use one label for the entire stamp section instead. It is up to you how you organize your catalog. Do what works and is best for you.


After I label each section, I highlight all of the products that I already have. When I first started using Stampin' Up! products, I thought I would remember everything. No problem, right? It wasn't until I started buying duplicates of stamp sets and embossing folders that I realized I needed a better system. Not to worry. The duplicates will become prizes for future classes and events or given to my family to use.


Check out the Celebrate Today (Item #138869) stamp set above. I highlighted the item number, the name of the stamp set, and the stamp style I have. This is one of my favorite sets! I have used it for birthdays, babies, and weddings. There is even a cute graduation sentiment! I love stamp sets that can be used for more than one occasion!


The catalog also has many project ideas scattered throughout. You can see how the products are used to create finished projects. Underneath the stamp set, there is a suggestion for a wedding card and a treat bag. The wedding card would be so simple to make too!

The catalog is a great way to get started stamping! The first demonstration that I went to was definitely overwhelming! All the beautiful colors! The stamps! The ribbons! It was so hard to choose where to start. I wanted everything! The catalog is a wonderful place for inspiration.

Here are a few of the projects that I made with the Celebrate Today stamp set.


I loved this project idea so much that I CASED it right from last year's annual catalog for my cousin's birthday card (Copy Everything and Share)! She loved it so much that it is still on display a year later!

 Above is the card I made for my brother's birthday. I often make two of each card if I especially like the design or if there are extra pieces. The two balloons on the sides of the card were cut in half. Rather than store the scraps, I completed a second card. This came in handy when I needed an unexpected birthday card!

Here is birthday card I CASED from Sandi McIver with some color changes. I love the combination of yellow, white, blue, and tan! It reminds me of the beach! Celebrate Today is definitely one of my must have stamp sets!

How the Year is Organized

Stampin' Up! publishes four catalogs a year: Annual, Occasions, Sale-A-Bration, and Holiday.

Craft with Beth: Stampin' Up! Catalog Release Information Graphic Banner How the Year is Organized and when catalogs are published

Annual Catalog
This is the main catalog for the year. It runs from the beginning of June through the May 31st of the following year. You will find your basic supplies, papers, stamps sets, and accessories here. The rest of the catalogs supplement the Annual Catalog. I will talk more about the annual catalog in my next post.

Items that will not be featured again in the next annual catalog are called retired. The list of retiring items is announced in May. Many but not all of the retiring items will be discounted at that time.

Occasions Catalog
This is the spring catalog. It runs from the beginning of January through March 31st. The Occasions catalog has additional stamp sets, papers, and accessories for springtime holidays and celebrations, such as Mother's Day, Father's Day, Valentine's Day, and Easter are featured in this catalog.

Sale-A-Bration Catalog
This is a mini-catalog with stamp sets and papers that are free with each $50 purchase. If host a party that earns $250, the hostess can also earn additional free products! Sale-A-Bration starts at the same time as the Occasions Catalog and ends on March 31st. It is a very exciting time of the year! Who doesn't love free stamping supplies!?! Sale-A-Bration is happening now! There are some amazing Designer Series Paper and stamps sets to choose from! Check out the Sale-A-Bration catalog now!

**Sale-A-Bration is also the best time to stock up on any In Color items that are retiring. In Color items, especially the ink refills, will sell out very quickly starting in April.**

Holiday Catalog
This is the winter catalog. It runs from the beginning of September until the day before the Occasions and the Sale-A-Bration catalogs start. Both the Holiday catalog and the Occasions catalog are seasonally oriented. The Holiday catalog contains more fall and winter holidays and celebrations, including Thanksgiving, Halloween, Christmas, and New Year's.

There's More!
In addition to the catalogs, there are also Weekly Deals and the Clearance Rack.
The Weekly Deals are published every Tuesday. Five surprise items are put on sale for one week (from Tuesday until the following Monday at 11:50:59pm). The Clearance Rack has retiring items and even some previously retired items at a great discount.

Monday, February 1, 2016

Introduction

My name is Beth. I have been a Stampin' Up! demonstrator since 2013. I absolutely love it! I do believe that Stampin' Up!'s quality is second to none. They are thoughtful in their designs, in their color palettes, and in their products.

I started this blog to help teach my family. We get together for crafting weekends, organizing parties, and even video stamping conferences. I intend to put what I have already taught them and what I will continue to teach them here. The majority of the products that I will use will be from Stampin' Up! with the occasional non-Stampin' Up! product (for example, organizing bins, bookshelves, labeling supplies, etc.). I do hope you will join me on my paper crafting journey too!