Monday, July 4, 2016

Fourth of July Fireworks Celebration Card & Banner

Happy Fourth of July! I hope you all are having a wonderful day celebrating our nation's birthday!

Craft with Beth: Fourth of July Fireworks Card

I am enjoying creating different shapes and patterns with the new Painter's Palette stamp set! I used the medium and small paint swishes to create the fireworks shape. The background stars are from Balloon Celebration and embossed with silver embossing powder. The greeting and number four are from the Number of Years and Large Numbers set.


Craft with Beth: Fourth of July Fireworks Card

The inside of the card has starburst fireworks in Night of Navy and in Real Red. This starburst stamp comes from the Perpetual Birthday Calendar stamp set. I love this stamp set because it is so versatile. Not only can you decorate a perpetual birthday calendar, but you can create amazing backgrounds!

Craft with Beth: Fourth of July Rosette and Firecracker Banner 4th

Here is another patriotic project! I made a banner with red, white, and blue rosettes and firecrackers.

Craft with Beth: Fourth of July Rosette and Firecracker Banner 4th

The rosettes are made with Real Red and Night of Navy DSP, Whisper White cardstock, and Silver Glimmer Paper. The red striped rosette is 5" across. The navy rosette is 3" across. The star was punched with the medium star punch. The white starburst shape is from the Baker's Box Thinlits. To make the red rosette cut 2 strips of 2.5" by 12" Real Red DSP and score every half inch. To make the navy rosette cut 2 strips of 1.5" x 12" Night of Navy DSP and score every half inch.

Craft with Beth: Fourth of July Rosette and Firecracker Banner 4th

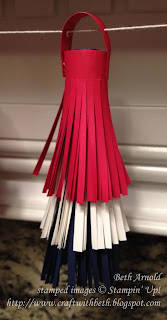
The firecracker is made by cutting three strips of cardstock and cutting them with the fringe scissors. The Real Red strip is 3" by 11". The Whisper White strip is 4" by 11". The Night of Navy strip is 5" by 11". Place tear and tape along the back of the navy strip and roll. Place tear and tape along the back of the white strip and roll around the navy strip. Do the same with the red strip. Glue a 3" by 3/4" handle to the top and punch holes to string.

Thanks for stopping by!
Beth


Fourth of July Celebration Card Project Supply List
Stamps
Number of Years
Perpetual Birthday Calendar
Balloon Celebration
Painter’s Palette
Paper
Whisper White
Real Red
Night of Navy
Silver Glitter
Ink
Night of Navy ink pad
Real Red ink pad
Basic Black Archival ink pad
Versamark ink pad
Embellishments
Stampin’ Dimensionals
Silver Embossing Powder
Tools
Stampin’ Trimmer
Bone Folder
Clear Acrylic Blocks A, B, C, D, and G
Grid Paper
Stampin’ Mist Cleaner
Stampin’ Scrub
Stampin’ Pierce Mat
Paper Snips
Large Numbers Framelits
Perfect Pines Framelits
Big Shot Machine
Heat Tool
Fine-Tipped Glue Pen
SNAIL Adhesive
Click here to start shopping!


Fourth of July Rosette and Firecracker Project Supply List
Stamps

Paper
Brights 12” by 12” DSP
Regals 12” by 12” DSP
Whisper White
Silver Glimmer
Night of Navy
Ink

Embellishments
Whisper White Baker’s Twine
Tools
Stampin’ Trimmer
Simply Scored
Bone Folder
Grid Paper
Paper Snips
Multipurpose Liquid Glue
Tear and Tape
Big Shot Machine
Baker’s Box Thinlits
Medium Star Punch
1-1/2” Circle Punch
Click here to start shopping!

Wednesday, June 29, 2016

Curtain Fold Thank You Card Two Ways

I love fun folds! They add a lot of interest and dimension to paper crafting projects! This thank you card features the curtain fold (also called the pleated fold). The curtain fold mimics the pleats in a curtain being drawn open.


This effect is made by adding score lines at specific intervals or at alternating intervals. I have seen many different measurements for this fun fold.

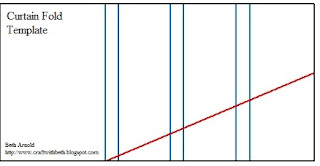
For this card, I cut a 3" x 6" piece of Playful Palette DSP. I scored it at 2", 2-1/4", 3-1/4", 3-1/2", 4-1/2", and 4-3/4". Then I measured 1-1/4" from the top right corner and made a mark. I lined up this mark with the 2" score line in the cutting track of the trimmer and cut. Next, I folded each pleat and adhered them in place.

Craft with Beth: Drapery Pullback Fold or Collar Fold Template

I think the widths of and the number of pleats are personal choice. Try varying the width and number of pleats until you find what is most pleasing to you.


For the inside, I cut a 4" x 5-1/4" Very Vanilla matte and a 1" x 4" Playful Palette DSP strip. I wasn't entirely happy with the front of the card. I had already glued everything down and could not move anything without tearing the paper. So, I made a second curtain fold card.


Instead of a plain piece of Very Vanilla underneath the curtain, I embossed the Very Vanilla with the Elegant Dots TIEF. I also changed the flower and added a pearl. The inside is the same except I used the back of the DSP used in the first card. I also changed the mark on the upper right corner to 1" instead of 1-1/4".


I hope you give the curtain fold a try! I would love to see what you make!

Thanks for stopping by!
Beth


Curtain Fold Card Card Project Supply List
Stamps
One Big Meaning
Flower Shop
Paper
Very Vanilla
Basic Black
Playful Palette DSP Stack
Sweet Sugarplum
Emerald Envy
Ink
Sweet Sugarplum ink pad
Basic Black Archival ink pad
Embellishments
Basic Pearl Elements
Emerald Envy Ruched Ribbon
Tools
Stampin’ Trimmer
Scoreboard
Bone Folder
Clear Acrylic Block C
Grid Paper
Paper Snips
Stampin’ Mist Cleaner
Stampin’ Scrub
Stampin’ Pierce Mat
SNAIL Adhesive
Pansy Punch
Elegant Dots TIEF
Click here to start shopping!

Monday, June 27, 2016

Butterfly Drapery Pullback Card

This is a totally cute fun fold! It is called the drapery pullback fold or the collar fold. It looks like the butterfly is pulling back the curtain to reveal a sweet sentiment.


Craft with Beth: Butterfly Drapery Pullback Card

On the inside I stamped two Sweet Sugarplum heart images, leaving the center blank to write a personalized heartfelt message.

Craft with Beth: Butterfly Drapery Pullback Card

The drapery pullback fold is easy to do. Trim your cardstock or DSP to the desired size. Then determine and mark the center.

Score from the center point to the upper right corner and from the center point to the lower right corner. Using your trimmer, line up the center mark and the upper right corner in the cutting track and score with the scoring blade. Repeat for the lower right corner. You can also score with a ruler and a stylus.

Next cut a straight line from the center of the right side to the center point. Fold the score lines back and secure with adhesive.

Craft with Beth: Drapery Pullback Fold or Collar Fold Template

I would love to see the drapery pullback cards you make! What embellishments and sentiments would you add?

Thanks for stopping by!
Beth


My Heart Smiles Card Project Supply List
Stamps
Suite Sayings
Perpetual Birthday Calendar
Paper
Very Vanilla
Basic Black
Playful Palette DSP Stack
Sweet Sugarplum
Ink
Sweet Sugarplum ink pad
Basic Black Archival ink pad
Basic Black Stampin’ Write marker
Embellishments
Basic Pearl Elements
Tools
Stampin’ Trimmer
Bone Folder
Clear Acrylic Block C
Grid Paper
Paper Snips
Stampin’ Mist Cleaner
Stampin’ Scrub
Stampin’ Pierce Mat
SNAIL Adhesive
Precision Base Plate
Big Shot Machine
Butterfly Framelits
Click here to start shopping!