Showing posts with label Banner. Show all posts

Wednesday, September 28, 2022

Go to Greeting Birthday Banner Card

I had my eye of the #158763 Go to Greetings stamp set since the 2022-2023 Annual Catalog debuted. I ordered it during the 24-hour stamp sale, and it arrived quicker than I thought it would! I was so excited to get it in the mail that I sat down to create cards right away. Today's birthday card is one of the ideas I knew I wanted to make first!


birthday card with horizontal band of pink paper with white embossed words saying happy birthday and banners of floral patterned paper below and perpendicular to the horizontal pink paper band. Go to Greetings stamp set birthday card, Awash in Beauty Designer Series Paper, DSP, birthday card, heat embossing

The largest greeting stamp size makes a bold, slightly more formal look for this birthday card. The font style is thick enough to make a clear impression when heat embossed. I also used the embossing buddy to double ensure that no stray embossing powder heat set on the Polished Pink cardstock just in case. The lettering embossed neatly and each of the letters are crisp and legible.

step-by-step photo of the banner placement on the card front. Go to Greetings stamp set birthday card, Awash in Beauty Designer Series Paper, DSP, birthday card, heat embossing


I first arranged the banners along the bottom half of the card front. Once I was happy with the placement, I added Stampin' Seal to the bottom half of the back of the Polished Pink greeting piece. I carefully placed the Polished Pink greeting piece on top of the banners to adhere them in place all at the same time. I totally held my breath during that step! Lol! Next I added liquid glue to the back and adhered it to the card front.

inside of birthday card has a horizontal band of pink paper on top of a horizontal band of pale pink plaid patterned paper along the bottom edge of the card inside. Go to Greetings stamp set birthday card, Awash in Beauty Designer Series Paper, DSP, birthday card, heat embossing


Inside the card I added a piece of pink plaid paper from the Awash in Beauty Designer Series Paper (DSP) pack and a narrow piece of Polished Pink cardstock to cover the DSP seam and for an extra pop of pink.

You can also see in the photo above that only the tops of the banners are adhered to the card front. This adds a bit of whimsy and movement to the card.


pick up all of the banners at once with the pink cardstock. Go to Greetings stamp set birthday card, Awash in Beauty Designer Series Paper, DSP, birthday card, heat embossing


Below are the measurements and supply list to recreate this Go to Greetings banner birthday card. If you need supplies to recreate this card, please, shop my online store HERE.


Measurements

  • Card Base: 8-1/2" x 5-1/2" (Thick Basic White Cardstock)
  • Greeting: 1-3/8" x 5-1/2" (Polished Pink Cardstock)
  • Banners (cut 9): 1/2" x 3" (Awash in Beauty Designer Series Paper (DSP))
  • Inside DSP Strip: 1/2" x 5-1/2" (Awash in Beauty Designer Series Paper (DSP))
  • Inside Cardstock Strip: 1/4" x 5-1/2" (Polished Pink Cardstock)


Supply List

Stamps
#158763 Go to Greetings Stamp Set

Paper
#159229 Thick Basic White Cardstock
#155710 Polished Pink Cardstock
#158973 Awash in Beauty Designer Series Paper (DSP)

Ink
#102283 Versamark Clear Watermark Ink Pad

Embellishments
#158136 Brushed Brass Butterflies
#155554 Basics Stampin' Emboss Powder (white)

Tools
#153608 Banners Pick a Punch
#129053 Heat Tool
#118490 Clear Block H
#110755 Multipurpose Liquid Glue
#152813 Stampin' Seal Adhesive
#102300 Bone Folder
#103579 Paper Snips
#130148 Grid Paper
#152392 Paper Trimmer
#126200 Stampin' Scrub
#153648 Stampin' Mist Cleaner


thinking of you card with horizontal band of pink paper with white embossed words saying thinking of you and banners of floral patterned paper below and perpendicular to the horizontal pink paper band. Go to Greetings stamp set thinking of you, Awash in Beauty Designer Series Paper, DSP, birthday card, heat embossing
 

The second card that I made using the thinking of you greeting turned out nicely even though this was not the greeting I intended to stamp! Whoops! Even still, what a cheerful way to let a loved one know you are thinking about them!

What other greetings would you use on this banner card? Let me know in the comments below!

I hope you enjoyed today's Go to Greetings birthday banner card. If you need supplies to make this sweet card, please, shop my online store HERE.

If you have any questions about today's project, please, don't hesitate to ask me.

Thanks for stopping by!
Beth

Tuesday, October 31, 2017

Say Eek! if You Love Rosettes

Craft with Beth: Spooky Cat Spooky Night DSP Halloween Garland Banner Rosette Rosettes Stampin Up

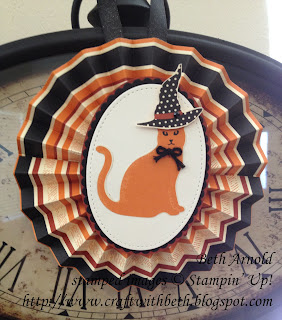
I love a rosette! And, I love a rosette banner even more! This frightful little rosette banner is hanging underneath the mantle in my family room. Rosettes are super easy and quick to make using the Simply Scored Board.

The rosettes measure 5" in diameter. So, I cut 2 pieces of Spooky Night Designer Series Paper for each rosette that measured 2-1/2" x 12". I scored each piece of Designer Series Paper every 1/2".

For the embellishment I die cut the largest stitched oval, the second largest oval, and the largest scalloped oval in Very Vanilla, Basic Black, and Cajun Craze cardstock, respectively. I also die cut the word eek plus an exclamation mark from the Large Letters Framelits with Basic Black cardstock.

Craft with Beth: Spooky Cat Spooky Night DSP Halloween Garland Banner Rosette Rosettes Stampin Up

I attached a small piece of Shimmery Black Ribbon to the back of each rosette. The string to hang each of the rosettes is also Shimmery Black Ribbon. Can I just say I am madly in love with all of the ribbons this year?! I am already on my second spool of Shimmery Black Ribbon, and I plan on ordering more!
 
Craft with Beth: Spooky Cat Spooky Night DSP Halloween Garland Banner Rosette Rosettes Stampin Up

I was having so much fun making rosettes, I couldn't help myself and made this witchy Cat Punch rosette. I added a longer ribbon on the back to drape around a wine bottle or hang as an ornament.

Thanks for stopping by!
Beth

Monday, August 1, 2016

Even More Paper Pumpkin July 2016 What a Gem Alternative Projects

Here are a few more alternative projects that my mom and I came up with during our Paper Pumpkin Club. My mom created a sparkling birthday card using the diamond stamp image and one of the larger tags. I really love the layout and colors on this card! The layout is truly dynamic. I like the angle of the Basic Black cardstock strip across the middle and the scatter of diamonds.

Craft with Beth: Mom's Birthday Card Alternative Project for July 2016 What a Gem Paper Pumpkin Stampin' Up! #imbringingbirthdaysback

The inside of the stamp has the birthday sentiment and more diamonds. My mom thinks she is still a starting stamper, but I think she is advancing and doing a terrific job creating her own cards!! Go Mom!!

Craft with Beth: Mom's Birthday Card Alternative Project for July 2016 What a Gem Paper Pumpkin Stampin' Up! #imbringingbirthdaysback

I couldn't resist making a small banner! I cut five triangles from the smaller box to make this party banner. I used the solid triangles and punched my own 1/8" holes.

Craft with Beth: Party Banner Alternative Project for July 2016 What a Gem Paper Pumpkin Stampin' Up! #imbringingbirthdaysback

Here is a close up of one of the pennants. I used the Back to Basics Alphabet, however you could substitute Labeler Alphabet.

Craft with Beth: Party Banner Alternative Project for July 2016 What a Gem Paper Pumpkin Stampin' Up! #imbringingbirthdaysback

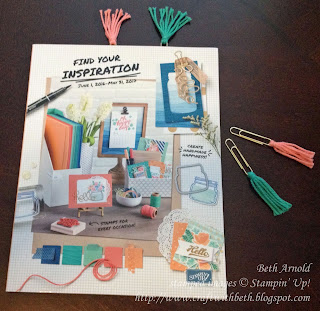
The last project I made was a planner clip with a tassel. I was trying to think of a way to use up the last bits of the thick baker's twine. I wasn't completely happy with the pre-made planner bookmarks, so I made my own.

I wrapped thick baker's twine around one end of a jumbo paper clip and tied the top with the pre-cut piece of twine. I can see making more of these planner clips with regular baker's twine and even washi tape. I purchased the jumbo paper clips at my local office supply store.

Craft with Beth: Planner Catalog Tassel Clip Alternative Project for July 2016 What a Gem Paper Pumpkin Stampin' Up! #imbringingbirthdaysback

I am all about my planner! But, you could also use these tassel clips for saving pages in magazines, books, and catalogs.

Craft with Beth: Planner Catalog Tassel Clip Alternative Project for July 2016 What a Gem Paper Pumpkin Stampin' Up!

What other alternative projects have you created with your Paper Pumpkin Kits? I would love to see what you make!

Thanks for stopping by!
Beth


More What a Gem July 2016 Paper Pumpkin Alternative Projects Project Supply List
Stamps
What a Gem
Paper
Whisper White
Basic Black
Emerald Envy
Flirty Flamingo
Pink Pirouette
Ink
Peekaboo Peach
Flirty Flamingo
Pear Pizzazz
Emerald Envy
Basic Black Archival
Embellishments
Stampin’ Dimensionals
Jumbo Gold Paper Clips
What a Gem July 2016 Paper Pumpkin Kit
Tools
Stampin’ Trimmer
Bone Folder
Grid Paper
Stampin’ Mist Cleaner
Stampin’ Scrub
Stampin’ Pierce Mat
Paper Snips
SNAIL Adhesive
Multipurpose Liquid Glue
Acrylic Blocks A and B
Click here to start shopping!

Thursday, July 7, 2016

Paper Pumpkin June 2016 Banner Surprise Alternative Project

We had a great time putting together our Paper Pumpkin Kits at our Club meeting. I try to put together at least one project according to the directions and then come up with a few alternative projects. Below is one example according to the directions. It is really cute! I know this cheerful banner would bright many people's days! I have someone in mind already to send this to.

Craft with Beth: Paper Pumpkin June 2016 Banner Surprise Alternative Project Stampin' Up!

This is an alternative project I shared during Saturday's Paper Pumpkin Club. I used the Jar of Love Bundle. I am thrilled that Stampin' Up! created a new mason jar stamp set and coordinating dies! I joined right as Perfectly Preserved was retiring and missed it. I love jars and canning! They remind me of family times spent together too!

Craft with Beth: Paper Pumpkin June 2016 Banner Surprise Alternative Project Stampin' Up!

I trimmed the striped card base to make a matte. I added gold trim and gold stars for accents. I used the larger jar and lid dies to create a shaker element.

Craft with Beth: Paper Pumpkin June 2016 Banner Surprise Alternative Project Stampin' Up!

To the back of the striped matte, I added foam adhesive strips around the shaker element and around the rest of the matte. Because the shaker element is a part of the matte layer and not an element sitting on top of the card, more stability is needed so the card won't buckle or tear, especially in the mail.

Craft with Beth: Paper Pumpkin June 2016 Banner Surprise Alternative Project Stampin' Up!

After filling the shaker element, I adhered a piece of Whisper White cardstock over the shaker element. This not only contains the sequins but has the sentiment stamped on the front. This photo also shows how I wrapped the gold trim.

Craft with Beth: Paper Pumpkin June 2016 Banner Surprise Alternative Project Stampin' Up!

On the inside I stamped "throw kindness around like confetti" in Basic Black Archival Ink and the dots image from Perpetual Birthday Calendar in Flirty Flamingo, Mint Macaron, and Tip Top Taupe ink.

I hope you will join us at our next Paper Pumpkin Club meeting!

Thanks for stopping by!
Beth

Monday, July 4, 2016

Fourth of July Fireworks Celebration Card & Banner

Happy Fourth of July! I hope you all are having a wonderful day celebrating our nation's birthday!

Craft with Beth: Fourth of July Fireworks Card

I am enjoying creating different shapes and patterns with the new Painter's Palette stamp set! I used the medium and small paint swishes to create the fireworks shape. The background stars are from Balloon Celebration and embossed with silver embossing powder. The greeting and number four are from the Number of Years and Large Numbers set.


Craft with Beth: Fourth of July Fireworks Card

The inside of the card has starburst fireworks in Night of Navy and in Real Red. This starburst stamp comes from the Perpetual Birthday Calendar stamp set. I love this stamp set because it is so versatile. Not only can you decorate a perpetual birthday calendar, but you can create amazing backgrounds!

Craft with Beth: Fourth of July Rosette and Firecracker Banner 4th

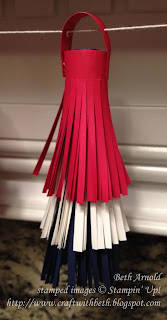
Here is another patriotic project! I made a banner with red, white, and blue rosettes and firecrackers.

Craft with Beth: Fourth of July Rosette and Firecracker Banner 4th

The rosettes are made with Real Red and Night of Navy DSP, Whisper White cardstock, and Silver Glimmer Paper. The red striped rosette is 5" across. The navy rosette is 3" across. The star was punched with the medium star punch. The white starburst shape is from the Baker's Box Thinlits. To make the red rosette cut 2 strips of 2.5" by 12" Real Red DSP and score every half inch. To make the navy rosette cut 2 strips of 1.5" x 12" Night of Navy DSP and score every half inch.

Craft with Beth: Fourth of July Rosette and Firecracker Banner 4th

The firecracker is made by cutting three strips of cardstock and cutting them with the fringe scissors. The Real Red strip is 3" by 11". The Whisper White strip is 4" by 11". The Night of Navy strip is 5" by 11". Place tear and tape along the back of the navy strip and roll. Place tear and tape along the back of the white strip and roll around the navy strip. Do the same with the red strip. Glue a 3" by 3/4" handle to the top and punch holes to string.

Thanks for stopping by!
Beth


Fourth of July Celebration Card Project Supply List
Stamps
Number of Years
Perpetual Birthday Calendar
Balloon Celebration
Painter’s Palette
Paper
Whisper White
Real Red
Night of Navy
Silver Glitter
Ink
Night of Navy ink pad
Real Red ink pad
Basic Black Archival ink pad
Versamark ink pad
Embellishments
Stampin’ Dimensionals
Silver Embossing Powder
Tools
Stampin’ Trimmer
Bone Folder
Clear Acrylic Blocks A, B, C, D, and G
Grid Paper
Stampin’ Mist Cleaner
Stampin’ Scrub
Stampin’ Pierce Mat
Paper Snips
Large Numbers Framelits
Perfect Pines Framelits
Big Shot Machine
Heat Tool
Fine-Tipped Glue Pen
SNAIL Adhesive
Click here to start shopping!


Fourth of July Rosette and Firecracker Project Supply List
Stamps

Paper
Brights 12” by 12” DSP
Regals 12” by 12” DSP
Whisper White
Silver Glimmer
Night of Navy
Ink

Embellishments
Whisper White Baker’s Twine
Tools
Stampin’ Trimmer
Simply Scored
Bone Folder
Grid Paper
Paper Snips
Multipurpose Liquid Glue
Tear and Tape
Big Shot Machine
Baker’s Box Thinlits
Medium Star Punch
1-1/2” Circle Punch
Click here to start shopping!