Tuesday, August 2, 2016

Thoughtful Branches Exclusive Bundle Now Available!

Thoughtful Branches Graphic

From August 2nd to August 31st (or while supplies last), purchase the exclusive Thoughtful Branches Bundle!

This bundle includes 23 photopolymer stamps and 9 thinlit dies to build your own seasonal creations and scenes! This limited time bundle is available for a short time, so don't wait too long to order yours!


Item #
Product Name
Retail
144328
Thoughtful Branches Bundle (ENG)
$52.00 USD/$66.50 CAD
144329
Thoughtful Branches Bundle (FR)
$52.00 USD/$66.50 CAD
143539
Thoughtful Branches Photopolymer Stamp Set (ENG)
$27.00 USD/$33.00 CAD
144264
Thoughtful Branches Photopolymer Stamp Set (FR)
$27.00 USD/$33.00 CAD
143538
Beautiful Branches Thinlits Dies
$31.00 USD/$41.00 CAD


Thoughtful Branches Graphic


Download the flyer to see the complete stamp set and thinlit bundle!

You can use your Bonus Day coupons that you received in July for the Thoughtful Branches Bundle too! This limited time bundle is available for a short time, so don't wait too long to order yours!

I would love to see what you make with this gorgeous stamp set and coordinating dies!

Thanks for stopping by!
Beth

Monday, August 1, 2016

Even More Paper Pumpkin July 2016 What a Gem Alternative Projects

Here are a few more alternative projects that my mom and I came up with during our Paper Pumpkin Club. My mom created a sparkling birthday card using the diamond stamp image and one of the larger tags. I really love the layout and colors on this card! The layout is truly dynamic. I like the angle of the Basic Black cardstock strip across the middle and the scatter of diamonds.

Craft with Beth: Mom's Birthday Card Alternative Project for July 2016 What a Gem Paper Pumpkin Stampin' Up! #imbringingbirthdaysback

The inside of the stamp has the birthday sentiment and more diamonds. My mom thinks she is still a starting stamper, but I think she is advancing and doing a terrific job creating her own cards!! Go Mom!!

Craft with Beth: Mom's Birthday Card Alternative Project for July 2016 What a Gem Paper Pumpkin Stampin' Up! #imbringingbirthdaysback

I couldn't resist making a small banner! I cut five triangles from the smaller box to make this party banner. I used the solid triangles and punched my own 1/8" holes.

Craft with Beth: Party Banner Alternative Project for July 2016 What a Gem Paper Pumpkin Stampin' Up! #imbringingbirthdaysback

Here is a close up of one of the pennants. I used the Back to Basics Alphabet, however you could substitute Labeler Alphabet.

Craft with Beth: Party Banner Alternative Project for July 2016 What a Gem Paper Pumpkin Stampin' Up! #imbringingbirthdaysback

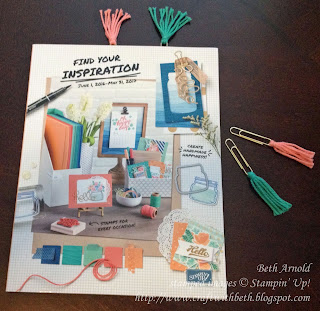
The last project I made was a planner clip with a tassel. I was trying to think of a way to use up the last bits of the thick baker's twine. I wasn't completely happy with the pre-made planner bookmarks, so I made my own.

I wrapped thick baker's twine around one end of a jumbo paper clip and tied the top with the pre-cut piece of twine. I can see making more of these planner clips with regular baker's twine and even washi tape. I purchased the jumbo paper clips at my local office supply store.

Craft with Beth: Planner Catalog Tassel Clip Alternative Project for July 2016 What a Gem Paper Pumpkin Stampin' Up! #imbringingbirthdaysback

I am all about my planner! But, you could also use these tassel clips for saving pages in magazines, books, and catalogs.

Craft with Beth: Planner Catalog Tassel Clip Alternative Project for July 2016 What a Gem Paper Pumpkin Stampin' Up!

What other alternative projects have you created with your Paper Pumpkin Kits? I would love to see what you make!

Thanks for stopping by!
Beth


More What a Gem July 2016 Paper Pumpkin Alternative Projects Project Supply List
Stamps
What a Gem
Paper
Whisper White
Basic Black
Emerald Envy
Flirty Flamingo
Pink Pirouette
Ink
Peekaboo Peach
Flirty Flamingo
Pear Pizzazz
Emerald Envy
Basic Black Archival
Embellishments
Stampin’ Dimensionals
Jumbo Gold Paper Clips
What a Gem July 2016 Paper Pumpkin Kit
Tools
Stampin’ Trimmer
Bone Folder
Grid Paper
Stampin’ Mist Cleaner
Stampin’ Scrub
Stampin’ Pierce Mat
Paper Snips
SNAIL Adhesive
Multipurpose Liquid Glue
Acrylic Blocks A and B
Click here to start shopping!

Saturday, July 30, 2016

Designer Washi Tape Coordination Chart

Craft with Beth: Stampin' Up! Designer Washi Tape Coordination Chart Printable

I added a new printable resource chart listing each of the colors that coordinate with the Designer Washi Tape. The chart contains the item number, the name of the washi tape, and the colors that are in each roll for all of the washi tape made by Stampin' Up! to date. Click on the image above or download the chart here.

Thanks for stopping by!
Beth

Friday, July 29, 2016

Fresh Fruit Card Set Gusseted Envelope

This is a great gusseted envelope to keep all of your Fresh Fruit cards we made this week! The Envelope Punch Board makes this card holder a snap!

Craft with Beth: Fresh Fruit Gusseted Envelope Fruit Stand DSP Stampin' Up!

This envelope has a gusset, so it has more dimension to hold all of your cards and envelopes. The finished dimensions are 6" by 4-1/2" by 1-1/4". To add the height, there will be two punches on each side of the envelope. Start by cutting a 9-3/8" by 9-3/8" piece of Crumb Cake cardstock.

Using your Envelope Punch Board, line your cardstock up to the 3-1/2" line, punch, and score. Line your cardstock up to the 4-7/8" line, punch, and score. Once the initial punches are made, you don't need to measure again. Use the score lines you just made as the guides for each subsequent punch.

Rotate your piece 90 degrees. Line it up to the 1st previous score line, punch, and score. Line it up to the 2nd previous score line, punch, and score.

Rotate your piece 90 degrees. Line it up to the 1st previous score line, punch, and score. Line it up to the 2nd previous score line, punch, and score.

Rotate your piece 90 degrees. Line it up to the 1st previous score line, punch, and score. Line it up to the 2nd previous score line, punch, and score.
Burnish all of your score lines.

Place strong adhesive such as Tear and Tape or Fast Fuse along two bottom edges of the left and right flaps. Fold up the bottom flap, securing the bottom flap to the two side flaps.

Add some hook and loop tape to the back of the top flap as a closure.

The front panel was made by layering Flirty Flamingo cardstock and Fruit Stand DSP. I used the largest scallop oval and the second largest oval to make the center embellishment.

Adhere the front panel to the front of the envelope and you have a fantastic gift!

Thanks for stopping by!
Beth


Fresh Fruit Gusseted Envelope Project Supply List
Stamps
Fresh Fruit
Paper
Whisper White
Crumb Cake
Flirty Flamingo
Fruit Stand DSP
Ink
Peekaboo Peach
Flirty Flamingo
Pear Pizzazz
Emerald Envy
Embellishments
Stampin’ Dimensionals
Tools
Stampin’ Trimmer
Bone Folder
Grid Paper
Stampin’ Mist Cleaner
Stampin’ Scrub
Stampin’ Pierce Mat
SNAIL Adhesive
Multipurpose Liquid Glue
Acrylic Blocks B and C
Layering Ovals Framelits
Big Shot Machine
Sponge Daubers
Envelope Punch Board
Click here to start shopping!