Wednesday, May 17, 2017

Celebrating Our Wedding Anniversary

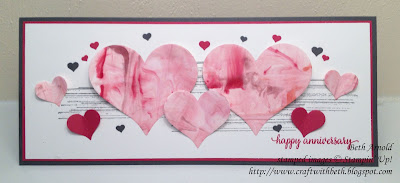
Sunday my amazing husband and I celebrated our sixth wedding anniversary! Here is the dear anniversary card I made for him!

Craft with Beth: Gorgeous Grunge Marbled Paper Reinkers Sweet and Sassy Framelits Anniversary Card So in Love Heart Confetti Punch

I used the striped image from Gorgeous Grunge across the center of the card front with Basic Gray Archival ink.

The greeting is from So in Love and stamped in Rose Red ink.

Craft with Beth: Gorgeous Grunge Marbled Paper Reinkers Sweet and Sassy Framelits Anniversary Card So in Love Heart Confetti Punch

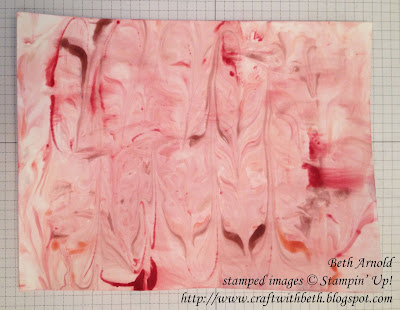
To create the background paper for the hearts, I marbleized a half sheet of Whisper White card stock with Flirty Flamingo. Rose Red, Melon Mambo, and a hint of Sweet Sugarplum ink refills.

I have been having a ball with this technique! Each time the paper comes out differently and so beautifully. 

Then I cut hearts from Rose Red cardstock and the marbleized Whisper White cardstock using the Sweet and Sassy Framelits. I sprinkled some Rose Red and Basic Gray hearts from the Confetti Heart Punch around the larger hearts. I think I may have gotten a bit carried away!

Craft with Beth: Gorgeous Grunge Marbled Paper Reinkers Sweet and Sassy Framelits Anniversary Card So in Love Heart Confetti Punch

The inside combines two greetings from So in Love stamped in Rose Red ink. The striped image from the card front with three confetti hearts is stamped in the bottom right corner.

So In Love Anniversary Card Measurements

Paper
Dimensions
Card Base
Basic Gray
9-1/4” x 8-1/4”; scored at 4-1/8”
1st Matte
Rose Red
8-7/8” x 4”
2nd Matte
Whisper White
8-5/8” x 3-3/4”
Confetti Hearts
Rose Red
Scraps
Basic Gray
Hearts
Rose Red
Scraps
Whisper White
8-1/2” x 5-1/2”
Inside Layer
Whisper White
8-7/8” x 4”

This card will fit inside a business-sized envelope. You can also create your own using the Envelope Punch Board. Cut a 10-5/8" square piece of envelope paper or cardstock. Use 7-1/8" as your scoring measurement.

Have you tried marbleizing paper? I would love to see what you create!

Thanks for stopping by!
Beth


So in Love Anniversary Card Supply List
Stamps
#143112 So in Love (Wood-Mount)
#143216 So in Love (Clear-Mount)
#130514 Gorgeous Grunge (Wood-Mount)
#130517 Gorgeous Grunge (Clear-Mount)
Paper
#100730 Whisper White
#102544 Rose Red
#121045 Basic Gray
Ink
#140929 Basic Gray
#126954 Rose Red
#141402 Flirty Flamingo Ink Refill
#115662 Melon Mango Ink Refill
#141400 Sweet Sugarplum In Refill
#102109 Rose Red Ink Refill
Embellishments

Tools
#137415 Confetti Heart Punch
#143263 Big Shot
#141707 Sweet and Sassy Framelits
Shaving Cream
Chopstick or Stir Stick
Glass baking dish

Monday, May 15, 2017

You Soar Above the Rest!

The focus of May's Technique Tuesday was marbleizing paper using ink refills and shaving cream. This technique is also called the Shaving Cream Technique. This is a fabulously fun way to create gorgeous and unique papers! It takes very little time and just a few supplies.

You'll need shaving cream (cream not gel), a chopstick or stir stick, a glass baking dish or plastic container big enough to hold your paper, ink refills in colors of your choosing, cardstock, and lots of paper towels or a bath towel you don't mind getting ink on.

This technique can be messy, so protect your work surface before you start.


You can choose all kinds of color combinations! Use a rainbow of colors, try opposite colors like blue  and orange, or stick to shades of one color. Marbleizing paper can be addictive! The results are so unique and pretty that it is difficulty not to try them all!

Craft with Beth: Lift Me Up Stampin' Up! Card Congratulations Marbleized Paper Shaving Cream Technique Spinner Card Fun Fold Decorative Label Punch Changing a punch's size Technique Tuesday class

For class we used varying shades of blue to mimic a cloud-filled sky - Pacific Point, Soft Sky, Tempting Turquoise, and Marina Mist.

Craft with Beth: Lift Me Up Stampin' Up! Card Congratulations Marbleized Paper Shaving Cream Technique Spinner Card Fun Fold Decorative Label Punch Changing a punch's size Technique Tuesday class

We used the marbled paper we made to create this fun, congratulatory spinner card featuring the Lift Me Up Bundle from the 2017 Occasions Catalog. What a great card for the graduate or to celebrate a promotion.

I try to layer a few additional techniques into class time. For the bonus techniques, we learned how to make spinner cards and to change the shape and size of punches. Can you guess which punch we used for the greeting?

Technique Tuesday is held on the first Tuesday of the month. I offer one class in the morning 10am to 12:20pm and one class in the evening 6pm to 8:30pm. We learn all sorts of techniques including embossing, resists, masking, fun folds, reflection, and more! Join the fun! Contact me today to sign up for June 6th's class!

Thanks for stopping by!
Beth


You Soar Above the Rest Card Supply List
Stamps
#142748 Lift Me Up Bundle
Paper
#100730 Whisper White
#111350 Pacific Point
Ink
#126951 Pacific Point
#102067 Tempting Turquoise
#111840 Pacific Point Ink Refill
#131161 Soft Sky Ink Refill
#101041 Tempting Turquoise Ink Refill
#119787 Marina Mist Ink Refill
#131259 Brights Stampin’ Write Markers
#131261 Neutrals Stampin’ Write Markers
Embellishments
#104430 Stampin' Dimensionals
#124262 Whisper White Baker’s Twine
Tools
#120907 Decorative Label Punch
#143263 Big Shot
#141705 Layering Circles Framelits
Shaving Cream
Chopstick or Stir Stick
Glass baking dish


Saturday, May 13, 2017

Paper Pumpkin has done it again!

If you have thought about subscribing to Paper Pumpkin, now is the time! From May 11th, 2017 to June 10th, 2017, first-time subscribers will enjoy a 3-month Paper Pumpkin subscription at 25% off! That means you could get 3 months of Paper Pumpkin Project Kits - June, July, and August - for a savings of $14.75! Woohoo!

Craft with Beth: Paper Pumpkin May 2017 25% off Sale Graphic

Each expertly-designed project kit comes pre-cut and ready to go, saving you valuable time and effort! The supplies (minus scissors) are gathered and wrapped in one box, saving you even more time and effort! No scrambling to find a glue dot or fussy cut intricate designs.

There are written and photographed instructions as well as a video to help you assemble your kit.

But, you don't have to stick to the instructions. Go where your creativity leads you! I love creating alternative projects with the kit supplies too! I think of it as my own crafty version of Chopped!

Plus. there is something new and different each month, keeping your creativity fresh and bright!

Did I mention that an ink spot comes with each kit? That's right! Even the ink spots come in the kit! And, ink colors do not repeat for an entire year. What a great way to sample new inks!

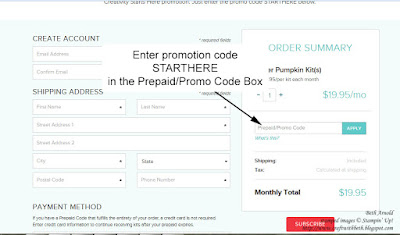
Would you like an expertly-designed, pre-cut, and ready to assembly project kit delivered straight to you each month? Skip to the fun and sign up today! Use promotion code STARTHERE in the Prepaid/Promotion Code Box at My Paper Pumpkin's website.

Craft with Beth: Paper Pumpkin Promotion May-June 2017 25% off 3-month subscription for new subscribers graphic screenshot of how to enter the promotion code

This offer is only available to first-tine subscribers and is only available for month-to-month subscriptions and not prepaid subscriptions. You must sign up by Saturday, June 10th, 2017 at 11:50 PM (MT) to take advantage of this offer. After the 3-month promotion, each kit will go back to the regular price $19.95 USD.

Don't forget to join us for the fourth Saturday of each month (except December) for my Paper Pumpkin Party. We assemble our kits while visiting with friends and munching on pumpkin themed treats!

I can't wait to see you are the next Paper Pumpkin Party! Please let me know if you have questions about Paper Pumpkin or how to start your Paper Pumpkin subscription. I am happy to help!

Thanks for stopping by!
Beth