To celebrate St. Patrick's Day my husband and I took an Irish bread making class. We made a free formed Irish Soda Bread with cheese, onions, and fresh rosemary. Yum!
We also made our own butter in a mason jar! We filled a mason jar part way with cream and shook it until it became butter.
It was a lot of fun! The shaking didn't take very long - only a few minutes. I got my arm workout for the day though. The butter was delicious on the Irish Soda Bread!
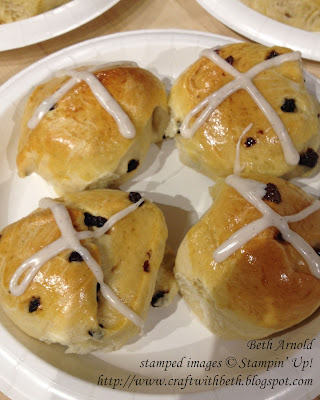
Then we made Hot Cross Buns with cardamom, currants, and raisins. We topped them with vanilla icing.
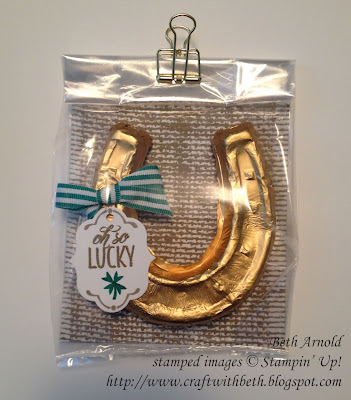
I also made my husband a gigantic chocolate lucky horseshoe treat holder. I am just so lucky to have a wonderful husband like him! He is such a dear!
I found the foil wrapped chocolate horseshoe at Bed, Bath, and Beyond of all places. They do have an interesting variety of national and international foods and candy. It is worth taking a look for cute ideas for the holidays!
Here is a close-up of the tag. It is made using the Lovely Friends Stamp Set and the Lovely Laurel Laurel Thinlits Set. The clover is made using the larger arrowhead shaped stamps. The stem is free formed using an Emerald Envy Stampin' Write Marker. So cute!
I hope that your blessings out number of shamrocks that grow, and may trouble avoid you wherever you go!
Thanks for stopping by!
Beth
Saturday, March 17, 2018
Wednesday, March 7, 2018
May Your Heart Be Lifted
Fellow Stampin' Up! demonstrator Liz Lindsay showed me how to make her card at our last demonstrator team meeting. This is a thoughtful card and well-designed card.
Cut a 8-1/2" by 5-1/2" Night of Navy cardstock card base and score it at 4-1/4". Cut two 4" by 5-1/4" pieces of Very Vanilla cardstock.
Stamp the "Sending Heartfelt Thoughts" sentiment image in the center of one of the Very Vanilla cardstock pieces with Night of Navy ink. Then stamp the large flower bouquet around the sentiment with Night of Navy ink.
Color in the daisy flower with Powder Pink and Crushed Curry Stampin' Write Markers.
Place the largest stitched circle die in the center and die cut. Adhere the card front to the front of the card. Attach dimensionals to the back of the die cut circle. Adhere the die cut circle to the center of the card front where it was originally die cut from.
Add rhinestones to the card front.
On the second Very Vanilla cardstock piece, stamp the "Praying that your heart will be lifted..." sentiment from Flourishing Phrases in the center with Night of Navy ink. Then stamp the large bouquet image in the upper left and in the lower right corners with Night of Navy ink. Color in the daisies as before and then adhere to the insides of the card base.
Thanks for stopping by!
Beth
Tuesday, March 6, 2018
An Irish Blessing
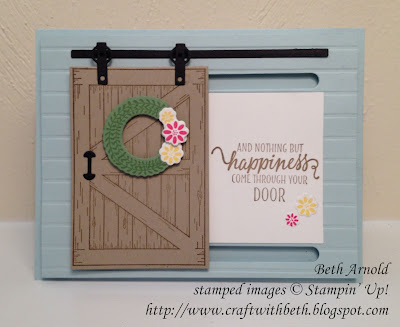
I CASED this Barn Door card from the 2018 Occasions Catalog. It is simply darling!
The Barn Door Bundle was at the top of my must have list of all of the 2018 Occasions Catalog products! I love the sliding barn door and all of the stamps!
I especially like the Irish Blessing stamps - "May your troubles be less and your blessings be more. And let nothing but happiness come through your door." This is the same blessing I used inside my St. Patrick's Day cards last year except I typed it on my computer and printed onto cardstock. Love it!
For the sliding mechanism, I used Hillman SAE 6 washers from my local hardware store.
Instead of creating a flat one sided card, I adhered the barn door to a 8-1/2" x 5-1/2" (scored at 4-1/4") card base and added the "Happy St. Patrick's Day" image from Teeny Tiny Wishes.
This clever card uses the wreath framelit three ways - once to cut out the entire wreath from Wild Wasabi cardstock, once to cut the trio of flowers, and once to cut each individual flower. Talk about triple duty and versatility!
Check out Stampin' Up!'s video to see how this card came together.
I can see more Barn Door cards and projects in my future. How adorable would it be to put the little piggies behind the door?!?
Thanks for stopping by!
Beth
Monday, March 5, 2018
Mini Shamrock Pots of Gold
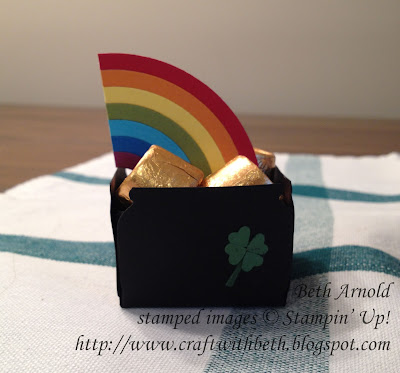
I created these adorable mini pots of gold to celebration St. Patrick's Day. I just loved using the Curvy Keepsake Thinlit to make little pots of gold last year. This year I wanted to expand on the idea.
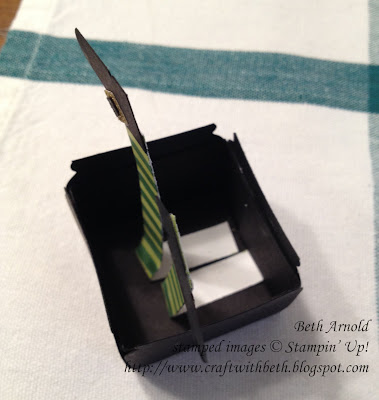
I came up with these mini pots of gold using the Everyday Jars Framelits and the Simply Scored Scoring Tool.
The base of the mini pot of gold treat holder is an open-topped box made with the Simply Scored Scoring Tool. The base measures 3-3/8" square and is scored on all four sides at 1".
The sides are made from the smallest jar in the Everyday Jars Framelit set. I cut off the top two threads where the lid goes to make it look more like a cauldron lip and adhered one jar to each of the four sides of the box.
The shamrock comprises of four Garden Green hearts punched from the Cookie Cutter Builder Punch. The stem is a free-formed sliver of Garden Green cardstock.
The mini pots of gold are filled with Rolos. This sweet plant holder was my great grandmother's. The leprechaun looks like he is about to steal the mini pot of gold! Cute!
I made three variations - one plain pot of gold, one with a rainbow, and one with cute leprechaun legs sticking out.
The rainbow features the Brights Color Collection and the Rainbow Builder Framelits. I adhered each stripe of the rainbow onto Whisper White cardstock. Once the rainbow was dry, I cut it in half.
The rainbow is attached to a piece of Basic Black cardstock and then adhered to the center of the pot of gold, so it appears to be floating.
This is my favorite pot of gold variation! Check out the leprechaun legs with striped pants! How adorable! I freehand drew the shoes and pants.
The legs are scored at the ends to make a tab to glue into the center of the pot of gold.
I hope you give these St. Patrick's Day mini pots of a gold a try! How would you decorate your mini pot of gold? I would love to see what you create!
Thanks for stopping by!
Beth
Monday, February 26, 2018
CASEing the Catty: Get Ready for Spring!
The 2018 Occasions Catalog is filled to the brim with fabulous project samples! I especially love the Easter and spring themed projects. After what feels like a long winter, I am ready for spring greenery. This sweet Spring card is a modified CASE (Copy and Share Everything) from the 2018 Occasions Catalog's page 38.
Instead of recreating the gift bag, I made a card. I used the central Easter egg embellishment as the focus of my card and framed it with layered mattes.
Egg decorating is one of my favorite Easter time activities. Hello Easter has the most darling stamps to embellish your Easter eggs. I had a blast stamping with the leaves and flowers. The stamped image style reminds me of the gorgeous pisanki, or painted Polish Easter eggs, that my family had when I was younger.
The inside is decorated with a row of Calypso Coral flowers, leaving plenty of room for a springtime or Easter message.
To determine the size of the mattes around the Easter egg, I measured the Easter egg stamp and added about 1/2" all around the stamped image. Then I added 1/4" to the first matte's length and width measurements to make the Lemon Lime Twist layer. For the larger mattes, I used a 1/8" and a 1/16" border.
This card layout can easily be adapted to fit other stamps and occasions. If the stamp is larger than the egg image, increase the sizes of the 3rd and 4th mattes, accordingly. If the stamp is smaller than the egg image, decrease the sizes of the 3rd and 4th mattes, accordingly.
I created a card sketch, also called a card layout, to use as a layout guide. Use the measurements listed in the chart above substituting your own color palette, theme, and Designer Series Paper.
I would love to see what you create with my very first card sketch! Post your card created with Card Sketch #1 on my Facebook Page to be entered to win 10% off your next single order in April 2018!* I will draw the winner randomly on March 20th, 2018. So, create and post your cards by March 19th, 2018 for a chance to win 10% off your single order in April 2018.
*This offer is only available directly from me and not available online. I reserve the right to change, amend, or remove this offer at anytime for any reason. Posting your card on my Facebook Page means you agree to the terms of this offer. Your single order must be placed in the month of April 2018.
I look forward to seeing all of your card creations!!
Thanks for stopping by!
Beth
Instead of recreating the gift bag, I made a card. I used the central Easter egg embellishment as the focus of my card and framed it with layered mattes.
The inside is decorated with a row of Calypso Coral flowers, leaving plenty of room for a springtime or Easter message.
To determine the size of the mattes around the Easter egg, I measured the Easter egg stamp and added about 1/2" all around the stamped image. Then I added 1/4" to the first matte's length and width measurements to make the Lemon Lime Twist layer. For the larger mattes, I used a 1/8" and a 1/16" border.
Hello Spring Easter Card Measurements
|
|||
Paper
|
Dimensions
|
Score at
|
|
Card Base
|
Lemon Lime
Twist
|
8-1/2” x 5-1/2”
|
4-1/4”
|
1st Matte
|
Whisper White
|
4-1/8” x 5-3/8”
|
-
|
2nd Matte
|
Whole Lot of
Lovely Designer Series Paper
|
4” x 5-1/4”
|
-
|
3rd Matte
|
Lemon Lime
Twist
|
3” x 4”
|
-
|
4th Matte
|
Whisper White
|
2-3/4” x 3-3/4”
|
-
|
Bunny
|
Whisper White
|
2-1/4” x 2”
|
-
|
Banner
|
Calypso Coral
|
3” x 1-1/4”
|
|
Inside Matte
|
Whisper White
|
4” x 5-1/4”
|
-
|
This card layout can easily be adapted to fit other stamps and occasions. If the stamp is larger than the egg image, increase the sizes of the 3rd and 4th mattes, accordingly. If the stamp is smaller than the egg image, decrease the sizes of the 3rd and 4th mattes, accordingly.
I created a card sketch, also called a card layout, to use as a layout guide. Use the measurements listed in the chart above substituting your own color palette, theme, and Designer Series Paper.
I would love to see what you create with my very first card sketch! Post your card created with Card Sketch #1 on my Facebook Page to be entered to win 10% off your next single order in April 2018!* I will draw the winner randomly on March 20th, 2018. So, create and post your cards by March 19th, 2018 for a chance to win 10% off your single order in April 2018.
*This offer is only available directly from me and not available online. I reserve the right to change, amend, or remove this offer at anytime for any reason. Posting your card on my Facebook Page means you agree to the terms of this offer. Your single order must be placed in the month of April 2018.
I look forward to seeing all of your card creations!!
Thanks for stopping by!
Beth
Hello Spring Easter Card Supply
List
|
|
Stamps
|
#145783
Hello Easter (Photopolymer)
|
Paper
|
#100730 Whisper White Cardstock
#144245 Lemon Lime Twist Cardstock
#144110 Whole Lot of Lovely Designer Series Paper
#122925
Calypso Coral Cardstock
|
Ink
|
#126983
Calypso Coral Ink Pad
#144086 Lemon Lime Twist Ink Pad
#144084 Powder Pink
#126978 Soft Suede
#102283 Versamark
|
Embellishments
|
#104430
Stampin’ Dimensionals
|
Tools
|
#126199 Stampin’ Pierce Mat
#103083 Embossing Buddy
#129053 Heat Tool
#109132 White Embossing Powder
#126889 Stampin’ Trimmer
#141483 Duet Banner Punch
|
Subscribe to:
Comments (Atom)


