Showing posts with label Easel Card. Show all posts

Wednesday, June 22, 2022

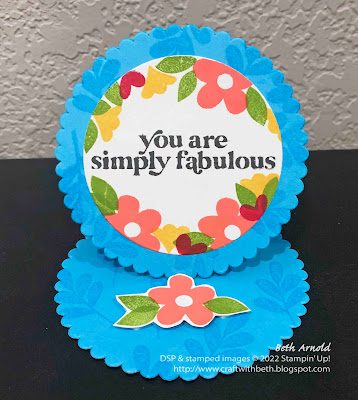
You are Simply Fabulous Circle Easel Card

Today's project is a circle easel card featuring the Simply Fabulous stamp set. The Simply Fabulous stamp set is one of my top must-have stamp sets from the 2022-2023 Annual Catalog. It has cute little flowers and leaves stamps along with greetings perfect for friendship, encouragement, and celebration.

Simply Fabulous Circle Easel Card


The varied scale of the flowers and leaves stamps ranges from small to large and makes this a fantastic set for building bouquets, wreaths, clusters, and more! Use the larger flowers and leaves for focal images. Sprinkle in the smaller flowers and leaves to fill in the spaces between to create a cohesive bouquet or wreath!

Simply Fabulous Circle Easel Card


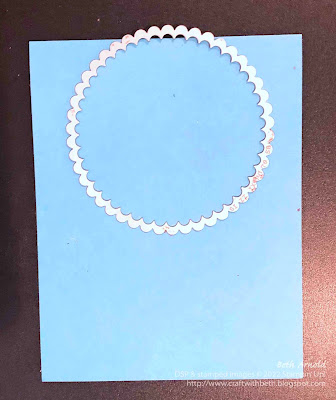
The base for the circle easel card is made of two connected scalloped circles. To connect the scalloped circles, I cut a piece of Tahitian Tide cardstock and folded it in half, then I placed the largest Layering Circle die on the Tahitian Tide cardstock with about 1/8" of the die above the fold, and ran it through the Stampin' Cut & Emboss Machine.

Simply Fabulous Circle Easel Card


Moving the topmost edge of the scalloped circle die above the fold line means that the area that the die is not touching the cardstock will not be cut.

Simply Fabulous Circle Easel Card


A second scalloped circle is die cut and adhered to one of the card base scallop circles to make the easel stand up.

 
Below are the measurements and supplies to recreate this Simply Fabulous Circle Easel Card.

Measurements

  • Card Base: 4-1/4" x 8"; scored at 4" (Tahitian Tide Cardstock)
  • Scalloped Circle: 3-1/2" x 3-1/2" (Tahitian Tide Cardstock)
  • Circles: 5" x 2-3/4" (Basic White Cardstock) - cut 2 of the 2-3/8" circles from this piece of cardstock and cut 1 of them in half
  • Stopper: 2" x 3"


Supplies

#159133 Simply Fabuous Stamp Set
#159261 Tahitian Tide Cardstock
#102283 Versamark Watermark Ink Pad
#147052 Flirty Flamingo Ink Pad
#147094 Daffodil Delight Ink Pad
#147095 Granny Apple Green Ink Pad
#147051 Melon Mambo Ink Pad
#132708 Momento Tuxedo Black Ink Pad
#104430 Dimensionals
#110755 Multipurpose Liquid Glue
#102300 Bone Folder
#103579 Paper Snips
#130148 Grid Paper
#152392 Paper Trimmer
#149653 Stampin' Cut & Emboss Machine
#118487 Clear Block A
#117147 Clear Block B
#118490 Clear Block H
#151770 Layering Circle Dies


A circle easel card makes a great display card. I chose "You are simply fabulous" for the greeting on this circle easel card. It is a kind reminder that we are fabulous too! It can be easy to focus more on the care of others and forget to care for and appreciate yourself too. This card could be a visual reminder that you are simply fabulous too!

I hope you give this circle easel a card and make one for each of your best friends! I think you will really enjoy stamping with the Simply Fabulous stamp set! If you need supplies to make this card, please, shop my online store HERE.

If you have any questions about today's project, please, don't hesitate to ask me. I am happy to help you with your stamping questions!

Thanks for stopping by! Have a great day!
Beth

Friday, November 17, 2017

Autumn Gratitude Easel Card

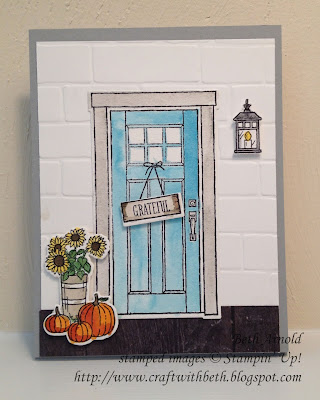
I am really enjoying the At Home with You Bundle! It is truly is an all season bundle. It is great for so many holidays and occasions. Today I am sharing a fall-themed card perfect for your significant other or a best friend. You can change the sentiment inside to reflect your occasion, too.

Craft with Beth: At Home with You Easel Card Fun Fold Stampin Up Autumn Thanksgiving Door Fall I feel at home whenever I am with you

The At Home with You Bundle comes with some fun, interactive framelits. However, for this card, I wanted to emphasis the layering of the stamped elements instead of the interactive door. I used aquapainters and watercolor paper to give the stamped images more vibrancy.

Craft with Beth: At Home with You Easel Card Fun Fold Stampin Up Autumn Thanksgiving Door Fall I feel at home whenever I am with you

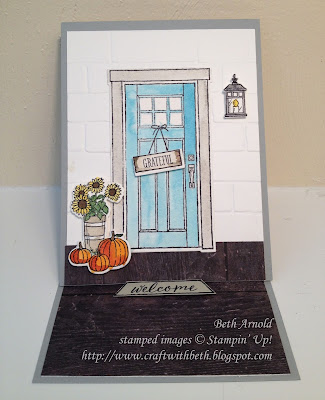
To make the card stand up like a door, I used an easel fun fold. The welcome mat acts as the stopper and is positioned further back on the card base to sit the door more upright. I covered half of the inside of the card base with the side wood Designer Series Paper as the front to make a front porch and the card more cohesive.

Craft with Beth: At Home with You Easel Card Fun Fold Stampin Up Autumn Thanksgiving Door Fall I feel at home whenever I am with you

Here is a side view of the card. I choose these colors because this is what I would like the outside color palette of my house to be one day. I love a turquoise door!

Craft with Beth: At Home with You Easel Card Fun Fold Stampin Up Autumn Thanksgiving Door Fall I feel at home whenever I am with you

The inside sentiment is one of my all time favorite sentiments! I like the emotion and love that this sentiment conveys. It is so cosy too, especially for this chilly time of year!

Autumn Gratitude Easel Card Measurements

Color
Dimensions
Score at
Card Base
Smoky Slate
4-1/4” x 11”
2-3/4” & 5-1/2”
Front Panel
Smoky Slate
4-1/4” x 5-1/2”
-
1st Matte
Whisper White
4” x 5-1/4”
-
Wood Porch Floor (2 pieces total)
Wood Textures Designer Series Paper
4” x 3/4"
-
4” x 2-1/2”
Front Porch Decorations
Water Color Paper
1 sheet
Stamp the door, lantern, sign, grateful greeting, the bow, and the autumn planter. Then color with aqua painters & ink pads
Welcome Mat
Sahara Sand
1-1/2” x 3”
Stamp the welcome mat image & die cut
Inside Matte
Whisper White
4” x 5-1/4”
-

I hope you give this sweet easel card a try! Do you have the At Home with You Bundle? I would love to see what you create!

Craft with Beth: Online Extravaganza 2017 November 20-26
 
Don't forget. Online Extravaganza starts on November 20th, 2017 with a special 24-hour flash sale and stamping deals through November 26th, 2017. To closeout Online Extravaganza 2017 there will be a second 24-flash sale on November 27th, 2017 with extra special savings. Click here for more details.

Thanks for stopping by!
Beth


Autumn Gratitude Easel Card Materials  List
Stamps
#145351 At Home with You Bundle
Paper
#100730 Whisper White
#122959 Water Color
#144177 Wood Textures Designer Series Paper
#121043 Sahara Sand
Ink
#140931 Basic Black Archival
#126945 Pumpkin Pie
#126976 Sahara Sand
#131173 Crushed Curry
#126973 Garden Green
#126952 Tempting Turquoise
#131179 Smoky Slate
#126974 Early Espresso
#126965 Cajun Craze
Embellishments
#104430 Dimensionals
Tools
#143263 Big Shot
#103954 Aqua Painter
#138288 Brick Wall Embossing Folder

Wednesday, June 7, 2017

Birthday Daisy Easel Card

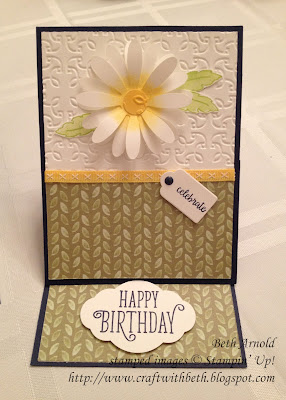
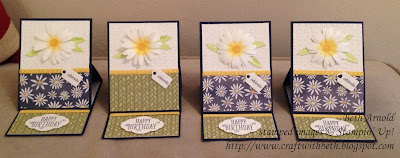
I am loving the Daisy Delight stamp set and Daisy Punch! It pairs so well with the Happy Birthday Gorgeous stamp set in this easel card too. These two stamp sets are quickly becoming my favorite new stamp sets!

Craft with Beth: Daisy Delight Happy Birthday Gorgeous Easel Card Pretty Label Punch Daisy Punch Delightful Daisy DSP Designer Series Paper template

I think this fun fold would be a great birthday card to send to your loved ones and to send loved ones in nursing homes.  The easel card is a great fun fold to display in the home as a reminder of your caring and thoughts.

Craft with Beth: Daisy Delight Happy Birthday Gorgeous Easel Card Pretty Label Punch Daisy Punch Delightful Daisy DSP Designer Series Paper template

This easel card is a fun fold that is as fun to give and display as it is to make. The easel card uses a top folding card base (11" x 4-1/4"; scored at 5-1/2") with an extra card front attached (5-1/2" x 4-1/4"). Each easel card base will use 1-1/2" pieces of 8-1/2" x 11" cardstock. The easel card will fold flat.

Craft with Beth: Daisy Delight Happy Birthday Gorgeous Easel Card Pretty Label Punch Daisy Punch Delightful Daisy DSP Designer Series Paper template

 Let's get started. You will need to cut the following pieces of cardstock and Designer Series Paper.


Happy Birthday Daisy Easel Card Measurements

Paper
Dimensions
Card Base
Night of Navy
11” x 4-1/4”, scored at 5-1/2”
Front Panel
Night of Navy
5-1/2” x 4-1/4”
Front Matte
Whisper White
5-1/4” x 4”; embossed with Garden Trellis Embossing Folder
Lower Front Panel
Delightful Daisy Designer Series Paper
2-1/4” x 4”
Celebrate Tag
Whisper White
2” x 2”; cut with the small tag die in the Wood Crate Thinlit set
Daisy
Whisper White
3-1/2” x 3”; punch 3 daisies with the Daisy Punch
Leaves
Whisper White
3” x 3”
Daisy Center
Daffodil Delight
Scraps; stamp with daisy center stamp & punch with a 1/2" circle punch
Inside Matte
Whisper White
5-1/4” x 4”
Lower Inside Panel
Delightful Daisy Designer Series Paper
2” x 4”
Birthday Sentiment
Whisper White
3” x 3-1/2”; stamp & punch with Pretty Label Punch

Start with the card base so that the two score lines are at the top. Fold and burnish the score lines on the card base toward you. These score lines will form a triangle on which the front panel will sit. Lay the card base flat again with the two score lines at the top.

Adhere the lower inside panel to the bottom of the inside matte. Wrap a 4-7/5" piece of Daffodil Delight Double-Stitched Ribbon around where the inside matte and the lower inside panel meet and attached with glue dots to the back. Then adhere this to the lower half of your card base as shown below. The upper portion is left blank to write a special message.

Craft with Beth: Daisy Delight Happy Birthday Gorgeous Easel Card Pretty Label Punch Daisy Punch Delightful Daisy DSP Designer Series Paper template

Stamp the Happy Birthday sentiment onto Whisper White cardstock in Night of Navy ink and punch out with the Pretty Label Punch. Attach Stampin' Dimensionals to the back. Then adhere to the center of the lower inside panel as shown above.

Put the card base aside for now.

Emboss the front matte with the Garden Trellis embossing folder. Adhere the lower front panel to the bottom of the front matte. I used the debossed side facing up, but this card looks just as pretty with the embossed side facing up.

Wrap a 4-7/5" piece of Daffodil Delight Double-Stitched Ribbon around where the front matte and the lower front panel meet and attached with glue dots to the back. Attach this to the front panel.

Stamp celebrate in Night of Navy ink onto Whisper White cardstock and die cut with the small tag die from the Wood Crate Thinlit set. Attach two Stampin' Dimensionals to the back of the tag - one underneath the hole and one in the center of the tag. Cover the hole in the tag with a Night of Navy large circle enamel shape or enamel shape of your choice. Adhere to the front panel on the Daffodil Delight ribbon toward the right side.

Bring your card base back. Fold the top score line toward you. The rectangular area between the top of the card base and the first score line will become the area the front panel will sit on. Put glue or snail adhesive on this area. Adhere this to the bottom of the front panel.

Craft with Beth: Daisy Delight Happy Birthday Gorgeous Easel Card Pretty Label Punch Daisy Punch Delightful Daisy DSP Designer Series Paper template

It is easier and less cumbersome to put as many of the flatter pieces together before adding the daisy.

Punch out 3 daisies from Whisper White cardstock. Sponge Daffodil Delight ink in the center of each daisy with a sponge dauber.

Glue the daisies together - one stacked on top of each other and off set. Off setting each layer will add more fullness to the daisy. Shape the petals by bending and curling them backwards by hand or with your bone folder.

Add a Stampin' Dimensional to the back of the completed daisy.

Stamp the daisy center image in Daffodil Delight ink onto Daffodil Delight cardstock. Punch out the daisy center using a 1/2" circle punch. Glue on top of the center of the daisy.
 
Craft with Beth: Daisy Delight Happy Birthday Gorgeous Easel Card Pretty Label Punch Daisy Punch Delightful Daisy DSP Designer Series Paper template

Attach the daisy to the center of the top portion of the front panel.

Stamp the leaf outline 3 times in Lemon Lime Twist ink onto Whisper White cardstock. Then fill in the leaf outline with the solid leaf image using Lemon Lime Twist ink first stamped off. That is, tap the solid leaf image on the Lemon Lime Twist ink pad. Then stamp onto your grid paper or scrap paper. Then stamp over the leaf outline. Stamping off the solid leaf image creates a contrast between the leaf outline and the solid leaf images.

Fussy cut the leaves and adhere underneath the daisy petals.

Craft with Beth: Daisy Delight Happy Birthday Gorgeous Easel Card Pretty Label Punch Daisy Punch Delightful Daisy DSP Designer Series Paper template

Craft with Beth: Daisy Delight Happy Birthday Gorgeous Easel Card Pretty Label Punch Daisy Punch Delightful Daisy DSP Designer Series Paper template

Your card is ready for giving and displaying. You can rest the front panel on the inside ribbon or on the Happy Birthday sentiment.

Craft with Beth: Daisy Delight Happy Birthday Gorgeous Easel Card Pretty Label Punch Daisy Punch Delightful Daisy DSP Designer Series Paper template


Happy Birthday Daisy Easel Card Card Supply List
Stamps
#143662 Happy Birthday, Gorgeous (Photopolymer)
#143669 Daisy Delight (Photopolymer)
Paper
#100730 Whisper White
#100867 Night of Navy
#144137 Delightful Daisy Designer Series Paper
Ink
#126970 Night of Navy
#144086 Lemon Lime Twist
#126944 Daffodil Delight
Embellishments
#144116 Daffodil Delight Double-Stitched Ribbon
#104430 Stampin’ Dimensionals
#141681 Regals Enamel Shapes
Tools
#143715 Pretty Label Punch
#143713 Daisy Punch
#119869 1/2" Circle Punch
#143730 Wood Crate Framelits
#126199 Stampin’ Pierce Mat
#143741 Garden Trellis Textured Impressions Embossing Folder

#126889 Stampin’ Trimmer

I hope you give this fresh as a daisy easel card a try! I would love to see what you make!

Thanks for stopping by!
 Beth

++++++++++++++++++
Host Codes:
June Host Code - RZGCQ2RT
When placing an order, please use host code RZGCQ2RT for orders under $150 USD. Please don't use the host code if your order is more than $150.

Stamp of the Month Class - June's Stamp of the Month Host Code is GFWW6YFC. If you are attending class virtually, please use this host code to have your stamp set mailed directly to you.

Current Promotions:

Craft with Beth: We Heart Hosts Banner Graphic

June 1st - 30th, 2017 - We Heart Hosts
If you host a party in June, you can earn more Stampin' Rewards with each qualifying party or order. Host a party with sales of $350 USD or more or place an order of $350 USD or more and earn $35 EXTRA in Stampin' Rewards (totals before shipping and taxes)! That's $35 on top of the regular Stampin' Rewards! Bonus!

Shop Online 24/7 in my Online Store
Check out the Clearance Rack
Sign Up for a Class
Sign up for my newsletter and mailing list or request a catalog
Sign Up for Paper Pumpkin