Jessica Williams from Stampin' Up!'s Artisan Design Team created an adorable bunny banner using framelits! Jessica used the Circle Framelits to form the body and head and the Flower Faire Framelits to create the ears. Each section of the bunny is cut separately. Start with the body, then cut the head, and finally cut each ear. The framelits overlap each other to form one cohesive bunny shape. Amazing!
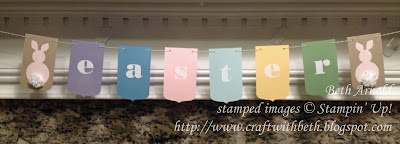
Jessica's design inspired me to create my own Easter bunny banner!
I used the Party Pennants Bigz Die (on the Clearance Rack) to die cut each of the banner pennants. I wanted something more pastel for this project, so I used Wisteria Wonder, Marina Mist, Pink Pirouette, Soft Sky, So Saffron, Wild Wasabi, and Crumb Cake cardstock as a base for the pennants.
Once the banner pennants were cut, I started cutting the bunny. Using a Crumb Cake pennant, place the fourth Circle Framelit from the center at the bottom of the banner and run it through the Big Shot machine.
Place the second Circle Framelit from the center at the top of and slightly overlapping the body circle. Run it through the Big Shot machine.
Position the smallest petal above the head and a bit to the left. Run it through the Big Shot machine.
Position the smallest petal above the head and a bit to the right. Run it through the Big Shot machine.
This is a bit time consuming but well worth the effort! I really admire the creativity that went into figuring out how to make this bunny! It makes me wonder what other animals can be made with framelits!
Cut another banner pennant in a contrasting color to back the bunny cutout.
Glue the bunny cutout to the contrasting banner pennant. If you do not like the look of the extra embossing line from the framelits, flip the bunny cutout over. Voila! No extra embossing lines show.
You can add a pom pom or a honeycomb embellishment as the tail. I used Whisper White Baker's Twine to make a pom pom.
For the other banner pennants, I wanted something simple but festive. I stamped each letter with Versamark and embossed them with white embossing powder.
The holes are punched with 1/8" circle punch. Then I strung each pennant with Old Olive Baker's Twine.
I hope you have a terrific Easter!
Thanks for stopping by!
Beth
Easter Bunny Banner Project
Supply List
|
|
Stamps
|
|
Paper
|
Crumb Cake
Cardstock
Wisteria
Wonder Cardstock
Marina Mist
Cardstock
Pink
Pirouette Cardstock
Soft Sky
Cardstock
So Saffron
Cardstock
Wild Wasabi
Cardstock
Subtles
Designer Series Paper Stack
|
Ink
|
Versamark
Ink Pad
|
Embellishments
|
Old Olive
Baker’s Twine
Whisper
White Baker’s Twine
White
Embossing Powder
|
Tools
|
Stampin’
Trimmer
Paper Snips
Bone Folder
Clear
Acrylic Block B
Grid Paper
Stampin’
Mist Cleaner
Stampin’
Scrub
Big Shot Die
Cutting Machine
Circles
Framelit Dies
Flower Faire
Framelit Dies
Party
Pennants BIgz Die
Multipurpose
Liquid Glue
Embossing
Buddy
Heat Tool
1/8”
Handheld Circle Punch
|
Click here to start
shopping!
|
|


No comments:
Post a Comment