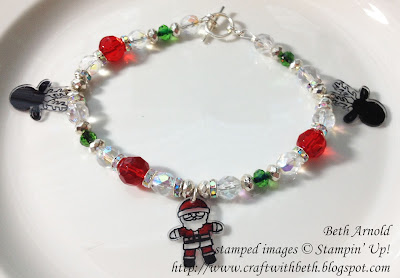
I used sterling silver clasps and beads and glass crystal beads in red, green, and iridescent clear set among Santa and his reindeer. This bracelet and earring set was fun, easy, and surprisingly quick to make!
First, stamp your image on shrink paper using Stayz On Ink or other ink that is permanent and NOT water soluble. You want an ink that will not smudge or evaporate in the oven. Allow your stamped image to dry for a few minutes. Then color each stamped image using permanent markers. I found that the color will deepen and darken in the oven. So, choose lighter shades.
Allow the markers to dry for a few minutes. Then punch out each stamped image. Then punch a 1/8" hole at the top of Santa's hat and at the top of one of the reindeer's antlers.
Place your cuties on a cookie sheet lined with parchment paper. Bake accordingly to the shrink paper's manufacturer's directions. Don't leave your oven. These guys took less than 2 minutes to shrink. It is fun to watch them shrink too!
With needle-nosed pliers, add jump rings to each of the Santas and the reindeer. Cut your beading wire. Add one part of the clasp and crimp bead to one end of the beading wire. Thread your beads. Add your other part of the clasp and crimp bead. Thread the beading wire back through a few beads. Crimp the crimp bead. Cut the excess beading wire. Viola! Your bracelet is finished and ready to wear!
To make the earrings, cut a length of beading wire. Place a Santa in the center of the beading wire. Fold the wire in half. You will thread the beads and earring finding to BOTH strands of the beading wire. Add a small silver bead, a green glass bead, another small silver bead, a crimp bead, and an earring finding. Then thread the beading wire back through the crimp bead and the small silver bead. Crimp the crimp bead. Cut the excess beading wire.
How cute are these earrings?! I made this set plus many more in one morning. It will take you much less time to make just one set. I bet you could make both the bracelet and earrings in the morning and wear them to a party at night!
Have you tried using stamps on shrink paper? What other stamps would you try? I would love to see what you make!
Thanks for stopping by!
Beth
|
Shrink Cookie Cutter Bracelet & Earring Set Project
Supply List
|
|
|
Stamps
|
#143493 Cookie Cutter Christmas Bundle
|
|
Paper
|
Shrink Paper
|
|
Ink
|
#101406 Stayz On Black
|
|
Embellishments
|
Jump Rings
Assorted beads
Crimp beads
Clasp
Beading Wire
Earring Findings
Permanent Markers
|
|
Tools
|
#134365 1/8” Handheld Circle Punch
#126199 Stampin’ Pierce Mat
Cookie Sheet
Parchment Paper
Needle-nosed Pliers
|


No comments:
Post a Comment