Showing posts with label Cookie Cutter Christmas. Show all posts

Friday, May 12, 2017

The Cutest Baby Shower Favors!

My mom's friend's daughter is having a baby! Her friend asked her if she would make the favors for the baby shower. My Mom made the cutest baby shower favors using the Curvy Keepsake Thinlits and the Cookie Cutter Christmas stamp and punch set.

Craft with Beth: Curvy Keepsake Baby Shower Favor Elegant Dots Embossing Folder gift packaging thank you Cookie Cutter Christmas Cookie Cutter Builder Punch

My mom created a multitude of favors in all different colors - Sweet Sugarplum, Mint Macaron, Peekaboo Peach, So Saffron, Tempting Turquoise, Emerald Envy, Soft Sky, Flirty Flamingo, and Melon Mambo! Gorgeous!

Craft with Beth: Curvy Keepsake Baby Shower Favor Elegant Dots Embossing Folder gift packaging thank you Cookie Cutter Christmas Cookie Cutter Builder Punch
 
The ladies at the baby shower raved over these darling favors! Way to go, Mom! I enjoy sharing the projects that my mom creates! She is a fantastic stamper and papercrafter! I am so grateful to spend time with and share stamping with my mom!

Craft with Beth: Retiring Products 2017 Title Graphic

Sadly, the Curvy Keepsake Thinlits are retiring at the end of May. I think these may the perfect sized favors and gifts! Be sure to purchase the Curvy Keepsake Thinlits before they are gone!

The Cookie Cutter Christmas stamp set and the Cookie Cutter Builder Punch are still available and are carrying over to the 2017-2018 Annual Catalog. This set also includes four additional fun, festive stamps, such as a Santa, a reindeer, an Eskimo, and a gingerbread man. Perfect for getting a head start on Christmas!

Thanks for stopping by!
Beth


Baby Bear Baby Shower Favor Supply List
Stamps
#142043 Cookie Cutter Christmas
Paper
#100730 Whisper White
#141418 Sweet Sugarplum
#142778 Succulent Garden
#105118 So Saffron
#102067 Tempting Turquoise
#141417 Peekaboo Peach
#141415 Emerald Envy
#131203 Soft Sky
#138337 Mint Macaron
#141416 Flirty Flamingo
#115320 Melon Mambo
#143831 6” x 6” Glimmer Paper Assortment Pack (retired)
Ink
#141395 Sweet Sugarplum
#115318 Soft Suede
#140931 Basic Black Archival
Embellishments
#134549 Whisper White Satin Ribbon (retired)
Tools
#118074 Owl Builder Punch
#140396 Cookie Cutter Builder Punch
#143263 Big Shot
#126199 Stampin’ Pierce Mat
#138287 Elegant Dots Textured Impressions Embossing Folder
#135853 Curvy Keepsake Thinlits

Saturday, December 24, 2016

Cookie Cutter Bling

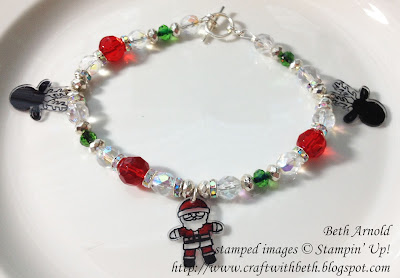
I participated in a Stampin' Up! Demonstrator Christmas Swap at my upline's last meeting. Our theme was to create a three-dimensional gift. I made a bracelet and earring set using the Cookie Cutter Christmas stamp set. I was thinking how much these stamps look like ginger bread cookies. How fun would it be to make little shrink cookies?!? When I saw that shrink paper has been a popular media for this adorable, festive stamp set, I couldn't wait to try it!

Craft with Beth: Cookie Cutter Christmas Bracelet and Earring Set Shrink Paper Shrinky Dinks

I used sterling silver clasps and beads and glass crystal beads in red, green, and iridescent clear set among Santa and his reindeer. This bracelet and earring set was fun, easy, and surprisingly quick to make!

First, stamp your image on shrink paper using Stayz On Ink or other ink that is permanent and NOT water soluble. You want an ink that will not smudge or evaporate in the oven. Allow your stamped image to dry for a few minutes. Then color each stamped image using permanent markers. I found that the color will deepen and darken in the oven. So, choose lighter shades.

Craft with Beth: Cookie Cutter Christmas Bracelet and Earring Set Shrink Paper Shrinky Dinks

Allow the markers to dry for a few minutes. Then punch out each stamped image. Then punch a 1/8" hole at the top of Santa's hat and at the top of one of the reindeer's antlers.

Craft with Beth: Cookie Cutter Christmas Bracelet and Earring Set Shrink Paper Shrinky Dinks

Place your cuties on a cookie sheet lined with parchment paper. Bake accordingly to the shrink paper's manufacturer's directions. Don't leave your oven. These guys took less than 2 minutes to shrink.  It is fun to watch them shrink too!

Craft with Beth: Cookie Cutter Christmas Bracelet and Earring Set Shrink Paper Shrinky Dinks

With needle-nosed pliers, add jump rings to each of the Santas and the reindeer. Cut your beading wire. Add one part of the clasp and crimp bead to one end of the beading wire. Thread your beads. Add your other part of the clasp and crimp bead. Thread the beading wire back through a few beads. Crimp the crimp bead. Cut the excess beading wire. Viola! Your bracelet is finished and ready to wear!

Craft with Beth: Cookie Cutter Christmas Bracelet and Earring Set Shrink Paper Shrinky Dinks

To make the earrings, cut a length of beading wire. Place a Santa in the center of the beading wire. Fold the wire in half. You will thread the beads and earring finding to BOTH strands of the beading wire. Add a small silver bead, a green glass bead, another small silver bead, a crimp bead, and an earring finding. Then thread the beading wire back through the crimp bead and the small silver bead. Crimp the crimp bead. Cut the excess beading wire.

Craft with Beth: Cookie Cutter Christmas Bracelet and Earring Set Shrink Paper Shrinky Dinks

How cute are these earrings?! I made this set plus many more in one morning. It will take you much less time to make just one set. I bet you could make both the bracelet and earrings in the morning and wear them to a party at night!

Have you tried using stamps on shrink paper? What other stamps would you try? I would love to see what you make!

Thanks for stopping by!
Beth


Shrink Cookie Cutter Bracelet & Earring Set Project Supply List
Stamps
#143493 Cookie Cutter Christmas Bundle
Paper
Shrink Paper
Ink
#101406 Stayz On Black
Embellishments
Jump Rings
Assorted beads
Crimp beads
Clasp
Beading Wire
Earring Findings
Permanent Markers
Tools
#134365 1/8” Handheld Circle Punch
#126199 Stampin’ Pierce Mat

Cookie Sheet
Parchment Paper
Needle-nosed Pliers

Thursday, September 29, 2016

CASE-ing the Catty: Gingerbread Christmas

The project samples in the Holiday Catalog are fabulous! I could not help but recreate this sweet gingerbread man Christmas card from page 4. Isn't he adorable?!?

Craft with Beth: CASE-ing the Catty Cookie Cutter Christmas Card Candy Cane Lane Baker's Twine Candy Cane Lane Designer Series Paper DSP

This card was quick and easy to make. Here's how I did it. You will need Crumb Cake, Real Red,  and Whisper White cardstock and Candy Cane Lane Designer Series Paper (DSP). Cut the paper to size according to the chart below.

Gingerbread Cookie Christmas Card Measurements

Color
Dimensions
Card Base
Crumb Cake
5-1/2” x 8-1/2”
1st Layer
Candy Cane Lane DSP
3-3/4” x 5-1/4”
Greeting Rectangle
Whisper White
1-1/2” x 4”
Gingerbread Man
Whisper White
3” x 2”
Heart Buttons
Real Red
2” x 2”
Inside Layer
Whisper White
4” x 5-1/4”

Adhere the Candy Cane Lane DSP to the Crumb Cake cardbase.

Then stamp your greeting with Early Espresso ink on the Whisper White rectangle. Stamp the gingerbread man with Crumb Cake ink on a scrap of Whisper White cardstock and punch him out.

Punch two hearts from Real Red cardstock and glue over the gingerbread man's buttons. Add dimensionals to the back of the gingerbread man.

Adhere the gingerbread man and the greeting rectangle to the card base.

Finally, tie a piece of Candy Cane Lane Baker's Twine around the left side of the card base. Your card is ready for giving!

Thanks for stopping by!
Beth


Gingerbread Cookie Christmas Card Project Supply List
Stamps
#143493 Cookie Cutter Christmas Bundle (Photopolymer Stamp Set & Punch)
Paper
#102482 Real Red
#120953 Crumb Cake
#100730 Whisper White
#141981 Candy Cane Lane DSP
Ink
#126974 Early Espresso
#126975 Crumb Cake
Embellishments
#141983 Candy Cane Lane Baker’s Twine
#104430 Stampin’ Dimensionals
Tools
#126199 Stampin’ Pierce Mat