Tuesday, October 31, 2017

I've Got My Eye on You Halloween Daisy Bouquet

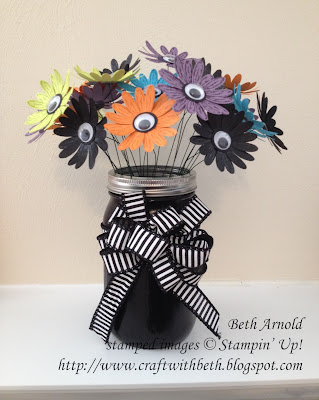
This creepy daisy bouquet is sure got its eyes on you this Halloween! I got the idea while trying to think of ways to create the daisy center without using the stamp. The center is made up of a 3/4" Basic Black circle and a 15mm wiggle eye glued in the center of 2 offset daisies.

Craft with Beth: Halloween Daisy Delight Delightful Daisy Bouquet 3D floral arrangement wiggle eyes googley googly daisy punch heat embossing versamark stampin up loopy bow mason jar craft vase eyeballs

I used traditional as well as newer Halloween colors - Basic Black, Pumpkin Pie, Tempting Turquoise, Perfect Plum, and Lemon Lime Twist - for the daisies. There are 5 daisies in each color for a total of 25 daisies.

Craft with Beth: Halloween Daisy Delight Delightful Daisy Bouquet 3D floral arrangement wiggle eyes googley googly daisy punch heat embossing versamark stampin up loopy bow mason jar craft vase eyeballs
 
The daisies are stamped with the same color ink as the corresponding cardstock except for the Basic Black cardstock. I used Versamark and clear embossing powder on the Basic Black cardstock daisies. Not only did the clear embossing powder give a shine to the Basic Black cardstock, but the tone on tone look was not lost.

Craft with Beth: Halloween Daisy Delight Delightful Daisy Bouquet 3D floral arrangement wiggle eyes googley googly daisy punch heat embossing versamark stampin up loopy bow mason jar craft vase eyeballs

To attach the daisy to the stems, I used 22 gauge floral wire stems cut to 10" long, dimensionals, and 1/2" circles of cardstock.

Craft with Beth: Halloween Daisy Delight Delightful Daisy Bouquet 3D floral arrangement wiggle eyes googley googly daisy punch heat embossing versamark stampin up loopy bow mason jar craft vase eyeballs

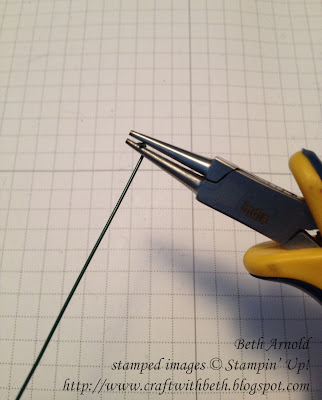
First create a loop by holding one end of the floral wire stem with round nosed pliers and rotate towards you.

Craft with Beth: Halloween Daisy Delight Delightful Daisy Bouquet 3D floral arrangement wiggle eyes googley googly daisy punch heat embossing versamark stampin up loopy bow mason jar craft vase eyeballs

Continue rotating the round nosed pliers toward you to close the wire into a circle.

Craft with Beth: Halloween Daisy Delight Delightful Daisy Bouquet 3D floral arrangement wiggle eyes googley googly daisy punch heat embossing versamark stampin up loopy bow mason jar craft vase eyeballs

Bend the wire close to the loop at a 90 degree angle. This will form the base which the daisy will sit on.

Craft with Beth: Halloween Daisy Delight Delightful Daisy Bouquet 3D floral arrangement wiggle eyes googley googly daisy punch heat embossing versamark stampin up loopy bow mason jar craft vase eyeballs

You need something to connect the wire to the daisy. You could use a low temperature glue gun, E6000 glue, or a dimensional and a circle of cardstock. The easiest, quickest, yet still very effective way to connect the wire to the cardstock is with a dimensional.

First cut a cover for the wire. That way the wire is hidden underneath the daisy and no adhesive is exposed. Cut a 3/4" x 8-1/2" strip of Basic Black cardstock.

Craft with Beth: Halloween Daisy Delight Delightful Daisy Bouquet 3D floral arrangement wiggle eyes googley googly daisy punch heat embossing versamark stampin up loopy bow mason jar craft vase eyeballs

Punch a 1/16" hole in the center of the strip.

Craft with Beth: Halloween Daisy Delight Delightful Daisy Bouquet 3D floral arrangement wiggle eyes googley googly daisy punch heat embossing versamark stampin up loopy bow mason jar craft vase eyeballs

Position a 1/2" circle punch over the center of 1/16" inch hole and punch.

Craft with Beth: Halloween Daisy Delight Delightful Daisy Bouquet 3D floral arrangement wiggle eyes googley googly daisy punch heat embossing versamark stampin up loopy bow mason jar craft vase eyeballs

This circle will cover the wire and the adhesive (from the dimensional). Punching the 1/16" hole first is easier than trying to get 1/2" centered underneath the 1/16" hand held circle punch.

Craft with Beth: Halloween Daisy Delight Delightful Daisy Bouquet 3D floral arrangement wiggle eyes googley googly daisy punch heat embossing versamark stampin up loopy bow mason jar craft vase eyeballs

Thread the circle up the floral wire stem so that it is right up to the wire loop.

Craft with Beth: Halloween Daisy Delight Delightful Daisy Bouquet 3D floral arrangement wiggle eyes googley googly daisy punch heat embossing versamark stampin up loopy bow mason jar craft vase eyeballs

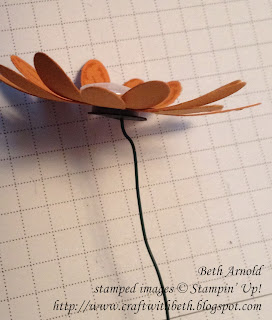
Place a dimensional on top of the wire loop. Press the dimensional firmly in place. Building the connection between the floral wire stem and the daisy is like a sandwich. The dimensional is on the top. The wire loop is in the middle. The circle cover is on the bottom.

Craft with Beth: Halloween Daisy Delight Delightful Daisy Bouquet 3D floral arrangement wiggle eyes googley googly daisy punch heat embossing versamark stampin up loopy bow mason jar craft vase eyeballs

Remove the dimensional backing and adhere to the back center of the daisy. Press the dimensional firmly in place.

Craft with Beth: Halloween Daisy Delight Delightful Daisy Bouquet 3D floral arrangement wiggle eyes googley googly daisy punch heat embossing versamark stampin up loopy bow mason jar craft vase eyeballs

This is how your daisy will look once the wire is adhered.

Craft with Beth: Halloween Daisy Delight Delightful Daisy Bouquet 3D floral arrangement wiggle eyes googley googly daisy punch heat embossing versamark stampin up loopy bow mason jar craft vase eyeballs

Repeat for each of the daisies and place them in a container. I painted a mason jar with acrylic paint for glassware.

Craft with Beth: Halloween Daisy Delight Delightful Daisy Bouquet 3D floral arrangement wiggle eyes googley googly daisy punch heat embossing versamark stampin up loopy bow mason jar craft vase eyeballs

For added decoration I tied a loopy bow with 6 loops on each side using 7/8" Striped Ribbon. Then I wrapped a separate piece of the ribbon around the jar and secured it with Tear and Tape. I secured the bow to the center of the ribbon around the jar using the floral wire used to make the bow.

Currently, this watchful bouquet gives a whimsical touch to the fireplace mantle in my family room. I am thoroughly enjoying stamping and playing with the Daisy Delight Bundle. I have some seasonal ideas for Thanksgiving to post soon as well as for Winter.

I hope you give this bouquet a try. What holiday or theme would you use the Daisy Delight Bundle for? I would love to see what you create!

Thanks for stopping by!
Beth


I’ve Got My Eyes on You Halloween Daisy Bouquet Project Supply List
Stamps
#145361 Daisy Delight Bundle
Paper
#101889 Perfect Plum
#102067 Tempting Turquoise
#105117 Pumpkin Pie
#121045 Basic Black
#144245 Lemon Lime Twist
Ink
#102283 Versamark
#126963 Perfect Plum
#126952 Tempting Turquoise
#126945 Pumpkin Pie
#144086 Lemon Lime Twist
Embellishments
#104430 Dimensionals
#144624 7/8” Striped Ribbon
15mm Wiggle Eyes
Tools
#103083 Embossing Buddy
#129053 Heat Tool
#134363 1/16” Handheld Circle Punch
#119869 1/2" Circle Punch
22 Gauge Floral Stem Wire (27 – 25 for daisies & 2 for the bow)
Round Nosed Pliers
Wire Cutters
Mason Jar
Black Acrylic Paint for Glassware
Paint Brush
 

Inlaid Washi Tape Technique

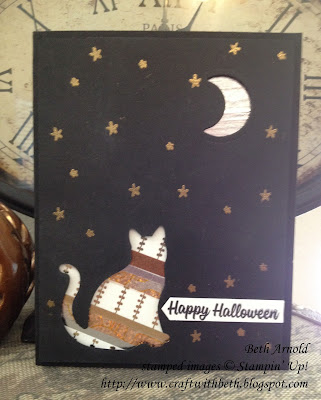
Happy Halloween! Here is a last minute card using a fun technique called inlaid. You can do this technique with washi tape, paper, ribbons, foil, and even fabric. The idea is to create recessed strips of your chosen material in a particular shape that look like they are one piece. Wood is also a very common material to use as an inlay.

Craft with Beth: Spooky Cat Halloween Stampin Up Card Year of Cheer Washi Tape Inlaid Technique

The create the inlay shape you can use punches or framelits/thinlits/dies. The inlaid technique is amazing for using up scraps, especially those one has trouble parting with. I know I do.

For this Halloween card, I used the Year of Cheer Washi Tape. First, I punched a cat from a 4" x 5-1/4" piece of Basic Black cardstock in the lower left corner. Then I die cut the moon using the Wood Crate Framelits in the upper right corner.

Then I stamp the smaller and the larger star images from Hearts Come Home stamp set using Versamark ink. I covered the stars with gold embossing powder before heat embossing with the Heat Tool. 

Next I stamped the Happy Halloween greeting from Spooky Cat stamp set and punched it out with the Classic Label punch. After, I adhered the greeting to the right of the cat and trimmed the excess.

Craft with Beth: Spooky Cat Halloween Stampin Up Card Year of Cheer Washi Tape Inlaid Technique

I turned the Basic Black cardstock over and added dimensionals. The entire cardstock piece needs to be supported, especially around the cut outs and the edges. I added dimensionals to the edges as well as around the cat and in the center. It may be too many dimensionals, but if I am mailing my card, I want to make sure they arrive in one piece and not torn from lack of support.

Sometimes it can be tricky to see if you have removed all of the dimensional backings. I recommend starting in one spot and moving in one direction. For example, I started in the upper left corner and worked my way to the upper right corner. Then I moved downward and began again from the left side, moving toward the right side.

To double check that you have removed all of the dimensional backings, tilt your card. If you see a matte finish on top of the dimensional, the backing is still on. If you see a shiny finish, the backing has been removed.

Craft with Beth: Spooky Cat Halloween Stampin Up Card Year of Cheer Washi Tape Inlaid Technique

Once the inlay shapes are cut out, I can add the washi tape behind. On a piece of Whisper White cardstock, I put down strips of washi tape randomly across the areas where the cat and the moon cut outs would show. I made sure to add a bit extra on all sides, so no edges will show.

Smooth the washi tape with a bone folder.

Then I adhered the Whisper White cardstock to the front of the card base (5-1/2" x 8-1/2"; scored at 4-1/4"). I adhered the Basic Black cardstock with the cat and moon cut out on top of the washi tape and the card base front.

Craft with Beth: Spooky Cat Halloween Stampin Up Card Year of Cheer Washi Tape Inlaid Technique

The inside features rows of Year of Cheer Washi Tape on a 4" x 5-1/4" piece of Whisper White cardstock. The vine tape is at the bottom with a strip of copper tape on the top. Lastly, there is the gold tape in the center of the copper tape.

I made two additional color scheme variations in Pumpkin Pie and in Perfect Plum using Halloween Night Washi Tape and Pick a Pattern Washi Tape, respectively.


This washi tape is from the 2016 Holiday catalog. However, you can substitute any washi tape of your choosing for this technique. Instead of cutting out the moon and embossing the stars, I simply stamped them with Versamark and let it dry to create a subtle texture. I used a Basic Black Marker to make faux stitch lines around the cat and the 1st matte.

Craft with Beth: Spooky Cat Halloween Stampin Up Card Year of Cheer Washi Tape Inlaid Technique

You can see that the inlaid technique is truly wonderful for using up little bits and scraps.

Craft with Beth: Spooky Cat Halloween Stampin Up Card Year of Cheer Washi Tape Inlaid Technique

The faux stitching lines are only around the cat on this Perfect Plum variation.

Craft with Beth: Spooky Cat Halloween Stampin Up Card Year of Cheer Washi Tape Inlaid Technique

The black and white dot washi tape is very wide, so I only used half of the width for the card front and inside.

How would you use the inlay technique? What types of shapes would you choose? I would love to see what you create.

Thanks for stopping by!
Beth


Inlaid Washi Tape Halloween Card Project Supply List
Stamps
#146014 Spooky Cat Bundle
Paper
#121045 Basic Black
#100730 Whisper White
Ink
#102283 Versamark
#140931 Basic Black Archival
Embellishments
#109129 Gold Embossing Powder
#104430 Dimensionals
#144644 Year of Cheer Washi Tape
Tools
#103083 Embossing Buddy
#143730 Wood Crate Framelits
#129053 Heat Tool
#143263 Big Shot Machine
#141491 Classic Label Punch


Pumpkin Pie Variation Inlaid Washi Tape Halloween Card Project Supply List
Stamps
#146014 Spooky Cat Bundle
Paper
#105117 Pumpkin Pie
#100730 Whisper White
Ink
#102283 Versamark
#140931 Basic Black Archival
#100082 Basic Black Stampin’ Write Marker
Embellishments
#104430 Dimensionals
#142026 Halloween Night Washi Tape (retired)
Tools
#141491 Classic Label Punch


Perfect Plum Variation Inlaid Washi Tape Halloween Card Project Supply List
Stamps
#146014 Spooky Cat Bundle
Paper
#101889 Perfect Plum
#100730 Whisper White
Ink
#102283 Versamark
#140931 Basic Black Archival
#100082 Basic Black STampin’ Write Marker
Embellishments
#104430 Dimensionals
#144166 Pick A Pattern Washi Tape
Tools
#141491 Classic Label Punch