Showing posts with label CASE. Show all posts

Monday, November 7, 2016

Happy Wonderful Christmas!

Craft with Beth: CASE Wondrous Wreath Wonderful Wreath Framelits Christmas

Today's card is a CASE that I cannot remember who designed it. I apologize. If this is your design, please let me know so I can give you the proper credit.

Wondrous Wreath is a stunning multi-step stamp set with a coordinating framelits. The wreath is stamped with Pear Pizzazz, Garden Green, and Cherry Cobbler ink to achieve this amazing look.

I can imagine this wreath would look stunning in shades of blue or even purple! Try adding silver embossing powder to the berries for an elegant look or using fall colors for a Thanksgiving wreath. The combinations are endless.

While this wreath looks complicated, I can assure you it is not. Wondrous Wreath comes with three separate stamps to form the leaves and the berries all with tabs to mark the top of the stamp and the die.


I hope you give Wondrous Wreath a try! I would love to see what you make!

Thanks for stopping by!
Beth

Saturday, October 29, 2016

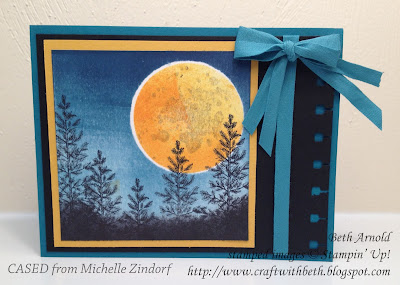
Moonlit Forest CASE

Michele from Michele's Craft Corner and I worked on recreating a gorgeous moonlit forest card by Michelle Zindorf. Her cards are absolutely stunning! I had to share my CASE.

Craft with Beth: Michelle Zindorf Moonlit Forest Lovely as A Tree Masking Reverse Masking Brayering Brayer CASE

We used several techniques to make this card - brayering, masking, reverse masking, and stamping off. It is not as complicated as it sounds. Just take one step and one technique at a time.

The moon is formed by creating a mask from a circle punch. The craters are a stamp from Gorgeous Grunge! How clever!

Thanks for stopping by!
Beth

Thursday, September 29, 2016

CASE-ing the Catty: Gingerbread Christmas

The project samples in the Holiday Catalog are fabulous! I could not help but recreate this sweet gingerbread man Christmas card from page 4. Isn't he adorable?!?

Craft with Beth: CASE-ing the Catty Cookie Cutter Christmas Card Candy Cane Lane Baker's Twine Candy Cane Lane Designer Series Paper DSP

This card was quick and easy to make. Here's how I did it. You will need Crumb Cake, Real Red,  and Whisper White cardstock and Candy Cane Lane Designer Series Paper (DSP). Cut the paper to size according to the chart below.

Gingerbread Cookie Christmas Card Measurements

Color
Dimensions
Card Base
Crumb Cake
5-1/2” x 8-1/2”
1st Layer
Candy Cane Lane DSP
3-3/4” x 5-1/4”
Greeting Rectangle
Whisper White
1-1/2” x 4”
Gingerbread Man
Whisper White
3” x 2”
Heart Buttons
Real Red
2” x 2”
Inside Layer
Whisper White
4” x 5-1/4”

Adhere the Candy Cane Lane DSP to the Crumb Cake cardbase.

Then stamp your greeting with Early Espresso ink on the Whisper White rectangle. Stamp the gingerbread man with Crumb Cake ink on a scrap of Whisper White cardstock and punch him out.

Punch two hearts from Real Red cardstock and glue over the gingerbread man's buttons. Add dimensionals to the back of the gingerbread man.

Adhere the gingerbread man and the greeting rectangle to the card base.

Finally, tie a piece of Candy Cane Lane Baker's Twine around the left side of the card base. Your card is ready for giving!

Thanks for stopping by!
Beth


Gingerbread Cookie Christmas Card Project Supply List
Stamps
#143493 Cookie Cutter Christmas Bundle (Photopolymer Stamp Set & Punch)
Paper
#102482 Real Red
#120953 Crumb Cake
#100730 Whisper White
#141981 Candy Cane Lane DSP
Ink
#126974 Early Espresso
#126975 Crumb Cake
Embellishments
#141983 Candy Cane Lane Baker’s Twine
#104430 Stampin’ Dimensionals
Tools
#126199 Stampin’ Pierce Mat

Thursday, August 4, 2016

CASEing the Catty: Sweet Cupcake

There are so many amazing new products in the 2016-2017 Annual Catalog that it has been hard to devote time to all of them! I am slowly working my way through all of my new stamps sets! They are so cute, I want to use them all right now!

Craft with Beth: CASEing the Catty with Sweet Cupcake Stamp Set #imbringingbirthdaysback birthday card

The next stamp set in my stack is the adorable, delectable Sweet Cupcake. For my first project I CASED the 2016-2017 Annual Catalog's Sweet Cupcake birthday card on page 23. I just wanted to play with the frosting stamp! Ha!

I stamped all over my grid paper testing the order and ink strength of each of the three frosting stamps. I found that it does not make much of a difference if you stamp the first, the second, and then the third image or if you stamp the third, the second, and then the first image.

However, I recommend playing with the ink strength before committing the ink to your project. Stamping all of the images with the same color ink at full strength did not make a well defined finished image for me. I suggest testing each ink with full ink strength, stamped off once, and stamped off twice to see which finished cupcake you like best.

Start with one color of ink. Then try multiple colors together.

Have fun and be sure to take notes so you can recreate your delicious looking treats!

Thanks for stopping by!
Beth


CASE the Catty Sweet Cupcake Card Project Supply List
Stamps
Sweet Cupcake
Paper
Whisper White
It’s My Party DSP
Ink
Melon Mambo
Mint Macaron
Sahara Sand
Crushed Curry
Embellishments
Stampin’ Dimensionals
Tools
Stampin’ Trimmer
Bone Folder
Grid Paper
Stampin’ Mist Cleaner
Stampin’ Scrub
Stampin’ Pierce Mat
Paper Snips
SNAIL Adhesive
Multipurpose Liquid Glue
Acrylic Blocks C and G
Big Shot Machine
Cupcake Cutouts Framelits
Click here to start shopping!