Showing posts with label coloring. Show all posts

Wednesday, November 1, 2017

Stampin' Blends are here!

I am so excited I can barely contain myself! Stampin' Up! debuted their new alcohol based markers Stampin' Blends today!


Stampin' Blends are a fantastic new line of alcohol based markers to help you add color, shading, depth, and blending to your stamped images.

 Craft with Beth: Stampin' Blends Marker Collection

There will be 12 different colors that coordinate with existing Stampin' Up! colors.

Craft with Beth: Stampin' Blends Alcohol Markers Debut Colors Chart

Each of the 12 colors will have 2 shades - one lighter shade and one darker shade.
 
Craft with Beth: Stampin' Blends Alcohol Markers

In addition, there will be a bronze, an ivory, and a colorlifter marker. In total, there will be 26 markers.

Craft with Beth: Stampin' Blends Alcohol Markers Debut Colors Chart

Stampin' Blends are dual-tipped with a brush on one end and a fine point on the other end.

Craft with Beth: Stampin' Blends Alcohol Markers

They are more square than round and will lay flat on the table instead of rolling. The caps will nest. So, no worries about losing a cap easily.

Craft with Beth: Stampin' Blends Alcohol Markers

The Color Lifter Marker can take some of the saturation away and almost "erase" small mistakes. It reminds me of the sun collages with the special light reactive paper or a slight bleach effect.

Craft with Beth: Stampin' Blends Alcohol Markers

Notice how the two shades of Rich Razzleberry remain distinct even when the darker shade is applied directly on top of the lighter shade.

The bronze and ivory Stampin' Blends are designed to be used to create skin tones. You can combine the two colors together, use them singularly, or with the color lifter. 

Why are alcohol based Stampin' Blends so special?
  • The alcohol base allows for more shading and blending when coloring stamped images. It creates a smoother gradient between the shades to make highlights and shadows without clouding the colors
  • Alcohol based markers also do not react with your paper, avoiding tears and felting you often see with a blender pen.
  • Alcohol based markers on permanent on most surfaces.
  • Alcohol markers have dye-based pigments that have a more vibrant color saturation.
  • Coloring books for adults have become more and more popular over the last few years. Many stamps have also changed to include more opportunities for coloring and shading. Waterbased markers are amazing. I use them quite a bit in my stamping and will continue to do so, for sure. However, they can be limiting when it comes to finer shading and blending. So, the need for a more specialized marker is apparent. If you enjoy coloring with shading and blending, these are definitely markers to have in your craft room.

Here are tips to remember when using and storing your Stampin' Blends markers.
  • Store your Stampin' Blenders markers horizontally so that the ink saturates both ends
  • Place the cap on as soon as you are finished using the marker to avoid evaporation. Push the cap completely down. You should hear a click.
  • Alcohol markers dry quickly, so work in small areas on your stamped image at a time
  • If coloring heat embossed images, avoid coloring over the embossed lines. If you do, wipe quickly with a paper towel or soft cloth.
  • Place the cap on tightly and securely to avoid evaporation
  • Alcohol markers like many other markers are UV light sensitive, so be sure to keep them and your projects out of direct sunlight to avoid fading
  • Use Stampin' Blends Markers with ink pads that will not run or smear such as Tuxedo Black Momento Ink. Tuxedo Black Momento Ink is a quick-drying, combination water and dye based ink pad that is water and light resistant. It is also archival quality. Wait a few moments before coloring to allow the ink to dry.
  • Use thicker paper such as Thick Whisper White cardstock and Watercolor Paper to avoid the markers bleeding through the paper but experiment with vellum, glossy cardstock, and other colors of cardstock to achieve the look you want
  • Stampin' Blends are not refillable
  • Protect your work surface with grid paper or other protective mats

Most of all, have fun. Stamp a bunch of images such as flowers, trees, animals, etc and try out different color combinations and shading angles.

Craft with Beth: Stampin' Blends Alcohol Markers Debut Colors Chart Template

I created a sample chart template to see all of your Stampin' Blends colors at a glance and practice blending. Print out the template with Thick Whisper White cardstock (make sure your printer can accept this weight of paper before printing).

To help you practice using your Stampin' Blends there is a card kit and stamp set called Color Me Happy. It features several of the new Stampin' Blends markers to create 16 gorgeous cards.

Craft with Beth: Color Me Happy Stampin' Blends Project Kit Graphic Stampin Up

Click here to download the Stampin' Blends brochure.

I will have all of the Stampin' Blends markers and the kit samples available to view and try on Saturday, November 4th during my Annual Birthday Sale.

Craft with Beth: Stampin' Blends alcohol markers debut today! stampin' up

Thanks for stopping by!
Beth

Friday, April 28, 2017

Peekaboo Card Revisited

I wasn't completely happy with the layering circles on my Peekaboo Swap card. The scale seemed off somehow. So, I took another look at it.

Craft with Beth: April Demonstrator Swap Card 2017 Basket of Wishes Thinking of You Succulent Garden Designer Series Paper Peekaboo Card Fun Fold Stitched Shapes Framelits Mother's Day

I used the second largest Stitched Circle Framelit for the backing circle instead of for the basket image. I used a smaller Layering Circle Framelit for the basket image. The matting looks more proportionate now.

Craft with Beth: April Demonstrator Swap Card 2017 Basket of Wishes Thinking of You Succulent Garden Designer Series Paper Peekaboo Card Fun Fold Stitched Shapes Framelits Mother's Day

Since I was revisiting the layering circles, I changed the theme of the card to Mother's Day. The Succulent Garden Suite is one of my mom's favorite suites in the Occasions Catalog. Shhh! This will be the card I send to my mom. So, don't tell.

Craft with Beth: April Demonstrator Swap Card 2017 Basket of Wishes Thinking of You Succulent Garden Designer Series Paper Peekaboo Card Fun Fold Stitched Shapes Framelits Mother's Day

A Sweet Sugarplum succulent and the corresponding inside greeting is stamped toward the bottom of the inside.

Here is another variation using the Oh, So Succulent stamp set.

Craft with Beth: April Demonstrator Swap Card 2017 Basket of Wishes Thinking of You Succulent Garden Designer Series Paper Peekaboo Card Fun Fold Stitched Shapes Framelits Mother's Day Oh, So Succulent

What do you think of my revisited peekaboo fun fold card? How you decorate your peekaboo fun fold card?

I appreciate you stopping by!
Beth


Peekaboo Fun Fold Revisited Card Supply List
Stamps
#142200 Basket of Wishes (Photopolymer)
#142992 Oh, So Succulent (Photopolymer)
Paper
#100730 Whisper White
#138336 Tip Top Taupe
#141418 Sweet Sugarplum
#142778 Succulent Garden Designer Series Paper
Ink
#126974 Early Espresso
#141395 Sweet Sugarplum
#131180 Pear Pizzazz
#131261 Neutrals Stampin’ Write Markers
#131259 Brights Stampin’ Write Markers
#131263 Subtles Stampin’ Write Markers
#141393 2016-2018 In Color Stampin’ Write Markers
#138333 2015-2017 In Color Stampin’ Write Markers
Embellishments

Tools
#143263 Big Shot
#126199 Stampin’ Pierce Mat
#102845 Blender Pens
#141705 Layering Circles Framelits
#126889 Stampin’ Trimmer
#122334 Simply Scored Board

Saturday, April 22, 2017

Peekaboo Card with Basket of Wishes

I participate in a mostly monthly card swap with a group of demonstrators. Each month we have a different theme. The theme could be a certain type of card, come from a particular catalog, or be related to a holiday. We have even done ornament swaps!

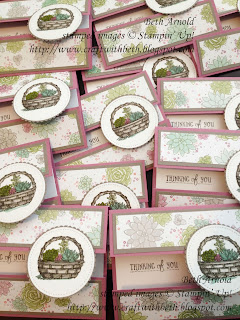
Craft with Beth: April Demonstrator Swap Card 2017 Basket of Wishes Thinking of You Succulent Garden Designer Series Paper Peekaboo Card Fun Fold

I love participating in these swaps. They are a great way to see new ideas, to see how each person interprets the monthly topic, and to refresh and renew your creativity, especially after a lull.

This month's theme was thinking of you, sympathy, and get well cards. I chose to use the Basket of Wishes stamp set expressing thinking of you.

Craft with Beth: April Demonstrator Swap Card 2017 Basket of Wishes Thinking of You Succulent Garden Designer Series Paper Peekaboo Card Fun Fold

Basket of Wishes has become a favorite of mine since it was introduced in the 2017 Holiday Catalog. I am so thrilled it will be carrying over into the 2017-2018 Annual Catalog!

This stamp set has baskets and basket fillers to mix and match, making it perfect for all four seasons. I used the bushel basket stamp and the pumpkin filler stamp for many fall and Thanksgiving projects and classes. This is a favorite with many of my customers too. I'm excited to create spring and summer projects with the succulent and the strawberry stamps!

The fun fold is called a Peekaboo Fold. It really highlights the basket image! Here's how to make it.

First, cut a 5-1/2" by 7-3/4" piece of Sweet Sugarplum cardstock. Line up the 7-3/4" side to the top of your score board (or trimmer) and score at 1-3/4" and at 6".

Craft with Beth: April Demonstrator Swap Card 2017 Basket of Wishes Thinking of You Succulent Garden Designer Series Paper Peekaboo Card Fun Fold Template

Then cut the front panel and the inside pieces. Cut two 5-1/4" by 1-1/2" pieces of Tip Top Taupe. Cut two 5" by 1-1/4" pieces of Succulent Garden Designer Series Paper. Cut one inside mat. Cut one basket circle and one basket circle mat.

Thinking of You Fun Fold Card Measurements

Paper
Dimensions
Card Base
Sweet Sugarplum
5-1/2” x 7-3/4”; scored at 1-3/4” & at 6”
Inside Mat
Whisper White
5-1/4” x 4”
1st Front Mat (2)
Tip Top Taupe
5-1/4” x 1-1/2”
2nd Front Mat (2)
Succulent Garden Designer Series Paper
5” X 1-1/4”
Basket Circle
Whisper White
Scraps; die cut 2nd largest stitched circle
Basket Circle Mat
Tip Top Taupe
Scraps; die cut  approximating 2-1/2” layering scalloped circle

Adhere the Succulent Garden Designer Series Paper mat to the Tip Top Taupe mats. Then adhere one completed mat to the top front panel and one completed mat to the bottom front panel.

To line up your sentiment, place your inside mat inside the card base. Don't adhere yet. Close both panels to reveal the peekaboo area. Stamp your sentiment toward the left side of the peekaboo area. Apply a piece of Pear Pizzazz washi tape across the bottom. Adhere to the inside of your card base.

Craft with Beth: April Demonstrator Swap Card 2017 Basket of Wishes Thinking of You Succulent Garden Designer Series Paper Peekaboo Card Fun Fold

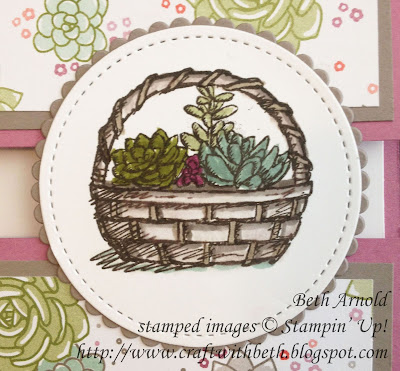
Stamp the basket and succulent stamps on the stitched circle. Use Blender Pens to color in the basket and succulents. The main color of the basket is Tip Top Taupe, echoing the front panel and the Designer Series Paper. The secondary color in the vertical, woven pieces is Crumb Cake.

Craft with Beth: April Demonstrator Swap Card 2017 Basket of Wishes Thinking of You Succulent Garden Designer Series Paper Peekaboo Card Fun Fold

The succulents in the basket are Sweet Sugarplum, Mint Macaron, Pear Pizzazz, and Old Olive. The above photograph shows Rich Razzleberry. I accidentally used the wrong marker and photographed the wrong card. The rest of the cards are really, truly Sweet Sugarplum. This is what happens when you make swap cards in a hurry!
 
Craft with Beth: April Demonstrator Swap Card 2017 Basket of Wishes Thinking of You Succulent Garden Designer Series Paper Peekaboo Card Fun Fold Color Palette Color Scheme

Adhere the stitched circle to the Tip Top Taupe scalloped circle. Apply adhesive on the back of the top third of the scalloped circle and adhere to the right side of the top front panel, so that the scalloped circle is centered over the top and bottom front panels.

Craft with Beth: April Demonstrator Swap Card 2017 Basket of Wishes Thinking of You Succulent Garden Designer Series Paper Peekaboo Card Fun Fold

This sweet fun fold card can be adapted to any occasion and color scheme. How would you embellish your Peekaboo Fun Fold card? I would love to see what you make!

I appreciate you stopping by!
Beth


Thinking of You Fun Fold Card Supply List
Stamps
#142200 Basket of Wishes (Photopolymer)
Paper
#100730 Whisper White
#138336 Tip Top Taupe
#141418 Sweet Sugarplum
#142778 Succulent Garden Designer Series Paper
Ink
#126974 Early Espresso
#131261 Neutrals Stampin’ Write Markers
#131259 Brights Stampin’ Write Markers
#131263 Subtles Stampin’ Write Markers
#141393 2016-2018 In Color Stampin’ Write Markers
#138333 2015-2017 In Color Stampin’ Write Markers
Embellishments
#142773 Tasty Treats Designer Washi Tape
Tools
#143263 Big Shot
#126199 Stampin’ Pierce Mat
#102845 Blender Pens
#141705 Layering Circles Framelits
#126889 Stampin’ Trimmer
#122334 Simply Scored Board