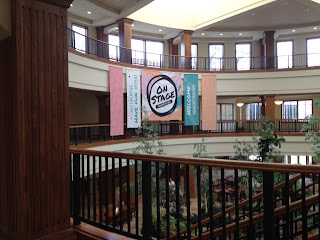
I attended Backstage 2016 hosted by Janet Baker and Susan Adams last Tuesday. It was amazing! The entire suite was decorated with a movie theater theme complete with film strip wall decor, popcorn machine, stars hanging decor, and candy bar. It was so much fun! We had four make and take projects and one take home project featuring products from the current catalogs.
The first project we made was a cute gift bag sponged with white craft ink and adorned with a friendship tag and Bermuda Bay sequins. The stamp set is Friendly Wish and is staying in the Annual Catalog. The dots were made using the Dots & Stripes Mask, which is retiring this year. I love this mask. I have used it on many gift and treat bags. I am really sad this mask is retiring. It is such a great tool and only $3!
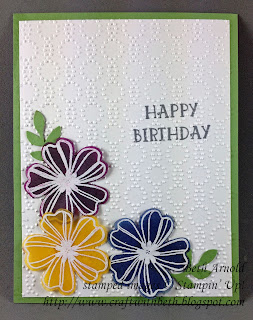
The second project we made was a card featuring Clear Wink of Stella, Timeless Textures stamp set, and the Birthday Blooms stamp set. I love this stamp set and color combination! All three are staying in the Annual Catalog. The Venetian Trim is retiring.
This is my favorite project we made! It is a variation on a cascading fold card. I love the It's My Party DSP and Happy Birthday die!
The inside reveals a sweet sentiment and more festive balloons!
The middles opens to hold a gift card. How much fun is this card?!?!
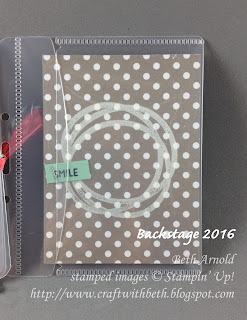
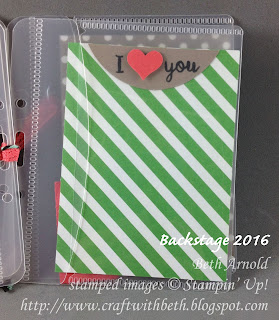
The last project we made was a clever mini photo album with the 2015-2017 In Color DSP stack and ID badge holders. Inside has four pages to put photos of your loved ones.
The take home project was a little goodie basket made using the Berry Basket Bigz Die and the Birthday Bouquet DSP (both are retiring).
This mini basket is a sweet way to give a little present or candy. I love the bow on top of the handle!
If you would like to make these projects too, please contact to set up a stamping session!
Thanks for stopping by!
Beth
Wednesday, April 20, 2016
Tuesday, April 19, 2016
April 2016 Paper Pumpkin Lovely Little Wreath
April's Paper Pumpkin arrived in my mailbox while I was at On Stage. Although I have not completed the project yet, I did see completed kits on display at On Stage. I think the wreaths are adorable! I LOVE wreaths! I have all of the wreath stamp sets and wreaths all over my house! This month's Lovely Little Wreath will be a perfect addition to my home decor! I cannot wait to put it together!
I think this wreath could be used for more than springtime and using more than just the yellow flowers included in the kit. I can see using this wreath in the summer and in the winter too. How about using the Garden in Bloom stamps, the Spiral Flower Die, or even little Real Red circles for holly berries? What about adding snowflakes or a poinsettia? The flowers from the bonus stamp set All About Everything? The possibilities are endless! I would love to see what you create!
In the meantime, check out this great video from Paper Pumpkin!
The bonus thank you stamp set is called All About Everything. It includes fantastic sentiments, flowers, leaves, and stems. This photograph from the Paper Pumpkin website features examples using the All About Everything stamp set. Stunning!
At On Stage, not only were we able to get a sneak peek of the May 2016 Kit, we even made one of the projects! Alisha from Paper Pumpkin said we could share a photo of the May 2016 Kit! You are going to love next month's kit too! I do! I love love love the triangular die cut, the colors, the stars, and the fonts!
To get this project and others sign up before May 10th to receive May's Kit seen above. Sign up in my store today.
I would love to see what you create with your April 2016 Lovely Little Wreath Kit and All About Everything stamp set!
Thanks for stopping by!
Beth
Monday, April 18, 2016
Retiring List 2016
The Retiring List is up!! There are a significant amount of products retiring this year. The retiring items will come from the 2016 Occasions Catalog and the 2015-2016 Annual Catalog.
Some of the items will already be discounted. As the new catalog release date gets closer, more items may be discounted.
Some of the items will be sold out. The Washi Label Punch is already sold out. Refunds have been given for any back ordered Washi Label Punches ordered.
Many of the items will sell out quickly, including In Color ink refills and accessories. Accessories will be available while supplies last.
Because of the high demand for retiring stamps, retiring stamp sets will be produced until May 22nd. After May 22nd, they will be available while supplies last.
Check your wish list against the retiring list PDF and order quickly to avoid missing out on your favorite products!
Shop the retired items now.
Thanks for stopping by!
Beth
Last Day for Weekly Deals!
Today is the last day to get the Weekly Deals. Weekly Deals will end tonight forever. I don't want you to miss out on these amazing sale prices! Order before 10:50 PM Eastern Standard Time!
Thanks for stopping by!
Beth
Thanks for stopping by!
Beth
Wednesday, April 13, 2016
Stampin' Up! Campus Tour
I had a great time touring the Stampin' Up! Riverton Campus! It was wonderful to meet some of the fantastic people I have talked to on the phone! Everyone was so kind and welcoming! Shout out to Yessica!
The displays were beautiful! Some of them were even from the annual catalog! I felt like I was in a photo shoot!
I also went a pre-convention went this morning. It was a make and take session sponsored by a group of demonstrators. We make four fantastic projects that I cannot wait to share with you! I even won a prize - a pack of rhinestones!
I appreciate you stopping by!
Tuesday, April 12, 2016
Weekly Deals: 04/12/16 - 04/18/16 The Last Week for Weekly Deals
Check out this week's deals! The Weekly Deals Offers will be ending on April 18th. There will no longer be weekly products revealed each Tuesday. However, the Weekly Deals will be replaced by Stampin' Up! with another promotional sale called Special Offers. Instead of every week, Special Offers will run every few months. The Special Offers will include MORE products with MORE tiered discounts!
The final Weekly Deals will run from today until Monday, April 18th. The last Weekly Deals include 15 amazing products!! Don't miss these deals while they last!!
In Color embellishments and In Color DSP retire each year. That means, the 2015 - 2017 In Colors Dotted Lace Ribbon, Blossom Accents, and DSP are also retiring. Below are the 2015 - 2017 In Color Products that are retiring this year.
I appreciate you stopping by! Please let me know of you questions about retiring In Color products or the Weekly Deals.
Beth
Monday, April 11, 2016
2016 On Stage Swap Cards
I have been working on making card front swaps for the 2016 On Stage event this week. On Stage is an amazing three day Stampin' Up! convention for Stampin' Up! demonstrators. I am so excited to attend this year's convention! As a demonstrator, we get to see new products, try new techniques, tour the Stampin' Up! home office campus, meet tons of demonstrators from around the country and world, and, best of all, see the new annual catalog! Heaven!! I can't show you anything until Stampin' Up! gives us the okay to share. But as soon as we are given the okay, I can share (P.S. This is one reason right now is an exciting time of year to become a demonstrator!).
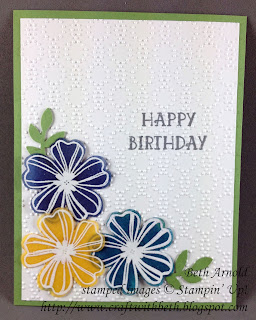
In the meantime, here are the card fronts I made to swap with other demonstrators. I made one card with 5 color schemes. I used the Flower Shop and the Number of Years stamp sets to create this card.
First, I cut the 4" by 5-1/2" card base in Wild Wasabi cardstock. If you are going to recreate this as a complete card, cut each card base 8-1/2" by 5-1/2" and fold in half like a book.
Next, I cut the 4" x 5-1/4" Whisper White mat. I placed the HAPPY sentiment and the BIRTHDAY sentiment (from Number of Years) on a clear block one above the other as shown in the photo above. I stamped HAPPY BIRTHDAY in Archival Basic Gray toward the center right side.
Then I embossed the stamped mat with Elegant Dots TIEF. I glued the mat to the base and set them aside to dry. You can use SNAIL Adhesive or Multipurpose Liquid Glue.
I chose the flower stamp (from Flower Shop) that reminds me of a dogwood flower. I thought this was a cheery, spring-like flower. The dogwood is also the flower of Virginia. On a piece of vellum, I stamped the flower using Versamark ink. I covered each flower image with white embossing powder and heat embossed them. Once the flowers were completely cooled, I punched each one out with the Pansy Punch.
I then sponged the BACK of each flower with ink. I pounced the sponge on some flowers and swiped the sponge on other flowers. Pouncing, created a darker, more saturated, and more vibrant look. Swiping created a lighter, more subtle look. I liked both ways. Experiment with both to get the look you want.
Set the flowers aside to dry for about an hour or so. If the ink is still wet, the flowers will not stick to the card front.
Sponging the color on the back of the flowers allowed both the sponged ink and the white embossing to show through, making an almost stained glass effect. You can try this technique with other colors of embossing powder. I bet silver or gold would be beautiful too!
Once the flowers are thoroughly dried, adhere them to the bottom left corner of the Whisper White mat. I used glue dots and multipurpose liquid glue. I tried both to see which adhesive held better. They both worked mostly the same. Because vellum is translucent, whatever adhesive you choose will show. I glued only the center portion of each flower. That way, the white embossed area hid the glue.
Lastly, I punched out just the leaves portion of the Bird Builder Punch in Wild Wasabi cardstock and glued them on using a two-way glue pen. The two-way glue pen is less messy on these more intricately cut leaves.
Here are the color schemes that I made for each of the 5 different card fronts.
Thanks for stopping by!
Beth
|
2016 On Stage Convention
Swap Card Project Supply List
|
|
|
Stamps
|
Flower Shop
Number of
Years
|
|
Paper
|
Whisper
White Cardstock
Wild Wasabi
Cardstock
Vellum
|
|
Ink
|
Rose Red Ink
Pad
Wisteria
Wonder Ink Pad
Blackberry
Bliss Ink Pad
Crushed
Curry Ink Pad
Night of
Navy Ink Pad
Melon Mambo
Ink Pad
Daffodil
Delight Ink Pad
Tempting
Turquoise Ink Pad
Blushing
Bride Ink Pad
Island
Indigo Ink Pad
Versamark
Ink Pad
Archival
Basic Gray Ink Pad
|
|
Embellishments
|
White
Embossing Powder
|
|
Tools
|
Stampin’
Trimmer
Bone Folder
Clear
Acrylic Blocks C, D
Grid Paper
Stampin’
Mist Cleaner
Stampin’
Scrub
Glue Dots
SNAIL
Adhesive
Multipurpose
Liquid Glue
Two-way Glue
Pen
Pansy Punch
Bird Builder
Punch
Elegant Dots
TIEF
Heat Tool
Embossing
Buddy
|
|
Click here to start
shopping!
|
|
Thursday, April 7, 2016
New Items on the Clearance Rack!
Stampin' Up! Has added more items to the already amazing Clearance Rack! Check out these new additions with discounts up to 60% off! Red Pom Pom Trim and Into the Woods DSP are back!!!! Yippeeee!!! Get yours while supplies last!!
Thanks for stopping by!
Beth
Wednesday, April 6, 2016
Rose Wonder Birthday Note Card
Create this beautiful birthday card in a snap using Stampin' Up!'s precut Crumb Cake Note Cards and Envelopes!
Cut a 1-1/4" by 4-3/4" strip of Subtles DSP. Here the example shows the flower print in Blushing Bride.
Cut a 4-1/2" by 1" strip of Whisper White cardstock. Punch one end with the Triple Banner Punch. Stamp the other end with the Happy Birthday sentiment in Soft Suede ink. Add dimensionals to the back on both ends and a few across the center. The dimensionals will also help to keep the gold metallic thread attached to your card.
Using Soft Suede ink, stamp the rose image in the center and at an angle on the front of the Note Card. Stamp just the leaf portion of the rose image in the bottom left corner also in Soft Suede ink. Make sure you have Grid Paper underneath your card to avoid staining your work surface.
Glue the Subtles DSP strip on the Note Card as shown in the photograph above - slightly above the bottom of and flush with the right edge of the Note Card.
Add a few drops of liquid glue on the Subtles DSP strip where you want to place your metallic gold thread. Wrap the gold metallic thread around your fingers multiple times to form a circle of gold threads. Cut the thread from the spool. Place your gold thread circle on top of the glue.
Place the Birthday sentiment strip on top of the gold thread. Make sure at least one of the dimensionals is adhered to the gold thread.
Add sequins to the negative spaces with either glue dots or a fine-tipped glue pen.
Stamp the What a Beautiful Blessing You are to Me sentiment on the inside.
Stamp the envelope flap with the rose image, and your card is now complete! This card is so quick and fabulous, why not make a bunch in all different colors?!
Thanks for stopping by!
Beth
Rose Wonder Birthday Card Project
Supply List
|
|
Stamps
|
Rose Wonder
|
Paper
|
Crumb Cake Precut
Note Card and Envelopes
Whisper
White Cardstock
Subtles DSP
Stack
|
Ink
|
Soft Suede
Ink Pad
|
Embellishments
|
Stampin’
Dimensionals
Metallic
Sequin Assortment
Gold Metallic
Thread
|
Tools
|
Stampin’
Trimmer
Bone Folder
Clear
Acrylic Blocks C, F
Grid Paper
Stampin’
Mist Cleaner
Stampin’
Scrub
Glue Dots
SNAIL
Adhesive
Multipurpose
Liquid Glue or Fine-Tipped Glue Pen
Triple
Banner Punch
|
Click here to start
shopping!
|
|
Tuesday, April 5, 2016
April's Stamp of the Month Club: No Bones About It!
April's Stamp of the Month Club will be meeting on Tuesday, April 26th from 6:30 PM to 8:30 PM. We will create four projects featuring the No Bones About It stamp set. This is an adorable set not only for kids but for adults too!
The cost is $5 plus supplies. If you make a $25 purchase that night, the $5 class fee is waived.
The supplies you will need are:
I look forward to seeing you at our next Stamp of the Month Club! Thanks for stopping by!
Beth
The cost is $5 plus supplies. If you make a $25 purchase that night, the $5 class fee is waived.
The supplies you will need are:
- No Bones About It Stamp Set - Item #138756
- Clear Blocks B, C, D, E, & G - Item #118491 (bundle) or individually
- SNAIL Adhesive - Item #104332
- Multipurpose Liquid Glue - Item #110755
- Paper Snips - Item #103579
- Bone Folder - Item #102300
I look forward to seeing you at our next Stamp of the Month Club! Thanks for stopping by!
Beth
Weekly Deals: 04/05/16 - 04/11/16 & Retiring In Color Products
Check out this week's deals! The Weekly Deals Offers will be ending on April 18th. There will no longer be weekly products revealed each Tuesday. However, the Weekly Deals will be replaced by Stampin' Up! with another promotional sale called Special Offers. Instead of every week, Special Offers will run every few months. The Special Offers will include MORE products with MORE tiered discounts!
The final Weekly Deals will run from today until Monday, April 11th. The last Weekly Deals include 15 amazing products!! Don't miss these deals while they last!!
In Color embellishments and In Color DSP retire each year. That means, the 2015 - 2017 In Colors Dotted Lace Ribbon, Blossom Accents, and DSP are also retiring. Below are the 2015 - 2017 In Color Products that are retiring this year.
I appreciate you stopping by! Please let me know of you questions about retiring In Color products or the Weekly Deals.
Beth
Subscribe to:
Comments (Atom)


