Friday, May 13, 2016

Weekly Stamping Session & Games!

Today my Aunt Tracy and I had our weekly stamping session. Since we don't live in the same state, we video chat to make projects when we cannot get together in person. Today we played a game, made washi tape votive candle holders, and talked about choosing a color palette.

My family is big on games - board games, cards, puzzles, word games, video games, etc. I shared a game I played at the monthly demonstrators' meeting with my mom and with my aunt. They loved it! It was a list of riddle-type questions related to the names of the Stampin' Up! colors. Some were puns. Some were funny. Some were really tricky. My mom loved the game so much that we make up two additional lists of questions!

Today, I am sharing the original game that started it all! There was no name or creator of the question listed. If this list of questions is yours, please let me know. My team leader shared this list with our group, but she didn't know where it came from either.

Download the Stampin' Up! Color Name Challenge #1 now to play along.

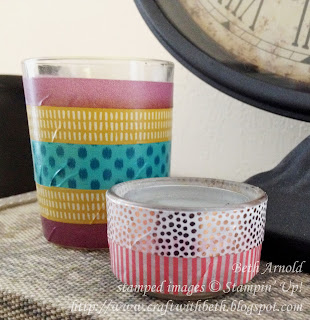
Aunt Tracy recently discovered washi tape! She loves candles too! So, she decorated a glass votive candle holder with Bohemian Washi Tape. These candle holders work best with the LED battery operated candles and not a real flame.

Here are the ones I made. The one on the left is Bohemian Washi Tape. Isn't it darling!?!? The one on the right is the soon to be released Affectionately Yours Washi Tape. Love it!! Can't wait for the new Annual Catalog in June!

Craft with Beth: Washi Tape Candle Holder

She also wanted to make a thank you card inspired by the Schoolhouse DSP. We talked about pulling inspiration from the colors that are already in the DSP and building from there. We also talked about using markers to color individual parts of a stamp and testing various combinations to see which one she liked the best. I cannot wait to see the finished card!

This reminded me of the Embellished Ornament card we made at a workshop last October. I CASED it directly from the 2015 Holiday Catalog. I thought it was too pretty not to copy and share!

Craft with Beth: Embellished Ornament Christmas Card

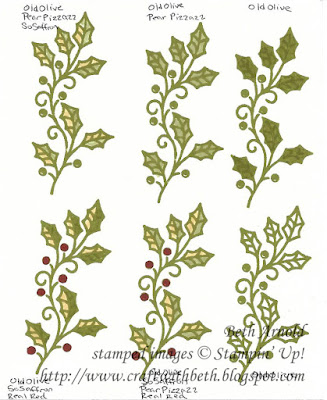
Sometimes, it can be difficult picking which colors to use, especially when there are so many fabulous choices! For this card, I wanted the same look as the catalog, but wasn't sure which colors the sample used for the leaves. So, I did some testing! I stamped the holly branch image in Old Olive ink multiple times onto scrap Very Vanilla cardstock. Then I colored them with different markers (labeling as I went).

Craft with Beth: Embellished Ornament Christmas Card Testing Color Schemes

I also tested the two-tone technique used on the ornament image. The stamp was inked with the lighter ink first. Then it was inked only on part of the stamp in the darker ink. Here I stamped the ornament image completely in Tempting Turquoise ink and then placed only the side(s) of the stamp in Pacific Point ink.

Craft with Beth: Embellished Ornament Christmas Card Testing Color Schemes

I brought my test samples to the workshop so that everyone could see how different each color changed the look of the card and to use it as a springboard for their own inspiration. I love how everyone interpreted the card differently!

Craft with Beth: Embellished Ornament Christmas Card

I apologize for such a long post! Thanks for sticking with me! I hope this inspires you to try different color combinations!

Thanks for stopping by!
Beth


Washi Tape Votive Candle Holder Project Supply List
Stamps

Paper

Ink

Embellishments
Bohemian Washi Tape
Affectionately Yours Washi Tape
Tools
Glass Votive Candle Holder
Paper Snips
Click here to start shopping!


Embellished Ornament Card Project Supply List
Stamps
Embellished Ornament
Gorgeous Grunge
Paper
Very Vanilla Cardstock
Crumb Cake Cardstock
Gold Foil Paper
Ink
Tempting Turquoise Ink Pad
Pacific Point Ink Pad
Old Olive Ink Pad
Soft Suede Ink Pad
Crumb Cake Ink Pad
Old Olive Stampin’ Write Marker
So Saffron Stampin’ Write Marker
Real Red Stampin’ Write Marker
Pear Pizzazz Stampin’ Write Marker
Embellishments
Gold Metallic Thread
Stampin’ Dimensionals
Tools
Stampin’ Trimmer
Big Shot
Delicate Ornaments Framelit Dies
Bone Folder
Clear Acrylic Blocks C, D, and H
Grid Paper
Stampin’ Mist Cleaner
Stampin’ Scrub
Stampin’ Pierce Mat
SNAIL Adhesive
Glue Dots or Multipurpose Liquid Glue
Paper Snips
Click here to start shopping!

Thursday, May 12, 2016

Happy Father's Day

As the 2016 Occasions Catalog winds down, I wanted to show another Going Global stamp set card before it retires. You know I love this stamp set! Going Global is definitely at the top of my must haves from the 2016 Occasions Catalog!

Craft with Beth: Going Global Father's Day Card Joy Fold

I have had this card on my desk ready to post for awhile now. I have been trying a few ideas with the Joy Fold. The Joy Fold is similar to the Gate Fold.  Both fun folds have flaps on the outside.

Craft with Beth: Going Global Father's Day Card Joy Fold

To make a Joy Fold Card, start with a piece of  Lost Lagoon cardstock and cut it into an 8-1/2" x 4-1/4" piece. Score at 3". This is your card base.

Cut a 8-1/2" x 3" piece of Lost Lagoon. Score at 4". This is the inside flap.

Let's make the inside base mats. Cut a 4" x 2-3/4" piece of DSP. This is the left inside base mat.

Cut a 4" x 5-1/2" piece of DSP. This is the right inside base mat.

Let's make the inside flap mats. Cut a 3-3/4" x 2-3/4" piece of Very Vanilla cardstock. This is the left inside flap mat. Stamp the You Mean the World to Me sentiment in the center in Archival Basic Black ink. Then stamp the globe image on top of the sentiment in Sahara Sand ink.

Cut a 4-1/4" x 2-3/4" piece of Very Vanilla cardstock. This is the right inside flap mat. Stamp the compass image in Sahara Sand toward the lower right hand corner. I left this mat mostly blank to leave room for a special message.

Now, let's cut the outside flap mat. Cut a 4-1/4" x 2-3/4" piece of DSP. Adhere all of the mats. Adhere the flap in the center and slightly to the right of the base as shown in the photograph above. You want the flap to be centered on the front when the card is closed.

For the Happy Father's Day sentiment, I cut a 1/2" x 8-1/2" strip of Very Vanilla cardstock. I stamped Happy in Archival Basic Black ink and trimmed it. I stamped Father's Day n Archival Basic Black ink and trimmed it. I eyeballed how much space to leave before and after the words.

Stamp the globe image in Mossy Meadow onto scrap Very Vanilla cardstock and cut out using Paper Snips. Adhere the sentiment and the globe using dimensionals to the outside flap mat.

Going Global Father’s Day Card Measurements

Color
Dimensions
Score at
Card Base
Lost Lagoon
4-1/4” x 8-1/2”
3”
Inside Flap
Lost Lagoon
8-1/2” x 3”
4”
Inside Left Base Mat
Going Places DSP
4” x 2-3/4”
-
Inside Right Base Mat
Going Places DSP
4” x 5-1/2”
-
Inside Flap Left Mat
Very Vanilla
3-3/4” x 2-3/4”
-
Inside Flap Right Mat
Very Vanilla
4-1/4” x 2-3/4”
-
Outside Flap Mat
Going Places DSP
4-1/4” x 2-3/4”
-
Sentiment Strip
Very Vanilla
1/2” x 8-1/2”
-
Globe Image
Very Vanilla
Scrap about 3” x 3”
-

The DSP Going Places featured on this card is still order-able, but it is on back order until May 30th. I decided to share this card because it is one of my favorite stamp sets and DSPs. I know you will love it as much as I do!

If you don't want to wait or while you wait, I recommend using any of the following stamps to create your own DSP. Stamp randomly all over a piece of 8-1/2" x 11" cardstock then cut each background piece.
  • The Open Sea - Clear-Mount Item #132032 / Wood-Mount Item #128454
  • Traveler - Clear-Mount Item #134513 / Wood-Mount Item #134510
  • World Map - Clear-Mount Item #130345 / Wood-Mount Item #130342
Typeset Specialty DSP (Item #133704) also has a world map that would be great for this card too!

World Traveler Textured Impressions Embossing Folder (TIEF) (Item #138289) would also be fantastic!

I used Going Places DSP as the inspiration for this card's color scheme. I used Basic Black, Very Vanilla, Lost Lagoon, Mossy Meadow, and Sahara Sand.


I would love to see what you create using the Going Global stamp set!
Thanks for stopping by!
Beth


Father’s Day Going Global Card Project Supply List
Stamps
Crazy About You
Going Global
Paper
Going Places DSP
Very Vanilla Cardstock
Lost Lagoon Cardstock
Ink
Mossy Meadow Ink Pad
Archival Basic Black Ink Pad
Sahara Sand Ink Pad
Embellishments
Stampin’ Dimensionals
Tools
Stampin’ Trimmer
Score Board
Bone Folder
Clear Acrylic Blocks B, C, and D
Grid Paper
Stampin’ Mist Cleaner
Stampin’ Scrub
Stampin’ Pierce Mat
SNAIL Adhesive
Paper Snips
Click here to start shopping!

Friday, May 6, 2016

Color Chip Sample Cards

I made these color chip sample cards to show the wide variety of colors that Stampin' Up! offers. The catalog photographs look amazing! However, seeing the colors in person is ever better!

I hang the color chip sample cards by my desk, so I can refer to them when choosing color combinations for projects. I also take them with me to workshops and demonstrations so that customers can see and feel the quality of the cardstock and the inks.  
Craft with Beth: Color Chip Sample Cards


I created a template to display samples of each of the color collections when I joined in 2013. As I purchased each of the colors, I punched a 1/2" circle from the corresponding cardstock, stamped the ink, and a drew a squiggle with the marker. I punched the corner with a 1/4" hand held circle punch and placed all of the cards on a metal binder ring. Because this was during the color re-do, some of the colors retired and some of the colors switched color collections. My color chip sample cards no longer matched the current color collections.

Craft with Beth: Color Chip Sample Cards


I recently redid all of the color chip sample cards with the current Stampin' Up! colors. I even made sets for my aunts and my mom. I included the 2016-2018 In Colors! Can you see the last card in the photo above? Aren't they bright, summery, fun colors!?! You are going to love them! I can't wait for June's 2016-2017 Annual Catalog Release!!

Download the template here. As your color collection grows, add a sample of each color. Keep your cards handy when creating new color combinations and designing projects.

Thanks for stopping by!
Beth

Wednesday, May 4, 2016

May the Fourth Be with You!

Happy May 4th! I saw this amazing and fantastic card on the card swap board at On Stage 2016. I love Star Wars! I have been trying my best not to share it with you until today in honor of May the Fourth!

Craft with Beth: May the Fourth Be With You Punch Art Birthday Card Star Wars

How stinking adorable is this card!?!? I love it! I think you could recreate this card with the extra-large oval punch and the word window punch. However, if you don't have the word window punch, you could try the corner rounder punch on a 1/4" strip of cardstock.

I apologize that I don't know who made this card. The cards were attached to the display boards and I could not reach high enough to take it down. If this is your card, please let me know. I want to give you credit for this terrific card!

I'm sure all Star Wars fans would love a birthday card like this! I know I would! May the Fourth Be with You!

Thanks for stopping by!
Beth